What did you fix today? (part 2)

The Padstow Busker

A
The Padstow Busker

  • 0
  • 0
  • 20
End Table

A
End Table

  • 1
  • 1
  • 102
Cafe Art

A
Cafe Art

  • 8
  • 6
  • 216
Sciuridae

A
Sciuridae

  • 6
  • 3
  • 201

Recent Classifieds

Forum statistics

Threads
197,663
Messages
2,762,688
Members
99,436
Latest member
AtlantaArtist
Recent bookmarks
0

Mr Flibble

Member
Joined
Mar 12, 2014
Messages
365
Location
The Lowlands
Format
35mm RF
Mine came with the advance and cocking uncoupled. I read it's a weak spot for the Korelles. No automatic advance stop either. It has a custom knob for the advance, you have to align the frame number in the window and you cock via the shutter knob.

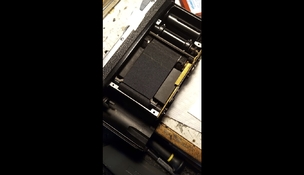
I wouldn't mind replacing the frame stopper but I'm not sure how it would disengage when loading or after a shot. Going manually, the spacing isn't great. Would be glad to have more info if you have some!

At least the shutter works but is slow (1/500 ~= 1/100, 1/200 ~=1/60, etc...). Measurable tapering but it doesn't affect the images.

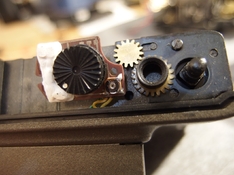
Yes the wire running between the advance lever and the shutter is definitely something that tended to fray and wear out. It should cock the shutter on the first full throw of the advance lever and then you need to wind the lever again until it hit the advance stop to fully advance to film to the next frame.
I did open mine up for repair months ago and had already gotten a replacement front-side mirror and a couple of yards of steel braided wire to play with. Until I discovered the broken return spring. I'd probably have to look into watch main springs.

Similarly, I have a Kodak Medalist where the film advance knob has been disconnected from the frame-stop and shutter cocking mechanism. Works fine using the red window and manually cocking the shutter. No double exposure prevention though.
 

henryvk

Member
Joined
Feb 14, 2021
Messages
380
Location
Europe
Format
Medium Format
I did my first reskin, with rosewood veneer, no less. Seems very affordable too, I got 10 or 12 A4 sheets of different kinds of wood for 11€.

The subject was my second Ricoh Auto Half, an interesting little camera which, back in the day, had sort of swappable front covers with different psychedelic/space age 60s designs. They're not a proper leatherettes but a thin metal sheet covered with plastic. Pretty durable but mine were badly dented and one corner was peeling off.

23jGFHy.jpg


I removed the covers, cleaned the front with alcohol and then traced the outlines by pressing a piece of paper into the recesses and going along the edges with a pencil, kind of like a frottage, to make the templates. Then I traced the paper templates on the sheet of veneer, taped along where I was going to cut to prevent the wood from splintering and cut them out with paper scissors. I did the final fitting by carefully sanding the edges by hand with a dremel sanding bit. I managed a pretty good, if not perfect, fit for the covers.

Finally, I glued them on with UHU all-purpose glue which should bind wood to metal reasonably well but excess amounts of which can still be easily peeled off and removed. I put the camera into an improvised vise because the edges were tricky to keep down and this glue needs a good deal of pressure.

As you can tell, I'll never be a product photographer but I think I did an okay job with the veneer:

LRyv9rt.jpg

1Y5x1b7.jpg


A drop or two of linseed oil should work well to protect the wood and keep it fresh.
 

allcode

Member
Joined
Jun 14, 2023
Messages
2
Location
York
Format
Medium Format
I think you did a great job with the veneer! It looks like a professional job. How did you choose the material for the veneer?
 

henryvk

Member
Joined
Feb 14, 2021
Messages
380
Location
Europe
Format
Medium Format
Thanks, that's very kind of you!

Good question also. I basically went on eBay and

a) got the thinnest veneer I could find (0.6 mm) and
b) got rosewood because I have a guitar with rosewood back and sides and I like how it looks.

My wife pointed out that the sheet of rosewood had a lighter, less stritated part in the center which would have made for a more subdued look, but I went with the outside of the sheet that has the distinct rosewood pattern instead. The dark vertical lines kind of echo the black trim around the viewfinder/light meter.

For those interested, here's a useful little write-up of a more complicated reskin:


And of course Dora Goodman's beautiful wood veneer work:

 
Last edited:

tokam

Subscriber
Joined
Nov 7, 2008
Messages
585
Location
Sydney, Aust
Format
Multi Format
@henryvk That looks good. Instead of linseed oil you might consider using tung oil. Dilute it to a 10-20% mixture with mineral turps and apply with a cloth. Several coats with a drying interval between coats will enhance and preserve the wood. Tung oil is food safe and can be used on wooden surfaces in the kitchen - bench tops, cutting boards etc. You'll need very little of it.
 

Helios 1984

Member
Joined
Aug 4, 2015
Messages
1,844
Location
Saint-Constant, Québec
Format
35mm

4season

Member
Joined
Jul 13, 2015
Messages
1,922
Format
Plastic Cameras
I did my first reskin, with rosewood veneer, no less. Seems very affordable too, I got 10 or 12 A4 sheets of different kinds of wood for 11€.

The subject was my second Ricoh Auto Half, an interesting little camera which, back in the day, had sort of swappable front covers with different psychedelic/space age 60s designs. They're not a proper leatherettes but a thin metal sheet covered with plastic. Pretty durable but mine were badly dented and one corner was peeling off.

23jGFHy.jpg


I removed the covers, cleaned the front with alcohol and then traced the outlines by pressing a piece of paper into the recesses and going along the edges with a pencil, kind of like a frottage, to make the templates. Then I traced the paper templates on the sheet of veneer, taped along where I was going to cut to prevent the wood from splintering and cut them out with paper scissors. I did the final fitting by carefully sanding the edges by hand with a dremel sanding bit. I managed a pretty good, if not perfect, fit for the covers.

Finally, I glued them on with UHU all-purpose glue which should bind wood to metal reasonably well but excess amounts of which can still be easily peeled off and removed. I put the camera into an improvised vise because the edges were tricky to keep down and this glue needs a good deal of pressure.

As you can tell, I'll never be a product photographer but I think I did an okay job with the veneer:

LRyv9rt.jpg

1Y5x1b7.jpg


A drop or two of linseed oil should work well to protect the wood and keep it fresh.

That looks great! Every so often I get the urge to pick up an Auto Half with one of the fancier designs, but then I look at the collector's premium they command and change my mind.
 

4season

Member
Joined
Jul 13, 2015
Messages
1,922
Format
Plastic Cameras
As a followup to post #1025, here's my completed Salyut-S repair/restoration. I thought it might be a challenging job, and it was! Simply figuring out how to install and tension the shutter curtains kept me occupied for more hours than I care to admit. And I'm puzzled about the lens, which contained several hand-cut brass shims, but lens wouldn't focus to infinity until I removed them, and the distance scale was way out of calibration, yet it didn't seem to have been forced or tampered with.
Salyut-S 640 px.jpg
 

Kino

Subscriber
Joined
Jan 20, 2006
Messages
7,636
Location
Orange, Virginia
Format
Multi Format
Pentax 645; Moved the lens pin bridge from a donor camera body to a body I purchased from KEH that was missing this item, but was otherwise functional.

This is a very harrowing thing to do; 7 tiny sliver caps with 7 micro, micro golden springs and a curved lens bridge that has little to no clearance for insertion. Took several years off my life, but I finally figured out how to stab it on without losing all those caps and pins.

Fully functional now...
 

Nicholas Lindan

Advertiser
Advertiser
Joined
Sep 2, 2006
Messages
4,219
Location
Cleveland, Ohio
Format
Multi Format
...I finally figured out how to stab it on without losing all those caps and pins.

I always work on a large fluffy white towel to catch all the things that would otherwise fall to the floor or go sproing. I once saw a watch repairman's workbench that had a bib attached to the bench, the bib tied behind the man's head and caught all the parts that would otherwise go rolling on the floor.
 

Kino

Subscriber
Joined
Jan 20, 2006
Messages
7,636
Location
Orange, Virginia
Format
Multi Format
I have an enclosed, near transparent Tote or tub with arm holes and a viewing hole on the top. The sides provide a nice diffuse light when hit from both sides with LED pucks. A Panavise in the bottom holds most things, but there is a cloth on the bottom to catch springs and parts that go "pop" when disassembled.

Small, divided parts bins with snap on tops keep everything safe and in sequence of disassembly.

I also have a very large magnet from Harbor Freight I can sweep the floor with when something Ferros obtains terminal velocity through various apertures.

Suspenders and a belt are not a bad thing sometimes...
 

4season

Member
Joined
Jul 13, 2015
Messages
1,922
Format
Plastic Cameras

Tel

Subscriber
Joined
May 9, 2011
Messages
941
Location
New Jersey
Format
Multi Format
Beginning a new project: curtain replacement in a "parts" Nikon S. First step--making and beginning installation of the first curtain. I'm using fabric from Micro-Tools (Japan Hobby Tool silk curtain material and silk ribbons) and Cemedine Super-X cement.
 

Attachments

  • s2 shutter.jpg
    s2 shutter.jpg
    127.4 KB · Views: 64

Xylo

Member
Joined
Dec 6, 2008
Messages
405
Location
South of Montreal, Canada
Format
Multi Format
I would love to know where he found those NOS parts and advertisments.
Well, Skorj does live in Japan, so I think that explains a lot of stuff.
Half frame cameras were really popular there for some time, so they are plentiful.
 

dxqcanada

Member
Joined
Jun 9, 2011
Messages
331
Location
Ontario, Canada
Format
Multi Format
Ok, I just took apart a modern plastic super zoom AF lens ... 17 elements in 13 groups ... needed to clean the two inner-most elements ... I never want to do that again !!! Think I will stick to old fixed focal length metal housed lenses.
 

Helios 1984

Member
Joined
Aug 4, 2015
Messages
1,844
Location
Saint-Constant, Québec
Format
35mm
A few weeks back, I replaced the worn out front bearing of our 13 years old dryer. That thing was so noisy that I could hear it from outside the house with the window closed (not kidding). Then, this past Saturday, I replaced the rear bearing which was only 3 years old but aged prematurely due the front one being so far gone. Now, the dryer sound as smooth as a new one.
 

MattKing

Moderator
Moderator
Joined
Apr 24, 2005
Messages
52,050
Location
Delta, BC Canada
Format
Medium Format
A few weeks back, I replaced the worn out front bearing of our 13 years old dryer. That thing was so noisy that I could hear it from outside the house with the window closed (not kidding). Then, this past Saturday, I replaced the rear bearing which was only 3 years old but aged prematurely due the front one being so far gone. Now, the dryer sound as smooth as a new one.

Perfect for your darkroom towels! So it is a photography related repair :smile:.
By the way, old, thrift store acquired souvenir linen towels make the best darkroom towels - and you get to admire pictures of the Eiffel tower or Niagara Falls to boot 😉 .
 

Cholentpot

Member
Joined
Oct 26, 2015
Messages
6,661
Format
35mm
Instamatic X-90. Fabricated a battery and did a lighted run of reloaded 126 film. I think I cracked it and can load respooled 126. Next is a real test.
 

Steve Roberts

Member
Joined
Oct 12, 2004
Messages
1,298
Location
Near Tavisto
Format
35mm
Yesterday actually. Pentax LX FA-1 finder. The view through the finder had become increasingly hazy. I dismantled it and cleaned both surfaces of the moveable dioptre correction lens and the inside of the window at the rear. A slightly fiddly job owing to the two gears that move the v/f lens but not too bad. Any LX users should be aware that although the v/f window at the rear looks like multicoated glass it is (on mine at least) only plastic as are so many pieces of the LX. Thus any cleaning of this whether internally or just externally, should be done with great care.
Having reassembled the finder all was well once more and clear vision restored.

Steve
 

Attachments

  • DSCN7319.JPG
    DSCN7319.JPG
    478.3 KB · Views: 65
  • DSCN7325.JPG
    DSCN7325.JPG
    633.7 KB · Views: 66

jaeae

Member
Joined
Jun 15, 2019
Messages
69
Location
Finland
Format
Hybrid
I bought a Kiev 35A.

I had a "someone has been here before" moment looking at the top cover screws - and the metering needle spring was mangled. It sits a paper thin distance away from the top cover, so it was stuck and in wrong position. There are 2 such springs on both sides of the coil. I managed to make it into "G" shaped again with a needle and small tweezers. 😅

Doing so it probably is not that linear anymore, so after electrical adjustment it seems to read somewhat correctly in the 1/30 - 1/125 range but closer to 1/500, I feel it reads wrong. But I need it mostly to show that metering is active and if there is camera shake danger under 1/30.

Tracing the wires that go from metering coil to the circuit board and from there to the bottom of camera I found out that the trim pot next to tripod mount is in fact the metering needle adjustment. It's very sensitive, I only adjusted it 0,5mm to achieve correct display at 1/30 speed.

The 3 trim pots on top circuit board are probably for the actual metering and/or shutter adjustment. But since there are 3 and no service manual available, I didn't want to mess with those. 1 trim pot would be easy, but 3... good luck finding out what does what.

At the moment shooting some Fomapan with this, let's see if the actual metering and shutter speeds are in the ballpark.
 

Attachments

  • P7010094p.jpg
    P7010094p.jpg
    339.6 KB · Views: 62
Photrio.com contains affiliate links to products. We may receive a commission for purchases made through these links.
To read our full affiliate disclosure statement please click Here.

PHOTRIO PARTNERS EQUALLY FUNDING OUR COMMUNITY:


Ilford ADOX Freestyle Photographic Stearman Press Weldon Color Lab Blue Moon Camera & Machine
Top Bottom