What did you fix today? (part 2)

20250427_154237.jpg

D
20250427_154237.jpg

  • 0
  • 0
  • 6
Genbaku Dome

D
Genbaku Dome

  • 2
  • 1
  • 18
City Park Pond

H
City Park Pond

  • 0
  • 1
  • 36
Icy Slough.jpg

H
Icy Slough.jpg

  • 1
  • 0
  • 39
Roses

A
Roses

  • 8
  • 0
  • 126

Recent Classifieds

Forum statistics

Threads
197,498
Messages
2,759,968
Members
99,518
Latest member
addflo
Recent bookmarks
0

Helios 1984

Member
Joined
Aug 4, 2015
Messages
1,844
Location
Saint-Constant, Québec
Format
35mm
The Spotmatic is in one piece again.

I78p8Fx.jpg
 

OptiKen

Member
Joined
Oct 31, 2013
Messages
1,055
Location
Orange County
Format
Medium Format
5E985334-2A7D-41C0-86F5-57AA62A45370.jpeg
Not fixed, but want to
I have a Kodak VPK 127 camera that I would like to shoot with. Unfortunately it has a dead shutter. I would like to open it up to see if I can fix it but would like to know the best way to get to the shutter. Do I remove the four outer screws and remove the entire face or only the four inner screws on the brass plate around the shutter or both?
 

Helios 1984

Member
Joined
Aug 4, 2015
Messages
1,844
Location
Saint-Constant, Québec
Format
35mm
View attachment 212183 Not fixed, but want to
I have a Kodak VPK 127 camera that I would like to shoot with. Unfortunately it has a dead shutter. I would like to open it up to see if I can fix it but would like to know the best way to get to the shutter. Do I remove the four outer screws and remove the entire face or only the four inner screws on the brass plate around the shutter or both?

This link might be helpful.


-----------------------------------------


I reattached the wire to the battery contact and reglued the leatherette. It looks more like a Spotmatic now :smile:

eunsjLR.jpg


KUKTnKZ.jpg
 
Last edited:

Truzi

Member
Joined
Mar 18, 2012
Messages
2,625
Format
Multi Format
Fixed the Airmatic suspension on my 2003 S500.

Oh, and freed up the advance on my Sears KS-2. It seems something under the bottom plate is flaking, jamming something with a miniscule bit of debris which keeps the advance mechanism from returning about 1mm - enough to freeze the camera. I'll have to take it completely apart sometime to fix this, but the temp fix should last a while.
 

Kino

Subscriber
Joined
Jan 20, 2006
Messages
7,602
Location
Orange, Virginia
Format
Multi Format
Restored the frozen shutters and cleaned the lens elements on a Braun Paxette and a Fujica V2.

The poor little Paxette's shutter looked like someone tried to poke their finger through the blades; one had a visible crease in a leaf and it rises above all the others, but it cleaned up and fires nicely! Tough little camera; only hope it doesn't cause a light leak.

The Fujica V2 was very clean, but simply would not fire. Took out the front element group, cleaned out a bit of creeping fungus along the edge and swabbed the shutter leaves with naptha gently for about 10 minutes and it sprang to life.

It was a good night; restored 2 cameras to functionality and didn't wreck either!

IMG_2162.JPG
 

mshchem

Subscriber
Joined
Nov 26, 2007
Messages
14,238
Location
Iowa City, Iowa USA
Format
Medium Format
I fixed a loose corner of the bellows on one of my Beseler enlargers. And I got out my 1965 Kodak model 16k Rapid Color Processor , set it in place over one of my big sinks.
 

Pentode

Member
Joined
Feb 14, 2017
Messages
959
Location
Brooklyn, NY
Format
Multi Format
My boiler.

At 3:00 AM I was lying under my furnace replacing a thermocouple.

Not as much fun as repairing a camera but at least my house has heat now!
 

Kino

Subscriber
Joined
Jan 20, 2006
Messages
7,602
Location
Orange, Virginia
Format
Multi Format
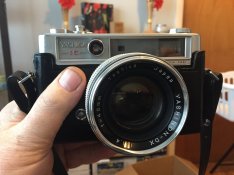
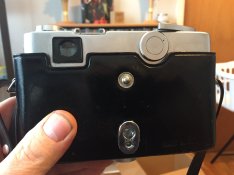
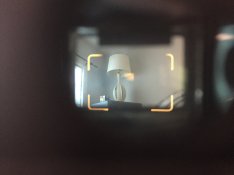
Yashica Lynx 14E. Took it apart, cleaned the viewfinder, the lens elements, replaced a rotten foam seal in the top with a felt washer, new light seals and a general polish. Unlike most, I seem to have a very bright viewfinder patch in this camera. Other than a light ding in the filter threads, this camera looks and works good!

IMG_2168.JPG IMG_2169.JPG IMG_2170.JPG
 

lobitar

Member
Joined
Jul 17, 2018
Messages
271
Location
Denmark
Format
Multi Format
Yashica Lynx 14E. Took it apart, cleaned the viewfinder, the lens elements, replaced a rotten foam seal in the top with a felt washer, new light seals and a general polish. Unlike most, I seem to have a very bright viewfinder patch in this camera. Other than a light ding in the filter threads, this camera looks and works good!

View attachment 212658 View attachment 212659 View attachment 212660
Gratulations! Impressive lens, I dare say. One shouldn't turn ones nose up to Yachicas. I remember at a photofair a few years ago someone displayed a neverreadycase with YACHICA on it. Of-course i didn't pick it up. But then I nearly had a stroke when someone took out a Yachica-NICCA (with normal 1,8 lens). Luckily he didn't seem to appreciate it and put it down again. I bought it instantly for the $200 asked.
Oh, and by the way: Why don't you fix the thread?
 

Kino

Subscriber
Joined
Jan 20, 2006
Messages
7,602
Location
Orange, Virginia
Format
Multi Format
Gratulations! Impressive lens, I dare say. One shouldn't turn ones nose up to Yachicas. I remember at a photofair a few years ago someone displayed a neverreadycase with YACHICA on it. Of-course i didn't pick it up. But then I nearly had a stroke when someone took out a Yachica-NICCA (with normal 1,8 lens). Luckily he didn't seem to appreciate it and put it down again. I bought it instantly for the $200 asked.
Oh, and by the way: Why don't you fix the thread?

Thanks! I love it. Congrats on your find!

I will fix the ding very shortly; I just self-imposed an embargo on camera purchases and will now invest in a few tools I need for my pile of needy cameras.

Old, cheap cameras are addictive to collect, but I have stockpiled a ridiculous number of cameras that need shutters cleaned, lenses "de-fungused" and so on.

Time to fix a few and start shooting. I kind of lost the whole point of having a camera; using it...
 

Helios 1984

Member
Joined
Aug 4, 2015
Messages
1,844
Location
Saint-Constant, Québec
Format
35mm
That's a clean looking Spotmatic!

I’ve found this one at a flea market, a few years ago. It was a repair project, than “for parts” and a repair project again. Now it’s on the active roster :smile:
 

Helios 1984

Member
Joined
Aug 4, 2015
Messages
1,844
Location
Saint-Constant, Québec
Format
35mm
Yesterday, I decided that the advance lever of my Spotmatic wasn't smooth enough, so I removed the frame counter to lubricate the bayonet spring.
At the same time, I was reading my copy of "National Camera Spotmatic Service Manual" when I got hit by one of these "Hey, wait a second..." moment.
The manual clearly shows 3 screws holding the bayonet spring, then why is it I only have 2?
Turns out, the head of the 3rd screw snapped off at some point in its life and I overlooked it because it was already broken when I opened the camera the first time.
So here's my temporary fix with an OK screw and 2 brass washers which I've trimmed a wee bit. Should be good enough until I find a replacement screw.

JE9Myg8.png
he7zwHT.jpg
X0pfKGv.jpg
 
Last edited:

lobitar

Member
Joined
Jul 17, 2018
Messages
271
Location
Denmark
Format
Multi Format
Thanks! I love it. Congrats on your find!

I will fix the ding very shortly; I just self-imposed an embargo on camera purchases and will now invest in a few tools I need for my pile of needy cameras.

Old, cheap cameras are addictive to collect, but I have stockpiled a ridiculous number of cameras that need shutters cleaned, lenses "de-fungused" and so on.

Time to fix a few and start shooting. I kind of lost the whole point of having a camera; using it...
I can second that, I'm afraid!
 

hartacus

Member
Joined
Nov 15, 2016
Messages
115
Location
Sydney, Australia
Format
35mm
Today I fixed the zoom ring (the bottom ring in the picture) on a Tokina SD 28-70mm 1:3.5-4.5 lens in FD mount that came with a recent purchase. The rubber on the zoom ring was slipping and it was very hard to turn the ring. On further inspection (prompted by this very helpful post) I found that the sticky tape that was holding together the focusing and zoom rings was shot.
Sticky tape.
This lens is held together by sticky tape.
And not just cosmetically. The focusing ring has two parts, one joined to the focusing element and the other is what hits the limiting bumps at the extremes of focusing range. These two rather important parts are only kept together by stationery.
Anyway.
The adhesive has degraded to the point where it's basically a lubricant. I couldn't do the focusing ring because it's night and I need to be able to find and set focus at infinity. For the zoom ring, I removed the rubber and tape. I cleaned the rubber and the ring beneath the tape with isopropyl alcohol. I had some red 1.5mm self-adhesive craft foam with a fairly strong adhesive backing, so I cut some to fit the groove where the rubber had fit. It adhered well. Then, I replaced the rubber over the top of the foam (it had stretched a bit as well). The ring now has plenty of grip and moves easily without slipping. While the shade of the red foam doesn't quite match the lens's original red ring around the front, I think it doesn't look terribly out of place.
The focus ring repair will come another day.
 

Born2Late

Member
Joined
Dec 15, 2012
Messages
448
Location
Southern Ind
Format
35mm
I replaced the mirror damper foam on one of my Minolta SRT 202's. I also removed some debris from between the focus screen and prism (my biggest beef with Minolta SLR's).
 

Helios 1984

Member
Joined
Aug 4, 2015
Messages
1,844
Location
Saint-Constant, Québec
Format
35mm
I removed the old & shrunk faux-leatherette on the latch area of my Topcon 35L and replaced it with real leather scavenged from the travel case of a Zenit TTL.

Click on the image for zoom.
 
Last edited:

campy51

Subscriber
Joined
Oct 16, 2014
Messages
1,214
Location
Boston area USA
Format
Multi Format
I am attempting to fix a silver Kowa Six 85mm lens. I need to take the shutter out but not sure how the front ring above the speed dial comes off. I see 2 very tiny screws on the inside of the ring but no way I am taking them out without knowing I need to. They are very tiny and I can see huge problem trying to get it back in. Any help?
 

Helios 1984

Member
Joined
Aug 4, 2015
Messages
1,844
Location
Saint-Constant, Québec
Format
35mm
I've made a cable release for my Ricoh XR-X 3PF which requires an odd 2.5mm Mono jack.
Nothing high tech, just a cable with the right jack and a on/off push button at the end.
 
Last edited:

Ian Grant

Subscriber
Joined
Aug 2, 2004
Messages
23,249
Location
West Midland
Format
Multi Format
Made an adapter board so I can use my 20" Rapid Rectilinear lens on it's board off my 12"x10" camera on my Agfa Ansco 10x8 Commercial or Universal View cameras.

I've already restored a large Thornton Pickard shutter to use front mounted with thwe lens.

upload_2018-12-31_17-49-52.png

Before restoration.

Ian
 

Robin Guymer

Member
Joined
Mar 27, 2017
Messages
204
Location
Melbourne Australia
Format
35mm
Took a $60 eBay punt on a supposedly dead Nikon F801 with an AF 35-135 lens. It was the lens I was after. Got the camera going but a broken spring on the metering aperture wheel relegates it to the junk bin. Was not a good buy once I checked the lens out as it was full of the dreaded fungus on all the internal elements as well as the easy to get to front ones. So with nothing to loose I worked out the dismantling tricks, cleaned all the fungus from the elements and body, then spent 4 hours trying to get the wrong way thread worm drive tubes to mesh in the correct position for assembly. If you tackle one of these the trick is to mark the fully closed position of the focal and focus worm drives and also mark the point that their threads unmesh from their partner so you then know the position to start winding them back together. Other than that this is quite an easy zoom lens to dismantle, clean and rebuild, and a very good quality lens when I tested it against a 135mm Summicron. It's now working perfectly on my F4 with resulting images I'm very happy with.
 

hartacus

Member
Joined
Nov 15, 2016
Messages
115
Location
Sydney, Australia
Format
35mm
Today I fixed the focus ring on the Tokina SD 28-70mm 1:3.5-4.5 I posted about a few weeks ago. Like the zoom ring, the focus ring was kept in place by sticky tape (still can't believe it), and removing the disintegrating adhesive was, in a word, disgusting. But isopropyl alcohol and persistence did the trick. I had to take the front group off to get all of it, and I'm glad I did, because the last person to try to fix the lens had left a great big fingerprint on the back element of the group.

After I cleaned it all up, I headed outside and set infinity focus on 70mm using some apartment buildings about 10km away. Not quite sure I nailed it, but it is very close, erring towards the other side of infinity if anything. What are you supposed to aim for when setting infinity - is there a conventional distance?

Here it is in the process of being taped up again (the lower tape hadn't been trimmed at that point):


And all done:


Unlike the zoom ring rubber, the focus ring rubber hadn't expanded appreciably so I could reuse it without padding it or shrinking it. Grips well, and the action is still quite smooth. I'm glad, I quite like the angled knurl.
 

John51

Member
Joined
May 18, 2014
Messages
797
Format
35mm
The slow/erratic shutter on my Kodak Signet 35.

Couldn't see any oil on the blades so was hoping that it just needed a bit of exercise. That improved it some but there's a little slide that has to be moved every time if there's no film in the camera. A real pita and time consuming so I kept losing interest.

Then I remembered I have a Kodak cable release, non tapered thread. Screwed that in and hey presto, could fire the shutter without needing to move the little slider. Game changer. I could fire the shutter a hundred times in 90 seconds. 20 at each speed plus B. 500 shutter fires later and it's good to go.
 
Photrio.com contains affiliate links to products. We may receive a commission for purchases made through these links.
To read our full affiliate disclosure statement please click Here.

PHOTRIO PARTNERS EQUALLY FUNDING OUR COMMUNITY:


Ilford ADOX Freestyle Photographic Stearman Press Weldon Color Lab Blue Moon Camera & Machine
Top Bottom