Autochromes...

about to extinct

D
about to extinct

  • 0
  • 0
  • 22
Fantasyland!

D
Fantasyland!

  • 9
  • 2
  • 97
perfect cirkel

D
perfect cirkel

  • 2
  • 1
  • 121
Thomas J Walls cafe.

A
Thomas J Walls cafe.

  • 4
  • 6
  • 281

Recent Classifieds

Forum statistics

Threads
198,745
Messages
2,780,276
Members
99,693
Latest member
lachanalia
Recent bookmarks
0
Joined
Aug 7, 2014
Messages
185
Location
Grand Rapids, MI
Format
Large Format
Since you are adjusting your erythrosin...as you use more erythrosin it will also begin reduce the blue sensitivity, so you can use the amount added to adjust the color balance.

Right! That's what I was doing, but I scrapped what I had because I thought I had gone too far with the pinacyanol, plus I was worried about contamination and decided to just do a clean start. IIRC pinacyanol is a pretty potent green de-sensitizer too.

I know the actual amount is going to vary wildly, but what is your ballpark with erythrosine? I had added about 9mg to this batch (per 3g AgNO3), which works out to about 511mg/mol. It seemed a bit excessive, which is why I bailed...
 

Photo Engineer

Subscriber
Joined
Apr 19, 2005
Messages
29,018
Location
Rochester, NY
Format
Multi Format
Generally, Iodide increases contrast.

A daylight sensitized emulsion, viewed in daylight appears to be gray or neutral. Have you thought of using extra UV filtration? There is a lot of it in daylight.

PE
 
Joined
Aug 7, 2014
Messages
185
Location
Grand Rapids, MI
Format
Large Format
Generally, Iodide increases contrast.

A daylight sensitized emulsion, viewed in daylight appears to be gray or neutral. Have you thought of using extra UV filtration? There is a lot of it in daylight.

PE

Good point, I hadn't really thought of that. I'm using a somewhat modern lens with a UV coating, plus exposing the plate glass side first... I figured that would filter out enough, but I might be wrong! I'll look into picking up a UV filter...
 

kb3lms

Member
Joined
Jun 24, 2006
Messages
1,004
Location
Reading, PA
Format
35mm
Very impressive, your results look quite nice. Besides contrast, KI also should help with speed, but it would depend on the exact emulsion formula you are using. If your blue response is too much, maybe you want to use a yellow filter? Or, maybe add a but of tartrazine (yellow food dye) to you emulsion or the varnish. I guess autochromes are shot through the glass with the emulsion on the back, right? Maybe you could put a yellow coating on the other side of the glass.

A yellow filter is probably just easier.
 
Joined
Aug 7, 2014
Messages
185
Location
Grand Rapids, MI
Format
Large Format
Very impressive, your results look quite nice. Besides contrast, KI also should help with speed, but it would depend on the exact emulsion formula you are using. If your blue response is too much, maybe you want to use a yellow filter? Or, maybe add a but of tartrazine (yellow food dye) to you emulsion or the varnish. I guess autochromes are shot through the glass with the emulsion on the back, right? Maybe you could put a yellow coating on the other side of the glass.

A yellow filter is probably just easier.

I'm re-running the emulsion with the KI this time. I kept the old AgBr run too, so I'll go back and fourth playing with those. Who knows, the AgBr might look better?

I'll probably just make my own lens filter, like you said. I have a bunch of dyes hanging around for the starch, so I should be able to make a custom colored lens filter. I actually have like a pound of tartrazine, because I couldn't find it in a smaller size, hah.

I'll coat tonight and shoot tomorrow and see how these look. I won't adjust dye content until I get that UV filter. Failing that, I'll start just making my own filters and play with that a bit.
 

Craig

Subscriber
Joined
Apr 8, 2004
Messages
2,330
Location
Calgary
Format
Multi Format
I'll probably just make my own lens filter, like you said. I have a bunch of dyes hanging around for the starch, so I should be able to make a custom colored lens filter.

I though there was a filter the original Autochromes were exposed through? I didn't think they were intended for in camera exposure unfiltered.
 
Joined
Aug 7, 2014
Messages
185
Location
Grand Rapids, MI
Format
Large Format
I though there was a filter the original Autochromes were exposed through? I didn't think they were intended for in camera exposure unfiltered.

They did! But their emulsion used ethyl violet for red sensitivity, which is generally worse than something like pinacyanol (which I'm using). I've worked with ethyl violet enough to know that I never want to work with it again. And so far, with my indoor exposures, I was able to get away filterless. But it's totally possible that, in conjunction with the screen, pinacyanol might not cut it for outdoor use either...
 

kb3lms

Member
Joined
Jun 24, 2006
Messages
1,004
Location
Reading, PA
Format
35mm
Out of curiosity, what is the problem with ethyl violet that you would not want to use it again? I have some here but haven't used it yet.
 
Joined
Aug 7, 2014
Messages
185
Location
Grand Rapids, MI
Format
Large Format
Out of curiosity, what is the problem with ethyl violet that you would not want to use it again? I have some here but haven't used it yet.

I originally chose ethyl violet as the red sensitizer for my experiments with Lippmann plates. Compared to pinacyanol, I feel like I was always playing with the dye content, and rarely ever got it right. My ratio of successful plates to scrapped plates must've been 1:25 or so.

I probably overreacted about never wanting to work with it again, though, heh. In fact, someday I will probably start making ethyl violet based emulsions with the autochromes, to try and capture that 'look' the classic ones have. I don't see that happening for a while, though.
 
Joined
Aug 7, 2014
Messages
185
Location
Grand Rapids, MI
Format
Large Format
Alright, here's the best success of the day. It's not the best ever, but I'm still getting colors consistently so I call it a win.

This emulsion was made the same way as the previous ones, only this time I added:

2mL 1:1000 erythrosine before precipitation
4mL 1:1000 pinacyanol before coating

I added the typical 200mL of water before coating, to dilute and allow for thin, even coatings. 6mL of the solution applied to each 4x5 plate.

As you can see, the colors here are very weak compared to some of my previous shots. It was an overcast day, ~EV11, exposed for 20 seconds. IIRC another stop would have increased the saturation a bit (and another plate shot at 10s seems to back this up, as the colors were even less distinct). I think the emulsion was a bit too dilute this time, as the shadows were fairly weak. I'll coat four more plates tonight with 8mL of emulsion each and see how that performs. As you can see from the exposed screen, this is an older one and hardly neutral in tone -- so I won't be basing any dye concentration adjustment decisions off of this.

The corners of the plate got contaminated with something while drying I think (causing fog, which was ultimately bleached away). The other 3 did not have any huge spots or anything of the sort. I know my fan fell over on these guys sometime last night, so it could have been from that.
 

Attachments

  • IMG_2493.JPG
    IMG_2493.JPG
    217.4 KB · Views: 251

Nodda Duma

Member
Joined
Jan 22, 2013
Messages
2,685
Location
Batesville, Arkansas
Format
Multi Format
Instead of adding water to thin out the coating, add Everclear (at about 40-80ml / L of emulsion). The alcohol will act as a surfactant and also help reduce air bubbles in the emulsion. The emulsion will set up quicker and dry nicer as well...it's just all around goodness. I use 5ml of emulsion for my 4x5 plates treated this way and they come out nicely contrasty (see my latest pic added to the media section).
 
Joined
Aug 7, 2014
Messages
185
Location
Grand Rapids, MI
Format
Large Format
Instead of adding water to thin out the coating, add Everclear (at about 40-80ml / L of emulsion). The alcohol will act as a surfactant and also help reduce air bubbles in the emulsion. The emulsion will set up quicker and dry nicer as well...it's just all around goodness. I use 5ml of emulsion for my 4x5 plates treated this way and they come out nicely contrasty (see my latest pic added to the media section).

That's definitely something to look into! The only reservation I have there is that some of my older screens seemed to have an issue where some residual alcohol would dissolve parts of the second varnish and leave big scars. I'll post a picture when I can. They always occurred around the outside of where the gelatin coating stopped. I haven't had issues with that ever since I started heating the plates after second varnish coating, which seemed to harden up the varnish a good deal.
 

Photo Engineer

Subscriber
Joined
Apr 19, 2005
Messages
29,018
Location
Rochester, NY
Format
Multi Format
It just struck me!!!

You generally cannot sensitize one emulsion to two wavelengths by adding two dyes. You need one "pan" dye or two emulsions with two sensitizers. Otherwise, the second dye added acts to desensitize the emulsion to the first wavelength.

PE
 
Joined
Aug 7, 2014
Messages
185
Location
Grand Rapids, MI
Format
Large Format
It just struck me!!!

You generally cannot sensitize one emulsion to two wavelengths by adding two dyes. You need one "pan" dye or two emulsions with two sensitizers. Otherwise, the second dye added acts to desensitize the emulsion to the first wavelength.

PE

I see. That makes sense. I imagine one can get a fairly close balance by trial and error when initially making the emulsion, but subsequent additions to tweak the response may be a lost cause.

Today I was able to try out an orange filter, which seemed to fix things. The colors were getting washed out due to the blue sensitivity being too high. The orange filter seems to have balanced things out nicely for an exposure in the sun. I think both the dyes here are probably nearing their upper limit, so the filter may be a necessity from here on out.

The last plate I coated I exposed 6 seconds without the macbeth chart. I think it would've made a nice picture, but unfortunately it was a few stops underexposed. I'm a little puzzled why it came out the way it did, since I had coated them all at the same time, developed them all within 1 hour, etc....
 

Attachments

  • 2s_nofilter.jpg
    2s_nofilter.jpg
    389.3 KB · Views: 250
  • 4s_nofilter.jpg
    4s_nofilter.jpg
    479.1 KB · Views: 248
  • 5s_orangefilter.jpg
    5s_orangefilter.jpg
    387.5 KB · Views: 243

Nodda Duma

Member
Joined
Jan 22, 2013
Messages
2,685
Location
Batesville, Arkansas
Format
Multi Format
If an orange filter is what’s needed, then you could theoretically coat a top layer emulsion With an orange dye that washes out during development.
 
Joined
Aug 7, 2014
Messages
185
Location
Grand Rapids, MI
Format
Large Format
If an orange filter is what’s needed, then you could theoretically coat a top layer emulsion With an orange dye that washes out during development.

That's an interesting idea. That may be fun to play with when I get some of the other problems ironed out.

Today's plate, made on the same screen plate as the "5s_orangefilter" picture from my previous post. 9mL of emulsion. The image is a bit dark and contrasty, but longer exposures just result in washed out colors. I think I'm going to coat some plates with 6mL emulsion again, and see how they look with the new filter.
 

Attachments

  • IMG_9169s.jpg
    IMG_9169s.jpg
    998.9 KB · Views: 240

erian

Member
Joined
May 23, 2018
Messages
69
Location
Luxembourg
Format
Large Format
Today's plate, made on the same screen plate as the "5s_orangefilter" picture from my previous post. 9mL of emulsion. The image is a bit dark and contrasty, but longer exposures just result in washed out colors. I think I'm going to coat some plates with 6mL emulsion again, and see how they look with the new filter.

If something is amazing then it is this! I read this whole thread with a groving awe.

I am wondering that have thought about heading commercial with this? Of course there are many issues that have to be ironed out like large variety in the grain sizes or problems with coating but these thing might be easier to solve with the right equipment and partner.
 
Last edited:
Joined
Aug 7, 2014
Messages
185
Location
Grand Rapids, MI
Format
Large Format
If something is amazing then it is this! I read this whole thread with a groving awe.

I am wondering that have thought about heading commercial with this? Of course there are many issues that have to be ironed out like large variety in the grain sizes or problems with coating but these thing might be easier to solve with the right equipment and partner.

Thanks for the encouragement guys. I've had to travel nearly 3 weeks out of the last month for work (including right now!), so I try to make as much progress as I can during the short time I have at home.

My biggest hurdle so far has been the second varnish. After talking things over with a friend, we determined that the ethyl acetate was evaporating too quickly, causing moisture to contaminate the varnish and starch (the "clouding" I spoke of). This made sense, since I had observed droplets of condensation on the bottom of the plate. You can also see areas where the dye did not discolor, which match up perfectly with where the glass was contacting the bubble level (it was acting as a heat source!). In the short term, hitting the plate with an infrared lamp not only allowed for a cloud-free, discoloration-free second varnish, but it also removed any trace of the wrinkles! It also removed the necessity to heat the plates post-coating to remove residual amyl acetate trapped in the second varnish. One step closer...

I have spoken to people about producing these commercially, and I do fully intend to at some point. Right now starch compression is a major bottleneck - I do them by hand and can't do more than one 4x5 at a time before my hand cramps up and the quality suffers. I work in industrial automation, and I have a machine design I've been kicking around -- I just need to build it. But I'm more on the "programming" side of controls engineering, and much less on the "mechanical" side of things, so physically building it will be a challenge. I'm hoping to start work on this in July or so. Once I eliminate this bottleneck I'll be able to better understand how much time and material it takes to make these, so I can dial in a price. Until then, it stays a hobby.

Getting a smaller grain size is probably dead last on the To-Do list, haha, but I understand where you're coming from. Lavédrine/Gandolfo describe a very accessible way to separate the grains by mixing them all up in water and siphoning off the particles suspended in water. I think there's even a video of them performing this somewhere on the internet (not Youtube). When I get some time I'll look more into it, but I'm happy with the graininess in the meantime. It has a charm to it, and I bet it would look really nice in 5x7 format. Most importantly, I can take a picture of something blatantly out of focus and it's really hard to tell that I screwed it up!

If anyone's interested, here's a Google Doc of the materials/sources I'm using to make these. I'm going to record some footage of the next screen I put together, just so everyone can see how I'm currently doing it.
 
Joined
Aug 7, 2014
Messages
185
Location
Grand Rapids, MI
Format
Large Format
Here's a new successful test. And it only took me 8 plates to get there! I was annoyed with inconsistent results with the Dufay Color FD, so for fun I went back to something I tried in December - just using plain old D76 as the FD. And now that my coating technique has improved significantly, this didn't turn out all that bad! Using D76, it appears the plate is a lot less contrasty, and much more like a normal looking photograph. This is at the cost of speed (this was 15 seconds with an EV 15 subject!) and brightness - this plate is quite dim.

I think this is something I'd like to continue to explore - I think I can make these a little faster and brighter by increasing the gelatin:AgX ratio even more. Right now I'm much more concerned about getting consistent results over speed.

The next run of this stuff, I'm going to shoot for 4g of gelatin, and 265mL of water to dilute the emulsion with, and coat again at 6mL of emulsion per plate.
 

Attachments

  • IMG_9175s.jpg
    IMG_9175s.jpg
    914 KB · Views: 221
Joined
Aug 7, 2014
Messages
185
Location
Grand Rapids, MI
Format
Large Format
Hey everyone,

Unfortunately work put me on a semi-permanent hiatus from all my darkroom activities for the last few months. I haven't made much progress in replicating my successes from earlier this year. So here's a little progress I've been making regarding machine pressing the starch.

Currently I've managed to modify my CNC router with an attachment that has a small 1/4" threaded bolt as an axle, with a small roller 
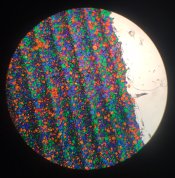
this kit. It provides two points of contact against the starch, both are just about 0.5mm wide. Right now my rolling program rolls back and fourth across the starch 14 times before picking up and moving over 0.5mm to the right, and repeating the process until it reaches the end of the plate. This takes about 45 minutes to complete. IMG_2751 shows a neat little comparison between the pressed and unpressed starch grains. Here's a video of the router in action.

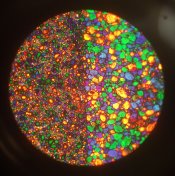
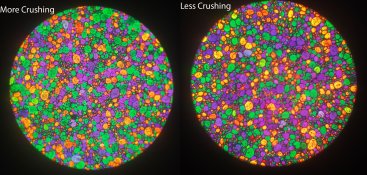
In IMG_2753, you can see the difference in transmitted light between one 45 minute pressing, and a second 45 minute pressing (the plate shifted near the end of the second pressing, giving us a neat little comparison). You can see the differences through the microscope in IMG_2754. It's hard to see, but the grains are a bit more rounded with only one pressing, and there seems to be a bit more interstitial spaces between them. I think, to get things to a satisfactory level, this second pressing may be necessary.

One observation that pops into my head while I'm writing this, is that there doesn't seem to be a whole lot of graphite in between the unpressed starch grains. I'm wondering if I might be a bit too aggressive when I'm brushing it off with the talc. It may be, with such large grains, that the graphite / talc steps are wholly unnecessary.

I tried filing down one of the edges of the little roller wheel, so that there was only one point of contact against the plate. In theory, this would double the pressure applied, since we're halving the surface area. Right now I can't apply any more force, since it causes the z axis belt to skip on the router. This didn't end well, since the roller now "leaned" so that a corner of the edge was in contact with the plate, dropping the contact width to something closer to 0.2mm (IMG_2750). I modified the program to perform smaller "hops", but I think the sharper edge of the contact area tended to destroy parts of the plate. The compressing was good in the areas that survived, though.

If someone can recommend a better roller, with the point of contact being closer to the middle of the bearing, I'd love to hear it. I'm sure something like that exists for a few niche applications somewhere, but I haven't been able to find anything quite yet.
 

Attachments

  • IMG_2750.JPG
    IMG_2750.JPG
    526.3 KB · Views: 167
  • IMG_2751.JPG
    IMG_2751.JPG
    475.5 KB · Views: 169
  • IMG_2753.JPG
    IMG_2753.JPG
    544.7 KB · Views: 176
  • IMG_2754.JPG
    IMG_2754.JPG
    978 KB · Views: 183

dwross

Member
Joined
Feb 13, 2004
Messages
1,262
Location
Oregon Coast
Format
Multi Format
[...]
One observation that pops into my head while I'm writing this, is that there doesn't seem to be a whole lot of graphite in between the unpressed starch grains. I'm wondering if I might be a bit too aggressive when I'm brushing it off with the talc. It may be, with such large grains, that the graphite / talc steps are wholly unnecessary.
[...]
.

Nice to see you posting again! I've been following your research with delight and absolute admiration for your tenacity. My research ground to a halt when I decided I needed to do the work in a separate space from my house/studio. I still haven't gotten it built :cry:.

I had the same thought/hope about eliminating the carbon black. Alas, I found that it seems indeed necessary. You are way beyond where I got, but if it's at all of help or interest, my last results are on this page, second and fourth entries: http://thelightfarm.com/cgi-bin/htmlgennew.py?content=Journal2

Best, d
 

dwross

Member
Joined
Feb 13, 2004
Messages
1,262
Location
Oregon Coast
Format
Multi Format
It just struck me!!!

You generally cannot sensitize one emulsion to two wavelengths by adding two dyes. You need one "pan" dye or two emulsions with two sensitizers. Otherwise, the second dye added acts to desensitize the emulsion to the first wavelength.

PE
Interesting (as is true for everything related to emulsions!). That hasn't been my experience. Erythrosin and pinacyanol chloride seem to play nicely together. Perhaps different dyes interact differently? What is your recommended "pan" dye? Thank you. d
 
Photrio.com contains affiliate links to products. We may receive a commission for purchases made through these links.
To read our full affiliate disclosure statement please click Here.

PHOTRIO PARTNERS EQUALLY FUNDING OUR COMMUNITY:


Ilford ADOX Freestyle Photographic Stearman Press Weldon Color Lab Blue Moon Camera & Machine
Top Bottom