
Yes the images are clearly visible, I overexposed 3 stops (the printed sheet absorbs 2 stops) to compensate. Good to know that is a good film to start with.I presume there was a negative B&W image on the film? There's somewhere between 3 and 5 stops of filtration due to antihalation layer when shooting modern films through the base. At least 35 mm Fomapan doesn't have the deep blue/green base dye found in 120 and large format stocks, as that would obviously mess up your color rendition beyond repair...
-
Welcome to Photrio!Registration is fast and free. Join today to unlock search, see fewer ads, and access all forum features.Click here to sign up
You are using an out of date browser. It may not display this or other websites correctly.
You should upgrade or use an alternative browser.
You should upgrade or use an alternative browser.
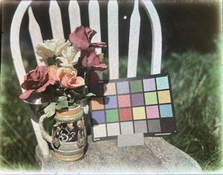
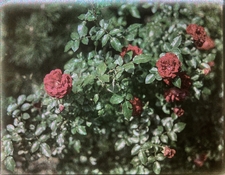
Autochromes...
-
A
- Thread starter htmlguru4242
- Start date


Recent Classifieds
-
For Sale Jobo CPE 2 Plus with Lift, - Tanks, Reels, accessories
- Started by nbagno
-
For Sale Multiple Large Format Lenses for sale
- Started by nbagno
-
For Sale Canon 2X EF Telextender
- Started by davela
-
For Sale Olympus OM 24mm F2.8 Lens Hood
- Started by davela
-
For Sale Original Rolleiflex SL35, SL35M, and Contax G2 Manuals
- Started by davela
Forum statistics
Donald Qualls
Subscriber
Ah, I see the problem. You have no black matrix between color spots. That means the white light passing between them overwhelms the color information.
Solution: fill the empty space with black or, preferably, expand the color spots to fill 100% of the area with no uncolored area between.
Solution: fill the empty space with black or, preferably, expand the color spots to fill 100% of the area with no uncolored area between.
Donald Qualls
Subscriber
You used graphics software of some sort to print the color matrix, right? That same software should be usable to either expand the color spots so they touch (even a little overlap and mixing won't hurt), or fill in black between them.
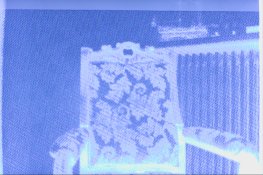
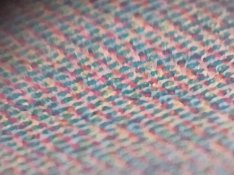
The image I printed is a .tiff file where each pixel is a different color (cyan, magenta or yellow). I don't see how I can fill the remaining area. In the attachments you can find a sample of the pattern and the surface of the printed paper. A laser printer was used.You used graphics software of some sort to print the color matrix, right? That same software should be usable to either expand the color spots so they touch (even a little overlap and mixing won't hurt), or fill in black between them.
Attachments

Donald Qualls
Subscriber
Ah, what I was taking for empty space was the yellow. I don't think what's going on the label stock quite matches the image file, though; possibly getting artifacts from too-fine image features relative to printer resolution. Maybe print with larger pixel size? Your image color will be coarser, but you should get a more consistent filter.
I agree. Probably the best thing to do would be using a medim format film to get "acceptable" results with the enlarged pattern. Any advice on which 120 film to use?Ah, what I was taking for empty space was the yellow. I don't think what's going on the label stock quite matches the image file, though; possibly getting artifacts from too-fine image features relative to printer resolution. Maybe print with larger pixel size? Your image color will be coarser, but you should get a more consistent filter.
nmp
Member
The image I printed is a .tiff file where each pixel is a different color (cyan, magenta or yellow). I don't see how I can fill the remaining area. In the attachments you can find a sample of the pattern and the surface of the printed paper. A laser printer was used.
Don't you need to randomize the pattern?
https://www.jonhilty.com/pseudochrome
Donald Qualls
Subscriber
Medium format films are much harder to shoot through the base -- you have to unroll and reroll inside out and remove and reset the tape at the head end. I'd suggest jumping directly to large format for this, at least until you have a working process.
An advantage -- with the right setup, you could shoot the emulsion side of the film using pin registration, remove the color matrix sheet, process to a positive (the way original Autochrome was done) then re-register the color matrix for viewing or reproduction.
An advantage -- with the right setup, you could shoot the emulsion side of the film using pin registration, remove the color matrix sheet, process to a positive (the way original Autochrome was done) then re-register the color matrix for viewing or reproduction.
I guess it's not relevant as long as there are enough dots of each colour in a given area. For sure randomization adds the signature autochrome look to it. Thank you for the link, very interesting.
Before trying to do the experiment with fomapan 100 I tried using medium format HP5, needless to say I wasted it, but there was a thing I noticed that i wasn't expecting: when you detach the adhesive paper from the film base it glows.Medium format films are much harder to shoot through the base -- you have to unroll and reroll inside out and remove and reset the tape at the head end. I'd suggest jumping directly to large format for this, at least until you have a working process.
An advantage -- with the right setup, you could shoot the emulsion side of the film using pin registration, remove the color matrix sheet, process to a positive (the way original Autochrome was done) then re-register the color matrix for viewing or reproduction.
Donald Qualls
Subscriber
when you detach the adhesive paper from the film base it glows.
Yep, I've seen that every time I've peeled that tape since 1970, with every brand of film I've done it on. Doesn't seem bright enough to fog beyond the contact area, but it certainly does it there.
Your method won't work on the emulsion side -- chemicals can't get under the plastic sheet -- but you'd want to find a film without a dye layer for medium format. Maybe Cinestill Double-X 120?
falotico
Member
- Joined
- Aug 31, 2012
- Messages
- 265
- Format
- 35mm
Autochromes are an ADDITIVE color process. Basically this means you had to use PRIMARY colors to form the image. Cyan/magenta/yellow are COMPLEMENTARY colors. Also, the photographic print behind the color screen must be a POSITIVE, not a NEGATIVE.I printed a cyan/magenta/yellow dot matrix on transparent adhesive paper
Ranieri
The PRIMARY colors used in Autochrome color screens are BLUE, GREEN AND RED.
ThePhotoChemist
Member
Autochromes are an ADDITIVE color process. Basically this means you had to use PRIMARY colors to form the image. Cyan/magenta/yellow are COMPLEMENTARY colors. Also, the photographic print behind the color screen must be a POSITIVE, not a NEGATIVE.
The PRIMARY colors used in Autochrome color screens are BLUE, GREEN AND RED.
Yup, I was about to say this as well. I know we're working with CMY inks at the end of the day, but we're looking to have RGB light transmitted through the transparency, and then to the emulsion. So you'd probably have better luck with an RGB random pattern instead.
Years ago I tried something similar, where I printed out different patterns on laser transparencies, and rubber-cemented 35mm film strips to them. This was way before I had much of a darkroom, so it's a bit of a janky setup. Results weren't great, but I definitely did get some color response on the RGB screens. I feel like results could be improved quite a lot with better technique all around.
https://www.jonhilty.com/pseudochrome
The scans aren't super great either, which doesn't help, but I recall being super excited that the traffic cone turned out a deep blue.
OP
OP
htmlguru4242
Member
I am beyond thrilled to see all of the progress here!
... and it's pretty cool that a thread I started almost 20 years ago is still going, lol.
... and it's pretty cool that a thread I started almost 20 years ago is still going, lol.
ThePhotoChemist
Member
Hey y'all,
I figured I'd post a big roundup of just random things I've changed in my workflow. I've been machinegunning out plates recently getting ready for a big trip, and I've been some pretty nice improvements to the process. I'll often post musings when I share pictures on Instagram, but those are near impossible to search for if you're looking for information, so I figured I'd compile the big ones here.
Masking the edges
I used to take 1/4" tape and mask the edges of each plate before coating the 1st Varnish. I was concerned that water would leak into the starch layer through the edges, and providing an area of contact between the glass and second varnish would neatly envelope the starch. In reality, the Lumiere second varnish has poor adhesion to glass, so the plate was much more likely to flake up at the edges and leak water in. Nowadays I just coat the whole plate with 1st varnish, starch, and 2nd varnish, and they perform much better (and are easier to coat!). The outer 1/8" or so says unflattened, because the roller wheel can't quite make it to the edges of the plate without bumping into the sides of the slot the plates go into.
Lampblack Heating
I noticed recently that I was leaving "fingermarks" when brushing in the lampblack into the plate - the areas near where my fingers were holding the plate had almost no lampblack deposited on the grains, while the cooler areas were considerably "dirtier" looking.
I've started preheating each plate to about 40C before brushing the lampblack now, and the results have improved considerably. This serves a dual purpose too - heating the plate causes the 1st varnish to expand, so cracks in between the starch grains appear. Brushing in the lampblack pre-emptively fills these in, reducing gaps that would often appear on the plate post-second varnishing.
I have absolutely no explanation on the mechanism behind the starch grains being "cleaner" when the plate is heated up.
Second Varnish Formulation
Using the Lumière 2nd Varnish has always caused artefacting - I can't be sure what it is, but it looks like the the Second Varnish warps slightly and lifts the starch away from the glass. In the vast majority if cases it's minor, and doesn't affect exposure or viewing. In extreme cases it causes cracking and delamination. Nearly all my original autochromes do not have this artefact though, so it bothers me.
I tried different formulations for the Second Varnish:
1.5x damar - this seemed to perform the best. Though it didn't eliminate the artefacting in all plates, it did reduce the severity in most cases.
1.5x nitrocellulose - no change from the standard formulation. Tended to have more gaps in the plate after drying.
3x (accidentally ended up being 4x) castor oil - Did not prevent artefacting. Emulsion adhesion was poor, but I probably should have washed the plates with soap and water before coating. Will need to try again after washing.
Second Varnish "Cooldown" Method
The plates must be warmed when applying the second varnish, otherwise the volatile ethyl acetate will evaporate and cool the plate down, condensing moisture into the starch causing cracks in the second varnish, and a "mother of pearl" sheen that reduces transparency. Keeping the plate warm and baking all the solvent off causes gaps/cracks to be "baked in", permanently leaving the gaps in place.
For a while I added a small quantity of "butyl-cellosolve" (5-10% volume) to the second varnish. It's a nitrocellulose solvent that is considerably less volatile. After most of the ethyl acetate had evaporated, the plate would gas out for the next 24 hours or so and the cracks would slowly close up. I theorize though, this exacerbates the previously mentioned "artefacting".
Now, I omit the butyl-cellosolve, and use the following method - I first heat the plates up to 40C, apply the lampblack, and then dose 10mL of varnish (diluted to 0.4g/10mL) to the plate. I then continue heating for an additional 2 minutes, before cutting power to the heating pad. This keeps the plate just warm enough initially, that the ethyl acetate rapidly cools it down to near-room temperature. This avoids the plate being too cold and pulling in moisture, but also from being too warm, and baking in the gaps. I should note that I use 1/4" glass as a leveling table retains the heating pad.
Coating
Since the emulsion has such high even-ness requirements, coating has always been a major PITA. I built a machine out of a 6040 CNC that can coat 14 4x5s at a time. The head's coating length is 5 inches, so that it'll work for 5x7 format too, though I have yet to try it. I'm still working some of the kinks out in the process, but the evenness of the coatings has been so great that I've hardly even thought about it since then.
You can read more about it in this thread: https://www.photrio.com/forum/threads/making-a-glass-plate-coating-machine.176482/#post-2691986
I'd like to make a dedicated video on the various pieces of equipment I've built for the darkroom, and no doubt the story behind this will take up most of that.
I dilute my stock emulsion 1:2, and adjust the gelatin for a final 3.5% by weight, and coat 5mL per 4x5.
The Safelight Saga
I realized recently that my safelights weren't exactly so safe, and were in fact giving off tiny amounts of green light. I've had these lights for a few years now, and probably fogged any emulsion I made that was remotely fast. Now my exposures are pushing 2-10 seconds, instead of 2 minutes.
You can read a little more about that here:

 www.photrio.com
UV Filtration
I've been struggling for weeks trying to figure out why my fine-grained plates look so washed and lacked saturation. I finally had a breakthrough yesterday - As soon as I shot a test with a UV filter from a Cibrachrome printing kit, the colors absolutely popped. It appears enough UV was leaking through the grains, muddying the colors and reducing saturation. I figured the plates had enough protection from UV, between being shot glass-side first, as well as with a modern lens with a UV coating, but this apparently wasn't the case.
To Do
Now that I have extra plates that I can kind of just play around with, I'd like to start experimenting with using permanganate bleach instead of dichromate. Not just for my European bros out there who want to buy plates from me eventually, but simply for the fact that I'm working with the stuff on a daily basis. I'm incredibly strict about my handling and disposing of the stuff, but working with the stuff almost daily just can't be good for me in the long run. I'll be looking into other bleaches as well and see what works best.
I've finished a script for a proper autochrome video guide - 32 pages of it! And I've started taking footage for it as well. I wouldn't expect it to be out for at least a few months, but I'm hoping to make it a winter project.
I figured I'd post a big roundup of just random things I've changed in my workflow. I've been machinegunning out plates recently getting ready for a big trip, and I've been some pretty nice improvements to the process. I'll often post musings when I share pictures on Instagram, but those are near impossible to search for if you're looking for information, so I figured I'd compile the big ones here.
Masking the edges
I used to take 1/4" tape and mask the edges of each plate before coating the 1st Varnish. I was concerned that water would leak into the starch layer through the edges, and providing an area of contact between the glass and second varnish would neatly envelope the starch. In reality, the Lumiere second varnish has poor adhesion to glass, so the plate was much more likely to flake up at the edges and leak water in. Nowadays I just coat the whole plate with 1st varnish, starch, and 2nd varnish, and they perform much better (and are easier to coat!). The outer 1/8" or so says unflattened, because the roller wheel can't quite make it to the edges of the plate without bumping into the sides of the slot the plates go into.
Lampblack Heating
I noticed recently that I was leaving "fingermarks" when brushing in the lampblack into the plate - the areas near where my fingers were holding the plate had almost no lampblack deposited on the grains, while the cooler areas were considerably "dirtier" looking.
I've started preheating each plate to about 40C before brushing the lampblack now, and the results have improved considerably. This serves a dual purpose too - heating the plate causes the 1st varnish to expand, so cracks in between the starch grains appear. Brushing in the lampblack pre-emptively fills these in, reducing gaps that would often appear on the plate post-second varnishing.
I have absolutely no explanation on the mechanism behind the starch grains being "cleaner" when the plate is heated up.
Second Varnish Formulation
Using the Lumière 2nd Varnish has always caused artefacting - I can't be sure what it is, but it looks like the the Second Varnish warps slightly and lifts the starch away from the glass. In the vast majority if cases it's minor, and doesn't affect exposure or viewing. In extreme cases it causes cracking and delamination. Nearly all my original autochromes do not have this artefact though, so it bothers me.
I tried different formulations for the Second Varnish:
1.5x damar - this seemed to perform the best. Though it didn't eliminate the artefacting in all plates, it did reduce the severity in most cases.
1.5x nitrocellulose - no change from the standard formulation. Tended to have more gaps in the plate after drying.
3x (accidentally ended up being 4x) castor oil - Did not prevent artefacting. Emulsion adhesion was poor, but I probably should have washed the plates with soap and water before coating. Will need to try again after washing.
Second Varnish "Cooldown" Method
The plates must be warmed when applying the second varnish, otherwise the volatile ethyl acetate will evaporate and cool the plate down, condensing moisture into the starch causing cracks in the second varnish, and a "mother of pearl" sheen that reduces transparency. Keeping the plate warm and baking all the solvent off causes gaps/cracks to be "baked in", permanently leaving the gaps in place.
For a while I added a small quantity of "butyl-cellosolve" (5-10% volume) to the second varnish. It's a nitrocellulose solvent that is considerably less volatile. After most of the ethyl acetate had evaporated, the plate would gas out for the next 24 hours or so and the cracks would slowly close up. I theorize though, this exacerbates the previously mentioned "artefacting".
Now, I omit the butyl-cellosolve, and use the following method - I first heat the plates up to 40C, apply the lampblack, and then dose 10mL of varnish (diluted to 0.4g/10mL) to the plate. I then continue heating for an additional 2 minutes, before cutting power to the heating pad. This keeps the plate just warm enough initially, that the ethyl acetate rapidly cools it down to near-room temperature. This avoids the plate being too cold and pulling in moisture, but also from being too warm, and baking in the gaps. I should note that I use 1/4" glass as a leveling table retains the heating pad.
Coating
Since the emulsion has such high even-ness requirements, coating has always been a major PITA. I built a machine out of a 6040 CNC that can coat 14 4x5s at a time. The head's coating length is 5 inches, so that it'll work for 5x7 format too, though I have yet to try it. I'm still working some of the kinks out in the process, but the evenness of the coatings has been so great that I've hardly even thought about it since then.
You can read more about it in this thread: https://www.photrio.com/forum/threads/making-a-glass-plate-coating-machine.176482/#post-2691986
I'd like to make a dedicated video on the various pieces of equipment I've built for the darkroom, and no doubt the story behind this will take up most of that.
I dilute my stock emulsion 1:2, and adjust the gelatin for a final 3.5% by weight, and coat 5mL per 4x5.
The Safelight Saga
I realized recently that my safelights weren't exactly so safe, and were in fact giving off tiny amounts of green light. I've had these lights for a few years now, and probably fogged any emulsion I made that was remotely fast. Now my exposures are pushing 2-10 seconds, instead of 2 minutes.
You can read a little more about that here:
Ammonia digest emulsions
Hi! I would really like to attempt to make an ammonia digest emulsion and would like to know if anyone here has any experience doing so. I've become pretty decent at making regular emulsions with dyes and sensitisers and would like to take the next step. Any assistance would be much appreciated! N.N
www.photrio.com
UV Filtration
I've been struggling for weeks trying to figure out why my fine-grained plates look so washed and lacked saturation. I finally had a breakthrough yesterday - As soon as I shot a test with a UV filter from a Cibrachrome printing kit, the colors absolutely popped. It appears enough UV was leaking through the grains, muddying the colors and reducing saturation. I figured the plates had enough protection from UV, between being shot glass-side first, as well as with a modern lens with a UV coating, but this apparently wasn't the case.
To Do
Now that I have extra plates that I can kind of just play around with, I'd like to start experimenting with using permanganate bleach instead of dichromate. Not just for my European bros out there who want to buy plates from me eventually, but simply for the fact that I'm working with the stuff on a daily basis. I'm incredibly strict about my handling and disposing of the stuff, but working with the stuff almost daily just can't be good for me in the long run. I'll be looking into other bleaches as well and see what works best.
I've finished a script for a proper autochrome video guide - 32 pages of it! And I've started taking footage for it as well. I wouldn't expect it to be out for at least a few months, but I'm hoping to make it a winter project.
Attachments

Graham Freeman
Member
DYES USED IN AUTOCHROMES
I purchased "The Lumière autochrome : history, technology, and preservation" by Bertrand Lavédrine and Jean-Paul Gandolfo. I thought Apug readers might like to see the dyes which are listed as used to manufacture the screens of Autochromes; and, also, the dyes used to sensitize the emulsion and make it panchromatic.
DYES USED TO PRODUCE SCREEN
1908 VERSION--crystal violet; tartrazine; erythrosine J; Patent Blue; solid green 3B (crystallized)
1929 VERSION--Patent Blue; erythrosine L; rose Bengal; crystal violet; solid green 3B; tartrazine
Some literature says that solid green 3B is another name for Food Green 3 (C.I. 42053). If that is true, then all these dyes except for crystal violet and rose Bengal are used for food coloring.
DYES USED TO SENSITIZE EMULSION
Orthochrome T; erythrosine; ethyl violet.
Identification of Solid Green 3B as Setoglaucine (CI 42025)
Summary:Recent research confirms that the dye historically referred to as Solid Green 3B, used in the green-stained starch grains of Lumière Autochrome plates from 1908 onward, corresponds chemically to the modern dye known as Setoglaucine.
Chemical Details:
- Common Names: Solid Green 3B, Setoglaucine O
- Colour Index: CI 42025
- CAS Number: 3521-06-0
- Chemical Class: Triarylmethane derivative (benzoxazine-based)
- Hue: Blue-green to greenish-blue
- Historical Use: Identified as a primary component in the green layer of Autochrome color screen plates alongside Tartrazine (CI 19140) and Patent Blue V (CI 42051).
- Spectroscopic analysis of early Autochrome plates (Casella et al., 2011; Lavédrine & Gandolfo, The Lumière Autochrome, 2009) consistently identifies CI 42025 in green starch grains.
- Cross-referencing historical dye names with modern databases confirms Solid Green 3B ≡ Setoglaucine O ≡ CI 42025 (CAS 3521-06-0), bridging nomenclature gaps between early 20th-century dye trade names and contemporary chemical identifiers.
| Photrio.com contains affiliate links to products. We may receive a commission for purchases made through these links. To read our full affiliate disclosure statement please click Here. |
PHOTRIO PARTNERS EQUALLY FUNDING OUR COMMUNITY:  |