-
Welcome to Photrio!Registration is fast and free. Join today to unlock search, see fewer ads, and access all forum features.Click here to sign up
You are using an out of date browser. It may not display this or other websites correctly.
You should upgrade or use an alternative browser.
You should upgrade or use an alternative browser.
Autochromes...
-
A
- Thread starter htmlguru4242
- Start date


Recent Classifieds
-
For Sale Jobo CPE 2 Plus with Lift, - Tanks, Reels, accessories
- Started by nbagno
-
For Sale Multiple Large Format Lenses for sale
- Started by nbagno
-
For Sale Canon 2X EF Telextender
- Started by davela
-
For Sale Olympus OM 24mm F2.8 Lens Hood
- Started by davela
-
For Sale Original Rolleiflex SL35, SL35M, and Contax G2 Manuals
- Started by davela
Forum statistics
Donald Qualls
Subscriber
Nice! Of course, for autochrome, the emulsion must be panchromatic, so the process would have to be done in total darkness...
VesaL
Member
- Joined
- Jun 8, 2008
- Messages
- 65
- Format
- Medium Format
Yes indeed. I have used kids night vision goggles with success in the darkroom when coating materials.Nice! Of course, for autochrome, the emulsion must be panchromatic, so the process would have to be done in total darkness...
Nice! Of course, for autochrome, the emulsion must be panchromatic, so the process would have to be done in total darkness...
Not necessary, you can make the panchromatic sensitization after coating and after the plate dryed, you simply make water bath with the sensitizing dye.
I the DIY realm, the ortho (Erythrosine) sensitization is done early in the silver nitrate addition itself, in that way it has twice the effect, but the sensitization to red is usually perfromed with a bath after drying.
I guess this would be possible with autochromes as the amount of sensitizing dye is very, very small.
I still need to find a better coating technique... Right now it involves dosing 2.5mL of emulsion onto the plate, spreading it around with my finger
Keep in mind I know nothing about the properties of emulsions, but could it be sprayed onto the plates to obtain an even thickness?
I've painted cars and the modern basecoat paints go on very thin, spec is dry thickness between 0.0005" -0.002". A HVLP spray gun can do it without too much difficulty and those can be bought at places like Harbor Freight/Princess Auto quite cheaply.
Donald Qualls
Subscriber
Commercial coating is done by flowing the liquid emulsion in a thin sheet, onto moving film (or glass, back in the day), with the flow rate, nozzle thickness, distance of fall, and traverse rate of the film base all interactively adjusted to produce the correct coating thickness.
I don't think emulsion would level the way automotive paints do -- instead, the gelatin would (I think) capture thousands of little air pockets from the spraying and wind up with a cloudy, misty looking product.
I don't think emulsion would level the way automotive paints do -- instead, the gelatin would (I think) capture thousands of little air pockets from the spraying and wind up with a cloudy, misty looking product.
ThePhotoChemist
Member
Hey everyone, long time no update. I spent a lot of time banging my head against the wall trying to get a decent coating for the second varnish. I was using Amsterdam Acrylic Gloss diluted in turpentine, but all of the sudden I was no longer able to coat the screen without it forming horrible wrinkles. My guess is that turpentine causes parts of the latex layer to swell substantially, and then it evaporates away, leaving behind the varnish to harden.
I see I haven't written a post since last November... there's a lot of ground to cover, but in a way, there's not (since a lot of the work I did ended up not working out for one reason or another). Regardless of my recommendations in previous posts, do not use "Golden's MSA Varnish" as a Second Varnish, as 100% of the plates I made with it have all desaturated. Amsterdam Acrylic Gloss seems to hold up well, if you can get it coated without getting wrinkles.
I spent the last 3 months experimenting with the original Lumière formula for the Second Varnish, and only recently had success with it. The varnish is dissolved in ethyl acetate, which is very volatile, and tends to cause large and rapid drops in temperature in the plate. This pulls moisture out of the air, often causing a white opalescent fog or mist in the varnish. A small network of wrinkles usually would form, and quite frequently a substantial amount of moisture would soak into the starch and cause the dyes to run.
I was able to get good coatings with the Lumière varnish by using a small silicone heater pad from eBay and sticking it to the bottom of the glass on my leveling table. I set the controller to 35C, which is just warm enough to keep the plate's temperature up, and not so hot as to cause the ethyl acetate to start boiling.


If the test plates work out and I switch over to the Lumière formula, I will make a post detailing how to make the varnish, which is a multi-day long process.
I also found that reducing the thickness of the first varnish helps with compression. The goal is to have just enough latex applied to allow the starch to stick to them, but not so much as to form a "pillow" that absorbs the force from the roller.

The above two plates were pressed back to back with the same amount of pressure. Currently my First Varnish formula is:
100mL Xylene
16g Elmer's Rubber Cement
Coat on a plate as you would a wet plate, rocking around until the whole thing is covered, then tipping a corner back into the bottle to drain the excess. Then set to dry vertically for an hour or so.
I need to try this again! I tried it >1 year ago with miserable results. When I sandwiched the two pieces of glass together, I recall having an issue where tiny bubbles had been squashed out to near dime-like size, so that my emulsion looked like a piece of swiss cheese. I also recall having issues getting the pieces apart -- they did not peel apart easily, and it seemed like the Rain-X didn't do all that much to prevent the wet emulsion from sticking to the top piece. I may have to play with this again soon, and may reach out with some questions.
I have some night vision goggles too, but I've had a miserable time doing any work in the darkroom with them on!
This wasn't an option to me up until very recently -- the reason being, the acrylic based Second Varnishes were incredibly sensitive to ammonia and alcohol, which is necessary for bath panchromatizing with pinacyanol IIRC. However, now that I'm having some success with the Lumière nitrocellulose-based varnish this may be something I can do, as I recall it being much more resistant to such things.
I'm working on making a coating machine primarily for Autochromes if anyone is interested. I detailed the build further in this post here: https://www.photrio.com/forum/threads/making-a-glass-plate-coating-machine.176482/
I see I haven't written a post since last November... there's a lot of ground to cover, but in a way, there's not (since a lot of the work I did ended up not working out for one reason or another). Regardless of my recommendations in previous posts, do not use "Golden's MSA Varnish" as a Second Varnish, as 100% of the plates I made with it have all desaturated. Amsterdam Acrylic Gloss seems to hold up well, if you can get it coated without getting wrinkles.
I spent the last 3 months experimenting with the original Lumière formula for the Second Varnish, and only recently had success with it. The varnish is dissolved in ethyl acetate, which is very volatile, and tends to cause large and rapid drops in temperature in the plate. This pulls moisture out of the air, often causing a white opalescent fog or mist in the varnish. A small network of wrinkles usually would form, and quite frequently a substantial amount of moisture would soak into the starch and cause the dyes to run.
I was able to get good coatings with the Lumière varnish by using a small silicone heater pad from eBay and sticking it to the bottom of the glass on my leveling table. I set the controller to 35C, which is just warm enough to keep the plate's temperature up, and not so hot as to cause the ethyl acetate to start boiling.
If the test plates work out and I switch over to the Lumière formula, I will make a post detailing how to make the varnish, which is a multi-day long process.
I also found that reducing the thickness of the first varnish helps with compression. The goal is to have just enough latex applied to allow the starch to stick to them, but not so much as to form a "pillow" that absorbs the force from the roller.
The above two plates were pressed back to back with the same amount of pressure. Currently my First Varnish formula is:
100mL Xylene
16g Elmer's Rubber Cement
Coat on a plate as you would a wet plate, rocking around until the whole thing is covered, then tipping a corner back into the bottle to drain the excess. Then set to dry vertically for an hour or so.
There is thin Gelatin film coating technique that I have learned from youtube (very old video) but it really works! (Tried it myself)
I need to try this again! I tried it >1 year ago with miserable results. When I sandwiched the two pieces of glass together, I recall having an issue where tiny bubbles had been squashed out to near dime-like size, so that my emulsion looked like a piece of swiss cheese. I also recall having issues getting the pieces apart -- they did not peel apart easily, and it seemed like the Rain-X didn't do all that much to prevent the wet emulsion from sticking to the top piece. I may have to play with this again soon, and may reach out with some questions.
Yes indeed. I have used kids night vision goggles with success in the darkroom when coating materials.
I have some night vision goggles too, but I've had a miserable time doing any work in the darkroom with them on!
Not necessary, you can make the panchromatic sensitization after coating and after the plate dryed, you simply make water bath with the sensitizing dye.
I the DIY realm, the ortho (Erythrosine) sensitization is done early in the silver nitrate addition itself, in that way it has twice the effect, but the sensitization to red is usually perfromed with a bath after drying.
I guess this would be possible with autochromes as the amount of sensitizing dye is very, very small.
This wasn't an option to me up until very recently -- the reason being, the acrylic based Second Varnishes were incredibly sensitive to ammonia and alcohol, which is necessary for bath panchromatizing with pinacyanol IIRC. However, now that I'm having some success with the Lumière nitrocellulose-based varnish this may be something I can do, as I recall it being much more resistant to such things.
I'm working on making a coating machine primarily for Autochromes if anyone is interested. I detailed the build further in this post here: https://www.photrio.com/forum/threads/making-a-glass-plate-coating-machine.176482/
Attachments
-
 79648773_181514393034916_8865374408611898745_n.jpg453.4 KB · Views: 321
 -
 80051101_167997937745666_7973422350463483208_n.jpg208.5 KB · Views: 304
 -
 92952220_785809021943477_4302157756814413311_n.jpg134.5 KB · Views: 328
 -
 94124569_2969666566420165_7861844905449870458_n.jpg202.6 KB · Views: 290
 -
 96676987_271982533851407_8328445633066183810_n.jpg417 KB · Views: 304
 -
 95663365_234262851166773_7711333733741424555_n.jpg135.7 KB · Views: 297
 -
 104166708_589273051722317_4602011475325167699_n.jpg460.5 KB · Views: 303
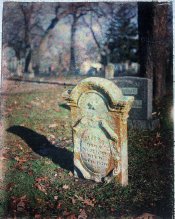
I'm working on making a coating machine primarily for Autochromes if anyone is interested.
I'm quite interested !!!
This wasn't an option to me up until very recently -- the reason being, the acrylic based Second Varnishes were incredibly sensitive to ammonia and alcohol, which is necessary for bath panchromatizing with pinacyanol IIRC.
How do you think, is pinacyanol sensitizing ok for this process? It should give some fall in green sensitivity, so as I thought, it had been used old Ethyl Violet dye instead of it (and later pinachrome violet), even EV gave only orange instead of red.
ThePhotoChemist
Member
How do you think, is pinacyanol sensitizing ok for this process? It should give some fall in green sensitivity, so as I thought, it had been used old Ethyl Violet dye instead of it (and later pinachrome violet), even EV gave only orange instead of red.
Correct, the original sensitizing dyes for the process were Ethyl Violet, Erythrosine and Orthochrome T. I personally have never used this combination, due to the complete unavailability of Orthochrome T. Last I looked it wasn't even available from chemical companies. I would have to synthesize it myself, I think.
Because of that, I've been using erythrosine and pinacyanol instead for color sensitizing.
Orthochrome T.
8 suppliers are listed, 3 in the US, 1 HK, 3 China, no idea if purchasing it is feasible:
http://www.chemcd.com/product/supplyInfo_CCD00045296_all_all_1.html#myTab

We had some nice surprises in recente times, like the cheap CD-3 availability !

Last edited:
Have you tried ordering it at that price?We had some nice surprises in recente times, like the cheap CD-3 availability !
View attachment 250064
Nodda Duma
Member
Correct, the original sensitizing dyes for the process were Ethyl Violet, Erythrosine and Orthochrome T. I personally have never used this combination, due to the complete unavailability of Orthochrome T. Last I looked it wasn't even available from chemical companies. I would have to synthesize it myself, I think.
Because of that, I've been using erythrosine and pinacyanol instead for color sensitizing.
Jon if it helps (and the price isn’t absolutely crazy) I’ll go halvsies on an order of Ortho T with you. Can probably order it on my business license, or see if Bostick & Sullivan or PF could get it for us.
Have you tried ordering it at that price?
No... sorry, I pointed a wrong sample offer not stating clearly the price.
The price you easily obtain CD-3 today is about $10 per Kq, which is an absolute bargain, and you have dozens of offers from $10 to $20: https://www.alibaba.com/trade/searc...Id=&SearchText=cd-3+24567-76-8&viewtype=&tab=
Only pointing that in the last few years cheap CD-3 avaliability has been a nice surprise for me.
In fact this is a trend in the recent times that Pro chem is sourced from China at bargain prices that can be 1/10 of the used western prices or even way cheaper, as always impurities are a concern with chemicals... but for each grade chinese chem is amazingly cheap. I guess a factor is that president Xi Jinping is just a chemist engineer (in our countries we have democracy and freedom, but worse politicians
 ), having promoted excellence in that industry, of course polluting in china was also ultra-cheap until now, this is changing.
Again, have you actually tried ordering it at that price?
I say this because I have, and the prices as listed on alibaba.com are NOT reliable if you're talking about orders close to the MOQ.
Now that's all I'll say about the issue in order to prevent this thread from going off track even further.
I say this because I have, and the prices as listed on alibaba.com are NOT reliable if you're talking about orders close to the MOQ.
Now that's all I'll say about the issue in order to prevent this thread from going off track even further.
Again, have you actually tried ordering it at that price?
A very good friend ordered 1kg of CD-3 after I pointed him that it was available there and he had no problem until I know, previously he had been purchasing it in Russia at ultra high price, I don't remember the exact russian price but it resulted many $ hundreds per kg. He gave me a 100gr sample as I was interested in experimenting with DIY color developers, I have it vacuum sealed and frozen since one year ago.
Anyway a tipycal E-6 formula includes 11gr per 1L (http://opie.net/orphy/photo/dr/wkft-e6.html), so even in the case you pay $40 per 1kg then CD-3 cost per 1L is $0.44, being CD-3 the most critical ingredient...
Cost per developed roll is a total steal: $0.05 CD-3 cost per roll. (soup 100ml / roll)
Presently an Alibaba search returns 31 offers if searching: CD-3 24567-76-8
Obviously for the Min Order you are to obtain the higher price in the range, what it may vary is shipping. On any doubt you can inquire a formal offer and you will know the precise conditions in those 31offers, most will end in total bargain compared to the situation/price we had in the past.
Last edited:
ThePhotoChemist
Member
Jon if it helps (and the price isn’t absolutely crazy) I’ll go halvsies on an order of Ortho T with you. Can probably order it on my business license, or see if Bostick & Sullivan or PF could get it for us.
Sounds good, I will keep you in the loop. I put in an inquiry at BOC sciences on Friday, I've been waiting for them to get back to me.
EDIT
I heard back from BOC, despite being listed they do not stock Orthochrome T. I suspect that the entire list of suppliers also probably do not stock it. They did give me $100 off my next $1000 order, which is nice I guess.
If anyone is interested, here is a synthesis route for both pinacyanol and Orthochrome T. I think it looks fun to do, but getting the materials might be a pain. Maybe someday...
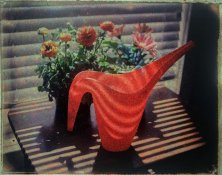
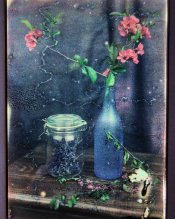
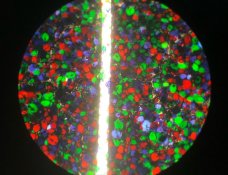
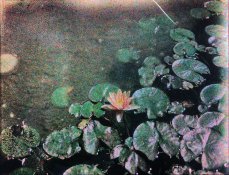
Here are some results of plates using the Lumière Second Varnish formula. After a few days a large crack formed on the lilypad flower plate. The area around the crack (about 1/3 of the plate) has small little imperfections that seem to indicate that the second varnish layer was thinner... My guess is that the gelatin, after processing, puts stress on the layer, and the thinner area is thin enough that it snaps/cracks. Interestingly, it looks like the starch gets pulled with it.
When the Second Varnish is too thick, it tends to cause "parallax desaturation" - where the colors are only viewable when looking at the plate straight on. However, even the coatings I thought were thicker aren't really exhibiting this to a significant degree, so I think I can start applying the varnish thicker. Hopefully that helps avoid more cracking. Failing that, I might start soaking these in a 5% glycerin solution, hopefully to swell them a bit and reduce any tension the gelatin might be applying to the screen plate.
Attachments
Last edited:
Donald Qualls
Subscriber
Shellac uses alcohol for its solvent.
Yes, that was the whole point. If the lacquer based varnish was sensitive to alcohol in the emulsion, then using a coating that is soluble in alcohol eliminates any reaction between alcohol in the emulsion and alcohol in the coating.Shellac uses alcohol for its solvent.
Donald Qualls
Subscriber
Ah. The longer version was much clearer.
ThePhotoChemist
Member
We've hit on shellac a few times in this thread before.
I report results in this post from 2015. It's too long ago for me to remember now, but it looks like it lifted off the plate, indicating it doesn't adhere to the glass very well.
The alcohol makes the dyes in the starch particles bleed. On a whim I tried UVP's ultra-pale shellac a few months ago, and the plate was a total mess. The whole plate was green afterwards.
Lastly, the Liquid Light instructions name shellac as a material that the emulsion will have a poor adhesion to. I've tested it here and there over the years, but I don't think it's worth pursuing too much farther. It might make a good protective top-coat, but probably not a good replacement for the Second Varnish.
I had missed the shellac results in this massive thread.
Could you briefly summarize what the second varnish needs to do? And does it have to be applied in the dark, or can it be applied in daylight? I wasn't sure if it was to seal the starch to the glass and the emulsion is then coated onto the varnish, or if the varnish coats the emulsion and needs to be permeable to the processing chemistry.
Could you briefly summarize what the second varnish needs to do? And does it have to be applied in the dark, or can it be applied in daylight? I wasn't sure if it was to seal the starch to the glass and the emulsion is then coated onto the varnish, or if the varnish coats the emulsion and needs to be permeable to the processing chemistry.
ThePhotoChemist
Member
No worries, this thread is an absolute monster at this point!
The goal of the Second Varnish layer is to seal in the starch and protect it from getting into contact with the emulsion and processing chemistry. There are a few requirements it must meet:
1. The varnish cannot be based in a solvent that will make the dyes run and bleed (this usually eliminates anything water or alcohol based)
2. The varnish must be able to form an extremely thin layer. If the layer is too thick the gelatin won't be able to cover up the correct starch grains, limiting the viewing angle.
3. The gelatin must be able to grip on to it and not lift during processing
All the work on the completed "screen-plate" (glass, first varnish, starch, and second varnish) can be done in the light. It's only when the emulsion is applied on top of the Second Varnish layer that the plate is sensitive to light.
The best alternative to the Lumière formula I was able to find was an acrylic varnish made by "Amsterdam", diluted 1:1 with turpentine. This allowed the screens to be reused many times before it started to leak. However, I had problems with the turpentine swelling the latex in the First Varnish, causing large cracks and wrinkles. "Golden MSA Varnish" seemed to be fairly effective too, however long term the gelatin does not stay anchored to it, and shrinks over the coarse of months even if its sealed under another coat of varnish. I'm slowly losing color in a few plates I've made over the months because of this choice.
With the gentle heat being applied as I outlined in a previous post, the Lumière formula (nitrocellulose and damar gum dissolved in ethyl acetate) seems to be extremely effective, and I have made about 35 screens with it so far with no major defects.
Seems like you have hit upon an effective varnish. My thought was automotive clearcoat, it would satisfy points 1 and 2. I have no idea about 3, but I'm guessing if gelatin can adhere to traditional film base it should be able to adhere to clearcoat. Clear will also not yellow over time.
If you spray the plates then you can get a very thin layer. Clear is designed to be sprayed, so it lays down smoothly without air bubbles.
For small jobs I have used Cromax ( foremerly Du Pont) Snap Dry Clearcoat 7776. I like it because it dries dust free in 8-10 min and is fully cured in 2 hours. For an autobody application the dry film thickness is specified as 0.0018-0.0022", but that's 2 coats. Of course you can apply a thinner layer.
Webpage: http://products.axaltacs.com/dcat/us/en/dr/product/HC-7776S.html?desktop=true
Technical data sheet: https://www.axalta.com/content/dam/NA/HQ/Public/Cromax/Documents/TDS/CX-TDS-HC-7776S-Eng.pdf
This is a 2 part catalyised cure, so will be more impervious to processing chemistry then some of the other single part coatings I think. It's a very different product from anything you'll find in a rattle can.
| Photrio.com contains affiliate links to products. We may receive a commission for purchases made through these links. To read our full affiliate disclosure statement please click Here. |
PHOTRIO PARTNERS EQUALLY FUNDING OUR COMMUNITY:  |