Autochromes...

Peaceful

D
Peaceful

  • 1
  • 8
  • 59
Cycling with wife #2

D
Cycling with wife #2

  • 0
  • 0
  • 39
Time's up!

D
Time's up!

  • 0
  • 0
  • 43
Green room

A
Green room

  • 4
  • 2
  • 92
On The Mound

A
On The Mound

  • 6
  • 0
  • 94

Recent Classifieds

Forum statistics

Threads
198,238
Messages
2,771,509
Members
99,579
Latest member
Estherson
Recent bookmarks
0

Photo Engineer

Subscriber
Joined
Apr 19, 2005
Messages
29,018
Location
Rochester, NY
Format
Multi Format
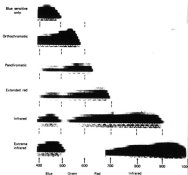
Denise, I have no "pan" dye to recommend OTOMH, but they do exist and there are examples in my book. Here are some examples. Unfortunately, I don't have the structures and I would guess that even if I did they would not be easily obtained.

As for your results, you may just be lucky or you may be sensitizing two different grain types if you have an odd frequency distribution of grain sizes or types. There are exceptions and reasons for these exceptions in every facet of emulsion making.

PE
 

Attachments

  • dye types.jpg
    dye types.jpg
    36 KB · Views: 171

Nodda Duma

Member
Joined
Jan 22, 2013
Messages
2,685
Location
Batesville, Arkansas
Format
Multi Format
Wouldn’t erythrosin added before precip be “compatible” with a dye added during chemical ripening?
 

dwross

Member
Joined
Feb 13, 2004
Messages
1,260
Location
Oregon Coast
Format
Multi Format
Jason, I can only vouch for erythrosin and pinacyanol chloride. They are by far the ones most mentioned in the literature of traditional emulsions, they are available and relatively inexpensive, and they deliver excellent pan film, so I've never tried other sensitizers.
In my experience, they can be added as you mention, and/or with erythrosin as a final, and PinCl used as a post-coating and drying sanitizing bath.
 

Photo Engineer

Subscriber
Joined
Apr 19, 2005
Messages
29,018
Location
Rochester, NY
Format
Multi Format
Erythrosine was generally added during or before PPTN. It was not added in the later prep. It is not a "classic" dye. So, there are exceptions as I noted above.

I worked in color where we used 3 or more dyes for films and papers. There is no mixing of emulsions (R+G) for example, but B&W uses one dye per emulsion.

PE
 
Joined
Aug 7, 2014
Messages
181
Location
Grand Rapids, MI
Format
Large Format
FWIW the original autochrome sensitizing solution was all added at the end. It was a mix of erythrosine, ethyl violet and orthochrome T (which has disappeared off the face of the planet). When I make Lippmann plates, I've always added erythrosine after precipitation, and those always had pretty good green response. When I mess around with these emulsions, I add the erythrosine before precipitation. I'm going to stick with just one layer of emulsion for now, since I know it works.
 
Joined
Aug 7, 2014
Messages
181
Location
Grand Rapids, MI
Format
Large Format
Hey everyone,

I put a new roller wheel back on, so we're back to two points of contact. I removed the two springs on the z axis of the router, which normally provide some force to help lift the axis back up. Between this and the new wheel, we're getting what I would haphazardly call "almost optimal" crushing.

I tried a plate where one side had the typical graphite / talc treatment, and another half that was just dusted with the starch. I think with these large grain sizes, the graphite and talc are somewhat redundant since there's nearly no unfilled interstitial spaces post-crushing. Post-2nd varnishing, the grains tend to move a bit, opening up some small spaces (this can be seen in both cases).

It looks like, for now, I'll stick to no graphite / talc, since it seems to increase the transmitted light a good deal.
 

Attachments

  • StarchComparison_s.jpg
    StarchComparison_s.jpg
    1.1 MB · Views: 302
  • IMG_2779.JPG
    IMG_2779.JPG
    672.2 KB · Views: 266

Nodda Duma

Member
Joined
Jan 22, 2013
Messages
2,685
Location
Batesville, Arkansas
Format
Multi Format
Regarding your second varnish layer: I just had to solve the problem of coating black anodize aluminum with emulsion for tintypes. I didn't trust the emulsion would stick well to the aluminum plates through developing. So what I did was cleaned and then dipped the aluminum plates in polyurethane thinned at least 1:1 with mineral spirits. After dipping I set the plates vertically in a dry plate rack to allow the excess to drain off and the varnish layer to set. This made a very smooth, thin uniform varnish layer which my hardened emulsion sticks very well to even through development. The bottom corner where the polyurethane forms a droplet had some build-up, but it wasn't enough to cause me to be concerned. The thinned polyurethane was also very clear.

I'm wondering if that might work for solving your second varnish layer issues. Plus, being that it is dipped and not brushed on, it would completely seal the starch layer.
 
Joined
Aug 7, 2014
Messages
181
Location
Grand Rapids, MI
Format
Large Format
Regarding your second varnish layer: I just had to solve the problem of coating black anodize aluminum with emulsion for tintypes. I didn't trust the emulsion would stick well to the aluminum plates through developing. So what I did was cleaned and then dipped the aluminum plates in polyurethane thinned at least 1:1 with mineral spirits. After dipping I set the plates vertically in a dry plate rack to allow the excess to drain off and the varnish layer to set. This made a very smooth, thin uniform varnish layer which my hardened emulsion sticks very well to even through development. The bottom corner where the polyurethane forms a droplet had some build-up, but it wasn't enough to cause me to be concerned. The thinned polyurethane was also very clear.

I'm wondering if that might work for solving your second varnish layer issues. Plus, being that it is dipped and not brushed on, it would completely seal the starch layer.

As long as the gelatin sticks to it, and it dries sufficiently thin, I think it'll work! I've got some free time today, and a few smashed and unvarnished plates... I'll try and give it a go!
 

Nodda Duma

Member
Joined
Jan 22, 2013
Messages
2,685
Location
Batesville, Arkansas
Format
Multi Format
cool. I used Minwax high gloss clear polyurethane ... just the regular stuff you can get at Home Depot or Lowe's.

I had tried shellac just prior, but it is too gritty.
 

Photo Engineer

Subscriber
Joined
Apr 19, 2005
Messages
29,018
Location
Rochester, NY
Format
Multi Format
Gritty shellac indicates improper solution of the solid shellac material. Both Varnish and Shellac should be smooth non-gritty materials.

PE
 
Joined
Aug 7, 2014
Messages
181
Location
Grand Rapids, MI
Format
Large Format
The polyurethane coating SEEMS to have worked... I had to play around with a few coating techniques before finding a way that worked well. I ended up using undiluted polyurethane, since the diluted stuff (with mineral spirits) tended to dry a bit unevenly and tended to leak around the edges. I coat it rather like one would coat collodion on a wet plate... pour a bit on, allow it to flow across the plate by gentle tipping, and drain off a corner until the varnish starts to drip. I then set it on an even surface (leveled with a bubble level) to dry for a few hours. It hardens up over a day or so. The colors don't run, and it's a lot less hassle than the damar/nitrocellulose stuff, which had very demanding temperature requirements while it dried.

I was worried that the gelatin would lift during bleaching, but this didn't see any sign of this at all. So from here on out, unless I see signs of degradation or other bad properties, I'll be sticking to using the polyurethane!

As it so happens, the polyurethane screen also happened to have the best results from my exposure tests today! The plate is still drying (it's quite humid currently), so I'll leave you all with a little preview of how it turned out. Unfortunately, I have a terrible migraine at the moment, so I'll update with some thoughts on emulsion / development in a day or two.
 

Nodda Duma

Member
Joined
Jan 22, 2013
Messages
2,685
Location
Batesville, Arkansas
Format
Multi Format
Awesome!

Regular polyurethane will yellow with age, so going forward it’d be a good idea to source some non-yellowing polyurethane. I just tried polycrylic tonight but will have to wait until morning to see how uniform it coated.
 

Wayne

Member
Joined
Jul 8, 2005
Messages
3,583
Location
USA
Format
Large Format
Super! That looks great! For some reason that palette really floats my boat.
 
Joined
Aug 7, 2014
Messages
181
Location
Grand Rapids, MI
Format
Large Format
Super! That looks great! For some reason that palette really floats my boat.

Thanks!

Awesome!

Regular polyurethane will yellow with age, so going forward it’d be a good idea to source some non-yellowing polyurethane. I just tried polycrylic tonight but will have to wait until morning to see how uniform it coated.

I made a few more with the polyurethane coating, but I agree - it might be best to look for another varnish. Standard hardware store polycrylic won't work here, since water based = immediate bleeding of the dyes. I found some oil-based acrylic driveway sealer though, which may work. I'm open to suggestions if anyone knows of a good oil or solvent based clear finish.

Unfortunately the plate from my little "preview" didn't make it -- overnight I had noticed it yellowed a bit (definitely the emulsion, not the polyurethane). Fearing that I had left some trace of developer in the emulsion, I wcolashed the plate for about 30 minutes before allowing it to air dry. This caused the gelatin to shift slightly, and most of the color was lost. I ended up trying to scrub the emulsion off (it's always considerably harder to remove the gelatin after it has dried out post processing), but it was really stuck on there! I ended up scrubbing a bit too hard, and one side of the second varnish lifted, allowing water to seep in and ruin the starch! I can't say either of these problems necessarily related to the polyurethane coating, but it's something to keep in mind moving forward...
 

Nodda Duma

Member
Joined
Jan 22, 2013
Messages
2,685
Location
Batesville, Arkansas
Format
Multi Format
Instead of scrubbing, let the emulsion soak in bleach water. It will dissolve away without harming the varnish layer.
 
  • nmp
  • Deleted

glbeas

Member
Joined
Sep 25, 2002
Messages
3,918
Location
Marietta, Ga. USA
Format
Multi Format
Im hesitant to mention this because of the difficulty handling it but thin superglue might do the job without yellowing.
 
Joined
Aug 7, 2014
Messages
181
Location
Grand Rapids, MI
Format
Large Format
Im hesitant to mention this because of the difficulty handling it but thin superglue might do the job without yellowing.

Interesting thought! You're thinking something along the lines of Krazy Glue, right? Going back to my lego days, I thought that stuff dried pretty cloudy, but I'd be worth to experiment a bit.


Very nice. Sad to hear about what hapenned afterwards. I’m following you in IG now.

Don't forget to subscribe to my Youtube, so that you can stay current on the 1 photography video I put out every 2 years (in between with weekly "gnome" videos!)

For those of you interested, I had a slow day at work yesterday and today, so I compiled some thoughts on my progress since January. It's got updated methods for making the screens, updated varnish formulas, and some thoughts on emulsion and development. I hope you all might find it helpful/enjoyable!
 

J 3

Member
Joined
Feb 1, 2016
Messages
147
Format
Medium Format
I must say once again I am in awe of this effort. Please keep up the really great work, and share your progress. It's heartwarming seeing such a important process being brought back to life. Hat's off to you
 

J 3

Member
Joined
Feb 1, 2016
Messages
147
Format
Medium Format
For those of you interested, I had a slow day at work yesterday and today, so I compiled some thoughts on my progress since January. It's got updated methods for making the screens, updated varnish formulas, and some thoughts on emulsion and development. I hope you all might find it helpful/enjoyable!

I was just wondering. I read that there are about 4 million starch grains per square cm in historical autochrome. That comes out to about 200 per linear mm depending on the packing.

Do/did you have to go to any particular trouble to make a fine grained emulsion? If the emulsion we're too course many silver halide grains would span more than one filter grains and the result would be much reduced color purity.
 

Photo Engineer

Subscriber
Joined
Apr 19, 2005
Messages
29,018
Location
Rochester, NY
Format
Multi Format
This is a very good point J3. It is discussed by many about Autochromes. Friedman has a formula for this very problem.

PE
 

J 3

Member
Joined
Feb 1, 2016
Messages
147
Format
Medium Format
...It is discussed by many about Autochromes. Friedman has a formula for this very problem.
PE
Also of potential interest is this video about autochrome work of Heinrich Kuehn. What is interesting is a brief snippet starting at 3:19ish where it's mentioned and shown that Kuehn photographed labeled paint pigments to help understand how autochrome would effect colors (shown in reverse then in positive. Maybe omitting the reversal step on first?). Several pigments are easy to discern even though the German (ultra marine, cadmium yellow, etc...) -
 
Photrio.com contains affiliate links to products. We may receive a commission for purchases made through these links.
To read our full affiliate disclosure statement please click Here.

PHOTRIO PARTNERS EQUALLY FUNDING OUR COMMUNITY:


Ilford ADOX Freestyle Photographic Stearman Press Weldon Color Lab Blue Moon Camera & Machine
Top Bottom