Autochromes...

Flowering Chives

H
Flowering Chives

  • 2
  • 0
  • 21
Hiroshima Tower

D
Hiroshima Tower

  • 3
  • 0
  • 26
IMG_7114w.jpg

D
IMG_7114w.jpg

  • 2
  • 0
  • 66
Cycling with wife #1

D
Cycling with wife #1

  • 0
  • 0
  • 62
Papilio glaucus

D
Papilio glaucus

  • 2
  • 0
  • 53

Recent Classifieds

Forum statistics

Threads
198,193
Messages
2,770,862
Members
99,574
Latest member
Model71
Recent bookmarks
0
Joined
Aug 7, 2014
Messages
181
Location
Grand Rapids, MI
Format
Large Format
Add humectants at the rate of 1 ml or less to each 100 ml of emulsion. You can experiment. You know you have too much when the coating gets tacky.

As for the rod device, AFAIK, no one has gotten things working right with it even having all of the instructions from the Lumiere brothers.

Yes, an alcoholic mixture can hurt things. You must control concentration.

PE

Thanks PE, I'll give that a try.


We're in the very dry part of the year. Perhaps low RH is causing the plates to dry too fast.

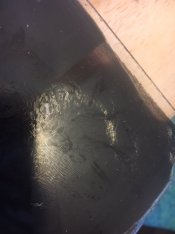
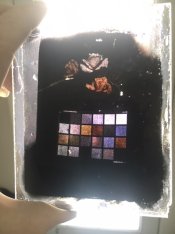
I must admit I was skeptical at first, since this seemed like an issue only with my new batch of screens/emulsion. However, I pulled out one of the plates from my first batch... It had cracked too! Since this seems to be affecting all my plates simultaneously, I'd have to conclude that you're right about dryness being the culprit. And again, there is no starch in the cracks, it seems to be getting 'dragged' with it... Perhaps the second varnish isn't quite as solid as I thought.

In the short term, I'm going to make new emulsion with some humectant and no alcohol and monitor for similar deterioration.

For a slightly longer term, I'm going to start troubleshooting a second varnish that is more in line with the Lumières' original formula. It could be something in the nitrocellulose lacquer throwing things off, possibly just the presence of amyl acetate in the varnish coating even after sitting for weeks. Adding pure nitrocellulose to the ethyl acetate at the rate called for in the original recipe seemed to give the varnish a thick, jell-o like consistency which seemed unsuitable for coating the screens. I'll start with a much smaller quantity of nitrocellulose and see how that does...
 

Attachments

  • deterioration.jpg
    deterioration.jpg
    122.4 KB · Views: 230

Nodda Duma

Member
Joined
Jan 22, 2013
Messages
2,685
Location
Batesville, Arkansas
Format
Multi Format
Searching for info on dye sensitization, I ran across this statement in Photographic Work journal, Volume 1 Issue 7, page 81, dated June 17, 1892:

IMG_1449.jpg


Link:

https://books.google.com/books?id=zrw6wQDwnZcC&pg=PA81&lpg=PA81#v=onepage&q&f=false

So did the Lumiere brothers carry that forward for Autochromes and put down two emulsion layers, one orthochromatic and the other sensitive to red, or had they converted to a panchromatic emulsion for Autochromes, and what would be the implications for Autochromes?
 
Joined
Aug 7, 2014
Messages
181
Location
Grand Rapids, MI
Format
Large Format
Searching for info on dye sensitization, I ran across this statement in Photographic Work journal, Volume 1 Issue 7, page 81, dated June 17, 1892:

View attachment 192950

Link:

https://books.google.com/books?id=zrw6wQDwnZcC&pg=PA81&lpg=PA81#v=onepage&q&f=false

So did the Lumiere brothers carry that forward for Autochromes and put down two emulsion layers, one orthochromatic and the other sensitive to red, or had they converted to a panchromatic emulsion for Autochromes, and what would be the implications for Autochromes?

To my understanding, the autochrome emulsions (at least early on) were just a single layer of panchromatic emulsion. Here's a link to their lab notes concerning spectral sensitization.

This was a busy week for me, but I'm finally getting around to making the emulsion with glycerin. It's digesting now. I also re-heated some spare screens while I was just messing around, and found that I was able to remove some residual amyl acetate in the second varnish which could have been preventing the layer from solidifying properly. I guess we'll find out if this was effective in a little bit...
 
Joined
Aug 7, 2014
Messages
181
Location
Grand Rapids, MI
Format
Large Format
Hi all,

I think the problems with cracking may be behind us now. Between adding glycerin (2mL / 100mL emulsion) and heating the screens, I haven't noticed any more 'drifting'. I'll keep an eye on them though - the snow has been melting here recently so no doubt my house is a great deal less dry than before. The raven/skull picture's condition continued to worsen, developing areas full of small bumps (much like a lenticular print)(see attached). Fearing its complete destruction, I mounted it behind some glass and taped the edges, like one would seal a daguerreotype. So far I haven't noticed additional degradation.

What I find interesting (though not surprising) is when the gelatin is washed off, the bumps remain in the second varnish!

When I make new screens, I heat them on a hot plate (set on 'Low') for a few minutes. The second varnish gets a bit sticky. It is heated until there is no lingering smell of amyl acetate (smells a bit like bananna flavoring). Post heating, the varnish seems to be much more solid. Before I started doing this, the second varnish often was soft enough that one's thumbprint could be imprinted on it, and they could not be stacked due to them sticking together.

Here is the problem I'm running into now: I've been having problems reproducing my coating technique, now with coatings either being too thick (resulting in a dark positive) or too thin (light positive). 2mL emulsion per 4x5 seems to be just a bit too much. I'm unable to dispense 1mL because the quantity of liquid is too small and starts to gel up too quickly (even when the screens have been heated!). My question is this: how would the emulsion be affected if I were to double or triple the gelatin content (adding swollen gelatin). My hope would be that this would allow me to add more emulsion volume while still keeping the amount of AgX the same or lower.

My other thought is this: Jeff Blythe's method of coating holograms involves sandwiching the emulsion between two pieces of glass - one treated with RainX and the other not - meaning that when they are separated the gelatin detaches from the RainX treated glass and sticks to the untreated piece in a fairly even manner. Tape lining the edges controls the spacing between the pieces of glass. This didn't seem to work for me, as the majority of the emulsion seemed to prefer to stick to the RainX glass instead of the second varnish. However, in previous posts we found that the emulsion absolutely WOULD NOT stick to coatings made with pure nitrocellulose lacquer. I think this method should be revisited, with a piece of glass coated with nitrocellulose lacquer instead of of the RainX.
 

Attachments

  • IMG_2325.JPG
    IMG_2325.JPG
    147.9 KB · Views: 207

Photo Engineer

Subscriber
Joined
Apr 19, 2005
Messages
29,018
Location
Rochester, NY
Format
Multi Format
IIRC, Amyl Acetate is one of the ingredients in banana flavoring. It is flammable, so be careful.

You can soak deteriorating plates in dilute glycerine solution and either stop or partially reverse the problem.

I'm sure a method using doctor blades would help your problem with coating thickness, but in the mean time, diluting with gelatin should work.

PE
 
Joined
Aug 7, 2014
Messages
181
Location
Grand Rapids, MI
Format
Large Format
Hey all,

Just checking in. Not too many successes to show off, but I think I'm on the right track now. I've found that diluting the emulsion 1:2 with distilled water before coating thins the emulsion significantly, but still allows the gelatin to gel up eventually. A plate can be meticulously leveled with a bubble level before applying 6mL of emulsion. The emulsion is rocked around on the plate to spread evenly, before being allowed to sit for a few minutes to gel up. Out of all the coating techniques I've tried in the last month, this has gotten me the best results, though still not quite perfect. I'm starting to suspect my bubble level may be a bit off, so I've ordered a nicer one. I'm going to try to cannibalize my old 3d printer's heated bed, which as thumbscrews to allow for precise adjustments to the bed's level.

Gentle heat to the screens to remove remaining amyl acetate seemed to have stopped most of the degradation, though unprotected plates left out are still apt to develop a small crack here and there. Mounting to a piece of glass with the edges taped up seems to prevent degradation.

I finally ran out of the first varnish I made this summer and mixed some more, only to find out that it's not clear or tacky! So in the meantime, I can't make any more screens until I sort that out. On the plus side, I've had exactly one 'keeper' in the last month or so, so I probably won't be running out any time soon...

P.S. I know, I know, I'll add more erythrosine to the emulsion before my next coating...
 

Attachments

  • IMG_9134s.jpg
    IMG_9134s.jpg
    254.2 KB · Views: 266

Photo Engineer

Subscriber
Joined
Apr 19, 2005
Messages
29,018
Location
Rochester, NY
Format
Multi Format
Just FYI, all sensitizing dyes are also desensitizers if you go up in concentration. There is always an optimum with lower sensitivity at both lower and higher concentration. Also, blue sensitivity goes down as you add sensitizing dye.

PE
 
Joined
Aug 7, 2014
Messages
181
Location
Grand Rapids, MI
Format
Large Format
Just FYI, all sensitizing dyes are also desensitizers if you go up in concentration. There is always an optimum with lower sensitivity at both lower and higher concentration. Also, blue sensitivity goes down as you add sensitizing dye.

PE

Thanks PE! I figured it worked something like that. I figured it would be easy to start low with the dye and slowly work my way up. Things look a bit blue still, so I imagine I could add a bit more.

As it turns out, my original bubble level was off! I poured three new plates last night with the new bubble level, all three had perfectly even coatings. So it looks like it'll be smooth sailing from here, hopefully!

edit:

Oh yeah, I should say I added an additional 1mL of 1:1000 erythrosine (in alcohol) to the emulsion for the boost in green sensitivity. This brings the total here to 2.5mL 1:1000 erythrosine, 1mL 1:1000 pinacyanol.
 

Attachments

  • IMG_9137s.jpg
    IMG_9137s.jpg
    354.8 KB · Views: 305
Joined
Aug 7, 2014
Messages
181
Location
Grand Rapids, MI
Format
Large Format
When and if you perfect your process to your satisfaction, will you be publishing a guide to the details of it? I'm very interested in attempting this myself sometime.

Absolutely! You can dig up a good amount of information from my blog posts, but the information is a bit scatterbrained. I'm going to start compiling it all into a more comprehensive guide pretty soon.

You need a MacBeth chart to gauge standard colors. Greens and blues are kinda lacking.

PE

I'll go ahead and pick one up. I think I'm a few years overdue for having one at this point, anyway...
 

Nodda Duma

Member
Joined
Jan 22, 2013
Messages
2,685
Location
Batesville, Arkansas
Format
Multi Format
PhotoChemist,

I love the progress you're making.

In Wall's 1929 Book "Photographic Emulsions", for making matte-surfaced emulsions (a specialized use of which he briefly mentions), he recommended use of starch grains in the emulsion. Perhaps of interest to you, he recommended "rice starch as being the finest-grained". Importantly, the rice starch should act very similar to potato starch but at a smaller granularity. Ideally, the smaller grains would mean a thinner colored grain layer and faster speed? Something to file away for future reference once you have the process down and feel like tinkering.

-Jason
 
Joined
Aug 7, 2014
Messages
181
Location
Grand Rapids, MI
Format
Large Format
PhotoChemist,

I love the progress you're making.

In Wall's 1929 Book "Photographic Emulsions", for making matte-surfaced emulsions (a specialized use of which he briefly mentions), he recommended use of starch grains in the emulsion. Perhaps of interest to you, he recommended "rice starch as being the finest-grained". Importantly, the rice starch should act very similar to potato starch but at a smaller granularity. Ideally, the smaller grains would mean a thinner colored grain layer and faster speed? Something to file away for future reference once you have the process down and feel like tinkering.

-Jason

Thanks for that! I'll have to check out that source. In the autochrome book they mentioned that the Lumières tried rice grains, but had issues getting the dye to take properly. I would be really interesting to play around with, though!

Here's a shot with the MacBeth chart, as requested! (sorry it's a bit jpeg-y, I used my phone camera for this one). I added 0.5mL erythrosine / 0.25mL pinacyanol to the emulsion. That brings dye additions to a total of 3mL / 1.25mL. I think I'm ready for some outdoors shots!

Curiously, I made a second exposure immediately after this test one. While the test shot came out with fantastic color saturation, the second shot (just the flowers and pastels again) was almost entirely colorless! Ah, well, baby steps as always...
 

Attachments

  • IMG_2398s.jpg
    IMG_2398s.jpg
    506 KB · Views: 296

Lee Rust

Member
Joined
Feb 7, 2010
Messages
513
Location
Rochester NY
Format
Multi Format
You've made so much progress in the past few months! I've always wondered why the Autochrome process has been so rarely revisited, and you've certainly shown why. It's a lot of work!
 

Wayne

Member
Joined
Jul 8, 2005
Messages
3,583
Location
USA
Format
Large Format
Thanks PE! I figured it worked something like that. I figured it would be easy to start low with the dye and slowly work my way up. Things look a bit blue still, so I imagine I could add a bit more.

As it turns out, my original bubble level was off! I poured three new plates last night with the new bubble level, all three had perfectly even coatings. So it looks like it'll be smooth sailing from here, hopefully!

edit:

Oh yeah, I should say I added an additional 1mL of 1:1000 erythrosine (in alcohol) to the emulsion for the boost in green sensitivity. This brings the total here to 2.5mL 1:1000 erythrosine, 1mL 1:1000 pinacyanol.

Fabulous looking
 

Keo

Member
Joined
Apr 21, 2017
Messages
16
Location
Texas
Format
Medium Format
Thanks for that! I'll have to check out that source. In the autochrome book they mentioned that the Lumières tried rice grains, but had issues getting the dye to take properly. I would be really interesting to play around with, though!

Here's a shot with the MacBeth chart, as requested! (sorry it's a bit jpeg-y, I used my phone camera for this one). I added 0.5mL erythrosine / 0.25mL pinacyanol to the emulsion. That brings dye additions to a total of 3mL / 1.25mL. I think I'm ready for some outdoors shots!

Curiously, I made a second exposure immediately after this test one. While the test shot came out with fantastic color saturation, the second shot (just the flowers and pastels again) was almost entirely colorless! Ah, well, baby steps as always...

I saw Autochrome and had a hunch it was you. Gonna go ahead and follow this here thread haha. Nice work as always dude!
 

Punker

Member
Joined
Mar 4, 2015
Messages
153
Location
Los Angeles,
Format
Multi Format
Phenomenal! I hope you decide to document your work in a blog post at some point for posterity and to help keep the process alive.
 
Joined
Aug 7, 2014
Messages
181
Location
Grand Rapids, MI
Format
Large Format
Hey everyone,

Just checking in. I've been working on these when I can, but life keeps getting in the way!

I've made some changes to the two varnishes that seem to allow them to perform a little better. Removing the damar resin component from the first varnish (now it's just rubber cement diluted with xylene) seems to provide a layer that is much more consistently sticky than with any amount of the damar resin.

I've had issues with the damar precipitating out of the second varnish during drying when it's cold out (or sometimes even when it's quite warm). The cloudiness seems to change the nature of the starch, and causes it to become bright violet. I've made some improvements that I'll share in a little bit, that avoids the cloudiness and lessens the wrinkles/cracks.

With the warmer weather, I've started trying to get the emulsion's color balance dialed in for the sunny outdoors. No luck so far, even after using a ton of dye, it looks like the response to blue is too strong. Emulsion for these looked 'hot pink' in the light. The speed didn't seem to be reduced as I added more, but I was concerned that the emulsion itself would start to take on a violet color after processing, and would throw off the color balance of the plate.

I'm making a new batch now, and started adding the erythrosine in before precipitation for (hopefully) a bit better response to green. Looking to get some screens coated tonight, and ready to shoot tomorrow!

EDIT:

I just remembered I forgot to add the potassium iodide to this batch. That'll result in an overall lower contrast, right?
 

Attachments

  • IMG_2458.JPG
    IMG_2458.JPG
    169.7 KB · Views: 200
  • IMG_2459.JPG
    IMG_2459.JPG
    142.6 KB · Views: 204
  • IMG_2481.JPG
    IMG_2481.JPG
    193.7 KB · Views: 191
Last edited:

Nodda Duma

Member
Joined
Jan 22, 2013
Messages
2,685
Location
Batesville, Arkansas
Format
Multi Format
Since you are adjusting your erythrosin...as you use more erythrosin it will also begin reduce the blue sensitivity, so you can use the amount added to adjust the color balance.
 
Photrio.com contains affiliate links to products. We may receive a commission for purchases made through these links.
To read our full affiliate disclosure statement please click Here.

PHOTRIO PARTNERS EQUALLY FUNDING OUR COMMUNITY:


Ilford ADOX Freestyle Photographic Stearman Press Weldon Color Lab Blue Moon Camera & Machine
Top Bottom