@Niglyn, I just recorded it with my Leica SL2 in 180fps. Same thing. Approx the same number of frames for 1/30 and 1/500. Still not sure how this is possible. I remember I shot 1/250 at f8-f11 yesterday, and the photos turned out ok. It might be that, if the shutter is broken, they would turn the same with 1/30 and 1/500s. I didn't test it, but I might try. I'm curious now.
Here's the video (1/30s starts at 1:25min, and then I shot 1/60, /125, 1/250 and 1/500.
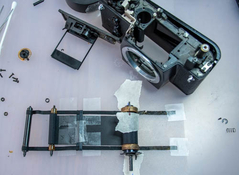
Btw, out of curiosity, I opened the camera again to see if there's something stuck that prevents needle from moving further. There was nothing particularly, but I rearranged the cables, shaked and knocked the meter few times, and now the needle goes more than before. I will test the accuracy, but this looks more correct than previously where the needle wouldn't go further than 1/3 of the whole range.
I haven't developed or scanned photos yet, but I develop b&w film myself.
Ah, I think I see the confusion.
'Shutter Speed' is a misnomer. The shutter always moves at the same speed. The shutter is in fact made up of two curtains, front and back.
Based on a Zenit and viewed from the back, both curtains start on the right-hand side, when the shutter is cocked.
When the shutter is pressed with a setting of 1/30s, the first curtain shoots across the frame opening (called the gate) and exposes the whole frame to light.This is the sync speed. Should a flash be used, it would fire and illuminate the whole frame.
Now, once the first curtain has travelled all the way from right to left and the frame exposed, the second curtain now travels from right to left, to cover the gate, which of course stops light getting to the film negative.
Now, if we double the 'speed' to 1/60s. When the shutter is pressed, the first curtain begins its journey from right to left, to uncover the gate & expose the film, but now, the second curtain is released and starts to move across the gate when the first curtain has travelled only half-way across the gate.
So, at speeds above sync speed, the whole frame is never completely exposed at the same time, only a section of it, as the two shutter curtains move across the gate, forming a slot for the light to pass through. Should a flash be used at higher than sync speed, only a portion of the film would be exposed to the flash.
Moving to 1/125s, the second curtain begins to close when the first curtain has opened only 1/4 of the way.
1/250, the second curtain now starts to close when the first curtain has opened 1/8 of the way. Ans so forth.
The important fact here is that the shutter curtains ALWAYS move at the same speed, regardless of 'shutter speed'. Exposure is controlled by when the second curtain starts to close, in relation to the first curtain opening.
Both the first curtain (which opens to start the exposure) and second curtain (which follows the first to end the exposure) must be balanced and move at the same speed. Should the first curtain be a bit sluggish, and the second curtain be running correctly, this will cause uneven exposure from right to left across the frame. At higher 'speeds' the second curtain will catch up to the first, before it has fully travelled across the gate, causing the last part of the frame not to be exposed.
There are examples of this fault on the facebook groups.
Have a look on the youtube for 'focal plane shutters' there are a number of slow-motion videos that demonstrate what I have tried to explain above.
You could also repeat your leica filming, but do this from the back of the camera, with the back door open.
When winding on, you should see both curtains being rewound onto the left side of the camera. They will be slightly overlapping (to block light).
As your leica allows high speed video, hopefully it will allow slow-motion, so you can slow the video down to study how the shutter curtains behave at different 'speeds'
With a test roll of film, find a subject that will give 1/30s at f/11. Use a light meter on a known good camera to verify exposure.
Take a photo, then move though all of speeds, so
1/30 f/11
1/60 f8
1/125 f/5.6
1/250 f/4
1/500 f/2.8
For every photo above, the exposure will be the same, only depth of field will vary. So, the negatives should all show the same density. This will confirm that the shutter speeds are changing and that they are within acceptable tolerance.
The shutter mech in a Zenit, is from Leica origins, stolen by the ruskies after the second world war. So, if it was good enough for leica, certainly good enough for Zenits. Millions of these cameras were made, so no doubt hundreds of millions of photos taken. The shutter 'speed' does vary from shot to shot & they are not as accurate or consistent as a more modern design SLR, but they still churn out good photographs & are fun to use. Colour film has a wide latitude for exposure & using a compensating developer for B&W will reduce blown out highlights.


 )
)
 Thanks - I'll make a point to hunt these down. But I think I'll wait until the Russia situation cools down! I'm on a mission as my original Zenit was a gift from my grandfather I want to restore it perfectly. It always surprised me how good the pictures were from this camera.