Zenit EM complete CLA ongoing thread (pic heavy)

Recent Classifieds

Forum statistics

Threads
198,754
Messages
2,780,451
Members
99,698
Latest member
Fedia
Recent bookmarks
0
OP
OP

jaeae

Member
Joined
Jun 15, 2019
Messages
69
Location
Finland
Format
Hybrid
I'm guessing there must be an issue with the shutter mech, worn or sticky oil. Although stripping an E is easier than a camera with a Zenit with TTL metering, not sure I want the hassle.

Sounds like it, yes. Something is sticking.

It's been a while since I did the last CLA but I try to make simple list what to do with E and in what order:

1. Before disassebly, if possible, test 1/500 with manual video capable camera with high shutter speed, to see if the slit width is OK. Then you can adjust it (if necessary) during re-glueing of the curtains
2. Adjust mirror to precisely 45 degree angle with the adjusting screw under it. I've used distant scenery with 50mm lens for this. Idea is to adjust until left/right and upper/lower portions of the image in the VF become in focus at precisely the same focus ring distance setting
3. Disasseble camera :smile:
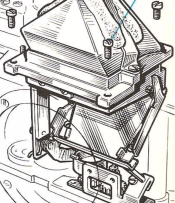
4. When pulling the shutter assy away from the camera, try to keep the main drum axle in it's bottom hole and then mark the position of the stopper gear in relation to the drum gear and mirror flip wheel (so you don't have iterate to find the correct tooth during reinstall..)
5. Clean the drum axles and rollers, maybe lube them also a bit. Clean dried grease from bottom gears etc and lube the mirror flipper wheel axle. Note the correct position of all of them in relation to the drum gear! Although the mirror flipper wheel CAN be removed and adjusted with the shutter unit in camera
6. Re-glue the curtains to the drums. It's not necessary to glue the second curtain to the big main drum. It has lot of glue and surface area, it's not going to let go
7. Assemble the shutter unit, but do NOT fully tighten the light baffle
8. Put the shutter into the body, it's much easier if you remove upper main drum bearing beforehand and put the bearing onto the shaft afterwards. Check that the bearing tooth goes to the drum hole.
9. Tighten the shutter unit to the body with a couple of screws. Assemble shutter controlling latch and slot wheel etc, so you can test it. Put a little tension to drum springs
10. Fiddle with the light baffle for 30 minutes so that there is a good spacious slot between it and the camera body for the shutter curtains to run in. Also check sideways, so that the baffle is in the center of the film opening and the edges do not hit the drums! Tighten it down
11. Put mirror/VF assy to camera. Adjust height of the mirror flipper lever in relation to the flipper wheel using B mode. The mirror shall NOT push against mirror foam, there MUST be some play. Otherwise the mirror mech will slow down the flipper wheel which directly slows down or stops the curtains!
12. Fiddle another 30 minutes with the side light baffle, so that it does not hit any curtain roller causing them to slow down
13. Adjust the conical helper spring / gear so, that it is neutral or very slightly pushes the 1st curtain drum + mirror flipper wheel clockwise (looking from the lens mount)
14. There's some play in the mirror assy screw holes. According to point 2., adjust the whole assy back or forth. If your lens did not reach infinity properly (hit the stop before it), put mirror assy towards lens mount (mirror closer to lens) and vice versa
15. Assemble rest of camera and do the final adjusting of curtain tensions
 

AgX

Member
Joined
Apr 5, 2007
Messages
29,973
Location
Germany
Format
Multi Format
Thank you for this extensive listing !


But reading:
10. Fiddle with the light baffle for 30 minutes ...
12. Fiddle another 30 minutes with the side light baffle...
, I wonder how they produced them at a conveyor belt...
 

Niglyn

Member
Joined
Feb 26, 2022
Messages
423
Location
Surrey, UK
Format
Analog
Thanks for the detailed reply and step by step guide. I'm attacking the Zenit E now, with the second curtain dragging.
The last Zenit I repaired, as the shutter ribbons had become unglued, trying to guess how the shutter mech should be aligned was a nightmare, I never did quite get it right.

I have made a special tool for adjusting the shutter curtain tension. It makes it far easier than using pliers and does not mark the base of the camera. However, no matter how I tweak the tensions, it makes no sense. Increasing tension to get the 1/500 shutter speed correct , I managed1/414, caused the lower shutter speed 1/30 setting, to increases to 1/50.

The other thing I see, is that the shutter speed varies from one side of the frame to the other, for example, on a Zenit 11, I bought 'new' a little while ago, made in 1993, measuring the 1/30 shutter speed on the right, middle and left (shutter moves right to left when viewed from the rear, I get 1/37, 1/40, 1/53.
Measuring at the 1/500 setting, I get 1/322, 1/417, 1/342. Taking the accurate millisecond readings of highest and lowest, 2104mS and 2400mS, the difference is 25%

Other cameras are even worse, on XP, I get a 50% difference from one side of the frame to the other. I have tweaked the curtain spring tension on this camera for hours, but it is hopeless, no matter what I ho, shutter speeds and exposure across the frame are hopelessly unbalanced.

Using my tensioning tool, I have slowly increased one curtains tension, a little at a time and then done the same with the other. Then reversed this process, slowly letting off spring tension. However, there is no logical change. One would think,
if the exposure is quicker at the end of curtain travel, lowering spring tension on the second curtain would correct it, but it does not.
So trying the opposite and increasing tension on the first curtain would give a better balance, but it does not.

So after many hours of tweaking the shutter curtain tensions, my conclusion is that curtain tension has no real affect on the overall exposure, it will affect the slowest and highest speed attainable, but you can't have both. If you want 1/30, the top end will only be around 1/300. If you want the opposite, getting the top to around 1/400, the slowest will be around 1/50.

Similarly, curtain tension will not balance the exposure from one side of the frame to the other.

I would love to be proved wrong and find some detailed explanation of how the tension of each curtain will affect the shutter speed & exposure balance across the frame
Right, tea break over, back to disassembling the E.
 

flavio81

Member
Joined
Oct 24, 2014
Messages
5,069
Location
Lima, Peru
Format
Medium Format
The curtain blades are about 4mm wide, so one can estimate slit width with that in mind.


The film frame is 36mm wide. So in principle, for different speeds, the curtain slit:

1/30: 36mm
1/60: 18mm
1/125: 9mm
1/250: 4.5mm
1/500: 2.25mm

It's worth noting that the E has no way of adjusting the slit. If the curtains are poorly glued to the drums in wrong places - and you find that out during adjustments - you must disassemble it and re-do everything.

In newer models like 11 or 12 (with the shutter speed knob that does not rotate along with the shutter drum) you can fine tune the slit. Which is an excellent feature.. !

You don't need to test any other speeds other than 1/30 and 1/500. Others will follow OK.

Here are 1/500 photos. NOTE: the curtains are of course perpendicular. The obliqueness is because of digital camera "rolling shutter" effect. Google it.

Shutter at start:


Middle-ish:


End:


You may ask why is the slit wider at the end? The curtain is fastest at there. And slow at the beginning. I have read somewhere that you should adjust the slit that way, and it so far it seems to be true. I have some other Zenits around and they are adjusted this way, and shooting clear skies at 1/500 show no banding or uneven exposure. I believe "one stop" of difference might be OK then? The slit is very accurately 2-3mm at the beginning and probably 4-5mm at the very end of the curtain travel. This is accomplished by setting the 2nd shutter travel time / speed just a bit slower than the 1st.


Fantastic! How did you take these pictures??
 

flavio81

Member
Joined
Oct 24, 2014
Messages
5,069
Location
Lima, Peru
Format
Medium Format
Jaeae,

This was a really excellent tutorial.

Even though I refuse to service the Zenit cameras (and your tutorial made me remember why!), the way you explain everything is so detailed and thorough, it deserves an award.
 

AgX

Member
Joined
Apr 5, 2007
Messages
29,973
Location
Germany
Format
Multi Format
A camera designed for a budget cannot be repaired for a budget. Is this a contradiction, or is one the result of the other?
 
OP
OP

jaeae

Member
Joined
Jun 15, 2019
Messages
69
Location
Finland
Format
Hybrid
A camera designed for a budget cannot be repaired for a budget. Is this a contradiction, or is one the result of the other?

It can, but maybe it requires a slightly different skillset. USSR stuff might need "handicraft" type skills more than - say, German stuff..?
I'm sure the ladies assembling these @ factory were quick and I think I could service a Zenit quite quickly these days.

If you take apart some electro-mechanical camera like Olympus OM-2SP you can wonder how they did manage to produce it at all. But the skllful workers learn how to route the 20 wires and screw 1x1mm screws in inconceivable locations.. :D
 
OP
OP

jaeae

Member
Joined
Jun 15, 2019
Messages
69
Location
Finland
Format
Hybrid
I have made a special tool for adjusting the shutter curtain tension. It makes it far easier than using pliers and does not mark the base of the camera. However, no matter how I tweak the tensions, it makes no sense. Increasing tension to get the 1/500 shutter speed correct , I managed1/414, caused the lower shutter speed 1/30 setting, to increases to 1/50.

-> that sounds like the mechanism is still dragging somewhere and/or the curtains are glued a bit wrong location on the drums

The other thing I see, is that the shutter speed varies from one side of the frame to the other, for example, on a Zenit 11, I bought 'new' a little while ago, made in 1993

--> that sounds like a mistake a have also made, the stuff that is in "new" condition are the worst, since the mechanism has not been really used in 30 years. There may be dried grease, dried curtain rubbering, even rust :smile:

measuring the 1/30 shutter speed on the right, middle and left (shutter moves right to left when viewed from the rear, I get 1/37, 1/40, 1/53.

--> yes all cloth leica shutters start slow and go faster at the end due to natural acceleration. you counteract this by making the slit narrower at the start (right, looking from camera back) and wider at the end (left). Basically the 2nd curtain should be a bit slower than the 1st

Using my tensioning tool, I have slowly increased one curtains tension, a little at a time and then done the same with the other. Then reversed this process, slowly letting off spring tension. However, there is no logical change. One would think,
if the exposure is quicker at the end of curtain travel, lowering spring tension on the second curtain would correct it, but it does not.
So trying the opposite and increasing tension on the first curtain would give a better balance, but it does not.

--> It might be that the conical helper spring is fooling you also? It helps rotate the 1st curtain drum, since it is flipping the mirror up at the same time, which takes some force. It can make the 1st curtain tensioning spring seem like it has no effect. See previous messages/pictures/videos in this thread. Note that 11, 12SD, 122 do not have that helper spring, instead they use just the 1st curtain tension to flip the mirror up also. It means that the mechanism needs to run smooth and more tension with the 1st curtain. This has been addressed by Zenit by making the 122 curtain cloth lines wider/stronger, better bearing of the main drum axle and easier adjusting nuts for curtain tension springs.
 

Niglyn

Member
Joined
Feb 26, 2022
Messages
423
Location
Surrey, UK
Format
Analog
Hello new friends :surprised:) First some good news, I have found a service manual for the Zenit E. It can be found at learncamerarepair.com

It is not 100% perfect, but is of great help taking apart and more importantly, putting back together again. It gives details alignment and how to adjust the curtain tension, although it does not cover in great detail, it is a great starting point.

It is interesting that the Zenit 11 does not have the conical spring, as I thought, the 11 was the final iteration of the E line, being E, EM, ET, 11. I have a TTL here & that does have the conical spring.

--> yes all cloth leica shutters start slow and go faster at the end due to natural acceleration. you counteract this by making the slit narrower at the start (right, looking from camera back) and wider at the end (left). Basically the 2nd curtain should be a bit slower than the 1st

The slit getting narrower to counteract the curtains moving faster would be to ensure even exposure.
Slow curtains & narrow slot should equal fast curtains & wide slot.
So the actual 'shutter open' time at any point would be the same, so my shutter timer should also read the same?

The service manual suggests setting the correct shutter speed for 1/500 and then ' the other speeds should be acceptable' :surprised:)
 
OP
OP

jaeae

Member
Joined
Jun 15, 2019
Messages
69
Location
Finland
Format
Hybrid
So the actual 'shutter open' time at any point would be the same, so my shutter timer should also read the same?
The service manual suggests setting the correct shutter speed for 1/500 and then ' the other speeds should be acceptable' :surprised:)

Yes, at least it should be so.. hmm. How exactly does your shutter meter work? Curious :smile:
 

gone

Member
Joined
Jun 14, 2009
Messages
5,504
Location
gone
Format
Medium Format
The service manual suggests setting the correct shutter speed for 1/500 and then ' the other speeds should be acceptable'
That's probably absolutely true. Kinda like setting a lens focus to be sharp at infinity, the rest of the distances after that should be fine.
 

Niglyn

Member
Joined
Feb 26, 2022
Messages
423
Location
Surrey, UK
Format
Analog
Yes, at least it should be so.. hmm. How exactly does your shutter meter work? Curious :smile:

Hi,

The laser is aligned to shine directly onto the receiver. I built a simple wooden jig to hold the laser and receiver in alignment, hot-gluing them, so they could be aligned whilst the glue cooled.
My jig is built to Box-Brownie length & height. More complex height adjustable solutions could be built with a nice project-box to put it all in.

The camera is placed between the laser & receiver. The Arduino monitors the receiver and when it sees the laser (shutter open) it starts timing, stopping when the laser is blocked by the closing shutter.

The computer screen shows the microseconds, milliseconds & fractional shutter speed.
LCD shows milliseconds & fractional shutter speed, newest reading at the top.

The photo of the LCD shows my Zenit set to 1/125 shutter speed and three readings taken, right, middle and left of the shutter opening, showing the horrendous variation!
The other photos show how I put it all together. Originally I used two lasers as shown but now I only use one and move the camera to take three readings, right, middle & left.

The parts, Ebay UK dispatch/delivery prices. (Far cheaper direct from China, even cheaper on AliExpress).
Arduino Nano £5.00 (more expensive if you want the header pins pre-soldered)
Arduino Laser Ky-008 £3.85
Arduino laser receiver £3.19 (or get both Laser Tx & Rx direct from China for £2.30)
Arduino 2004 LCD with 2 IC module £6.50 (optional, as display also shown on PC)
Dupont female-female wires 30cm (or longer) £3.25

The photos show my Arduino Nano in a prototyping board, this particular one connects the header pins to screw terminals. I soldered directly to the laser and receiver board (as I did not have long enough Dupont wires), but using Dupont wires for everything is simpler.

The Arduino Nano is almost identical to the Uno, there are plenty of 'getting started with Arduinio' tutorials on the YouTube, showing how to download the program and connecting to the Arduino.
I'm happy to supply my code should you wish to build one.

(wiring is easy, connect Vcc on Laser, receiver & LCD to the +5V on the Nano.
connect 0V of Laser, receiver & LCD to the 0V on the Nano.
Wire from 'out' of the receiver to pin 2 on Nano.
SDA on LCD goes to A4 on Arduino.
SDL on LCD goes to A5 on Arduino) .


20220304_130825_1.jpg


20220304_130818_1.jpg


20220304_130809_1.jpg
 

Niglyn

Member
Joined
Feb 26, 2022
Messages
423
Location
Surrey, UK
Format
Analog
Back on topic.....

My Zenit E with poor shutter accuracy and then a sticking first curtain, has now been stripped, old lubricant removed, a tad of new lubricant applied and reassembled.

I only had two washers left over, which I did not think was too bad :surprised:)
There is one large washer that I could only find one place where it fitted (top of speed selector arm) so I suspect two were put there in the factory. They are so thin & easily stick together.
The other, a teeny one, no idea. I also found washers added in places the service manual did not detail, under the flash contact plate, for example. Maybe they were acting as shims to adjust the plunger contact height.

I found, as with the OP, that the conical spring mechanism which operates the mirror and also gives assist to the first curtain was gummed up. This got a flush out & re-lube.

The curtain ribbons were removed and re-glued onto the rollers, as this is a common failure point of the Zenits. Not difficult but one has to be accurate & keep everything square. I made a paper template to ensure everything was aligned.

The blind rollers were degreased and the smallest tad of light oil applied. I was unable to remove the inner shaft and spring, so pulled the shaft gently out as far as it felt safe, wiped with IPA & a tad of oil.

Reassembling the shutter mech was a pig. The OP's comments that the mirror lifting wheel can be adjusted later, saved having to worry about that. So that just leaves just one cog on the bottom bearing plate that has to be in the fully rotated position (can't remember if cc or ccw) when the shutter blind is in the correct position.
It took about four attempts of setting the shutter curtain position, it has to go far further to the left, than one would think, actually going part way round the rollers.

The service guide helpfully tells us that the lug on the second curtain cam must line up with the hole in the body, for the shaft of the retaining lever.
This gem cost me about three hours!
I thought it meant the big brass lug that sticks out of the bottom of the cam. It does not, it means the thin pressed steel thingy on the top.

The diagram of the assembled shutter also shows a view of the second curtain drum, I assumed this would be drawn in the correct orientation, it is not.
More time gone.

Once the cam was aligned with said hole, the shutter looked to be in the correct position, so a little tension was added to the curtain roller springs and shutter drum turned, all seemed well.
(This is where the previous attempts showed that the shutter in the cocked position was too far to the right)

So back into the body the shutter mech goes. Hardest part over.

Added a few more parts as per the service manual & the shutter can be tested on B setting, with tension added to rollers and conical spring.

All seemed ok. So put it all back together, mirror box in & out a few times to get the mirror up cam set in the correct position.
The lightest of lubrication added to the gears and a light grease to the cocking spring was added.
The top plate, I left off, to see the workings.

Following the service manual, tension of 2 1/2 turns was added to the conical spring & second curtain just enough to make it operate correctly and first curtain 'considerably more' as the service manual helpfully tells us.

Well, success, all is working and after tinkering with the spring tensions, I have
1/30 sec setting giving 1/44 and 1/33 on left & right of shutter.
and at 1/500 setting 1/534 and 1/419

This, I think, is as close as it will ever be and is 'within acceptable tolerance' as worded in the manual.

So, another camera that I shall never use, is working.

What to do next?
I have another Zenit E which could do with a CLA, or
a 12XP, which has a pin hole in the shutter and fungus under the prism silvering (so will never be used), which I could CLA just for the practice,
A TTL which was my first Zenit 'repair' (shutter curtains again) that I did not get the mirror cam aligned correctly,
or a Braun Paxette that needs attention as it has a very white lens and the focus guestimator thingy does nothing. The wind ratchet does not catch, co needs a clean & lube, but big warnings on 'tinternet not to disassemble the ratchet as it explodes springs & cogs everywhere.

Or go down the pub......
 
OP
OP

jaeae

Member
Joined
Jun 15, 2019
Messages
69
Location
Finland
Format
Hybrid
Well, success, all is working and after tinkering with the spring tensions, I have
1/30 sec setting giving 1/44 and 1/33 on left & right of shutter.
and at 1/500 setting 1/534 and 1/419

This, I think, is as close as it will ever be and is 'within acceptable tolerance' as worded in the manual.

Yes, seems okay, at least the 1/500 is excellent. The 1/30 maybe a bit fast, I would try less rotations on the conical mirror helper spring.
There's one thing that came to my mind, about the speed test setup. Since you are using point lights, it could be that the dropping mirror is fooling it a bit. The mirror starts to come down already when the second curtain is only halfway closed. Seems moronic but the mechanism is very simple and it does not affect real-world exposure that much, because backmost lenses in optics are quite big usually and the left side of picture frame will receive light even if the mirror blocks half of the lens. If you want to experiment, maybe tape the mirror to the ceiling of mirror box and try to test shutter then.


So, another camera that I shall never use, is working.

What to do next?
I have another Zenit E which could do with a CLA, or
a 12XP, which has a pin hole in the shutter and fungus under the prism silvering (so will never be used), which I could CLA just for the practice,
A TTL which was my first Zenit 'repair' (shutter curtains again) that I did not get the mirror cam aligned correctly,
or a Braun Paxette that needs attention as it has a very white lens and the focus guestimator thingy does nothing. The wind ratchet does not catch, co needs a clean & lube, but big warnings on 'tinternet not to disassemble the ratchet as it explodes springs & cogs everywhere.

Or go down the pub......

:D


I also have one 12XP and one mint EM and also a Zenit 19 waiting for inspiration.
 
OP
OP

jaeae

Member
Joined
Jun 15, 2019
Messages
69
Location
Finland
Format
Hybrid
What is the mechanical reason for this design?

The mirror mech consists of 3 parts

- hinged mirror with spring
- one lever for pushing the mirror up
- rotating "cup" with cutout on its side that pushes the lever up

The rotating disk rotates in tandem with curtain roller, so it has the same number of rotations (well, one.. ). It's just barely sufficient to complete the cycle. The cutout in the "cup" catches the lever knob, pushes it up, and when the lever knob reaches the cutout edge again, the mirror comes down.
 

Attachments

  • Screenshot 2022-03-14 at 17.58.10.png
    Screenshot 2022-03-14 at 17.58.10.png
    1 MB · Views: 192
Joined
Jun 21, 2005
Messages
24
Format
Medium Format
Thank all for the valuable information. Would it be possible to post the sketch for the Arduino shutter meter?. Thank you again!
 

Niglyn

Member
Joined
Feb 26, 2022
Messages
423
Location
Surrey, UK
Format
Analog
Thank all for the valuable information. Would it be possible to post the sketch for the Arduino shutter meter?. Thank you again!
Hi,

Sorry only just seen your message.

Sure, no problem I will send you the sketch via PM (if I can work out how)
I was thinking of doing a step by step guide, with photos of the parts, connections etc,
as there are a few gotchas, it is not obvious which way the photocell should be fitted onto the board &
the laser pcb is marked 'S' where the voltage input goes.
However, you are the only person intersted, so not worth the effort.

I have gone back to using two lasers, as, after further testing, found they work ok.

Please let me know how you get on with it, & if you have any problems, issues or improvement ideas..
I have also tried it on an STM32 dev board, to see if the faster processor would make any difference to the results, it did not.
 

Niglyn

Member
Joined
Feb 26, 2022
Messages
423
Location
Surrey, UK
Format
Analog
A camera designed for a budget cannot be repaired for a budget. Is this a contradiction, or is one the result of the other?
Probably, because they are so cheap, the modern labour costs exceed the value of the camera. They were built in the Soviet era, where everybody had to have a job. It did not matter if the cameras were actually needed, sold or made a profit.

They pop up all day long on Ebay, (mainly overpriced & do not sell, as peeps expect too much for them). When they do sell, a mint body will fetch max £10. Same could be said of many modern appliances. Is it worth repairing a 5 year old store-brand telly or toaster?

Spares & service manuals are also non-existent for the Zenits. After years of hunting, all I have is the Zenit E service manual & a schematic of the TTL light meter.
I have made my own shutter tension adjustment tool, which helps.

The shutter failing due to the curtain ribbons coming un-glued from the roller is one of the most common fault on an otherwise working Zenit.
Easily fixed, but requires the whole camera to be stripped down, reassembled and aligned (which are the hard parts). Which can take a good day & a lot of patience.

All Zenits will suffer prism rot. If yours does not yet show the orange streak in the viewfinder, it will, so get it repaired now. It is caused by the foam securing the prism, breaking down and becoming a sticky goo. This in turn damages the top of the prism. I have not yet found a Zenit where the foam is ok. If you can get to it before the prism is damaged, it is easy to carefully pick off the goo, clean with IPA and replace with a new bit of foam.

The other way to kill a Zenit, is poor storage. So many Zenits appear on Ebay rusty & covered in filth, where they have spent years in attics, subject to cold, damp and heat.
 

Niglyn

Member
Joined
Feb 26, 2022
Messages
423
Location
Surrey, UK
Format
Analog
Yes, seems okay, at least the 1/500 is excellent. The 1/30 maybe a bit fast, I would try less rotations on the conical mirror helper spring.
There's one thing that came to my mind, about the speed test setup. Since you are using point lights, it could be that the dropping mirror is fooling it a bit. The mirror starts to come down already when the second curtain is only halfway closed. Seems moronic but the mechanism is very simple and it does not affect real-world exposure that much, because backmost lenses in optics are quite big usually and the left side of picture frame will receive light even if the mirror blocks half of the lens. If you want to experiment, maybe tape the mirror to the ceiling of mirror box and try to test shutter then.


:D


I also have one 12XP and one mint EM and also a Zenit 19 waiting for inspiration.
PLEASE at least change the prism foam, if nothing else. I can guarentee that the foam is already a goey mess and will eat into the prism unless removed.

I keep looking out for the rarer Zenits, like the 19, but to no avail.

Interesting thought on the mirror. The cameras were rough when new, so thirty years on expecting them to be anywhere near accurate is a tall order.
 

hiroh

Member
Joined
Dec 30, 2021
Messages
319
Location
Lisbon
Format
Multi Format
I disassembled the top plate to clean it underneath the buttons, as the camera was sitting in the shed for decades.

I used Zeiss lens wipes and liquid, the same one I use all the time on my Leicas. However, it erased the Zenit logo completely and whatever was white. I’m now careful about the marks for X/M and Reverse, but I’m wondering what solution is best for cleaning body on this camera?

Also, have anyone replaced the leather on their EM? Mine looks quite bad and I don’t think it can be saved, but I can’t find anyone selling the replacement leather for this model.
 

hiroh

Member
Joined
Dec 30, 2021
Messages
319
Location
Lisbon
Format
Multi Format
@foc Thanks, this looks good! I ordered Bell & Howel type of leather, it looks the closest to the original Zenit EM.

I’d also appreciate a help from anyone experienced in assembling Zenit EM. I have no experience with this by any means. I never opened any camera myself before and I did it this time just because I couldn’t find a single person in the US who is servicing Zenit cameras + I found this forum thread. I thought putting it back together would be as easy as disassembling it :smile: At the end, this is fun and interesting project to learn something from, but it's also frustrating because there are not many resources out there, so I have to either figure it out myself, or ask good people on the forum for help.

So, here is the problem — I removed the top plate, cleaned everything a little bit and now I’m stuck with putting back the winder and shutter. I didn’t take a good photo before removing it and now I’m not sure how the shutter was positioned. This is the only photo I have after removing the top plate. The shutter looks like it's just sitting there and not holding to anything. Is this the correct position? How does it interacts with the other parts? Anything I should pay attention to when I'm putting it back?

IMG_7137.jpeg


Then, somehow, this ring with coiled wire/spring loosened, and while fiddling with it, it fell off. I put it back, but it's tight as long as I'm holding it with my fingers. As soon as I release it, in unwinds and it looks like on the photos below. I tried to flip the wire, as I'm not sure I put it right, but this one seems to be the correct position and direction, but I can't find nothing to stop it unwinding. Do I have to hold it with my fingers all the time, while putting back the top plate and screwing the advance lever? Or there's something that can block it after I tighten it manually?

IMG_7153.jpeg

IMG_7157.jpeg

IMG_7158.jpeg

IMG_7156.jpeg


I'm not sure if I was clear, because I don't know the official names for these parts, as there is no service manual for EM. I downloaded the "Zenit-E service procedure", but many of the parts there are different.
 
Last edited:

hiroh

Member
Joined
Dec 30, 2021
Messages
319
Location
Lisbon
Format
Multi Format
Ok, I figured out that the small spring in the ratchet assembly should be in the notch of that silver thing (shown in the last photo of my previous post). I put it back so it clicks now again.

I managed to stop unwinding by putting in the paperclip in one of the holes on the top to block the spring.

IMG_7165.jpeg


I still didn't figure how the shutter button should be positioned.
 

Niglyn

Member
Joined
Feb 26, 2022
Messages
423
Location
Surrey, UK
Format
Analog
Hi,
Look in the files section for my most excellent guides on Zenits :surprised:)
Firstly you MUST change the foam on top of the prism, else it will DESTROY your prism. Please refer to my most excellent guides :surprised:)
Also change the small piece of foam above the eyepiece, but be careful not to damage the wool door seal directly below it.
Some models also have additional foam for light sealing, change this as well. They will all be breaking down & going gooey.

So you have worked out the 'trick' of using a paperclip to keep the spring wound and also how to locate the teeny hair spring in the ratchet pawl. Very good (did I mention my most excellent guides? :surprised:).

However, you have the spring wound far too tightly, unwind it so it is just inside the winding drum.

Straighten the end of the paperclip. You can mow put the top back on, leaving the paperclip in place.
Fit the winding lever, using the two remaining screw holes. Then you can remove the paperclip and fit the remaining screw.
 
Photrio.com contains affiliate links to products. We may receive a commission for purchases made through these links.
To read our full affiliate disclosure statement please click Here.

PHOTRIO PARTNERS EQUALLY FUNDING OUR COMMUNITY:


Ilford ADOX Freestyle Photographic Stearman Press Weldon Color Lab Blue Moon Camera & Machine
Top Bottom