Fast speeds running slow is almost unavoidable with leaf shutters after half a century to a century of intermittent use and wear, and potentially being left cocked for decades. Experts usually just test and record the actual speeds rather than try to make 250 and faster run at the rated value.
True, Donald. Though I bought a Flexaret from Jiri/flexaretcameras (long ago) that runs at the rated value.
Also, a Retina IIc sent for service to Chris Sherlock came back with close to perfect speeds from slow to fast!
Set infinity focus on this Yashica ML 35mm/2.8 lens.
In this case the foucus ring can be removed, the helicoid can be set at the infinity position, then the focus ring can be re-attached resting up against the infinty stop.
If the shutter wasn't left cocked for fifty years, it's got a better chance of the springs still having original force. Correctly designed springs won't weaken with age, but materials available in the 1950s and earlier may not have allowed modern spring design to be applied (and design methods are better now than they were, also).
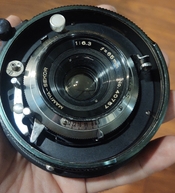
A Wollensak Studio #2 shutter that was stuck at f/8.
Opened it up and found that the old grease of the aperture ring had solidified.
Cleaned it all off, and..."Bob's your uncle!" ...a 100% functional Studio shutter.
Did a quick refurbish on a really ugly Mamiya 65mm for the universal 23. Focus was super stiff. Shutter did not open at all. And there was fungus on the lens. Everything is working now. Lens looks much better. I'll be trying to build a 3d printed camera for it next.
Spent the last week, on and off, smoothing out this unknown Contax-to-LTM mount.
The focus threads and RF coupling tube were both binding inside the mount. It was so tight it would just unscrew the lens from the camera.
I applied a fine abrasive polish on the offending parts a few times until the focus was turning smoothly in the mount again.
Tested it on the Leica M-E with a Jupiter-8 after reassembly to verify the focus and it is spot on.
Next up for servicing is the the CZJ Sonnar 50/1.5 that came with it.
I am dealing with a broken 'tooth' on the carrier in this planetary gearbox inside a Graflex Combat KE-4
Cut a brass strip and shaped it like an "L", refined it until it would clamp into this position.
But I couldn't get the new "tooth" properly angled so it would disengage with the underlying cam when required to decouple the shutter/film winding from the spring motor drive.
So prototype no.2 will be more "T"-shaped with the tooth sitting further back towards the center of the carrier.
While I was at it, I also replaced a disintegrating shutter curtain.
Biggest worry will be reassembly, where everything needs to mesh just right. But I have a PDF of the service manual (US Army TM 11-2343) that should help a lot.
I haven't fixed anything yet but I cooked up a spanner wrench using reshaped flat screwdriver bits that I pressed in a stick of PTFE. It worked flawlessly and, most important of all, didn't scratch anything.
I cleaned the inside rear element of my Hi-Matic 7s which had small snowflake-like humidity spots. As for the retainer ring in my previous post, I made a spanner wrench for the front group.
Also,I thought I could swap the CdS cell for one that I salvaged on a Zenit TTL but it was the wrong size.
It suffered from the slow mirror issue. When the camera was having issues, all speed would act as bulb mode. I saw the various theories for this issue The bottom plate rubbing seems to only be plausible if there is bottom plate damage. Mine also had light rubbing marks, but that was not it.
Old dried grease on the mirror mechanism seemed more likely. I tried the warm the camera trick and it worked for a short while. When I went outside in just sub 40F weather, it stopped working again.
I found I could access the mirror mechanism by removing the battery plate and battery box. From there I rinsed the mechanism with 91% rubbing alcohol being careful not to drip into the shutter parts.. After firing the shutter several times and then drying the alcohol out, the shutter sounds much better and is snappier.
Took it out and shot a roll, no issues. It was not very cold today, so I will have to try again when the temps drop.
So far so good. I did get some extra light oil that I'm debating lubing the pivots with. need to make sure I can get it exactly where I want it.
Very happy I was able to get this Konica iiia working again. It was in bad shape when I received it but now really clean and working. Next will be to run a roll of film through it.
A long overdue shutter speeds adjustment on my Contaflex IV. I serviced the shutter over 2 years ago but never revisited it to adjust the speeds because the camera gave me so much trouble that, after fixing it, I was done. So, after several tries, I got what I believe is the best balance I can get out of this old bird. It's leagues better than how it was before.
Turns out, my flashlight was too weak which caused the fast speeds readings to be off. I double checked my adjustment, and tested again with a fully charged light stick. Now, I get 1/133, 1/222, and 1/357 *thumbs up.
I made a new light baffle for the mirror of the Contaflex IV with some light tight material. The original was made of light craft paper which was falling apart.
And while I was reviewing a reference video of the advance mechanism, I spotted an awfully loose cog due to an equally loose retainer nut.
Glued a 1.8mm thin strip of mahogany-to the top edge of an Agfa Ansco lens board.
This lens board came with a different 10x8 Agfa Ansco camera and a 12" lens in a Betax #5. It was a touch loose and the slider holding it in place only just gripped the top of the board.
A couple of weeks ago I serviced a Zeiss Ikon Nettax for a friend,
One of the shutter straps had come loose from the top curtain. Luckily the stitching had prevented it from going through the friction buckle on the lower curtain.
It was a matter of stitching the strap back to the top curtain.
Also removed a bucket-load of sand from the camera mechanism.
The rewind knob was also binding. It probably came out of alignment from a fall. It became much smoother after I slightly bent back the tube it rides in.
The leatherette was given a few coats of black leather dye for good measure.
The Contaflex IV is finally back in one piece, after a few weeks on the bench. I overhauled the advance mechanism, cleaned the prism unit, lubricated pretty much everything, and adjusted the focus & the split screen. While revisiting it, I learned a lot of things that are not in the service manual. Things like how to adjust the split screen focus by adjusting the mirror stopper screw or resets the advance mechanism without taking off the mainspring. I also discovered quirky stuff like the prism unit preventing the shutter actuation if screwed 1/2mm too close to the bevel cog or, my favorite, actuation issues if the lens carrier sits a tad too low on the body. Took me a while to smoke out the gremlins, but I'm quite pleased with the result.
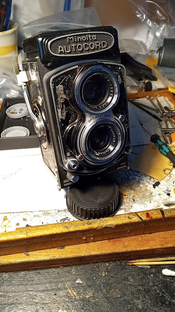
Fixed a Minolta Autocord. New one for me—never been inside one of these but I like what I saw. This one was refusing to fire and the winding crank was very very stiff. I guesstimated a fossilized grease problem, and that’s what it was. I took the right side plate off and cleaned up the gears but the shutter still refused to fire, so I took off the front plate. Flushed out the shutter and the winding-to-shutter linkages and took off and cleaned the taking lens elements. Did a little black paint touch-up and took the VF off to find a fogged-up mirror inside. New skin and mirror ordered from Hugo so maybe it’ll be done next week!
I’m impressed by the innards of this camera—robust gears and fairly simple mechanisms. The moving parts are easy to get to and this one had no issues with its focus mechanism
Photrio.com contains affiliate links to products. We may receive a commission for purchases made through these links. To read our full affiliate disclosure statement please click Here.