Film Speed and Development Test (Excel spreadsheet supplied)

A window to art

D
A window to art

  • 0
  • 0
  • 20
Bushland Stairway

Bushland Stairway

  • 4
  • 1
  • 67
Rouse st

A
Rouse st

  • 6
  • 3
  • 107
Do-Over Decor

A
Do-Over Decor

  • 1
  • 1
  • 115

Recent Classifieds

Forum statistics

Threads
199,240
Messages
2,788,395
Members
99,840
Latest member
roshanm
Recent bookmarks
0

Chuck_P

Subscriber
Joined
Feb 2, 2004
Messages
2,369
Location
Kentucky
Format
4x5 Format
Make sure your tape lets negligible light through.

Since chemical fog is the density increment on the film base due to processing, it should be measured without any density added from light exposure, so can't agree with you on that one.

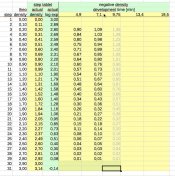
I should have clarified, I was looking at Ralph's spead sheet from his website, I'm sure there's an explanation that I'm not aware of.
 

PeterB

Member
Joined
Apr 3, 2005
Messages
644
Location
Sydney, Aust
Format
Medium Format
I thought you were using the tape to block the light. If so then why don't you agree it must let negligible light through?
Why don't you just use the film's leader or trailer or inter frame spaces to measure the B+F ?
 

PeterB

Member
Joined
Apr 3, 2005
Messages
644
Location
Sydney, Aust
Format
Medium Format
Been looking at the spread sheet, the 21st or 31st step is shown as being the chemical fog density, but these are defined steps and clearly, at least from my tests, contain density both from exposure and chemical fog.
.
It depends entirely on the amount of exposure you give during your test as to whether step 31 on the tablet contributes to exposure or not. Ralph's spreadsheet actually relies on there being no exposure for at least the last step, otherwise it can't work out the base+fog density which is critical for its calculations.
 

Chuck_P

Subscriber
Joined
Feb 2, 2004
Messages
2,369
Location
Kentucky
Format
4x5 Format
I thought you were using the tape to block the light. If so then why don't you agree it must let negligible light through?
Why don't you just use the film's leader or trailer or inter frame spaces to measure the B+F ?

It's a 4x5 step tablet, sorry I didn't make that clear---the tape just provides a larger area by which to read just fog density.
 

Chuck_P

Subscriber
Joined
Feb 2, 2004
Messages
2,369
Location
Kentucky
Format
4x5 Format
.
It depends entirely on the amount of exposure you give during your test as to whether step 31 on the tablet contributes to exposure or not. Ralph's spreadsheet actually relies on there being no exposure for at least the last step, otherwise it can't work out the base+fog density which is critical for its calculations.

My test procedure is here, which is definitely different than what is explained in Ralph's method, but my resulting negatives are hard for me to argue with, and results are what matters------but I've been thinking on his method and feel like it is something I might try, could easily do it in a mornings worth of time when the darkroom is functional.
 
OP
OP
RalphLambrecht

RalphLambrecht

Subscriber
Joined
Sep 19, 2003
Messages
14,663
Location
K,Germany
Format
Medium Format
I thought you were using the tape to block the light. If so then why don't you agree it must let negligible light through?
Why don't you just use the film's leader or trailer or inter frame spaces to measure the B+F ?

Exactlyexactly!!!:whistling:
 

PeterB

Member
Joined
Apr 3, 2005
Messages
644
Location
Sydney, Aust
Format
Medium Format
quote_icon.png
Originally Posted by CPorter (there was a url link here which no longer exists)
come on, why should it let neglible light through, sounds like you are agreeing that where I want to read just fog must also have density from light. :confused:


come on, why should it let neglible light through, sounds like you are agreeing that where I want to read just fog must also have density from light. :confused:
yes, i do!

NO !!! The black tape used by CPorter as a mask should NOT let any light through. When I used the word negligible I intended it to mean "a sufficiently small amount (of light) that will not contribute to any measurable increase in density". Letting light through the tape that contributes to a density increase is contrary to the intention of using the black tape in the first place !!
 

Chuck_P

Subscriber
Joined
Feb 2, 2004
Messages
2,369
Location
Kentucky
Format
4x5 Format
quote_icon.png
Originally Posted by CPorter (there was a url link here which no longer exists)
come on, why should it let neglible light through, sounds like you are agreeing that where I want to read just fog must also have density from light. :confused:


NO !!! The black tape used by CPorter as a mask should NOT let any light through. When I used the word negligible I intended it to mean "a sufficiently small amount (of light) that will not contribute to any measurable increase in density". Letting light through the tape that contributes to a density increase is contrary to the intention of using the black tape in the first place !!

Ahh! That clears it up, forum communication can be tricky sometimes-----sorry for my contribution to that misunderstanding.
 

gmfotografie

Member
Joined
Feb 6, 2013
Messages
61
Location
Austria
Format
Medium Format
i prefer landscape photographing. for film testing as lambrecht descripes i need daylight or a daylight bulb.
i want to use a daylight bulb because actually light conditions changes too fast.


can you also recommend a daylight bulb for fim testing in this situation?


whats with the setup?
just photographing a white-sheet of paper in my room?


best michael
 

Bill Burk

Subscriber
Joined
Feb 9, 2010
Messages
9,330
Format
4x5 Format
Although any light source other than real sunlight is a compromise, the repeatability of artificial light sources makes them a good compromise, if your tests don't need to result in laboratory grade accuracy. For example, my purposes I would be happy to be within 1/3 stop accuracy, 2/3 stop is tolerable. Once I get into the field to take pictures, I can't get my light meter readings to within 1/3 stop accuracy/repeatability anyway.
 

gmfotografie

Member
Joined
Feb 6, 2013
Messages
61
Location
Austria
Format
Medium Format
i work with a hasselblad 501cm.
i put the stouffer 6x6 just into the film holder and make a contact print.
it seams to work (did a test on one foto, the bars are fine)

shooting 5 films with one holder costs time so i'm afraid that light conditions are changing during the test.
 

gmfotografie

Member
Joined
Feb 6, 2013
Messages
61
Location
Austria
Format
Medium Format
hello,

after i did the first three tests with the stouffer 120 6x6 I got following results -> see pictures
the steps 30/31 and 1/2 are missing because the stouffer wedge was displaced in the hasselblad filmholder :-(

- why I have this "jump" on step 16 to 16 (other side of the step-wedge).
- what do you think about those results in general?
- should I have to repeat the whole process or should i go on with minute 13,4 and 19,5 ?

best michael
 

Attachments

  • 2013-03-29_16-25-33.jpg
    2013-03-29_16-25-33.jpg
    75.8 KB · Views: 139
  • 2013-03-29_16-27-04.jpg
    2013-03-29_16-27-04.jpg
    136.7 KB · Views: 157

Bill Burk

Subscriber
Joined
Feb 9, 2010
Messages
9,330
Format
4x5 Format
hello,

after i did the first three tests with the stouffer 120 6x6 I got following results -> see pictures
the steps 30/31 and 1/2 are missing because the stouffer wedge was displaced in the hasselblad filmholder :-(

- why I have this "jump" on step 16 to 16 (other side of the step-wedge).
- what do you think about those results in general?
- should I have to repeat the whole process or should i go on with minute 13,4 and 19,5 ?

best michael

Hi michael,

Double-check your actual step wedge "calibration" densities.

I don't think the jump is that dramatic, but it's interesting.

When I drew a smooth dotted line between points, the "outlier" on the 9,75 curve was the point for Step 17.

I see your calibrated value for Step 17 is 1.60. The "outlier" "fell into line" when I changed that value to 1.61. So double-check, maybe your calibrated wedge is 1.61

Regards,

Bill
 

albada

Subscriber
Joined
Apr 10, 2008
Messages
2,175
Location
Escondido, C
Format
35mm RF
- why I have this "jump" on step 16 to 16 (other side of the step-wedge).

Michael, the jump probably means illumination onto the Stouffer was uneven. I suspect the right half of the chart got more light than the left part. If you're using an enlarger as a light-source, this could mean the film-holder was not centred under the enlarger, so that the left half was farther away from the centre, experiencing fall-off from the enlarger's lens. Or the light-output of the enlarger might be uneven.

I suggest checking centring. You also might want to use an enlarger lens with a longer focal length and raise the head some. An easy way to test uniformity is to expose a piece of film in your film-holder, with *no* Stouffer present. Then measure density at various locations across the negative.

Best,

Mark Overton
 

gmfotografie

Member
Joined
Feb 6, 2013
Messages
61
Location
Austria
Format
Medium Format
thx,i used a step wedge-negative placing in the hasselblad filmholder, photographing a white card placing on zone X; did this with 5 films!

maybe the displacing of the negativ leads to an uneven illumination (i lost steps 30/31 and 1/2)

should i repeat shooting 5 films:blink:
 

Attachments

  • Foto.JPG
    Foto.JPG
    176.5 KB · Views: 126

Bill Burk

Subscriber
Joined
Feb 9, 2010
Messages
9,330
Format
4x5 Format
thx,i used a step wedge-negative placing in the hasselblad filmholder, photographing a white card placing on zone X; did this with 5 films!

maybe the displacing of the negativ leads to an uneven illumination (i lost steps 30/31 and 1/2)

should i repeat shooting 5 films:blink:

No, I think it's expected to have a jump at 15-16-17 because those steps are near the edge. My edge densities are often "higher" than the inner densities. Just look at the overall trend and ignore the anomaly in the middle - consider it an artifact of the layout of the step wedge.
 

albada

Subscriber
Joined
Apr 10, 2008
Messages
2,175
Location
Escondido, C
Format
35mm RF
thx,i used a step wedge-negative placing in the hasselblad filmholder, photographing a white card placing on zone X; did this with 5 films! maybe the displacing of the negativ leads to an uneven illumination (i lost steps 30/31 and 1/2)
should i repeat shooting 5 films :blink:

I downloaded your photo and looked at pixels in the two #16 wedges in Gimp. Densities by the centre are the same, but they're different by the outside. No need to repeat development. Just re-measure the wedges at the inside.
By eliminating the jump, you can compute CI accurately.

HTH,

Mark Overton
 
Joined
Jan 7, 2005
Messages
2,634
Location
Los Angeles
Format
4x5 Format
One problem with the in camera contracted step tablet test is that lenses are brighter in the center than the edges. A nice long lens with a good size image circle would be the best way of minimizing it.
 

albada

Subscriber
Joined
Apr 10, 2008
Messages
2,175
Location
Escondido, C
Format
35mm RF
One problem with the in camera contracted step tablet test is that lenses are brighter in the center than the edges. A nice long lens with a good size image circle would be the best way of minimizing it.

Yes!
My Stouffer chart is back-lit with doubly diffused light.
Shooting with a 50mm macro lens onto 35mm film got corner-falloff, creating dips in the curves.
Switching to a 135mm lens with an extension tube, stopped down 1.5 stops, solved the problem.
FP4+ and HP5+ now have straight line curves from centre to edge back to centre of the Stouffer.

Also, I shoot the upper and lower halves of the Stouffer chart in separate exposures, so that each shot only has a 5-stop range instead of 10-stops. This almost eliminates flare that would otherwise push up the toe-area.

The result of all this is almost as good as contacting.

Mark Overton
 

albada

Subscriber
Joined
Apr 10, 2008
Messages
2,175
Location
Escondido, C
Format
35mm RF
Mark, how are you determining speed/EI photographing the backlit wedge?

You'll laugh at this: I guess based on where various films hit .1 over B+F!
That's their ISO speed-point, and I know where that should be on the log E axis. Of course, developers shift that point, and there's no guarantee that the films themselves hit it exactly. But this gets me close. All my work has been comparative, usually comparing with XTOL's curves, so I haven't needed accurate log E numbers.

Mark
 
Joined
Jan 7, 2005
Messages
2,634
Location
Los Angeles
Format
4x5 Format
You'll laugh at this: I guess based on where various films hit .1 over B+F!
That's their ISO speed-point, and I know where that should be on the log E axis. Of course, developers shift that point, and there's no guarantee that the films themselves hit it exactly. But this gets me close. All my work has been comparative, usually comparing with XTOL's curves, so I haven't needed accurate log E numbers.

Mark, there is a way to quantify those results. It's not perfect as you can't be certain of the metered exposure, so any variance of the film speed can't be attributed with certainty to any one factor. The basic idea is to know the value of the metered exposure. Once you know this, you can determine the exposure value at what ever additional stops is given for the test. Next, know the target exposure at the speed point for the the speed of film being tested. You can then calculate what step tablet density that should fall at for a given speed with your chosen exposure value. The attachment breaks this technique down. It's from an analysis of a method proposed by Schaefer, but it should be applicable to your situation.

BTW, if your interested in learning more about the ISO speed point and what it means, check out the thread (there was a url link here which no longer exists) ,ISO speed determination constants - question for Stephen, Bill etc.

Schaefers exposure.jpg
 
Photrio.com contains affiliate links to products. We may receive a commission for purchases made through these links.
To read our full affiliate disclosure statement please click Here.

PHOTRIO PARTNERS EQUALLY FUNDING OUR COMMUNITY:


Ilford ADOX Freestyle Photographic Stearman Press Weldon Color Lab Blue Moon Camera & Machine
Top Bottom