Lovely space Roy.
-
Welcome to Photrio!Registration is fast and free. Join today to unlock search, see fewer ads, and access all forum features.Click here to sign up
You are using an out of date browser. It may not display this or other websites correctly.
You should upgrade or use an alternative browser.
You should upgrade or use an alternative browser.
Darkroom portraits
-
A
- Thread starter argentic
- Start date


Recent Classifieds
-
For Sale Out of Production Paper Sale - Sealed Boxes - UK only.
- Started by Gary Holliday
-
For Sale Sinar Norma 4x5 5x7 set and some Sinar accessories.
- Started by Jammoh
-
Free 3 enlarging lenses
- Started by jvo
-
For Sale Pentax 67 body with metered prism and grip
- Started by Guivd
Forum statistics
- Status
- Not open for further replies.
Hello darkness my old friend
LOL.....for sure!
Ah - the most profound problem!
LOL.....for sure!
My tiny darkroom
My darkroom is 200 cm across and 160 cm deep. This is also where I keep most of my cameragear and other stuff.
But the important thing is that I have a permanent place to work in, that it includes running hot and cold wate, that it does have a vent and that I can easily crank out 16x20 prints any time. I have just upgraded my enlarger from an old Durst-C65 to a LPL-7700 which makes it a lot easier to make big prints (the lamp on the Durst is a wee bit weak compared to the powerful halogen on the LPL). I have new lenses comping in shortly. With a pile of negs to print - life is good.
My past two darkrooms (from when I lived in San Francisco a while back) were not permanent. In one flat I could set everything up in the bathroom. In the other the kitchen was the best spot.
Now if I could just find some place in the house for a dry-mount press...
Attachments
Would your 6th darkroom you build please be for me! 
The first darkroom you build for an enemy.
The second one you build for a friend.
And the third one you build for yourself.
Until now I have built five darkrooms. But there are still things to improve. And everytime I study other peoples darkrooms, I learn one or two nice tricks.
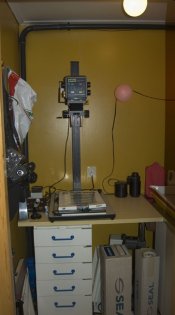
Would you mind posting some images of your darkroom? I'll start with mine. I use it one day every week. And even after about twenty years of darkroom work, I still want to change things. (That's why I got the idea of this thread.) My desktop is very cluttered because I'm in the middle of a rearranging my darkroom.
1) My darkroom sink. I adapted an existing sink to do all my film developing, and washing. Above the sink chemicals are stored child-safe. I built my own sodium lamp.
2) An Omega D5 XL enlarger for 4x5 inch negatives
3) A Durst M605 enlarger, my darkroom books and negatives.
4) The wet bench with photographic paper to the left, and film tanks underneath.
5) Bulk chemical storage and processing clock.
Dark Side of the Moon
Here's my latest wetplate collodion darkbox. This one will keep me out of the ether/alcohol fumes. I wanted this box as light and small as possible, to fit on the front seat of my car (have to remove the wheels for that), yet still able to do full plates. The box is 1/4" thick aspen plywood attached to a 3/4" thick reinforcing frame. Full plate will be tight in here but do-able. Smaller plates should be no problemo.

The box is hexagonal rather than rectangular and the sleeves go in at 45 degrees through the angled front sides. It seems much more natural for my arms to go in that box at a 45-degree angle rather than straight on. I can still reach every point inside the box if needed. The sleeves are constructed of an exterior layer of aluminized nylon and an interior layer of Porter's premium darkroom fabric. The sleeves have integrated elastic bands at one end and in the middle to form a light seal.
The angled rear panels are essentially upward sliding doors that should allow easy access to the interior. The silver tank is about 13" high and can easily go inside these doors. So, there should be plenty of room for holders as well.

There is a red acrylic safelight window on the top and another red angled viewing port 45 degrees off vertical on the front. The top of the box forms a hood over the inset and angled front window. I intentionally designed that viewing window to be at my eye level to avoid any stooping over. I'm hoping the top of the box will be an adequate hood to prevent glare on that window. If not, it shouldn't be difficult at all to attach a fabric hood around that window.

I built a tray out of red acrylic that fits between the dropped silver tank and the front wall of the box. It has a drain hole and attached acrylic hollow tube that goes through the base of the tank. The clear tube will be covered by a black rubber hose that will attach to some tubing below the box. The drain hose will empty into a yet to be determined waste container of some sort. The box is elevated slightly on ~ 2.5" high feet with room for the hose to curl underneath. I figured a slight curve to the black hose would prevent light from entering the tank.
I've also kicked around the idea of a gravity-fed water supply from the top of the box but haven't decided where it should enter yet. I built a lip around the top of the box to help prevent anything put on the top from falling off. I'm thinking of adding a net or bungee cords to the top to help hold stuff in place. I'll probably tweak this thing a bit more before I'm done.
The silver tank is similar to Kerik's design with a foam seal to allow transport of the tank when full. The thing is on 14" wheels and the front pair of legs are attached in such a manner as to act as handles for pulling/pushing the thing around.

I've also built a back panel-easel sort of thing that is attached to the folding rear leg. (Maybe I'll do some plein air painting with this as well).
If I were to do this again I would probably have the base squared off in the back to provide an exterior shelf for the tripod on one side and a water container on the other side for ease in transport. That wouldn't increase the weight very much but it would add to its functionality.
How well this thing will work is still up in the air, but I think it will be quite functional even though butt-ugly. I should be able to strap a tripod on the rear, transport needed chemicals and trays inside the box, and carry the camera on the top. I'll give it the initial trial sometime this week.
Joe
Here's my latest wetplate collodion darkbox. This one will keep me out of the ether/alcohol fumes. I wanted this box as light and small as possible, to fit on the front seat of my car (have to remove the wheels for that), yet still able to do full plates. The box is 1/4" thick aspen plywood attached to a 3/4" thick reinforcing frame. Full plate will be tight in here but do-able. Smaller plates should be no problemo.
The box is hexagonal rather than rectangular and the sleeves go in at 45 degrees through the angled front sides. It seems much more natural for my arms to go in that box at a 45-degree angle rather than straight on. I can still reach every point inside the box if needed. The sleeves are constructed of an exterior layer of aluminized nylon and an interior layer of Porter's premium darkroom fabric. The sleeves have integrated elastic bands at one end and in the middle to form a light seal.
The angled rear panels are essentially upward sliding doors that should allow easy access to the interior. The silver tank is about 13" high and can easily go inside these doors. So, there should be plenty of room for holders as well.
There is a red acrylic safelight window on the top and another red angled viewing port 45 degrees off vertical on the front. The top of the box forms a hood over the inset and angled front window. I intentionally designed that viewing window to be at my eye level to avoid any stooping over. I'm hoping the top of the box will be an adequate hood to prevent glare on that window. If not, it shouldn't be difficult at all to attach a fabric hood around that window.
I built a tray out of red acrylic that fits between the dropped silver tank and the front wall of the box. It has a drain hole and attached acrylic hollow tube that goes through the base of the tank. The clear tube will be covered by a black rubber hose that will attach to some tubing below the box. The drain hose will empty into a yet to be determined waste container of some sort. The box is elevated slightly on ~ 2.5" high feet with room for the hose to curl underneath. I figured a slight curve to the black hose would prevent light from entering the tank.
I've also kicked around the idea of a gravity-fed water supply from the top of the box but haven't decided where it should enter yet. I built a lip around the top of the box to help prevent anything put on the top from falling off. I'm thinking of adding a net or bungee cords to the top to help hold stuff in place. I'll probably tweak this thing a bit more before I'm done.
The silver tank is similar to Kerik's design with a foam seal to allow transport of the tank when full. The thing is on 14" wheels and the front pair of legs are attached in such a manner as to act as handles for pulling/pushing the thing around.
I've also built a back panel-easel sort of thing that is attached to the folding rear leg. (Maybe I'll do some plein air painting with this as well).
If I were to do this again I would probably have the base squared off in the back to provide an exterior shelf for the tripod on one side and a water container on the other side for ease in transport. That wouldn't increase the weight very much but it would add to its functionality.
How well this thing will work is still up in the air, but I think it will be quite functional even though butt-ugly. I should be able to strap a tripod on the rear, transport needed chemicals and trays inside the box, and carry the camera on the top. I'll give it the initial trial sometime this week.
Joe
The L.E.M is back...
Beautifully made :...Speechless.
-)
Guillaume
Beautifully made :...Speechless.
-)
Guillaume
Here's my latest wetplate collodion darkbox. This one will keep me out of the ether/alcohol fumes. I wanted this box as light and small as possible, to fit on the front seat of my car (have to remove the wheels for that), yet still able to do full plates. The box is 1/4" thick aspen plywood attached to a 3/4" thick reinforcing frame. Full plate will be tight in here but do-able. Smaller plates should be no problemo.
The box is hexagonal rather than rectangular and the sleeves go in at 45 degrees through the angled front sides. It seems much more natural for my arms to go in that box at a 45-degree angle rather than straight on. I can still reach every point inside the box if needed. The sleeves are constructed of an exterior layer of aluminized nylon and an interior layer of Porter's premium darkroom fabric. The sleeves have integrated elastic bands at one end and in the middle to form a light seal.
The angled rear panels are essentially upward sliding doors that should allow easy access to the interior. The silver tank is about 13" high and can easily go inside these doors. So, there should be plenty of room for holders as well.
There is a red acrylic safelight window on the top and another red angled viewing port 45 degrees off vertical on the front. The top of the box forms a hood over the inset and angled front window. I intentionally designed that viewing window to be at my eye level to avoid any stooping over. I'm hoping the top of the box will be an adequate hood to prevent glare on that window. If not, it shouldn't be difficult at all to attach a fabric hood around that window.
I built a tray out of red acrylic that fits between the dropped silver tank and the front wall of the box. It has a drain hole and attached acrylic hollow tube that goes through the base of the tank. The clear tube will be covered by a black rubber hose that will attach to some tubing below the box. The drain hose will empty into a yet to be determined waste container of some sort. The box is elevated slightly on ~ 2.5" high feet with room for the hose to curl underneath. I figured a slight curve to the black hose would prevent light from entering the tank.
I've also kicked around the idea of a gravity-fed water supply from the top of the box but haven't decided where it should enter yet. I built a lip around the top of the box to help prevent anything put on the top from falling off. I'm thinking of adding a net or bungee cords to the top to help hold stuff in place. I'll probably tweak this thing a bit more before I'm done.
The silver tank is similar to Kerik's design with a foam seal to allow transport of the tank when full. The thing is on 14" wheels and the front pair of legs are attached in such a manner as to act as handles for pulling/pushing the thing around.
I've also built a back panel-easel sort of thing that is attached to the folding rear leg. (Maybe I'll do some plein air painting with this as well).
If I were to do this again I would probably have the base squared off in the back to provide an exterior shelf for the tripod on one side and a water container on the other side for ease in transport. That wouldn't increase the weight very much but it would add to its functionality.
How well this thing will work is still up in the air, but I think it will be quite functional even though butt-ugly. I should be able to strap a tripod on the rear, transport needed chemicals and trays inside the box, and carry the camera on the top. I'll give it the initial trial sometime this week.
Joe
A few more pics of it in transport mode:

ready to roll

I'll be adding a cargo net to the top.

I can still access the interior in transport mode.

Danger Will Robinson! Danger!
ready to roll
I'll be adding a cargo net to the top.
I can still access the interior in transport mode.
Danger Will Robinson! Danger!
Smieglitz, are you sending that device to Mars?
Because it sure looks like one of those planetary exploration robots.
You just need to attach a camera and add a remote control and you can sell it
to NASA claiming that those new digital photos are crappy and they should bring
back the good old days when they carried Hasselblads and Rolleis to their missions!
A few more pics of it in transport mode:
"Transport mode", that sure sounds like NASA jargon!!!
Want to see the first astronaut trying to put a rounded bubble of emulsion on top of free floating glass plate...
Added a few more mods to it earlier in the week. It now has a 4ft long ribbed drain hose exiting the bottom. I also added some tubing inside and out near the top right so I can gravity-feed water into the box, assuming there is gravity.
It is becoming sort of Gigeresque as it evolves. And speaking of which, check out this guy's pinhole cameras and images: Wayne Martin Belger
Joe
It is becoming sort of Gigeresque as it evolves. And speaking of which, check out this guy's pinhole cameras and images: Wayne Martin Belger
Joe
In keeping with tradition of my "Ghetto Darkroom", here's my new print drying rack/screen:

36" x 7' fiberglass screen $6.49:
Dead Link Removed
1 1/4" x 5/8" capacity binder clips $2.99:
http://www.staples.com/webapp/wcs/s...d=10051&productId=19366&cmArea=SEARCH
36" x 7' fiberglass screen $6.49:
Dead Link Removed
1 1/4" x 5/8" capacity binder clips $2.99:
http://www.staples.com/webapp/wcs/s...d=10051&productId=19366&cmArea=SEARCH
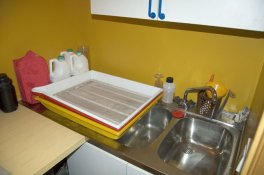
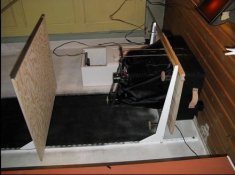
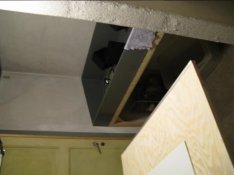
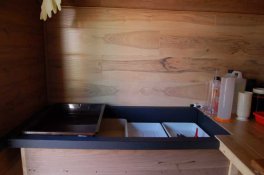
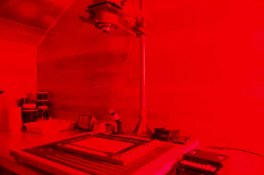
My small darkroom/bathroom. Enlarger head is above the easel, but too dark to see in the picture. The dark towel on the right is used to block stray light coming through the door cracks. The enlarger is a russian suitcase enlarger UPA-601.
Both pictures were taken during a darkroom session, with safelight as the only lightsource.

Stop-bath on the right, fixer in the middle, wash tray on the left (with a print in it). Developer tray is in the sink, not seen in the image.

Both pictures were taken during a darkroom session, with safelight as the only lightsource.
Stop-bath on the right, fixer in the middle, wash tray on the left (with a print in it). Developer tray is in the sink, not seen in the image.
- Joined
- Aug 27, 2006
- Messages
- 1
- Format
- 4x5 Format
darkroom photostory
Well, I have just finished building my third darkroom. I must say that it is far more superior then previous ones.
Here you can find some pictures documenting the process of changing kitchen to darkroom.
http://57things.com/photography/darkroom-photostory
--
Robert Wijas
The first darkroom you build for an enemy.
The second one you build for a friend.
And the third one you build for yourself.
Well, I have just finished building my third darkroom. I must say that it is far more superior then previous ones.
Here you can find some pictures documenting the process of changing kitchen to darkroom
.http://57things.com/photography/darkroom-photostory
--
Robert Wijas
Mine is coming along slowly.


I write these thoughts and post these images with the hope of repaying a debt of gratitude, to say thanks.
30 years ago I got a 35mm camera as a gift in prelude to a year long trip as a Foreign Exchange student. I found I liked taking pictures. A little over 25 years ago I took a course at my University in photography, and learned a little about black and white photography, everything from composition to developing and printing. At this point I was in a word addicted. The process from start to finish fascinated me. I have been at it in starts and fits ever since.
I worked in everything from college darkrooms to moral support darkrooms in the military to makeshift ones where ever I might have lived at the time. After a while I began to dream of one day having my own. I spent some time and a little money accumulating the stuff I needed but never seemed to be at the right place at the right time to start.
Then not too long ago I ran across something called APUG. Here is a community of people with lots of good ideas presented in ways that I found inspiring. So I borrowed a lot of the ideas and have soaked up some inspiration. Here are some of the results.
The enlarger is based on heavy duty shelving brackets. (Based on a lead I got from APUG) It has an aluminum and plywood frame. The bellows I made and are from a homemade camera project. They worked great but were just a tad twisted. They didnt look so good, but for this application it didnt matter. The light stage, the negative stage and the lens stage can all be aligned independent of each other via threaded rod. The focus is also with threaded rod. ( yes, alignment takes patients ;-) ) The light source is 6 ea. 11watt daylight florescent bulbs (75 watt tungsten eq.) behind a diffuser of Perspex.
The negative drying cabinet is shelving material, some 2x2 and air-conditioning filter from the local hardware store. It has an 80 watt heater in the bottom that was from an electrical box, but I seldom use heat.
The 4x5 film washer is Plexiglas glued together with loctite attak. I then went over the joints with fish tank silicone.
The darkroom sink is of 12mm plywood. The joints are sealed with tech7. I then painted it with 6 ( or was it 7) coats of boat paint. It is sitting on a frame work built with 2x2 lumber.
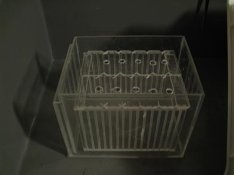
The print washer is a plastic container form the local hardware store with a Plexiglas false wall at the drain end to force drainage from the bottom. The separators are Plexiglas held in place with PCV trim. Water is injected in each section from a plastic pipe clamped to a water hose. The jets are 2mm holes drilled at appropriate intervals.
None of the ideas behind the dark room equipment I have made are my own. To all of you from whom I have borrowed ideas; thanks for helping me realize the dream of having my own darkroom! To those of you who are on the edge of building your own but arent quite there yet, if I can you can. I hope you see here an idea or get inspiration to realize your wish.
Thanks Sean for putting together the community called APUG.
Victor
http://www.doak.no
30 years ago I got a 35mm camera as a gift in prelude to a year long trip as a Foreign Exchange student. I found I liked taking pictures. A little over 25 years ago I took a course at my University in photography, and learned a little about black and white photography, everything from composition to developing and printing. At this point I was in a word addicted. The process from start to finish fascinated me. I have been at it in starts and fits ever since.
I worked in everything from college darkrooms to moral support darkrooms in the military to makeshift ones where ever I might have lived at the time. After a while I began to dream of one day having my own. I spent some time and a little money accumulating the stuff I needed but never seemed to be at the right place at the right time to start.
Then not too long ago I ran across something called APUG. Here is a community of people with lots of good ideas presented in ways that I found inspiring. So I borrowed a lot of the ideas and have soaked up some inspiration. Here are some of the results.
The enlarger is based on heavy duty shelving brackets. (Based on a lead I got from APUG) It has an aluminum and plywood frame. The bellows I made and are from a homemade camera project. They worked great but were just a tad twisted. They didnt look so good, but for this application it didnt matter. The light stage, the negative stage and the lens stage can all be aligned independent of each other via threaded rod. The focus is also with threaded rod. ( yes, alignment takes patients ;-) ) The light source is 6 ea. 11watt daylight florescent bulbs (75 watt tungsten eq.) behind a diffuser of Perspex.
The negative drying cabinet is shelving material, some 2x2 and air-conditioning filter from the local hardware store. It has an 80 watt heater in the bottom that was from an electrical box, but I seldom use heat.
The 4x5 film washer is Plexiglas glued together with loctite attak. I then went over the joints with fish tank silicone.
The darkroom sink is of 12mm plywood. The joints are sealed with tech7. I then painted it with 6 ( or was it 7) coats of boat paint. It is sitting on a frame work built with 2x2 lumber.
The print washer is a plastic container form the local hardware store with a Plexiglas false wall at the drain end to force drainage from the bottom. The separators are Plexiglas held in place with PCV trim. Water is injected in each section from a plastic pipe clamped to a water hose. The jets are 2mm holes drilled at appropriate intervals.
None of the ideas behind the dark room equipment I have made are my own. To all of you from whom I have borrowed ideas; thanks for helping me realize the dream of having my own darkroom! To those of you who are on the edge of building your own but arent quite there yet, if I can you can. I hope you see here an idea or get inspiration to realize your wish.
Thanks Sean for putting together the community called APUG.
Victor
http://www.doak.no
Attachments
Victor,
Your post was a joy to read! It's so great to see someone "stand on the shoulders of giants" and use what they've found here to create such a wonderful space.
This is the first time I've seen the enlarger-from-shelving-brackets approach. You've got me thinking about perhaps doing one in my own space, fixed focus, for the sole purpose of enlarging full-page print files onto 11x14 or 16x20 enlarged contact sheets.
Thanks for the inspiration!
-KwM-
- Rhianan
- Deleted
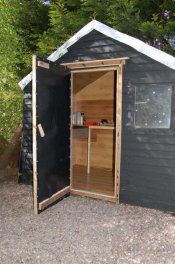
Darkshed
I too could not have completed my "Darkshed" without this thread and the help of everyone here. I've spent many hours trawling through posts, taken on board all advice and recommendations and even built the sink with the help of Appugians.
So thanks to everyone who contributed, and specially to Fintan for all the equipment and for hauling it to Cashel for me!
Síle
Here's a few pics of before and after :
Attachments

Nice work. Almost a shame to keep it in the dark!
Deleted member 19578
Finally clean enough to show pics...
Okay, I got a bit carried away on the cabinets- they were having a sale!
The wet side: 3' x 6' stainless steel sink.

It's kind of hard to see the ventilation system, but it is a 4" PVC pipe for
a septic system. I enlarged the holes & it runs down into the basement
& outside. I like the idea of all the fumes being drafted over the trays
& down, rather than over my nose.
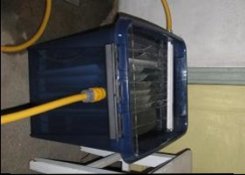
Dry workbench: Film fridge & 1200watt mercury-lamp UV exposure unit.

Dry side enlarger bench: Durst Laborator CE100 & tunes.

The room is 11' x 13' and is on the lower floor, so no external windows.
It was a cinch to set up, but it took me a year to convince my wife
that she needed more light for her sewing room... Sure beats trying to
build out the basement!
Now, if I can just get some help cleaning up the printmaking studio I can
post those pics to Wet Canvas.
Okay, I got a bit carried away on the cabinets- they were having a sale!
The wet side: 3' x 6' stainless steel sink.
It's kind of hard to see the ventilation system, but it is a 4" PVC pipe for
a septic system. I enlarged the holes & it runs down into the basement
& outside. I like the idea of all the fumes being drafted over the trays
& down, rather than over my nose.
Dry workbench: Film fridge & 1200watt mercury-lamp UV exposure unit.
Dry side enlarger bench: Durst Laborator CE100 & tunes.
The room is 11' x 13' and is on the lower floor, so no external windows.
It was a cinch to set up, but it took me a year to convince my wife
that she needed more light for her sewing room... Sure beats trying to
build out the basement!
Now, if I can just get some help cleaning up the printmaking studio I can
post those pics to Wet Canvas.
Wow, you have a very nice setup there. Thanks again for the graflex holders I bought from you. I'm in the process of converting a spare room into a darkroom.
Wow - Page 60 of this thread is a real humdinger!
Murray
Murray
Mobile Darkroom
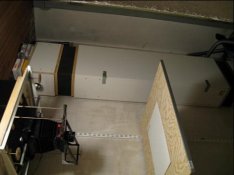
Having gone head over heals for the wet plate process, I decided to go with a mobile darkroom over the portable darkbox used by many. I like a lot of working space!
I started off by ordering a 5x10 foot aluminum trailer with additional height so I could stand up inside, a side door and extra seals for dust and light. For the last week I have been making modifications. A 12-volt electrical system, 21 gallon water and waste tanks, stainless steel sink, in-counter silver bath, high-speed ventilation system, etc. All is coming together well and I should be able to do some road tests by tomorrow. After a successful road test, I can begin all the cosmetic finishing touches like cupboards with door latches and secure storage for chemicals, trays and plates. It's shaping up nicely and I can't wait to get it on the road!
Dang Bill. All the creature comforts! Hope to see this rig up in Northern MN this fall
Thanks Andrew! Really hoping to be able to bring it along.Dang Bill. All the creature comforts! Hope to see this rig up in Northern MN this fall
- Status
- Not open for further replies.
| Photrio.com contains affiliate links to products. We may receive a commission for purchases made through these links. To read our full affiliate disclosure statement please click Here. |
PHOTRIO PARTNERS EQUALLY FUNDING OUR COMMUNITY:  |