Darkroom portraits

Recent Classifieds

Forum statistics

Threads
199,638
Messages
2,794,589
Members
99,974
Latest member
Walkingjay
Recent bookmarks
1
Status
Not open for further replies.

Chuck_P

Subscriber
Joined
Feb 2, 2004
Messages
2,369
Location
Kentucky
Format
4x5 Format
Am I the last person on Earth building a darkroom?

No, I think that would probably be me, so far I've got just the sink built as you can see (there was a url link here which no longer exists). I hope to be building the stand for it this weekend, very similar to what I see with yours and I like the incorporation of drying rack screens beneath the sink that I saw in Robert Hall's darkroom photos. Currently, I'm in the process of clearing the spare bedroom and making way for things---now, I'm re-routing the dish cable and wireless internet to another room.
 
Last edited by a moderator:

papagene

Membership Council
Council
Joined
Jun 11, 2004
Messages
5,438
Location
Tucson, AZ
Format
Multi Format
Excellent job of converting that dingy space into a very nice darkroom.
 

David Brown

Member
Joined
Feb 16, 2004
Messages
4,056
Location
Earth
Format
Multi Format

Attachments

  • silver chand.jpg
    silver chand.jpg
    168.7 KB · Views: 659
  • highsafelight2.jpg
    highsafelight2.jpg
    92.3 KB · Views: 540

David Brown

Member
Joined
Feb 16, 2004
Messages
4,056
Location
Earth
Format
Multi Format

Roger Thoms

Subscriber
Joined
Nov 18, 2007
Messages
1,781
Location
Flagstaff, AZ
Format
8x10 Format
Ok, thanks.
Unfortunatly, the 25 W does not sell in Europe because it functions under 120 volts.
In France, it exists in 15 W/220 volts.

JP

Nice job on your darkroom. As far as a the bulb wouldn't the 15W/220V be equivalent to a 30W/120V, so in other words pretty close to a 25W/120V bulb.

Roger
 

jbrianfoto

Subscriber
Joined
Oct 9, 2006
Messages
169
Location
Fredericksburg, VA
Format
8x10 Format
MY home darkroom in Virginia - nearly complete.....

Hi everyone -

This is my 4th darkroom in my lifetime - and so far it is shaping into my "dream" darkroom. I am running two sinks, one for processing film, the other for paper. Am going to be using nitrogen burst agitation on the film line (very excited about that). The enlarger is an old Durst L184 with electric elevation and a T1414 cold light head. The long wall on the left is where I'm going to build cabinets. Later this year I want to install a suspended ceiling and some good ventilation fans. BTW, this is located in my basement - my dear wife was very supportive of me taking up this large corner of our basement.

I'll post more photos as things get finished. Thanks for looking !
 

Attachments

  • Darkroom Panorama small.jpg
    Darkroom Panorama small.jpg
    601.6 KB · Views: 691
  • Darkroom panorama Sinks small.jpg
    Darkroom panorama Sinks small.jpg
    830.5 KB · Views: 637
  • Paper sink Panel.jpg
    Paper sink Panel.jpg
    496.6 KB · Views: 636
  • Process sink panel.jpg
    Process sink panel.jpg
    462 KB · Views: 607

jbrianfoto

Subscriber
Joined
Oct 9, 2006
Messages
169
Location
Fredericksburg, VA
Format
8x10 Format
My wife sewed my pleated bellows....

Nice attention to detail with the enlarger column and the flocking paper. I had thought of such things, but on my Omega 4x5s, the column is angled, so the angle on incidence is very large. Also reminds me of last year at this time when I was restoring my Durst. Its column has a bellows that performs a similar function to your flocking paper scroll.

Hi - My newest La184 had the same problem all of my last L184's had - the bellows delaminating from their backing. She took a look and said she could solve the problem. She put it on her sewing machine and re-sewed every pleat. Took her all afternoon, but in the end they looked and worked like brand new ! She is really a gem.
 
Joined
Jan 16, 2010
Messages
1,685
Location
Atlanta, GA
Format
Medium Format
This is my 4th darkroom in my lifetime - and so far it is shaping into my "dream" darkroom.

Very cool! It looks like you built your wall to chop off part of your basement, and this is exactly what I am going to do. How did you handle the light proofing between the floor joists? Does your sink drain down into a sump system or just a standard drain? And how does the nitrogen system work - do you buy it or DIY?

Thanks!
 

jbrianfoto

Subscriber
Joined
Oct 9, 2006
Messages
169
Location
Fredericksburg, VA
Format
8x10 Format
Very cool! It looks like you built your wall to chop off part of your basement, and this is exactly what I am going to do. How did you handle the light proofing between the floor joists? Does your sink drain down into a sump system or just a standard drain? And how does the nitrogen system work - do you buy it or DIY?

Thanks!

Hi there - and thanks !

I am installing 2X10 plugs into each floor joist gap. This becomes hard for the gaps which have electrical or air ducting running thru it. For those areas I've been cutting a plug, then using a saber saw to remove wood that will be in the way. So far that's worked pretty good, however I do have a few gaps which are just too complicated to deal with in this manner. For those I'm going to stuff insulation in so that light is blocked. Now - in all the plugs I've made so far, there are still leaks (because the floor joists are curved or crooked) - I'm going to get that thick metal-film based tape that the HVAC guys use for building ducts. That'll be applied on all the corners to keep out light. Finally - where the framed wall meets the cinder block wall, there is a leak -so I'm going to apply caulking to fill the void.

Both sinks drain into our septic line. I choose this corner of our basement for several reasons, the first was it's where all of the water in the basement is, and the septic line for the whole house is there. Here in Virginia, sewer lines are made of black ABS (at least they were in the 80's when our home was built). Now it is all white PVC. That makes it easy to cut and splice into. I got a pair of 3" unions (which each have a 1 1/2" female drain sweep) - cut the septic pipe about 6 inches from the floor, then removed a 15" section of ABS pipe. From that section I cut out a 5" section (used to join the two 3" unions) and then fit-checked that part. From there I was able to figure out how much remaining pipe was needed to fill the gap. So I cut and installed another section of the ABS pipe and then slid on a 3" X 8" rubber coupling (to join all the parts together at the top). Since the pipe going into the floor and the pipe running up into the bathrooms above me cannot be moved, this is how I delt with inserting my sink drains. Now both sinks have pee-traps (under each sink) and they each have their own drains.

In the years past I've had a sump system to drain my sink. It was in an apartment - I let the sink drain into a big Rubbermaid storage bin, in which I installed a float activated sump pump. It pumped water thru a hose which ran into the air conditioning drain (on the other side of the wall from my darkroom).

As for the nitrogen burst agitation system. I had many good emails with Michael Kadillak (on this forum) about such a system. He was very helpful and generous with his time. I bought off eBay a Ted Pella gas-burst timer for about $50, and have been scrounging stainless tanks, baskets and pleniums for roll-film processing. I'm very close to having everything I need. This coming year I'm planning on buying a good drill press - when I do I'll be setting up a jig for drilling stainless steel plenium tubing (so that I can make my own tanks). Currently I only have the 3.5 gallon size tanks, which is fine when I'm souping sheet film or 20 rolls of 35, but I want a smaller tank for processing only a few rolls of film. I have a plastic plenium now, and that is fine, but I like the durability of stainless (+ I really like working with the stuff).

I'll post more photos of the ceiling joist inserts and the drain plumbing (hopefully this afternoon).
 

mjs

Member
Joined
Mar 15, 2005
Messages
1,123
Location
Elkhart, Ind
Format
Multi Format
My Minature Darkroom

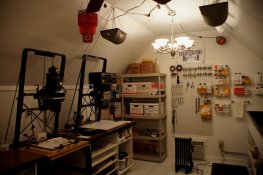
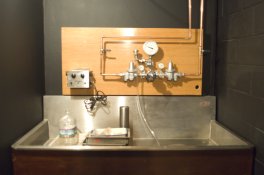
My darkroom space measures 5.5' x 6' and fits into a corner of the utility room, across from the washer and dryer. In fact, we feed water from the same lines. The room isn't quite square; one corner is cut off to give more generous access to the washing machine, and that corner's where I fit the door. All of the materials for the darkroom were salvaged, except for the door hinges and door knob, and the drywall. Even the paint (a decent approximation of Zone V, actually!) was a reject from the paint store (the customer didn't like it so I got it for half price.) I figure I spent less than $100 for all the materials.

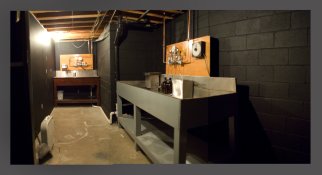
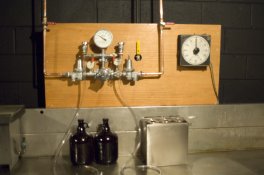
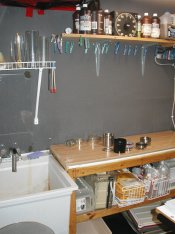
It's a little small, granted, but works fine for my needs. The wet sink is a laundry tub and the table next to it with the brown top is some sort of covered shelving; particle board covered with a tough plastic of some sort. I seal the edges with a couple of coats of marine polyurethane and every five years or so when the top gets too beat up I glue a new layer on top. Trays up to 11x14 fit well; 16x20 needs a tray ladder. I used to wash everything in trays in the tub but have been fortunate enough in the past couple of years to find an 8x10 washer at an auction and an 11x14 washer locally on Craigslist, and I made a washer for 4x5/5x7 film out of a plastic storage container and fishing line, so that part of processing is more convenient these days. The shelf under the table holds unopened chemicals, the 8x10 washer, etc. (the 11x14 washer is too large to store in the darkroom; it's in a garbage bag elsewhere in the basement. I bring it in to use it, of course!) Trays are on the floor underneath. Overhead are lines holding a number of plastic clothespins; this is overflow space to hang prints and film to dry. Primary space for drying is similar arrangement over the sink but it doesn't show in the picture. On the overhead shelf are mixed chemicals and a processing timer I just put up there today!

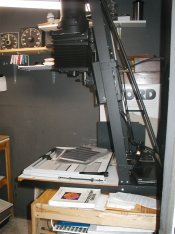
The enlarger is a Beseler 45 MX with condenser head. I have an older cold light which I bought on Ebay and used for a year; the lamp died and I hadn't fallen in love with it, so I went back to the condenser head. I got the enlarger for free from a local photographer, who got them for free from a local high school. He has two or three more he'd like to get rid of... (South Bend, IN.) That is actually my second 4x5 enlarger; years ago I got a Beseler 45 mcrx (or something like that) from another local school auction but it had many student years on it (I'm thinking dog years x 2,) and I'm glad to have had the opportunity to get a newer one in much better condition. Beyond the enlarger are a pair of 11x14 paper safes stacked on top of one another, and an old oak library card catalog holding 4x5 negatives on top of those. There's another small oak box on the very top, holding 5x7 negatives. Most negatives (35mm, 120 and 8x10) are stored in three-ring binders in bookshelves elsewhere in the basement.

Unopened paper is underneath the enlarger table, along with contact print frames, a semi-broken boom box (the radio part works, the CD player doesn't,) etc. Stored on the floor underneath are a paper cutter, currently empty chemical jugs, distilled water, etc. I recently discovered wire shelving at my local home improvement store, dirt cheap, and spent part of this weekend attaching them to the bottom of the shelf tops to give me more storage space. They work great! I also got a couple older Gralab timers at an auction and with the addition of the new shelving now have room to add them into the darkroom. Whoo-hoo, three processing timers; I feel like I've hit the big time! :D Actually, one of the Gralab timers is earmarked for a UV light box I'm building so I can make cyanotypes, Van Dyke prints, and salt prints. It will be attached underneath the enlarger table, at the far end where the paper safes are on top. I have an older light box that was more a prototype to see if I was really interested in these other processes or not; it turns out that I am but the light box wasn't well thought out so I'll salvage the lights and ballast and make another out of the same white shelving material the wet side table top is made from. That way it won't take up precious table top space, which I am obviously short of!

This is the third darkroom I've had in my lifetime. The first was a corner of a detached garage used as an upholstery workshop during the day. The second was the loft over the workshop, light-proofed with aluminum foil and the heaviest sheet plastic the local home improvement store carried. Neither had running water and I carried water out in 5-gallon camping totes. In the summer it was so hot in the loft that the only practical means of working was in the nude and in the winter I shared part of the space with my oldest daughter's hampster (the workshop was heated, more or less, but not cooled.) In comparison, this one is pure luxury. I built it about seven or eight years ago, I think, and just recently have been upgrading it by adding more storage space. Better organization means that it's easier to clean, and for a darkroom that's really important so I'm doubly happy.

Mike
 

Attachments

  • Darkroom1.JPG
    Darkroom1.JPG
    1,016.4 KB · Views: 565
  • Darkroom2.JPG
    Darkroom2.JPG
    1,000.5 KB · Views: 587

dambo29

Member
Joined
Jan 7, 2012
Messages
7
Location
Los Angeles,
Format
35mm
Hi Henry,
I'm in the planning stages of building my own darkroom and one of the things that I'm still figuring out is the ventilation from the wet side. I really like that exhaust system that you have there above the trays. Could you please give me some more information about how you made it and perhaps show me some pictures of where and how it hooks up to the Soler & Palau TD-350/125 ?

Thank you very much,
A
 

MattKing

Moderator
Moderator
Joined
Apr 24, 2005
Messages
53,547
Location
Delta, BC Canada
Format
Medium Format
Hi Henry,
I'm in the planning stages of building my own darkroom and one of the things that I'm still figuring out is the ventilation from the wet side. I really like that exhaust system that you have there above the trays. Could you please give me some more information about how you made it and perhaps show me some pictures of where and how it hooks up to the Soler & Palau TD-350/125 ?

Thank you very much,
A

Welcome to APUG!

You might find it helpful to "Private Message" (pm) Henry your question. Just click on his name beside his post, and choose that oprtion. That way he will be more likely to see your question (he may not check this thread).
 

cliveh

Subscriber
Joined
Oct 9, 2010
Messages
7,585
Format
35mm RF
Multipurpose Darkroom
This is a very interesting thread, to which I have much to comment and more than I can write here. When I built my first darkroom, it was designed for developing and printing. However, over the years I have noticed how such a dedicated room can be designed for specific functions and my latest darkroom is nothing like my first.
For example I like to think of it as a thinking room and because I can have total light exclusion it makes an ideal small studio, as although it isn’t big enough to photograph very large objects, it’s great for still life work. The fact that the room blacks out, gives almost total control of lighting and I can leave things set up for days, weeks if necessary. I have UV lights mounted in the ceiling and I had a division sink made with three compartments. The first two have a drain with pipes and valves, which allows me to return chemicals to their original containers. The third goes to drain. However, I felt I could make more of this design and so I built a slatted wood cover hinged and bolted at the wall side and covered with light proof material and drop down flaps. This means that when I drop it down it makes the first two chambers of the sink light tight. When I built this I thought I was just being OTT and would not use it much. However, I am surprised to say I have found this facility extremely useful. In short, the thought about designing equipment and its configuration for convenience of use is extremely important.
I have always felt that design of small details within your working environment of great importance. If you are going to do something again and again and again and get good at it, then design of your working environment is extremely important. To give an example of this, my Durst enlarger is bolted to the wall at a height to suit me, as is the bench beneath, as is my Durst Labotim and Stop Clock, as is my De Vere. In short I would suggest that consideration of small design details within your darkroom/studio are of great importance. Have others considered how their initial design could be improved and can they give examples which may be of use to others?
 
OP
OP
argentic

argentic

Member
Joined
Sep 7, 2002
Messages
317
Location
Echandelys,
Format
4x5 Format
I have always felt that design of small details within your working environment of great importance. If you are going to do something again and again and again and get good at it, then design of your working environment is extremely important. To give an example of this, my Durst enlarger is bolted to the wall at a height to suit me, as is the bench beneath, as is my Durst Labotim and Stop Clock, as is my De Vere. In short I would suggest that consideration of small design details within your darkroom/studio are of great importance. Have others considered how their initial design could be improved and can they give examples which may be of use to others?

That's exactly why I started this thread seven years ago. It's the small details that make all the difference in a workspace. Since then I learned a great deal from all these different darkroom designs. But many contributors dont realise how important the small details are. And often the simplest solutions are the most ingenious ones. So details please ! Details !
 

cliveh

Subscriber
Joined
Oct 9, 2010
Messages
7,585
Format
35mm RF
That's exactly why I started this thread seven years ago. It's the small details that make all the difference in a workspace. Since then I learned a great deal from all these different darkroom designs. But many contributors dont realise how important the small details are. And often the simplest solutions are the most ingenious ones. So details please ! Details !

Well for instance, the ability to lightproof sink compartments means that I can coat material with light sensitive solutions and by putting down the wooden lightproof cover, they can then dry within an air space in total darkness.
 
Status
Not open for further replies.
Photrio.com contains affiliate links to products. We may receive a commission for purchases made through these links.
To read our full affiliate disclosure statement please click Here.

PHOTRIO PARTNERS EQUALLY FUNDING OUR COMMUNITY:


Ilford ADOX Freestyle Photographic Stearman Press Weldon Color Lab Blue Moon Camera & Machine
Top Bottom