Darkroom Portraits (Part 2)

Ford Trimotor

A
Ford Trimotor

  • 1
  • 0
  • 37
museum

A
museum

  • 4
  • 1
  • 72
Old Willow

H
Old Willow

  • 0
  • 2
  • 98
SteelHead Falls

A
SteelHead Falls

  • 9
  • 1
  • 109

Recent Classifieds

Forum statistics

Threads
198,135
Messages
2,770,164
Members
99,566
Latest member
ATX_BW_Arch
Recent bookmarks
0

Shootar401

Member
Joined
Feb 25, 2012
Messages
399
Location
New England
Format
Large Format
Imagine a sort of "inverse TARDIS" ... but buying a stainless steel "Ikea" kitchen trolley has made it possible to set up in less than ½ an hour, and added about 6ft2 to my workspace
Dead Link Removed
I haven't got a wide enough angle of view lens (except a pinhole) to get in the bathroom and show what it looks like from the inside (when standing at the enlarger, I can almost lean back to rest on the on the wall behind me)

I like that Idea!
 

pdeeh

Member
Joined
Jun 8, 2012
Messages
4,765
Location
UK
Format
Multi Format
The key to getting use of a temporary darkroom is to make it quick and easy to set up and take down.
Almost everything needed stays on the trolley, so takes just a few seconds to wheel in; but pinning up blackouts, putting down newspapers for spills and making up chemicals & carrying them in takes 20 minutes or a little more, depending how energetic I feel.
The most time-consuming bit is afterwards - tidying & washing up, washing prints & so on.

It underlines for me that the "master" printers (past and present) who learned their early skills printing in similar conditions simply have that extra "something" in their makeup that I don't. I can produce a decent enough print for just me to look at, or even to give as a token gift, but exhibition or "fine" print? ... never happen.
 

Luis-F-S

Member
Joined
Sep 19, 2013
Messages
774
Location
Madisonville
Format
8x10 Format
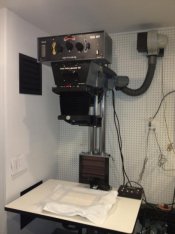
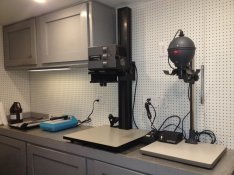
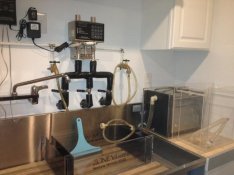
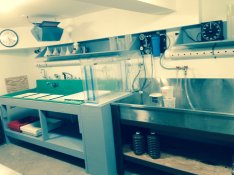
This the darkroom I've been working on for a few months, it's small, 91 SF approx 7'-9' x 11'-9" (2.9 x 3.5 meters for those of you across the pond). It has 3 enlargers, A Durst SM-183 for 5x7 & 4x5 with a motorized CLS 301 head. Also have a condenser head and a cold light for it. Tomorrow I work on the cord clutter around the Durst. Also an LPL 4500II for formats up to 4x5 with VCCE & Dichroic modules and finally a Leitz Valloy II, probably the finest 135 enlarger made. To the left of the Durst are two filtered louvered air intakes, the exhausts are over the sink. There is Thomas Duplex as well as an LED Zone VI safelight. The sink is a 6' SS Leedal that I bought some 25 years ago and have had it in 3 darkrooms since. There is a digital Intellifaucet K250, and an Elkay chiller for temperature control. That way I can get 70 Deg water year round (the water gets over 80 Deg here in the summer). Next to the sink is a Zone VI 8x10 print washer and a Kostiner film washer that takes 8x10 frames. I also have an 11 x 14 print washer that I set up when needed. There is a Cal Stainless drying cabinet. It's very workable for one person, and I can process film up to 8x10 which I contact print. There's a flat file storage cabinet on a second story loft and a film freezer outside the darkroom. Hopefully my final darkroom!

SM183:301.jpg LPL.jpg Wetside.jpg
 
Joined
Sep 20, 2002
Messages
440
Location
Los Angeles,
Format
4x5 Format
I am in the process to build a new shed and place my darkroom there, since my old location has been flooded countless times lately.
Unfortunately I will have to wait until April, since in March I have a show and I need to make 26 16 x 20 prints. For this I have arranged a temporary darkroom in the garage. This plan refers to the darkoom in the shed.

NEWDARKROOM.jpg
 
Joined
Jan 16, 2010
Messages
1,685
Location
Atlanta, GA
Format
Medium Format
Darkroom Updates

Here are a few before and after pix from my darkroom about two years ago and today. The walls were flaking and it was a bit icky feeling to be down there some times. Problematically, I had one electrical circuit on the far side of the basement, so I had to have extension cords all over the place to power everything.

Two years ago:
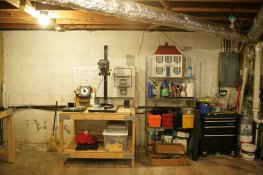
20111023-05.jpg
You can see the flaking walls and crap piled everywhere. (No, that's not my doll house.)
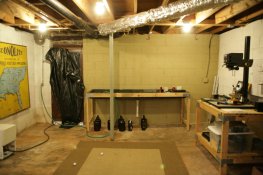
20111023-04.jpg
Not very inviting. Rug doubles as a putting green.

Today:
photo 3.JPG
Freshly primed and painted walls, and a new 15AMP electrical circuit to feed everything! I love working with conduit. Still draining into a bucket.

photo 1.JPG
New enlarger (man, I miss that LPL…) and cheesy Rembrandt reproduction. I turned the enlarger table so that the back is where I want to build a partition. Eventually the table will either be cabinets or just a heavy plywood mounted to the wall. I will probably wall mount the sink as well. Electrical right where it needs to be. On the far right you can just barely see my light box on a metal table.
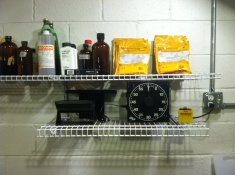
photo 2.JPG
You can see the electrical conduit on the right, with a switched inspection light (finally!) on the ceiling which you can see in the first picture. Old Kodak Polycontrast filter set for that retro touch.
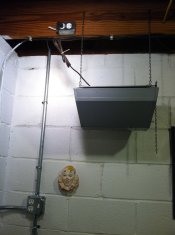
photo 4.JPG
Here's my setup for Sir Thomas Duplex, with a switched outlet in the ceiling. No more extension cord hanging down, and having to plug and unplug. Just flick the switch and go. It's configured with black foam core on one vane and lots of Rolux on both sides, so I can easily make it very dark if needed, or pop open the vanes and create a beautiful bounce light off the wall. Creepy clown head for atmosphere.

Eventually, I will lose the garden hose and bucket and get everything properly plumbed. For now, very happy. This setup still allows me to do 16x20 if I need, although I suspect my needs will be 11x14 max for the most part. I will add a rolling table with my 18x23 stainless holding bath, and another stainless steel cart will hold the print washer so it can be moved in when I need it. The space will be about 8x10, very compact but totally comfortable and serviceable, with plenty of storage.
 
Last edited by a moderator:

David Brown

Member
Joined
Feb 16, 2004
Messages
4,048
Location
Earth
Format
Multi Format
... I turned the enlarger table so that the back is where I want to build a partition.

... Eventually, I will lose the garden hose and bucket and get everything properly plumbed. ...

When you get proper plumbing and walls, you'll think you've died and gone to darkroom heaven. :wink:
 

jon koss

Member
Joined
Sep 4, 2004
Messages
748
Location
Boston, MA
Format
35mm
Hi Parker - Looks fantastic. Is the Tommy Light the only safelight? If so is it bright enough? I am just laying out a new 7 foot by 11 foot dark space and I am wondering if one Thomas Light will do the trick.

Thanks,
Jon

Edit: Doh, sorry for the dumbest post ever. I finally got off my butt and checked the other Thomas threads and more importantly plugged in the dang unit that is awaiting installation down in the basement. The entire 24 by 36 foot space is now bright enough to perform ocular surgery!
 
Last edited by a moderator:

David Brown

Member
Joined
Feb 16, 2004
Messages
4,048
Location
Earth
Format
Multi Format
This thread has sort of stalled. Allow me to get your juices flowing again ... :cool:
 

Attachments

  • DRpano.jpg
    DRpano.jpg
    96.6 KB · Views: 732

pbromaghin

Subscriber
Joined
Sep 30, 2010
Messages
3,791
Location
Castle Rock, CO
Format
Multi Format
3 enlargers, 2 sinks and in-the-wall pressure hose?

Holy moly.
 

Markauf

Member
Joined
Jan 14, 2006
Messages
62
Location
Chicagoland
Format
Multi Format
Almost Completed !

After years of planning / dreaming, I'm about to complete my darkroom build. One last project is to install the revolving darkroom door. I secured the door on eBay and drove 2 1/2 hours away to haul it home. I was so concerned about the door fitting in my SUV ( it stuck out the back a couple of ft) that I neglected to figure out how I was going to get it through my basement door. Turns out the door will need to be completely disassembled ( thousands of rivets!) and rebuilt again!

image.jpg image.jpg
 
Last edited by a moderator:

MattKing

Moderator
Moderator
Joined
Apr 24, 2005
Messages
52,411
Location
Delta, BC Canada
Format
Medium Format
After years of planning / dreaming, I'm about to complete my darkroom build. One last project is to install the revolving darkroom door. I secured the door on eBay and drove 2 1/2 hours away to haul it home. I was so concerned about the door fitting in my SUV ( it stuck out the back a couple of ft) that I neglected to figure out how I was going to get it through my basement door. Turns out the door will need to be completely disassembled ( thousands of rivets!) and rebuilt again!

View attachment 90367 View attachment 90368

Can you take your basement door out instead?
 

Barry S

Member
Joined
Jan 28, 2007
Messages
1,350
Location
DC Metro
Format
Large Format
I don't get the appeal of those revolving doors for a personal darkroom. They take up a lot of space and they're a pain to use (compared to a simple door). If you have multiple people continually entering and exiting a group darkroom, they make sense--otherwise, I'm not sure of the benefits.
 

Markauf

Member
Joined
Jan 14, 2006
Messages
62
Location
Chicagoland
Format
Multi Format
Removing the basement door and the molding will still not allow for the width of the door.
I wanted to go the route of the revolving door to reduce dust from the rest of the basement into the darkroom and thought it would also be easier to take prints outside into the light without putting away paper ( I have a print inspection area set up just outside the door). Space wasn't really an issue, as the rest of the basement is unfinished storage space.
 

pbromaghin

Subscriber
Joined
Sep 30, 2010
Messages
3,791
Location
Castle Rock, CO
Format
Multi Format
I was so concerned about the door fitting in my SUV ( it stuck out the back a couple of ft) that I neglected to figure out how I was going to get it through my basement door. Turns out the door will need to be completely disassembled ( thousands of rivets!) and rebuilt again!

Oh, thank you for this post. You saved me the trouble of finding out the hard way.
 

MartinP

Member
Joined
Jun 23, 2007
Messages
1,569
Location
Netherlands
Format
Medium Format
I'd not want to carry prints through a revolving door (post #118, above). You need two hands for the print, one hand for the door and have very limited space. Also, in prehistoric times (25 years ago, when I worked in a darkroom) usually there would be a wide standard door for moving kit in and out of the darkroom as a revolving door is just meant to let people walk in and out without letting the dark out all the time . . .

To get large prints in and out of the darkroom, while keeping it dark, make a light-lock going through the partition wall - simply a boxed-in table with a lift up door on each side of the wall. Put the print in a tray in the dark and close the light-lock door, walk through your light-proof exit from the darkroom, open the 'light' side of the light-lock and pick up your print out of the tray. Much easier than carrying a soggy print through any kind of revolving door and you can have two people working, one in the dark and one in the light, if you can coordinate between each other about the light-lock.

I must also say that most of the darkrooms I see in this thread are better equipped and laid out than the professional ones I have worked in! It is possible to do a lot with much less, especially at amateur work rates. My (amateur) darkroom now doesn't have a sink or running water for example, but 16x20" prints are still do-able regularly.
 

David Brown

Member
Joined
Feb 16, 2004
Messages
4,048
Location
Earth
Format
Multi Format
I must also say that most of the darkrooms I see in this thread are better equipped and laid out than the professional ones I have worked in! It is possible to do a lot with much less, especially at amateur work rates. My (amateur) darkroom now doesn't have a sink or running water for example, but 16x20" prints are still do-able regularly.

My current darkroom (pictured above) is much better equipped than the one I designed, built and equipped for an employer in the 1980s. However, I am sure that I spent a lot less (even in inflation adjusted dollars) than the "professional" 1980s one cost my boss. Analog gear is so cheap now, I have things I could have never dreamed of even 15 years ago. And, it just accumulates.

So, yes, it is possible to do a lot more with a bit less. But if you have the space and the resources, it's just nice to have better tools. :cool:
 
Joined
Jan 16, 2010
Messages
1,685
Location
Atlanta, GA
Format
Medium Format
IMG_4732.jpg

Current status of the darkroom. I've been shrinking my footprint and now have a space laid out about 9'x10'. Sold the 4x5 enlarger and now have a 23C. Seems about perfect for my workload.

The needed two walls would enclose the pole on the left and the stud on the far right.

Still draining into a bucket, but I love having a switched safe light and an inspection light.

My personal motto: "When in doubt, add more electrical outlets."
 

JRoosa

Member
Joined
Jul 31, 2014
Messages
112
Location
Colorado, US
Format
35mm
IMG_4807.jpg
Here's the new darkroom setup. Ikea desk for a workbench, Ikea wheeled organizer for enlarger stand.

The huge shelving unit is going to be swapped for a narrower one from the garage at some point to get some elbow room, and then probably an Ikea cabinet for the wall over the workbench with LED lights underneath. Will also need some speakers for some music/podcasts. Awfully boring right now in there. Also the baby will be big enough for the playgym and we can get that obnoxious thing out of there.

At some point I'm going to add the ability to mount my reloading press so that I don't have to do that in the garage when it's 10 below zero. This will be a multifunction workshop when all is said and done. Dirty projects in the garage, cleaner projects indoors. I'm so excited.

In the corner behind that shelf there are hookups for a sink, which used to be in the room when it was a darkroom years ago. My mother-in-law ripped out the sink and counter to make it a storage room. Maybe at some point I'll put in a small sink for print washing, but there is already a sink in the laundry room just outside the door which serves the purpose well enough for now.

-J.
 
Joined
Jan 16, 2010
Messages
1,685
Location
Atlanta, GA
Format
Medium Format
View attachment 93528

Current status of the darkroom. I've been shrinking my footprint and now have a space laid out about 9'x10'. Sold the 4x5 enlarger and now have a 23C. Seems about perfect for my workload.

The needed two walls would enclose the pole on the left and the stud on the far right.

Still draining into a bucket, but I love having a switched safe light and an inspection light.

My personal motto: "When in doubt, add more electrical outlets."

I (finally) decided on a layout for the darkroom and decided to get busy. I've posted over the last few years the various evolution of the darkroom but I've always had to work in the basement with the windows covered up. Since I have a corner, I only needed to build two walls, and this was the weekend to get started.

The most difficult part is to get the bottom plates square to the walls and to each other. Just kept checking the measurements and then tacked it down with the hammer drill and concrete screws. Rather than running a top plate I tacked the studs to the open floor joists up top. I'll post more details later. For now, it's quitting time. Not that I want to stop, just have a family thing... :tongue:

photo 2.JPG

Yeah, baby! Yeah!
 
Joined
Jan 16, 2010
Messages
1,685
Location
Atlanta, GA
Format
Medium Format
Darkroom_Panorama-1.jpg

Pulled down the old ductwork and got the walls mostly finished, still have to frame in the door, do the electrical, plumbing, etc. but I wanted to do some work and get used to the layout before I slapped up the sheetrock only to realize "darn, I should have added an outlet over here!" So I temporarily added some black plastic. Final size of the space is 9x11. Not huge but should be plenty for what I'm doing.

Looking through the wall on the far left is where my temp control unit will mount, with taps that extend along the sink, and one that will come through to the facing side of the wall for a small print washing sink. Hot and cold water lines are directly above.

On the right I will build a 30" deep table for the enlarger, paper safes and all that jazz.

Fun!
 
Last edited by a moderator:
Photrio.com contains affiliate links to products. We may receive a commission for purchases made through these links.
To read our full affiliate disclosure statement please click Here.

PHOTRIO PARTNERS EQUALLY FUNDING OUR COMMUNITY:


Ilford ADOX Freestyle Photographic Stearman Press Weldon Color Lab Blue Moon Camera & Machine
Top Bottom