Darkroom Portraits (Part 2)

Carved bench

A
Carved bench

  • 0
  • 3
  • 2
Anthrotype-5th:6:25.jpg

A
Anthrotype-5th:6:25.jpg

  • 6
  • 3
  • 87
Spain

A
Spain

  • 2
  • 0
  • 80
Nothing

A
Nothing

  • 2
  • 3
  • 154

Recent Classifieds

Forum statistics

Threads
198,053
Messages
2,768,934
Members
99,547
Latest member
edithofpolperro
Recent bookmarks
0

Chris Lange

Member
Joined
Aug 17, 2009
Messages
770
Location
NY
Format
Multi Format
This is my space, not quite as posh as Jbrian's but it's evolved into a very good darkroom over the past 2 years. I have a large 7x4' light table outside the darkroom that has a folding wooden top, so it can double as a desk when I'm not using it for editing. There's also a film drying cabinet behind the vantage point for the photograph.

darkroom.jpg
 

jbrianfoto

Member
Joined
Oct 9, 2006
Messages
164
Location
Fredericksburg, VA
Format
8x10 Format
This is my space, not quite as posh as Jbrian's but it's evolved into a very good darkroom over the past 2 years. I have a large 7x4' light table outside the darkroom that has a folding wooden top, so it can double as a desk when I'm not using it for editing. There's also a film drying cabinet behind the vantage point for the photograph.

View attachment 54829

Nice ! I like that you can just spin around and drop your paper in the developer. Perfect size. I also like the wall-rack that you have over the sink - looks like that stuff you see in stores where they can mount different shelves for display. Good idea there. My first good enlarger was a Beseler 45 just like yours - you've done a nice job here, everything is thoughtfully placed.
 

Keith Pitman

Subscriber
Joined
Mar 21, 2004
Messages
663
Location
Pine Junction, Colorado
Format
Large Format
Rather than duckboards, take a look at a product called "Dri Dek." You can find it at restaurant suppliers or on-line (Dead Link Removed). It is 12" tiles that snap together to form a custom sized mat. They will last forever and can be separated easily to clean the sink. Get black which will not show stains.


Here's my B/W lab - been at it for over a year - now I'm processing film again. In there you'll see the 10X10 Durst L184 with 1414 cold light, an auto focus DeVere 504 (with ZBE controller and Ilford 600H V/C head) - film processing line with nitrogen burst agitation, paper processing sink, film dryer and big custom table that folds open on one side to allow use of Seal 500TX press. I still have things to finish up on, like building a print drying rack and some duck boards for the sinks. I have a power amp for my stereo, but still need a preamp and a tuner, gotta have music in the lab.
 

Ghostman

Member
Joined
Dec 5, 2011
Messages
504
Location
Switzerland
Format
Multi Format
I convert my kitchen into a darkroom. I look forward to the day I can set it up permanently.

darkroom (1).jpg
 

rovinghermit

Member
Joined
Jun 16, 2011
Messages
3
Location
Canada
Format
Medium Format
So I'm finally getting my darkroom in here.
First off, I cannot extend enough thanks to the APUG community. Looking at the darkroom portraits from all of you was inspirational, educational, and strangely soothing in my time between darkrooms. I've been doing black and white completely on my own for about 8 years now, and with having never actually worked in a proper darkroom (not even one time), the information all of you share here has been invaluable to me. In the past I was always in rental properties, so there was no option to build specifically, it was pretty dodgy, cobbled together, punkrock darkrooms for years. The last one had a hole in the floor for a sink and drain, in a different part of the basement.

Now I finally own a house and spent over 2 months last winter putting this together after I was unexpectedly laid off. Best thing that happened to me in awhile.

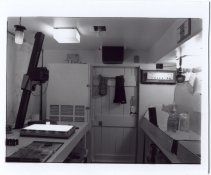
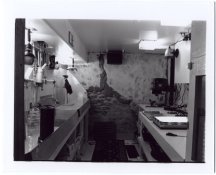
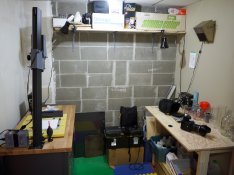
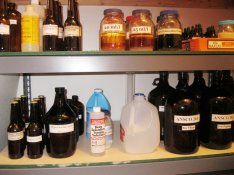
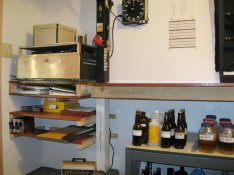
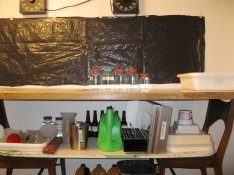
Started out with tearing out a cold storage room, patching some deteriorated parging on the foundation. All in all, about 70% of the materials were either used, scavenged, or recycled. The sinks were made out of the metal/enamel liners from two old ass freezers that were left in the house. The ceiling was done with nearly full size sheets of new drywall that were waste from a neighbour's reno. Almost all of the lumber was scavenged. I had to buy paint, some electrical and plumbing and 2 sheets of plywood.
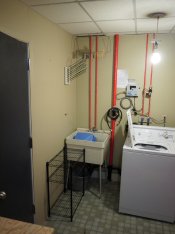
There is a master switch to close off all of the electrical, including plug ins.
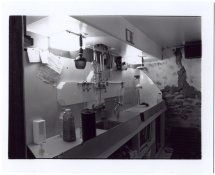
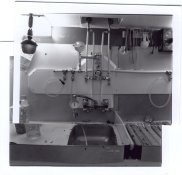
The plumbing has it's own set of shut offs for easy maintainence or changes.
I got one of the lawler mechanical temp control valves off of the auction site for a little over $100. Someone here had posted a link to this, http://conradhoffman.com/9700.htm, for tips with tuning these valves up. I went through and followed it, and the valve works like a dream.
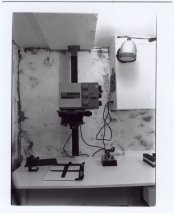
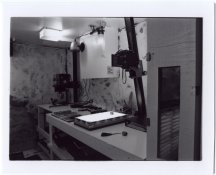
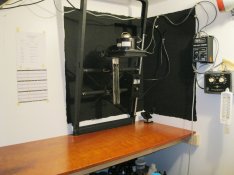
I got the LPL enlarger for free from one of the high schools here in town which has an incredible photography program. Since the film price jump a year or more ago, they've had to scale back on the film component, and so were getting rid of a bunch of equipment. I modified the column slightly to mount it to the ceiling so that the work surface underneath would be movable for doing bigger enlargements. It has only 2 positions, but they both have adjustible bolts so that it can be properly aligned with the enlarger.

There is some more stuff in it now with settling in and refining here and there, but I sure am happy with it.
I'm pretty typed out now, but if any of you have any questions, ask away.
Thanks again APUG, couldn't have done it with out you.
 

Attachments

  • darkroom5.jpg
    darkroom5.jpg
    256.4 KB · Views: 1,310
  • darkroom4.jpg
    darkroom4.jpg
    260.2 KB · Views: 1,298
  • darkroom3.jpg
    darkroom3.jpg
    259.5 KB · Views: 1,368
  • darkroom2.jpg
    darkroom2.jpg
    241.5 KB · Views: 1,431
  • darkroom.jpg
    darkroom.jpg
    275.4 KB · Views: 1,485
  • darkroom6.jpg
    darkroom6.jpg
    357.3 KB · Views: 1,223

Sim2

Member
Joined
Nov 21, 2009
Messages
492
Location
Wiltshire UK
Format
Medium Format
Really glad you got your first darkroom up and running - as first darkrooms go it sure beats under the stairs/in a cupboard, good times ahead. Enjoy your space!
 
Joined
Jan 16, 2010
Messages
1,685
Location
Atlanta, GA
Format
Medium Format
So I'm finally getting my darkroom in here.

Very nice work! Seriously cool.

When you ceiling mounted your LPL, how did you modify it? You mentioned that it has two positions, do you mean it doesn't work properly in the upside down orientation, or did I misread that?
 

andrew.roos

Member
Joined
Jan 4, 2011
Messages
572
Location
Durban, Sout
Format
35mm
Here's mine after a minor update. I've enclosed the enlargers (left) under a lightproof "tent" of black material to reduce stray light from the enlargers and prevent direct paper exposure to the safelight while printing and added a set of metal baskets (right) for drying fibre-based prints.

DSC_3152.jpg DSC_3129.jpg
 

Kav

Member
Joined
Sep 13, 2011
Messages
145
Location
Time will te
Format
Multi Format
So I was given a new enlarger and complete darkroom that pretty much replaced everything I had. So now I need to find a new home for my other two enlargers. The Omega D2 has a new home, but need to re-home my Beseler 67S2 color enlarger with an extra head.

But here's what it looks like now:
i-5jJj4CZ-XL.jpg

Here's what all I got:
Jobo CPA2. I can't seem to figure out how to get the drums to work. But I will figure it out. Heater and pump seem to work.
BTZS sheet developing system
Durst CLS 450 enlarger with a few voltage stabilizers.
Timers, safelights, and papersafes
Four Jobo drums that cover 35mm, 120, 4x5 film and prints up to 20x24"
A 150mm Schneider-Kreuznach lens
50mm, 80mm, and 135mm Nikon enlarging lenses. All are El-Nikkor.
All kinds of odds and ends.
 

Kav

Member
Joined
Sep 13, 2011
Messages
145
Location
Time will te
Format
Multi Format
Your Jobo CPA is set up to use a Jobo lift, but one is not attached in the photograph. That will allow you to connect the drums to the processor.

Thanks for the info, I guess my next question is how do I set the Jobs up to not use the lift. I don't have one.
 

rovinghermit

Member
Joined
Jun 16, 2011
Messages
3
Location
Canada
Format
Medium Format
This in response to ParkerSmithPhoto's question.

To put this in another way, (I'll assume you've used spring supported head/columns before). The head and it's mount to the column are in the same orientation as normal, just the column and baseboard mount are upside down.

The only thing with getting it to work with the column upside down, had to do with the spring that supports the weight of the enlarger head. It originally hooked onto the top of the column, and to work upside down, it needed to hook on to the bottom.

To do this meant removing the "plug" (I don't know what the proper term would be) that fit into the column tube and has a post that fits into the base mount.

Next, I removed with a file, enough material from the backside of the column, where the spring runs, so that the spring hook would sit flush with end of the column.

Then material had to be removed from the back of the plug to accommodate the part of the spring hook that sits inside the tube. And then it all goes back together.

This was a bit involved, but as much as I can, I like any mods I make to things to be reversible so things can still be used again as they were originally intended.

As for the two positions. This is concerning the working surface that the printing easel sits on. Most of the times it's at regular desk height, and here you're printing 4x5 inch prints, up to 11x14's, depending on what kind crops you're making.
But for doing larger prints than this, and I do prints up to 20x24 inches, you can move the surface down to about knee height. This allows me to do almost up to 50% crops even at that size, depending on what format of negative I'm using.
 

adelorenzo

Member
Joined
Mar 10, 2012
Messages
1,421
Location
Whitehorse, Yukon
Format
4x5 Format
Here's a look at my current setup, my first actual darkroom.

I started out with a small enlarger (LPL 6600) doing a little bit of printing inside of our sauna. After being given a new enlarger (Omega B-66 XL) along with a full darkroom setup, my wife was OK with us getting rid of the sauna. So I have about 32 sq ft to work with on one half of our laundry room, along with access to the laundry sink.

On the dry side I mounted the enlarger directly onto a workbench and store paper, negative binders, lenses, bulbs etc. in the drawers. I also keep my film scanner in there so I can pull it out to do scanning.

On the 'wet' side I threw together a cheap plywood/2x4 bench to hold working trays. I should probably coat the tabletop somehow as right now it is just soaking up any drops of chemicals or, better yet, actually turn it into more of a sink. Storage underneath for trays, chemicals and whatnot.

Over in the corner with the laundry sink is where I do my rinsing and I also have spaces there to dry prints, film, and also a drying rack for containers. I have an old Arkay print dryer that I've been using to fully dry prints into a flat state. I'm just using a kitty litter tray to rinse prints for now, getting a print washer would be nice at some point.

Jammed onto the shelf and into corners are the piles of gear that I'm not using, mostly color stuff like drums, processors, color enlarger head and various easels. I also have a huge supply of dry mounting stuff that is stashed underneath the 'wet' side.

The only thing I really need is a space heater, it stays around 15 C in there in the winter and it would be nice to bring it up to 20 C when I am working. Will probably pick one up this week.
 

Attachments

  • darkroom-Nov-11-2012__0085-4.jpg
    darkroom-Nov-11-2012__0085-4.jpg
    251.8 KB · Views: 1,509
  • darkroom-Nov-11-2012__0085-3.jpg
    darkroom-Nov-11-2012__0085-3.jpg
    254.4 KB · Views: 1,337
  • darkroom-Nov-11-2012__0085-2.jpg
    darkroom-Nov-11-2012__0085-2.jpg
    331.7 KB · Views: 1,448
  • darkroom-Nov-11-2012__0085.jpg
    darkroom-Nov-11-2012__0085.jpg
    310.4 KB · Views: 1,443

grahamp

Subscriber
Joined
Mar 2, 2004
Messages
1,696
Location
Vallejo (SF Bay Area)
Format
Multi Format
For years I used a plywood over-bath arrangement for my trays, and a couple of coats of good exterior grade varnish was all it needed. I use an electric oil-filled radiator in my space with the thermostat set to 68-70 F. I don't run it all the time, but with a bit of planning it brings the temperature up. Admittedly we don't get down much below freezing here very often, but keeping the temperature no lower than the mid-40's protects the chemicals. If you have a device with a low setting you can use a plug-in timer to warm the space up in good time. Just watch the power rating of the device - many are designed for lamps, not heaters.
 

sepiareverb

Member
Joined
Feb 17, 2007
Messages
1,103
Location
St J Vermont
Format
Multi Format
Been in my new darkroom for a year and a half now. Loving it.

L2002975.jpg


LPL4500VC enlarger, and an epoxied plywood sink. Ikea cabinets.
 

MattKing

Moderator
Moderator
Joined
Apr 24, 2005
Messages
52,340
Location
Delta, BC Canada
Format
Medium Format
Looks great, but I think you have a ghost :whistling:

Been in my new darkroom for a year and a half now. Loving it.

L2002975.jpg


LPL4500VC enlarger, and an epoxied plywood sink. Ikea cabinets.
 

Dennis S

Subscriber
Joined
Mar 16, 2008
Messages
1,760
Location
Vancouver B.C.
Format
Multi Format
1-IMG_0549.JPG

My latest and most useful arrangement. They all have a certain format and contrast settings that they each do extremely well. The sink and trays are by my butt...
The larger print washer 11x14 & 16x20 is at my feet
 
Last edited by a moderator:

rjhelms

Member
Joined
Aug 13, 2012
Messages
21
Location
Peterborough
Format
35mm
Well, my kid-sized craft table in my bedroom with barely enough room for an Omega B-600 enlarger and 3 8x10 trays doesn't look so impressive. Lots of inspiration in this thread for what I'm going to do once I've got the time, money and space for something bigger & better.
 
Joined
Jul 23, 2003
Messages
87
Location
Portland - O
Format
Large Format
Here’s my small contribution to darkness. I built it in the basement. It is about 81/2’ square. It still needs ventilation and the “sink” is an old door on 2 chairs while the bucket serves as the temporary drain.

The wooden box is my home built VU light box for Kallitype and Palladium work.
I’ve got the Zone VI washer on a dolly and push it to the real sink near the washer.

The Beseler enlarger is set up with a Zone VI cold light head and stabilizer for contact printing on Azo and Lodima. It is bolted to the ceiling joists and to the work table. It is very sturdy.

Alan
 

Attachments

  • IMG_0760.jpg
    IMG_0760.jpg
    593.3 KB · Views: 933
  • IMG_0758.jpg
    IMG_0758.jpg
    530.9 KB · Views: 943
  • IMG_0761.jpg
    IMG_0761.jpg
    612.6 KB · Views: 950
  • IMG_0765.jpg
    IMG_0765.jpg
    575 KB · Views: 987
  • IMG_0763.jpg
    IMG_0763.jpg
    440.8 KB · Views: 994

munz6869

Subscriber
Joined
May 17, 2004
Messages
1,302
Location
ɐıןɐɹʇsnɐ 'ɐıɹoʇɔıʌ
Format
Large Format
New Darkroom 01.jpg New Darkroom 02.jpg

My refurbished darkroom/laundry! Cool new bits include an aluminium frame, with the sides covered in velcro loop, and a black foamcore front panel, that, with handles, slides into the window frame and completely blocks out the light!! Also, the Elfa shelving and pegboard that nicely organises all my bits and pieces, and keeps things like scissors, pens, negative frames and clips out of the way but within easy reach. So far it all seems very ergonomic. Just in time for the mammoth printing challenge that is my annual xmas calendar...

Marc!
 
Photrio.com contains affiliate links to products. We may receive a commission for purchases made through these links.
To read our full affiliate disclosure statement please click Here.

PHOTRIO PARTNERS EQUALLY FUNDING OUR COMMUNITY:


Ilford ADOX Freestyle Photographic Stearman Press Weldon Color Lab Blue Moon Camera & Machine
Top Bottom