Darkroom Portraits (Part 2)

Ford Trimotor

A
Ford Trimotor

  • 1
  • 0
  • 37
museum

A
museum

  • 4
  • 1
  • 72
Old Willow

H
Old Willow

  • 0
  • 2
  • 98
SteelHead Falls

A
SteelHead Falls

  • 9
  • 1
  • 109

Recent Classifieds

Forum statistics

Threads
198,134
Messages
2,770,159
Members
99,566
Latest member
ATX_BW_Arch
Recent bookmarks
0

vysk

Member
Joined
Oct 6, 2008
Messages
75
Location
Ottawa, Cana
Format
35mm RF
Mine:
8275667175_fe708f5554_z.jpg

It is in the corner of my basement, beside the dryer.

Big laundry tub with running water is opposite the enlarger.

Vick
 

konakoa

Member
Joined
Sep 23, 2006
Messages
186
Format
Large Format
I've been reading and watching the old darkroom portraits thread for years. Like a lot of people, I've had temporary setups in bathrooms, laundry rooms, and garages; making prints meant I'd have to set up in the evening, get to work, clean up and finally clear out before dawn. I've been printing like that for over fifteen years.

I am proud to say I have had a new permanent darkroom for about a year now, a little different than most but one I am very pleased to have. The room is six feet by eight feet and incorporates several ideas that I've seen here on APUG. There's much that I'd like to point out in the layout--apologies in advance for the gushing info dump below.

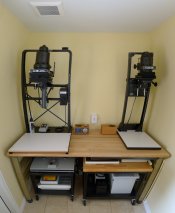
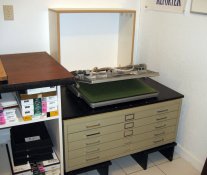
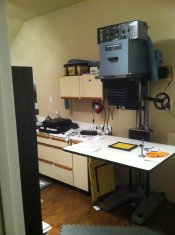
My enlargers rest on a heavy industrial grade solid maple wood workbench. Behind them the wall has multiple electrical outlets--they're all GFCI protected and are also all on a separate new line I had installed from the main house electrical panel. Above the enlargers is a Panasonic vent fan (these are wonderfully quiet and are well worth the cost!) Hanging underneath the workbench are a set of fiberglass drying screens on hooks. The screens are pulled out and are placed separately on a homemade collapsable PVC pipe frame (seen lying flat against the wall at right) for wet fiber prints. A paper cutter, print washer, RC print dryer, trays and dry mount press on mobile rolling carts (from all my temporary in and out setups) finish off the space.

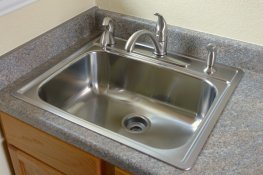
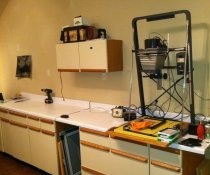
There wasn't enough room for a wall length sink on the other side of the room (the door would have been partially blocked) so instead I put in a standard stainless steel kitchen sink. Worth pointing out is that I have two faucets in the sink. This allows me to be able to wash film or paper, and have the second for cleaning up or mixing fresh chemistry. Two faucets are a **huge** time saver. Trays go on the countertop as space allows. Liquid and dry chemistry I keep in spill-proof plastic bins under the sink. Graduates and mixing containers are also kept there. A squishy extra thick anti-fatigue foot mat lies in front of the sink cabinet for long printing or film developing sessions.

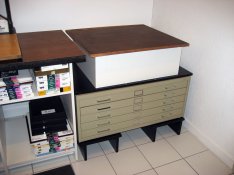
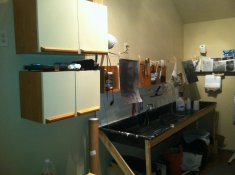
Next to the sink I have a metal rolling tool chest with multiple drawers for lots of storage of the numerous small bits and pieces needed for printing. It's also useful as a paper drawer to keep unexposed enlarging paper safe and out of the way (in the original packaging) and is also great for keeping precoated papers for cyanotype and van dyke browns sufficiently dark until they're used.

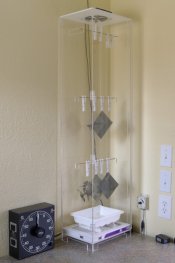
On the right corner on top of the tool chest countertop is my film drying cabinet. It's my own design and I built it myself. The cabinet allows me to dry two rolls of 120 film or multiple sheets of 4x5. The cabinet is made of clear acrylic and uses a high quality air filter and a quiet twelve volt fan to aid in allowing film to dry inside without any worry of dust or damage to wet freshly developed film.

Directly above the sink is a safelight I built, using an extra long row of red LEDs that goes the length of the wall. The LEDs are mounted to the flat side of a little section of baseboard molding turned upside down. The long illuminated length allows for soft and even light to be bounced off the walls and ceiling--so there are no hotspots or pools of light for the entire room. The LEDs are connected to a dimmer (the small box mounted on the wall) made to safely dim LED lights so I can set the brightness as low or bright as needed.

Things I'd do differently and goofiness: the maple wood work top is beautiful and it feels wonderful to the touch, but if so much as a single drop of water lands on the surface it raises the grain of the wood and leaves a rough patch when it dries. The wood must be periodically oiled, and any unabsorbed oil easily transfers to paper or negatives placed on the wood. (What was I thinking?) I should have bought laminate for that side.

There are preexisting windows (really silly for the "dark" part of "darkroom", hmm?) I didn't cover them up nor did I want to. They can't be blacked out well enough for printing during the day, so I can only print at night. However, I can develop film just fine in daylight tanks during the day and the windows do let in lots of nice indirect natural light. It's surprising but having a window to look out makes a twenty minute film processing run go by much more quickly.

One other little bonus: on nice weather days (or nights) I can open the window and the door to the outside. After decades of souping film indoors and endlessly staring at my reflection in bathroom mirrors or gazing at the multitude of settings of the laundry machine for the thousandth time, doing a film run or rocking paper in a tray with those open portals makes for a very different experience. :smile:
 

Attachments

  • Dark-4.jpg
    Dark-4.jpg
    64.3 KB · Views: 970
  • Dark-3.jpg
    Dark-3.jpg
    96.2 KB · Views: 938
  • Dark-2.jpg
    Dark-2.jpg
    114.7 KB · Views: 1,035
  • Dark-1.jpg
    Dark-1.jpg
    112.8 KB · Views: 993

Darkroom317

Member
Joined
Mar 2, 2009
Messages
653
Location
Mishawaka, IN
Format
Large Format
I like your venting, what is it hooked up to?

There is a fan in that vertical section. It is hooked up to an already existing ventilation system that leads outside.
 

David Brown

Member
Joined
Feb 16, 2004
Messages
4,048
Location
Earth
Format
Multi Format
Latest addition to the darkroom: a flat file!

Made the base, the black surface on top of the flatfile, and the white box out of scrap material already in the shop. Inside the white box will be the dry-mount press. This gets the press off my other work table and adds another misc. work surface. The wood-grain work surface is temporary; I'm afraid I will actually have to buy a nice piece of something for a counter top. I was hoping this was going to be free ... :tongue:
 

Attachments

  • flatfile3.jpg
    flatfile3.jpg
    180.3 KB · Views: 786
  • flatfile2.jpg
    flatfile2.jpg
    171.8 KB · Views: 771
Joined
Jan 16, 2010
Messages
1,685
Location
Atlanta, GA
Format
Medium Format
Latest addition to the darkroom: a flat file!

Made the base, the black surface on top of the flatfile, and the white box out of scrap material already in the shop. Inside the white box will be the dry-mount press. This gets the press off my other work table and adds another misc. work surface. The wood-grain work surface is temporary; I'm afraid I will actually have to buy a nice piece of something for a counter top. I was hoping this was going to be free ... :tongue:

Does the weight of the press tend to krunkle in the top of the flat files? I have a similar set of files and was considering something like this. I figured I would need to build a shell to go over the files and support that weight.

PS: you got enough paper there, David? You're making us all feel bad... :smile:
 

David Brown

Member
Joined
Feb 16, 2004
Messages
4,048
Location
Earth
Format
Multi Format
Does the weight of the press tend to krunkle in the top of the flat files? I have a similar set of files and was considering something like this. I figured I would need to build a shell to go over the files and support that weight.

I was concerned about that, too. However, when I looked inside the case, I found that the top of the flatfile is structurally reinforced by a bar that runs across the long dimension, as if the manufacturer anticipated something being on top of the file (though perhaps not a Seal press). I also placed boards across the top (under the press) in the short dimension.
 

GKR1

Member
Joined
May 27, 2009
Messages
78
Location
San Diego
Format
Multi Format
I tried going to our local college for DR use, however, they would not let me take the lab without going through other classes. What a joke.... I wrote the guy who runs the foto dept 3 times and he did not even respond back. Something that day clicked inside of me and I started the darkroom project. After hemorrhaging some money I'm up and running and doing a lot time in the dark. Sunday I was in there 15 hours while girlfriend was visiting her folks out of town. lol.

Here are few phone pics and some results. I must say, there is nothing like fiber prints and split grading development. I'm hooked.

Here is my DR, need a dry press ASAP.
i-PbQSN6L-XL.jpg


Dry mounted in 16x20 mats.
i-4KccvkK-XL.jpg
 

Red Tractors

Member
Joined
Nov 18, 2012
Messages
135
Location
The windswep
Format
Multi Format
GKR1,

Nice!

I have access to the college lab for another seven weeks, then I am out on my own. I'm sad, and exited at the same time.

I have read through all three of the major darkroom threads, pretty amazing what can be accomplished in modest space.
 
Joined
Mar 26, 2011
Messages
733
Format
35mm
Thanks RT

You'll be more productive in your own DR.

In my case, and mentioned by others here, having your own DR to escape to can be profoundly therapeutic. (You've already experienced the Time Contraction.) :smile:

s-a
 

ataim

Member
Joined
Apr 19, 2012
Messages
50
Location
Fort Worth,
Format
8x10 Format
Here are a few picture of my humble Darkroom. Highlights, Durst 10X10 enlarger, CLS300 dichroic head, Beseler 45 Aristo Coldhead light, eight foot sink (I think), and plenty of storage. This is the way that it is in real life, cluttered,
 

Attachments

  • 002.JPG
    002.JPG
    548.9 KB · Views: 1,005
  • 001 (2).JPG
    001 (2).JPG
    538.4 KB · Views: 1,024
  • 003.JPG
    003.JPG
    477.1 KB · Views: 1,000
  • 032.jpg
    032.jpg
    599.2 KB · Views: 969
  • 030.jpg
    030.jpg
    611.7 KB · Views: 1,013
Last edited by a moderator:

pbromaghin

Subscriber
Joined
Sep 30, 2010
Messages
3,791
Location
Castle Rock, CO
Format
Multi Format
Ataim - I haven't started building my darkroom yet, but was given a sink very similar to yours. Is it anchored to the wall, with just the 2 legs and a 2x4 along the front?
 
Joined
Jan 16, 2010
Messages
1,685
Location
Atlanta, GA
Format
Medium Format
Ataim - I haven't started building my darkroom yet, but was given a sink very similar to yours. Is it anchored to the wall, with just the 2 legs and a 2x4 along the front?

I have the same ABS type sink, and made a base using 2x4 and Simpson Strong Tie Connectors (Lowes or Home Depot). Even the very light duty brackets of the 90 degree variety are more than enough to build a very sturdy base with a shelf underneath.

photo 2.JPG
 

pbromaghin

Subscriber
Joined
Sep 30, 2010
Messages
3,791
Location
Castle Rock, CO
Format
Multi Format
Parker, can you post a pic of where the 2x4 cross member supports the sink? It's hard to explain, but I wonder just where and how the wood meets the fiberglass, and how the sink sits on the wood.

Shoot. At the rate I'm going, it might be another 5 years before I actually build this thing. The retired guy who gave me most of my darkroom equipment stipulated that he wanted one of the first images it produces. He might die before that happens. When we were kids there was so much time to kill. Now I have more money than time and it ain't no bargain.
 

mesantacruz

Member
Joined
Feb 21, 2013
Messages
256
Format
Medium Format
GKR1...

I thought i recognized those places, it's SD alright. wonderful photos, and awesome framing

there's a group of us meeting on the 9th of june, if you look up San Diego APUG meeting.
 
Joined
Jan 21, 2003
Messages
15,708
Location
Switzerland
Format
Multi Format
Here's a picture of my very modest darkroom after building new benches for enlargers and processing trays.
Our house is absolutely tiny, and there isn't room for a darkroom other than in the basement, which isn't finished, insulated, or heated. In the winter it's about 40F / 5C in there, so I need tray heaters. Up until now I've used a water jacket, which is a pain in the butt, but recently I've been able to save up enough photo cash to have an electrician come in and install new electrical circuits, so that I can use electric tray-warmers instead. That will be a heaven sent.
A standard double utility sink is behind me, where the print washer sits. The enlarger table at the far left now fits all three enlargers.
Wish I had a heated space to work, but this is something that works at least. Just need to dress warm in the winter and equip myself with something nice and warm to drink. Hot chocolate with rum, perhaps? :smile: ImageUploadedByTapatalk 21369695822.482731.jpg
 
Last edited by a moderator:

zsas

Member
Joined
May 12, 2011
Messages
1,955
Location
Chicago, IL
Format
35mm RF
Looks great T! Nice n sturdy! Whoa - I spy the fabled Ektalure stash! There better be bars on that window or there might be the great Ektalure heist of 2013...
 
Joined
Jan 16, 2010
Messages
1,685
Location
Atlanta, GA
Format
Medium Format
Wish I had a heated space to work, but this is something that works at least. Just need to dress warm in the winter and equip myself with something nice and warm to drink. Hot chocolate with rum, perhaps?

You probably already know this, Thomas, but those oil filled radiators do a terrific job heating in small spaces, much better than the "hair dryer in a box" heaters. They need some time to get up to temp, though.

I prefer the hot buttered rum myself. However, I live in Georgia where what winter we have lasts about five hours. It's been Spring since February. :D
 
Joined
Jan 21, 2003
Messages
15,708
Location
Switzerland
Format
Multi Format
You probably already know this, Thomas, but those oil filled radiators do a terrific job heating in small spaces, much better than the "hair dryer in a box" heaters. They need some time to get up to temp, though.

I prefer the hot buttered rum myself. However, I live in Georgia where what winter we have lasts about five hours. It's been Spring since February. :D

Oh, indeed, and I appreciate your comment! Space heaters are great. My basement is one big unfinished room, however, and not insulated. There isn't a space heater in the world that can keep it warm in there, not without wasting enormous amounts of energy. The walls are extremely cold, as the outside is sometimes as low as -30*F. That's why tray heaters is the only sensible option.
In the future I dream of taking a space of the basement where I can build around the darkroom, insulate, and then heat it. But then enter 70-90% humidity in the summer, and things like mold becomes a problem instead... The house is over 100 years old, and conditions in the basement do not really lend themselves well to energy efficient heating and cooling.

Speaking of rum, I've been liking my Manhattans lately, one part sweet Vermouth, three parts good rye Whisky, a few drops of bitters, and a maraschino cherry. So I discovered that the same drink can be made, substituting the rye whisky for rum, and it's called a Havana Club. Very tasty indeed! Makes you a wizard printer in no time too (until the day after).
 

pbromaghin

Subscriber
Joined
Sep 30, 2010
Messages
3,791
Location
Castle Rock, CO
Format
Multi Format
Thomas, is your darkroom walled off from the rest of the basement at all? When we lived in Minnie, I enclosed my wife's basement exercise area with sheet plastic hung from the rafters, and used one of those oil-filled heaters ParkerSmith mentions. It helped a lot.
 

rmann

Member
Joined
Mar 14, 2004
Messages
679
Location
New York
Format
4x5 Format
It is fairly small - 100 square feet and I think I am using almost all of it. Enlarger is a Beseler VXL with a Beseler 8x10 head on a Fotar stand with a drop table. Sink is a little small, if I could design it again I would have more sink and less countertop. Light table is from an old print shop and the center island is made from a Sears tool cart and workbench.

darkroom 001.jpg

darkroom 002.jpg

darkroom 003.jpg
 
Photrio.com contains affiliate links to products. We may receive a commission for purchases made through these links.
To read our full affiliate disclosure statement please click Here.

PHOTRIO PARTNERS EQUALLY FUNDING OUR COMMUNITY:


Ilford ADOX Freestyle Photographic Stearman Press Weldon Color Lab Blue Moon Camera & Machine
Top Bottom