Build a shutter tester for Focal Plane shutters - Cheap, Easy & it Works

blossum in the night

D
blossum in the night

  • 1
  • 0
  • 33
Brown crested nuthatch

A
Brown crested nuthatch

  • 2
  • 1
  • 47
Double Self-Portrait

A
Double Self-Portrait

  • 7
  • 2
  • 141
IMG_0728l.jpg

D
IMG_0728l.jpg

  • 7
  • 1
  • 105

Recent Classifieds

Forum statistics

Threads
198,713
Messages
2,779,677
Members
99,684
Latest member
delahp
Recent bookmarks
0
OP
OP

Niglyn

Member
Joined
Feb 26, 2022
Messages
423
Location
Surrey, UK
Format
Analog
Hi!
I can't open the new file, it's giving me an invalid PDF error. All the others are fine.

Edit: it is working now, thank you for fixing it!

Sorry, yep file was corrupted on upload.
Have replaced the file & also added a firmware beta folder.

In there is the latest 4-0-09b firmware.
alignment screen also now allows touch to scroll down the menu as well as pressing the encoder.
 

Dmitry K

Member
Joined
Apr 15, 2025
Messages
7
Location
Lithuania
Format
35mm RF
Sorry, yep file was corrupted on upload.
Have replaced the file & also added a firmware beta folder.

In there is the latest 4-0-09b firmware.
alignment screen also now allows touch to scroll down the menu as well as pressing the encoder.

Hi!
I have installed the beta version, it is working fine. My blue button is not working on the alignment screen (it does switch the info on the main screen), but touch does.
 

Dmitry K

Member
Joined
Apr 15, 2025
Messages
7
Location
Lithuania
Format
35mm RF
And I think I found an error in SD-card wiring. At least on my display-pcb pins go like this: CDI SDO SDI SCS. So the wiring will be: blue, yellow, green, white. I repinned my connector (switched green and yellow) and SD card is working now.
 
OP
OP

Niglyn

Member
Joined
Feb 26, 2022
Messages
423
Location
Surrey, UK
Format
Analog
Hi,
Thanks for the feedback.
New beta firmware on Github (still the same file name).
Encoder & touch works in the Alignment screen, for progressing the menu selection.

For parameter changing, one still has to turn the blue button/encoder.
Touch parameter functionality will be added shortly.


Will look at the SD card wiring.
 

bto

Member
Joined
May 9, 2024
Messages
7
Location
Germany
Format
35mm
Hello would need possibility to PM to get Code?

thx
 

Attachments

  • Ohne Titel.jpg
    Ohne Titel.jpg
    105.3 KB · Views: 37

simplex

Member
Joined
Jun 27, 2024
Messages
10
Location
Germany
Format
Digital
Finally ... it took AliExpress weeks to deliver that tiny encoder. Now it's time to build ...

DSC05818.JPG


And now I know why that orange cable has been in my basement for years after a different project. No need for colour replacements!

If you look closely, the space between display and encoder is very limited, in fact zero. This is because AliExpress delivered a case that is 2 mm shorter than your prototype. The encoder board touches the screw holding the display, but it just works out.
 

simplex

Member
Joined
Jun 27, 2024
Messages
10
Location
Germany
Format
Digital
Just soldered a piece of my orange cable to a shortened cable from the kit. A bit of shrink wrap over it: done.

DSC05819.JPG
 

simplex

Member
Joined
Jun 27, 2024
Messages
10
Location
Germany
Format
Digital
More colour emulations: no grey and no purple cable in the kit? Simple:

A red cable from the kit combined with tiny bits of blue shrink wrap? Purple!
A black cable from the kit combined with tiny bits of blue shrink wrap? Grey!

DSC05822.JPG
 
OP
OP

Niglyn

Member
Joined
Feb 26, 2022
Messages
423
Location
Surrey, UK
Format
Analog

Hi, it's looking good.

The pcb for the encoder does overhang the tft a bit. There is only just enough space in the box to fit everything in. Some people have used smaller buttons.

Originally I used single Dupont wires, but found they did not fit tightly.
So I changed to pre-made JST-HX connectors, however they required the pins removing to swap colours around, which was quite fiddly.

Final solution was the kit of separate wires and connectors, so the colours could be plugged up in the correct order.
Only issue here is the kit does not contain all of the colours or the 8-pin connector. Details are on the parts list for purchasing the additional colours.

A bespoke pcb would be good, to replace the breakout board. It would fit directly onto the back of the tft board, so all of the tft & SD car connections would be automatically made without additional wiring (see my weather-station project) however this starts adding additional cost & complexity with ordering the pcb.

Look forward to seeing the completed project.
 

simplex

Member
Joined
Jun 27, 2024
Messages
10
Location
Germany
Format
Digital
Hi, it's looking good.
...
Look forward to seeing the completed project.
Thank you! Regarding a housing for the lasers and receivers, I've decided not to fiddle around with prototyping using Lego or simple wood. A few weeks ago, a 5 minute walk from my home a 3d Print Shop has opened. I'm not sure about it from a business model point of view in a small town of 20,000 inhabitants. But I'll give them a try on my 1st design.

So last week I downloaded FreeCAD, a 3d modeling software, all open source, and made my first steps. Finding really nooby friendly YouTube tutorials isn't so easy, by the way. First videos I watched were more suitable for engineers than 3d noobs like myself.

Wish me luck, guys - I'll need it! Will keep you informed.

FreeCAD.JPG
 

Timur

Member
Joined
Jun 8, 2025
Messages
4
Location
Russia
Format
35mm
Hello, friends!
Today, I finally managed to assemble the basic model.
I'm still waiting for the sensors, but once they arrive, I'll definitely send you the final result.
Many thanks to Niglyn for the clear instructions.
Niglyn, could you please send me the authorisation code? My reference code is: 44784760.
 

Attachments

  • 1.jpg
    1.jpg
    727.3 KB · Views: 34
  • 2.jpg
    2.jpg
    523.3 KB · Views: 34

Timur

Member
Joined
Jun 8, 2025
Messages
4
Location
Russia
Format
35mm
Dear Niglyn,
I haven't received enough messages to send private messages yet. Could you send me the password?

Dear MattKing,
Сould you help me send a message to Niglyn?
Thank you!
 

koraks

Moderator
Moderator
Joined
Nov 29, 2018
Messages
22,639
Location
Europe
Format
Multi Format
@Nyglin kindly reach out to @Timur if you will; thanks!

@Timu, welcome to Photrio! I think @Nyglin has just been kind of busy as he hasn't signed on in the last couple of days. He generally contacts people pretty swiftly, so I'm sure it's just a simple matter of other priorities getting in the way. Please hold until he has time!
 

Brenva1A

Member
Joined
May 28, 2025
Messages
1
Location
Italy
Format
35mm
1750955319454.png
Buongiorno scrivo dall'Italia sto costruendo 2 shutter tester, per me e per mio fratello, sono quelli che vedente in foto devo finire di assemblarli nella scatole e fissare i led e i sensori. Dove devo chiedere per i codici di sblocco ? grazie per aver condiviso il progetto
 
OP
OP

Niglyn

Member
Joined
Feb 26, 2022
Messages
423
Location
Surrey, UK
Format
Analog
Many apologies for not responding to the thread. Not my usual level of service.

I normally get an email advising of a new post, but this has not been happening.

Will send direct messages now.
 
OP
OP

Niglyn

Member
Joined
Feb 26, 2022
Messages
423
Location
Surrey, UK
Format
Analog
Hello everyone,

Has anybody tried the beta firmware?
It adds touch-screen features (firmware still works if you don't have the touch wired up, but obviously touch does not work).

It features a third display screen option (press encoder to cycle through them)
and auto scaling of the seconds & milliseconds reading, allowing for a larger typeface to be used.
 
OP
OP

Niglyn

Member
Joined
Feb 26, 2022
Messages
423
Location
Surrey, UK
Format
Analog
Firmware Update

Hi all, version 4.1.0.0b is now on Github.

It has autoscaling of the mS and S readings, allowing a larger typeface.

Three display screens to choose from, two with a much larger typeface, changed by pressing the Blue button.

Touch-screen functionality. When in the Splash, Averages or Alignment screen, touching the screen will return to the main screen.

In the Alignment screen, touching on the left will toggle down the parameter list (same as pressing Blue).
and touching on the right will toggle though the parameters (same as rotating Blue).

Touching at the bottom will save and exit the screen.

User Guide will be updated shortly.

Please report any grumbles, bugs, thoughts or ideas.
 

bto

Member
Joined
May 9, 2024
Messages
7
Location
Germany
Format
35mm
Hello,

started to build mine to test a Canon F1N Camera. Now a friend of mine would like to test his Hasselblad 501 with Leaf Shutter. How would I have to place the Laser and Sensor for best results? How reliable will the measurements for this type of Camera be?

Thank you
Branko
 
OP
OP

Niglyn

Member
Joined
Feb 26, 2022
Messages
423
Location
Surrey, UK
Format
Analog
Hello,

started to build mine to test a Canon F1N Camera. Now a friend of mine would like to test his Hasselblad 501 with Leaf Shutter. How would I have to place the Laser and Sensor for best results? How reliable will the measurements for this type of Camera be?

Thank you
Branko

Hi, there is a discussion of leaf shutters further up.
They are measured slightly differently, shutter 'speed' is calculated by

time to fully open + time to fully close /2
+ time fully open.

The Shutter Tester has the option to test leaf shutters and uses the formula above.

Sensor 1 is aligned with the centre of the shutter iris and Sensor 2 on the inner edge.
Sensor space parameter is set to the distance between the two sensors (on-centres)

There is one caveat. I have no way to check the accuracy of the results. All works fine with my test rig, so functionally it works.
However, I would assume it will be well within the normal ISO tolerance for shutter speeds.

The user guide is currently being updated to include the new touch functionality and the colour choice options, so will add details for the leaf shutter as well.

Regards,
N.
 

bto

Member
Joined
May 9, 2024
Messages
7
Location
Germany
Format
35mm
Hello,
Thank you so much for your answer and this fine project.

I am not shure what/where the „inner Edge“ exactly is?
Also if I use only 2 Sensors/Lasers where to connect these to the breakout board?

Branko
 
OP
OP

Niglyn

Member
Joined
Feb 26, 2022
Messages
423
Location
Surrey, UK
Format
Analog
Hello,
Thank you so much for your answer and this fine project.

I am not shure what/where the „inner Edge“ exactly is?
Also if I use only 2 Sensors/Lasers where to connect these to the breakout board?

Branko

Hi,
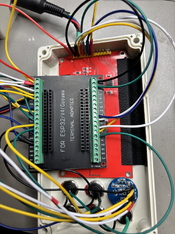
connect Sensor/Laser 1 & 2 as normal, as per the wiring diagram.

Sensor 1 is placed directly in the centre of the shutter iris.
Sensor 2 should be placed such that it just triggers when the leaves fully open, so on the inner edge of the outer rim.

Something to be aware of, The Shutter Tester is designed to test the shutter directly, not when attached to a lens.
The Hassy has the leaf shutter mounted in the lens, so you would be able to test it, without separating the parts.

The Shutter Tester requires the shutter to be in the closed position at the start of the test.
SLR type leaf shutter cameras start with the shutter open, so would not work with The Shutter Tester.

It would be easy enough to change the code to work with SLR type leaf camera shutters, but as I don't have such a camera/lens to test, if anybody requires such functionality, they would need to test the beta code for me.
 
Photrio.com contains affiliate links to products. We may receive a commission for purchases made through these links.
To read our full affiliate disclosure statement please click Here.

PHOTRIO PARTNERS EQUALLY FUNDING OUR COMMUNITY:


Ilford ADOX Freestyle Photographic Stearman Press Weldon Color Lab Blue Moon Camera & Machine
Top Bottom