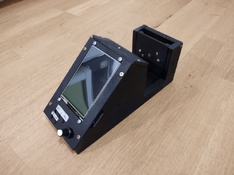
Build a shutter tester for Focal Plane shutters - Cheap, Easy & it Works

For V.

D
For V.

  • 0
  • 0
  • 0
Mt Rundle

A
Mt Rundle

  • 3
  • 0
  • 36
Sonatas XII-35 (Homes)

A
Sonatas XII-35 (Homes)

  • 0
  • 1
  • 32
Ode to Cor

H
Ode to Cor

  • 2
  • 0
  • 72
Moon in Myrtle

D
Moon in Myrtle

  • 5
  • 0
  • 65

Recent Classifieds

Forum statistics

Threads
199,454
Messages
2,791,853
Members
99,912
Latest member
ArcherKeating
Recent bookmarks
1

bto

Member
Joined
May 9, 2024
Messages
7
Location
Germany
Format
35mm
Hello,
it shows to be very tricky to place the laser beam at the outer edge of my lens (Zeiss Planar 80/2.8 CB) the shutter diameter fully open should be 26.8 mm. Would it be problem if the outer edge laser is of by 1 mm?
The Hasselblad lens starts with shutter open; 1. shuts fast; 2. opens for exposure time and 3. shuts again. How could I test this with the Shutter Tester. It would be great to have this mode. I could try to beta test the code.

Thank you very much in advance
Branko
 
OP
OP

Niglyn

Member
Joined
Feb 26, 2022
Messages
440
Location
Surrey, UK
Format
Analog
Hi Branko,
Yes, I can certainly add a Leaf Shutter Open mode, it waits whilst the shutter is open and then starts the testing routine once the shutter closes.
Give me a few days & I will do this.

As for Laser placement, I don't think 1mm will effect things too much. It will detect fully open a little early and starting to close a little late, so will probably cancel each other out. Make sure you set the Sensor spacing parameter in the Alignment menu.

Shutter Testers are designed to test the shutter only, without the lens, so do not know how testing with the optics in place will change things.
I guess we will find out :surprised:)


Just be careful with a lens, that you do not focus any strong light or Lasers though it and damage the camera, in the same way shutter cloth can be burned by the sun.
 

bto

Member
Joined
May 9, 2024
Messages
7
Location
Germany
Format
35mm
Hi,
the lens deflects the "outer " Laser beam" slightly towards center. Laser distance at front of lens for now is 13 mm. Had to place the sensors at 9,5 mm spacing just at the rear end of the lens.
I started to build a rig to test the lens only. Without camera. At the Hasselblad lenses the shutter could be armed with a flat screwdriver when not at camera.
I 3d printed front and rear caps for the lens which fit in the front an rear bayonet of the lens. To this caps I attached the lasers in front and the sensors rear. Will post some pictures when things start working.

Thank you again
Branko
 
OP
OP

Niglyn

Member
Joined
Feb 26, 2022
Messages
440
Location
Surrey, UK
Format
Analog
Hi, new firmware 4_1_0_1b available.

It removes 'Leaf' from the shutter type options and adds....

LeafC This is for testing leaf shutters that stay closed before & after firing (like a focal Plane shutter)
and
LeafO which is for the rich & can afford a Hasselblad :surprised:) where the shutter remains open until it is fired, then closes, exposes the film, opens for the exposure, closes, covers the film & opens again.

It works on my homemade leaf shutter, but not been tried in the real world, so please do not rely on the results until you are happy.

As always, please report back grumbles, complaints or praise :surprised:)
 

dmoriya

Member
Joined
Jul 13, 2025
Messages
1
Location
Germany
Format
35mm
Hi,

Can I have access to the code? Thanks! I am also curious why the code is not accessible like conventional open source...
 

japim

Member
Joined
Jul 13, 2025
Messages
2
Location
Cornwall
Format
Medium Format
Thank you for this tester - finally I can actually check some of my cameras!

I've roughed it out to check the functionality before boxing it up, and have some questions.

  • I have three lasers and three sensors, with the outer two at 32mm centres. Does this correspond to the 32mm in the settings menu, with the third one assumed to be centred?
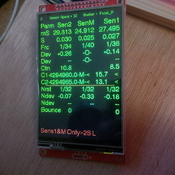
  • I'm getting the red message "Sens1&M Only>2SL"
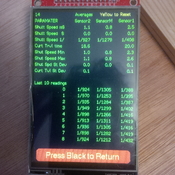
  • Which order are the sensors supposed to be in? The wiring diagram shows yellow, green, blue for the sensor connections going to pins 33, 25, 32 respectively, but no numbering. I've put the green in the middle as per the diagram. On 1/500 on the (uncalibrated) shutter I'm working on, I get the attached results showing the curtains aren't very happy at this speed, but consistently wildly out over eight tries. At 1/30, 1/60, 1/125 it's surprisingly even. "Paramater" should be "Parameter".
  • I can't get any results with the two outer sensors plugged in as it is still looking for the third.
  • My encoder counts backwards from expected rotation; is inconsistent in registering rotation and has a 5V pin labelled. I only have experience of valve electronics so this is all new to me. Is this just the switched logic level rather than required supply for the encoder, so connecting to the 3.3V pin as per the diagram is still correct?
Thanks again! This is going to be so very useful, especially with the medium format additions discussed previously...
 

Attachments

  • IMG_20250714_003213.jpg
    IMG_20250714_003213.jpg
    1.6 MB · Views: 62
  • IMG_20250714_022024.jpg
    IMG_20250714_022024.jpg
    1.5 MB · Views: 62
OP
OP

Niglyn

Member
Joined
Feb 26, 2022
Messages
440
Location
Surrey, UK
Format
Analog
Thank you for this tester - finally I can actually check some of my cameras!

I've roughed it out to check the functionality before boxing it up, and have some questions.

  • I have three lasers and three sensors, with the outer two at 32mm centres. Does this correspond to the 32mm in the settings menu, with the third one assumed to be centred?
  • I'm getting the red message "Sens1&M Only>2SL"
  • Which order are the sensors supposed to be in? The wiring diagram shows yellow, green, blue for the sensor connections going to pins 33, 25, 32 respectively, but no numbering. I've put the green in the middle as per the diagram. On 1/500 on the (uncalibrated) shutter I'm working on, I get the attached results showing the curtains aren't very happy at this speed, but consistently wildly out over eight tries. At 1/30, 1/60, 1/125 it's surprisingly even. "Paramater" should be "Parameter".
  • I can't get any results with the two outer sensors plugged in as it is still looking for the third.
  • My encoder counts backwards from expected rotation; is inconsistent in registering rotation and has a 5V pin labelled. I only have experience of valve electronics so this is all new to me. Is this just the switched logic level rather than required supply for the encoder, so connecting to the 3.3V pin as per the diagram is still correct?
Thanks again! This is going to be so very useful, especially with the medium format additions discussed previously...

Hi,
Yes 32mm sensor spacing is between the outer sensors. The physical spacing must also be set in the setting menu.
(For vertical shutters one would physically place the sensors at 20mm and also set this value in the settings menu).

Pin 33 is the left sensor and pin 32 the right sensor. Lasers point into the rear of the camera.

Error 'Sens1&M Only>2SL'
means that sensor 1 and sensor M have been triggered as the shutter opens but after two seconds or greater, Sensor 2 has not been triggered.
This indicates a very slow curtain, or shutter capping.
(Without The Shutter Tester timing out after two seconds, it would sit there forever waiting for sensor 2 to be triggered)

(L refers to the code-block that found the error, useful for me to know which part of the code found the error)

Do not expect to see 100% accurate shutter speeds. Older cameras using springs will vary from shot to shot. Often slower for the first few, as the old grease gets warmed up.
Using a modern electronic shutter, will give far more consistent results.
Look at the ISO chart for min & max values. Your 1/500s tests look to be fine.

Never try to get all the speeds spot on. It will drive you mad, then when you pick up the camera again, the speeds will be different. As said, just get them to within the ISO tolerance.

The Shutter Tester requires readings from all three sensors to compute the shutter speed and check for errors, so trying to run it without the middle sensor will not work.
(Single sensor mode requires just sensor 1 and leaf shutter modes only use sensor 1 and 2)

If your encoder is working backwards, check the S1 & S2 connections go to the correct pins.
Swapping the wires on S1 and S2 will reverse the direction of the encoder.
Whilst the encoder is marked 5V, it is only a mechanical contact so works happily on 3 volts.

Thanks for the questions, feedback and spell checking :surprised:)

All comments, questions, suggestions & issue reports are most welcome.
It helps me improve The Shutter Tester
 
OP
OP

Niglyn

Member
Joined
Feb 26, 2022
Messages
440
Location
Surrey, UK
Format
Analog
Sorry, just looked at your averages again. yes something not right with the curtains.
No obvious explanation, strange mid readings are the fastest.
Curtain 2 is travelling faster, which accounts for sensor 2 showing a shorter exposure.
Why it is faster in the middle, possibly second curtain spring tension reaches it's peak here and then starts to loose energy.
 

japim

Member
Joined
Jul 13, 2025
Messages
2
Location
Cornwall
Format
Medium Format
Yes, thought that was peculiar. However, having tensioned the shutter as per the manual it's evened up a lot. The second curtain needs more tension than I'd like - when it's just got enough oomph to close on Bulb (as per manual) it sticks when it's almost across on 1/60 and needs a nudge. I can't see what it's binding on, but a little more tension causes it to reliably close. The second curtain tension increases the speed. I'm going to have to take the top off again anyway as I've missed a piece of foam, so I'll see if the light baffle or mirror leatherette is catching the curtain.

Also the idea that one sensor is not receiving light is odd. On firing the shutter, it's clear all three get hit with a red pulse. Perhaps the alignment on my lash-up is not quite pointing the source and sensor at each other directly enough. The horizontal lines of the lasers are clearly visible inside the film gate on the back of the shutter curtain, and all three report 'seen' and 'blocked' correctly in the settings.
 

MattKing

Moderator
Moderator
Joined
Apr 24, 2005
Messages
53,411
Location
Delta, BC Canada
Format
Medium Format
Photrio doesn't allow PMs for new users - I'm in need of a code for a new build.

Welcome to Photrio.
Noting this request, and after performing some additional checks, we have manually turned on your access to the Conversation function.
You will find an explanatory Conversation message in your Inbox.
For the information of others, the best way to ask for this is to do so using the Report function - Report your own post, and it will be drawn to our attention.
 

F4U

Member
Joined
Jan 15, 2025
Messages
598
Location
Florida
Format
8x10 Format
Welcome to Photrio.
Noting this request, and after performing some additional checks, we have manually turned on your access to the Conversation function.
You will find an explanatory Conversation message in your Inbox.
For the information of others, the best way to ask for this is to do so using the Report function - Report your own post, and it will be drawn to our attention.

You guys run a pretty sharp operation.
 
OP
OP

Niglyn

Member
Joined
Feb 26, 2022
Messages
440
Location
Surrey, UK
Format
Analog
Photrio doesn't allow PMs for new users - I'm in need of a code for a new build.

Hi, PM sent.
for reference, if you are too new to PM, post here & I will PM you. This will allow you to PM back.

However the admins are pretty sharp here (thanks) and as in this case, will often beat me to it & enable your PM functions.
 

infamouspbj

Member
Joined
Aug 3, 2025
Messages
1
Location
United States
Format
Med. Format RF
Hi Niglyn,
I just got a build setup and I am here to request a code, I'll need to be pm'd first as I am a new user, thanks, hope to hear back soon!
 

Kotanov

Member
Joined
Aug 4, 2025
Messages
4
Location
Bulgaria
Format
Digital
Hello all and Niglyn,
I am building the arduino version currently and I need the passkey, auth code is 159.
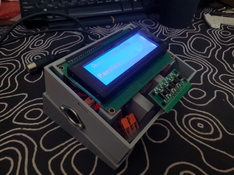
Photo is my attempt to design and 3d print a box for the tester, it's kind of disappointing there are no models for 3d printing available out there or maybe
I'm cant find them.
 

Attachments

  • 20250804_150306.jpg
    20250804_150306.jpg
    526.6 KB · Views: 24
OP
OP

Niglyn

Member
Joined
Feb 26, 2022
Messages
440
Location
Surrey, UK
Format
Analog
Hello all and Niglyn,
I am building the arduino version currently and I need the passkey, auth code is 159.
Photo is my attempt to design and 3d print a box for the tester, it's kind of disappointing there are no models for 3d printing available out there or maybe
I'm cant find them.

Hi, The Shutter Tester was designed to be simple to build, so it avoided the need to get parts 3d printed or circuit boards made.

Anybody is welcome to make 3d printed parts and I can add them to the github files. There are a few there already, which I made for for a cutting template, a bezel and Laser holders.

I will get a 3d printer at some point in the future, but this is a long way off, but when I do, I will offer my 3d prints for cost price.

Would be good if somebody made a pcb for the Shutter Tester. A daughter board where both the ESP32 and TFT plugs in (look at my weather station, which has a daughter board for these) with the other connections bought out to screw terminals. I don't have the skills for pcb design. I would happily then get a load made & again sell for cost price.

Will send you pass key via pm.
 

Kotanov

Member
Joined
Aug 4, 2025
Messages
4
Location
Bulgaria
Format
Digital
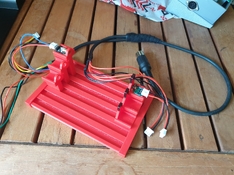
Hey Niglyn, I have not received pm with the passkey, I'm done with the cable harness now and the only 3d model for diagonal configuration sensor holder I found on the net ( I will buld the three sensor version later).
Now I need the code so I can test, align and fix the lasers and sensors in place, hope you can sent it when you can , thanks.
 

Attachments

  • 20250805_134804.jpg
    20250805_134804.jpg
    655.9 KB · Views: 21

Backfocus

Member
Joined
Jul 23, 2025
Messages
5
Location
Germany
Format
35mm
Hello Niglyn,
I've now tried building your shutter tester. It's a really nice project. I started with a simple wooden frame version. I've now reached the point where I have to enter the code. The device assigned me the initial code 8998400. Would it be possible to get a PM code?
Best Regards
 

Attachments

  • test11.jpg
    test11.jpg
    87.2 KB · Views: 35
OP
OP

Niglyn

Member
Joined
Feb 26, 2022
Messages
440
Location
Surrey, UK
Format
Analog
Hello Niglyn,
I've now tried building your shutter tester. It's a really nice project. I started with a simple wooden frame version. I've now reached the point where I have to enter the code. The device assigned me the initial code 8998400. Would it be possible to get a PM code?
Best Regards

Hi, nice looking case.

Having three Lasers/sensors mounted diagonally does make it difficult to align the camera and with your narrow opening, this might also hinder alignment of the film gate?

PM sent, please let us know how you get on.
 
OP
OP

Niglyn

Member
Joined
Feb 26, 2022
Messages
440
Location
Surrey, UK
Format
Analog
Hey Niglyn, I have not received pm with the passkey, I'm done with the cable harness now and the only 3d model for diagonal configuration sensor holder I found on the net ( I will buld the three sensor version later).
Now I need the code so I can test, align and fix the lasers and sensors in place, hope you can sent it when you can , thanks.

Hi, PM sent.
I have always had issues with diagonal sensors. They are a pain as the camera has to be aligned in both planes for it to work.

Would be interested in people's thoughts on this.

I prefer a dedicated frame, one for horizontal and another for vertical sensors.
 

Backfocus

Member
Joined
Jul 23, 2025
Messages
5
Location
Germany
Format
35mm
Hi, nice looking case.

Having three Lasers/sensors mounted diagonally does make it difficult to align the camera and with your narrow opening, this might also hinder alignment of the film gate?

PM sent, please let us know how you get on.

Hello Niglyn,
unfortunately, I didn't receive the PM-code yet. Could this be because I don't have enough posts yet and therefore am not allowed to start a private conversation?
 

Backfocus

Member
Joined
Jul 23, 2025
Messages
5
Location
Germany
Format
35mm
Hi, PM sent.
I have always had issues with diagonal sensors. They are a pain as the camera has to be aligned in both planes for it to work.

Would be interested in people's thoughts on this.

I prefer a dedicated frame, one for horizontal and another for vertical sensors.

Thanks for the tip.
I thought I'd start with the diagonal approach to test different cameras. However, I made the plates with the lasers and sensors interchangeable just in case. If I fail there, I'll adopt your approach and rebuild them.
 

MattKing

Moderator
Moderator
Joined
Apr 24, 2005
Messages
53,411
Location
Delta, BC Canada
Format
Medium Format
Hello Niglyn,
unfortunately, I didn't receive the PM-code yet. Could this be because I don't have enough posts yet and therefore am not allowed to start a private conversation?

Hi @Backfocus
Welcome to Photrio.
Us moderators saw your plea, did the extra manual checks that are necessary, and have now enabled private Conversation access for you.
We look forward to your participation on Photrio.
 

sepd123

Member
Joined
Aug 6, 2025
Messages
1
Location
Ireland
Format
Medium Format
Hi All
Thanks to Niglyn for creating this project.

This is my first electronic project so will see how this goes.

Found the project through Alin's youtube video.

I have started working as a photo tech for an art college and have a large array of cameras that are in various conditions. Hoping to create a chart for each camera so students can correct for the metered reading.
Alas i do not see there being budget to CLA everything.


Hoping to build the Arduino version this weekend while I wait for a soldering iron to be delivered for the ESP build.

Have all the parts list in now other than the LED panel and flash sync jack which I dont think are crucial for my needs. I also mistakenly ordered 8 Din male connectors and 6 pin female. So I may have to skip this feature while I wait for a reorder.

Some quick questions if I may, have read the full thread but apologies if they have been answered already.

  • What is the function of the optional light meter, and how should it be implemented, in the case or a separate cable.
  • Saw lots of issues with LED flickering if not using lasers, has anyone tried to use an enlarger head for a light source? Seems pretty straight forward to just rotate the enlarger head 90 degress. with a medium format or LF condensor box you would have an evenly lit and large light source to aim at. and using an incandescent I imagine no flickering issues.
  • For Large format lenses given the issues noted about measuring leaf shutters and lens distorting the lasers, would a non columinated light source be easier to set up?
Looking forward to the build, this thread has given me a real itch to play around with these sort of projects

All the best
S
 

ronron

Member
Joined
Aug 10, 2025
Messages
5
Location
france
Format
35mm
Hi Niglyn, i've orderered all parts, i need the serial to start it. Thanks for this great work.
 
Photrio.com contains affiliate links to products. We may receive a commission for purchases made through these links.
To read our full affiliate disclosure statement please click Here.

PHOTRIO PARTNERS EQUALLY FUNDING OUR COMMUNITY:


Ilford ADOX Freestyle Photographic Stearman Press Weldon Color Lab Blue Moon Camera & Machine
Top Bottom