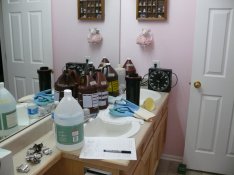
-
Welcome to Photrio!Registration is fast and free. Join today to unlock search, see fewer ads, and access all forum features.Click here to sign up
You are using an out of date browser. It may not display this or other websites correctly.
You should upgrade or use an alternative browser.
You should upgrade or use an alternative browser.
Bathroom and other Temporary/Makeshift Darkrooms
-
A
- Thread starter JBrunner
- Start date
Recent Classifieds
-
For Sale Fujichrome Velvia 100F 4x5 film. Two 20 sheet boxes.
- Started by Simon Benton
-
For Sale Nikon, Canon, Pentax, Fuji, Kodak, Walz 35mm Film Camera Sale
- Started by J Durr
-
For Sale Rollei SL66 Kit
- Started by campy51
-
For Sale Olympus Pen FT camera body, with 25mm lens $150, plus shipping.
- Started by riverdog
Forum statistics
- Joined
- Oct 26, 2012
- Messages
- 61
- Format
- Medium Format
Hi.
I do not own a print washer. I wash my RC paper um a large tray, same as those for developing, and fixing paper, but only larger. I place it in the tub and let water run from the shower.
I use a large large bathroom (but mostly unused) as a darkroom. I place the enlarger on top of the counter to one side of the washing basin. Of course I do not use this basin. I place the developing trays on the ground. I also work standing up. I do not have any shots for you, nor will I until late December.
ozphoto
Subscriber
Here in TH, installing a new socket is nothing anyone thinks twice about, and yes, the term "safety first" doesn't even rate a blip on the radar. No registered sparkies needed - just about everyone has a relative or friend who will wire you up, with whatever you need.
Does it concern me? Ah, yes - I'm rather cautious around power sockets over here, but so far only had misfortune once and that was with a power board. Scared the c*** out of me, hurt like hell, and it was promptly tossed and replaced. Don't want to experience it *ever* again!!
Does it concern me? Ah, yes - I'm rather cautious around power sockets over here, but so far only had misfortune once and that was with a power board. Scared the c*** out of me, hurt like hell, and it was promptly tossed and replaced. Don't want to experience it *ever* again!!
I have a simple dry darkroom. The plywood on top of the washer expands the tray surface. My print washer is a 12x15 tray. I use the fill and dump tray method. The safe light is a red Jr Lab in $8.00 silver reflector. The Gorilla DR can only be used at night. There is no ventilation so I use a water stop and TF-4 fix.
I know, it's not a bathroom but close.
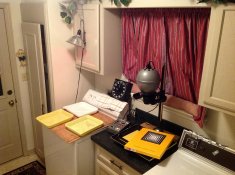
I know, it's not a bathroom but close.

Last edited by a moderator:
I actually had more space in my apartment than in my house.
In the apartment, I used the bathroom.
- 1/2" plywood over the tub, for the enlarger.
- A homemade portable extension to the sink counter over the toilet, for the trays.
- Washing was done in the kitchen.
In my house, the only room I can use is a small half-bath which is less than 36 inches wide.
- The MF enlarger is put on the toilet.
- I use a drum or rocking print tray to process on the counter.
- Washing is done in the kitchen.
- Because of the very cramped setup and drum/rocking print tray, I've only done RC paper, not fiber.
In both setups, I either removed the white bulb from the bathroom light fixture or replaced the bulb with a small safelight. I needed the light switch in the ON position to run the exhaust fan.
I'm in the process of building a darkroom under my house, but like most home DIY projects, that will take way longer than I think it will to complete.
ozphoto
Subscriber
I remember doing a load of B&W in my hotel room in Braintree, UK. Picked up the supplies at a Jessops, blocked the light under the door with some extra towels, and processed 8 rolls over two days (4 rolls per night).
Probably the first and only time I've actually used a hairdryer in a hotel room - dried the reels and the films rather nicely.
Probably the first and only time I've actually used a hairdryer in a hotel room - dried the reels and the films rather nicely.

Sorry that I'm a bit late in discussion.
I do all my processing in my very small bathroom. I have a three-shelved cart on wheels. I keep all the printing stuff on the bottom, the graduates, chemicals and tanks on the middle, and the enlarger (a huge 23C III) on top. When it's time to print, I wheel the cart to the bathroom and shove a towel under the door to block out the light and set the trays in the tub. Because of the room's small size, I have to squat or get on my knees to agitate the trays. For print washing I take a re-purposed litter box (bought new of course!) with drainage holes and place it under the tap and do my prints left to right with the prints ending in the litter box.
Oh, and I hang the safelight by the cord over the curtain rail so it's above my trays. Again, very crude (and painful) but it gets the job done. Only downside is that it's like an oven in the summer!
Never too late. This thread gets dredged up from time to time as you can see. I'm now in the upstairs full bath, though there is a little space, 6x11 including shower.
I'm set up much like you. I keep the chems on the lower shelf, that way if something happens, wet side stuff gets on the floor instead of into the paper safe, et al. I set the developer tray on the sink top with a book to level it out on the basin edge. Stop is on top of the hopper tank. Fix on the closed seat lid. I put a 16x20 tray in the shower and run water in it for rinse. Hang from some mechanic's wire suspended from the shower curtain rod. Towels go under the door cracks from the outside.
Setup and breakdown time might total an hour, tray drying time excluded. But there is a lot more room than I had before. Still not nearly as much as I would like. I think in a couple years I might invest in my own darkroom if I can find one with a house attached to it.
Never too late. This thread gets dredged up from time to time as you can see. I'm now in the upstairs full bath, though there is a little space, 6x11 including shower.
I'm set up much like you. I keep the chems on the lower shelf, that way if something happens, wet side stuff gets on the floor instead of into the paper safe, et al. I set the developer tray on the sink top with a book to level it out on the basin edge. Stop is on top of the hopper tank. Fix on the closed seat lid. I put a 16x20 tray in the shower and run water in it for rinse. Hang from some mechanic's wire suspended from the shower curtain rod. Towels go under the door cracks from the outside.
Setup and breakdown time might total an hour, tray drying time excluded. But there is a lot more room than I had before. Still not nearly as much as I would like. I think in a couple years I might invest in my own darkroom if I can find one with a house attached to it.
You know, I really should keep the paper above the chems! Outside the bathroom is my internet cable that's strung between the hallway and I usually hang prints/film on 'the line' to dry. With it on wheels, I think it only takes ten minutes to set up and then break down. If no one needs to shower for a bit, I usually leave the various rinsed utensils in the tub on a kitchen drying rack until the next time or when I get bothered. Speaking about a darkroom on wheels, why doesn't someone buy an old ice cream van and convert it into a darkroom? Then you can drive around with your speakers jingling accepting film orders!

I use 3/4" playwood on the counter and extend it over part of the tub with support leg (Ikea leftover) in the tub. This is spare bathroom on the lower level of the house, right next to utility and storage room. I cant set it up in 5mintes and I can dismantle is in as much time. My Enlarger sits on top of playwood with chemical trays next to it, wash trays (water) are in the tub and I run final wash by letting water run in the tub into last tray. It is nice setup and the only issue I have it gets really warm especially when i work with my kids (can only accomodate max 2 people)partially due to bathroom light fixture that has 6 bulbs and generates lots of heat once room is light proofed. I run bathroom fan during processing and printing, not much help for heat. O yes, unfortunately, I do keep paper on toilet below playwood as the is the most optimal place for it. The only problem I have is the safe light is only about 2.5 feet from dev. tray so I try to not trun it on untill I have paper in for at least 5 sec. (B&W), did not notice any fogging yet, but might have to move is down on the floor.
My red safelight is within three feet of both the dev tray and the enlarger base board I have no issues thus far with any fogging. Of course, a sheet of paper is in this range for no more than five minutes at a time, seldom for that long.
But, yeah. Once I added the roller cart into the mix thing start and end much more quickly. Darkroom work is much less a perceived inconvenience than it once was.
If I could change one thing in my present situation, it would be the location and arrangement of the trays. It's functional right now but there has to be a better way. I toyed with the plywood-ish idea, but I haven't come up with anything suitable just yet. A three or four foot by 15 inch card table with adjustable legs would be perfect.
My latest darkroom in progress in a second bathroom in our apartment here in Honolulu. Toilet and sink will still be usable, but the bathtub is now the wet side.
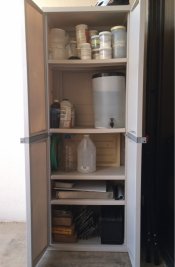
Chemical storage will be outdoors in a plastic cabinet on the balcony, where I also keep the film freezer. I also have a closet for photo/darkroom gear just outside the darkbathroom, and we have a storage unit in a climate controlled building down the street for additional storage.
Dry side:
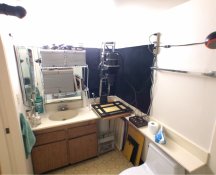
Wet side:
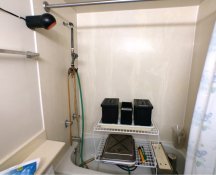
I'm working on a solution to make more tray space, but I may just print small for now.
My Thomas safelight is just way too powerful for this space, so it's going into storage for now. I've got two Jobo LED safelights, which seem adequate, and they can be pretty close without fogging.
I also had to consolidate my paper, and I'll probably sell off or locally trade my single-sheet feed paper safes.
Chemical storage will be outdoors in a plastic cabinet on the balcony, where I also keep the film freezer. I also have a closet for photo/darkroom gear just outside the darkbathroom, and we have a storage unit in a climate controlled building down the street for additional storage.
Dry side:

Wet side:

I'm working on a solution to make more tray space, but I may just print small for now.
My Thomas safelight is just way too powerful for this space, so it's going into storage for now. I've got two Jobo LED safelights, which seem adequate, and they can be pretty close without fogging.
I also had to consolidate my paper, and I'll probably sell off or locally trade my single-sheet feed paper safes.
Last edited by a moderator:
Some of those shelves look a bit bendy!! It might be comforting for leak control to have trays, or shallow 'storage bin' things, holding the bottles instead of having them separately on the shelves - just as a worst-case reassurance. Ideally the total volume of chemical should be less than the capacity of the tray of course.
I was also thinking of another problem with the whole thing being on a balcony, but I don't suppose that Hawaii often has weeks under minus 10C, unlike here !!
I was also thinking of another problem with the whole thing being on a balcony, but I don't suppose that Hawaii often has weeks under minus 10C, unlike here !!
The shelf with the fixer tank is actually in the strongest position in the cabinet, but I'm keeping an eye on it, in case it needs some reinforcement.
Our temperature here in Honolulu is reliably 14 to 34C, usually around 27C, which can lead to some high processing temperatures, but I suppose that's for me to figure out. I doubt I'll ever be using the hot water tap in the darkroom, since even after it runs for a while, the cold is coming out at 24C. We're on the north side of the building, so there's no possibility of direct sun falling on the cabinet and heating up the contents.
Our temperature here in Honolulu is reliably 14 to 34C, usually around 27C, which can lead to some high processing temperatures, but I suppose that's for me to figure out. I doubt I'll ever be using the hot water tap in the darkroom, since even after it runs for a while, the cold is coming out at 24C. We're on the north side of the building, so there's no possibility of direct sun falling on the cabinet and heating up the contents.
The inner pedant in me can take it no more.
The thing you have in the bathroom to wash your hands in is a basin, not a sink. Sinks live in the kitchen.
Rant over!!
Steve.
The thing you have in the bathroom to wash your hands in is a basin, not a sink. Sinks live in the kitchen.
Rant over!!
Steve.
On the Isle of Wight, it's a basin, but on the island of O'ahu, it's a sink.
Just a response to the news about Hawaii today - I hope David's chemical-cupboard is both earthquake proof and hurricane proof !!
Basin is a generic term. Sink is a specific type of basin (and they don't live in bathrooms!).
Steve.
Steve.
You really don't need much to set up a darkroom. Excellent prints can be created with a good enlarger and standard bathroom sink, everything else is a luxury. My darkroom is a very, very cramped unused bathroom. I have a sturdy end table with the enlarger across from the toilet, which I use as a chair. The bathtub will hold four 8x10 trays. When I print using larger trays I have a folding table that fits in the bathtub. Two of the trays go on the table and two below in the bathtub bottom.
A large piece of think black plastic mounts over the door with velcro and makes the room absolutely light tight during the day. Since I took this picture I have added a piece of black felt that I suspend from the towel rack behind the enlarger, which stops any stray light from bouncing back to the paper.
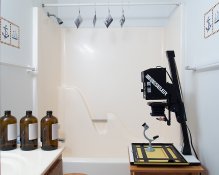
A large piece of think black plastic mounts over the door with velcro and makes the room absolutely light tight during the day. Since I took this picture I have added a piece of black felt that I suspend from the towel rack behind the enlarger, which stops any stray light from bouncing back to the paper.

Just a response to the news about Hawaii today - I hope David's chemical-cupboard is both earthquake proof and hurricane proof !!
We'll see. I put some silicone sealant on the outward facing seams (can't seal the doors, obviously), put some extra weight down low, and added a hasp and lock to keep the doors closed (and kids out, hurricane aside). I'll report back afterward.
I originally posted this in the "Darkroom Portraits" thread, but I might as well cross post and update here.
One of the difficulties I faced is that I can't do anything "structural" as my house is rented, and I imagine this is a difficulty faced by quite a few people. Nor do I have any tools or workspace to build stuff. The bathroom is the only reasonable option for a darkroom and of course it needs to be usable for normal bathroom business.
It is really very small - the floor area is nominally about 5'x5' but the usable space is more like 3'x4'. There's a shelf behind the sink (I'm going to use the words "sink" and "basin" interchangeably, just for LOLs ...) deep and wide enough for 3 10x12 trays.
There is a window but it gives on to a lobby and I leave it permanently blacked out with 3-pass blackout material.
The extractor fan leaks light, but has a sheet of rubylith draped over it. Unfortunately this means no proper ventilation either.
The door leaks a lot of light; adhesive foam strip did nothing to ameliorate this, so I ended up making a curtain from a length of 3-pass blackout stapled to a length of dowel. It hangs from two hooks screwed to the top of the door frame on the outside and can be put up and taken down in a trice.
I originally started out with the enlarger on the floor, then on a cardboard box, but I'm getting older and my joints and leg muscles couldn't tolerate all the kneeling and standing by turns. It was good exercise but I was tired and in pain after an hour or two and that didn't make for good concentration on the task in hand.
Solution: a stainless steel "Ikea" kitchen trolley made it possible to set up in less than ½ an hour, and added about 6ft2 to my workspace. I haven't got a wide enough angle of view lens (except a pinhole) to get in the bathroom and show what it looks like from the inside (when standing at the enlarger, I can just about lean back to rest on the on the wall behind me)
I recently discovered that the baseboard from a spare enlarger fits exactly and securely over the top of the bath, giving space for a couple more trays (useful for processes like paper reversals), and again saving knee and back pain from otherwise having to kneel at the side of the bath with trays at the bottom.
Dead Link Removed
For a work-surface to go over a bath, try looking for a piece of melamine-faced chipboard material in the diy-shop. There are usually pieces up to (at least) a couple of feet wide and they are very cheap. A couple of pieces of wood underneath at just less than bath-width, to stop the chipboard sliding an inch and falling in the bath, will be enough to make it secure.
The "custom cut at Home depot" wire shelving works great over my bathtub. I use two pieces - one reversed and on top of the other - to deal with the "L" shape.
Here is a Canadian link: http://www.homedepot.ca/product/20-inch-x-4ft-white-tight-mesh-shelf/969890
Here is a Canadian link: http://www.homedepot.ca/product/20-inch-x-4ft-white-tight-mesh-shelf/969890
| Photrio.com contains affiliate links to products. We may receive a commission for purchases made through these links. To read our full affiliate disclosure statement please click Here. |
PHOTRIO PARTNERS EQUALLY FUNDING OUR COMMUNITY:  |


