Bathroom and other Temporary/Makeshift Darkrooms

Custom Cab

A
Custom Cab

  • 0
  • 0
  • 6
Table for four.

H
Table for four.

  • 8
  • 0
  • 73
Waiting

A
Waiting

  • 5
  • 0
  • 73
Westpier

A
Westpier

  • 2
  • 2
  • 76
Westpier

A
Westpier

  • 4
  • 0
  • 55

Recent Classifieds

Forum statistics

Threads
197,593
Messages
2,761,552
Members
99,410
Latest member
lbrown29
Recent bookmarks
11

Mick Fagan

Subscriber
Joined
Sep 13, 2005
Messages
4,406
Location
Melbourne Au
Format
Multi Format
The smallest darkroom I have ever had was the insides of a large box, which I also slept in; it was attached to a motorcycle. The box replaced the original sidecar that was damaged quite badly after some bodywork done by a tree on an off road excursion. It was a coffin shaped rectangular box with a canvas top; it carried all of my worldly possessions.

On moonless nights camped alongside a river (for water) I draped a canvas over the bike, with two poles between the bike and chair, to give elevation; I had a nice darkish set-up. My enlarger was a small fold down English thing which when folded up, resembled a very small suitcase, the baseboard was one side of the case, I was only using 5x7 paper.

Power was from the bike battery; I had a 6-volt globe in the enlarger, as the bike was a 6-volt system. The safelight was a hurricane lamp with some ruby on a wire frame surrounding it. I could use the battery until it almost went flat as the bike had a magneto system for the ignition. I used a super cheap alarm clock with two bells on it's top, as a timer. It didn't have a second hand, but the ticks were really loud.

I developed in 3, 5x7 Ilford dishes, which I still have. Washing was done in a saucepan picked up from the side of the road, it had no handle.

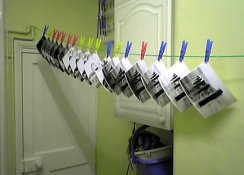
This was in the late sixties, I still have a few prints, the quality is terrible, but they are pictures that have great memories.

On the road one day, I met up with a couple travelling in a Kombi camper. They had a really good darkroom that packed away in one very small cupboard, which I think was originally a small wardrobe. They were using the same enlarger as I was.

Another time in the mid to late seventies I met a couple of photographers travelling for about 3 months at a time and they used a small lean to tent, as a darkroom on moonless nights as well. I met them again in the early eighties, in the far north of Australia; they were camped alongside a river and were processing E6 films.

One of the really inspirational things I saw them doing, was the heating of the E6 developer in jam jars, by using magnifying glasses focused onto a small piece of steel sitting inside the developer. As the ambient temperature never got below about 24C overnight in the dry season, the solution was already reasonably warm to start with.

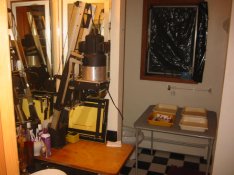
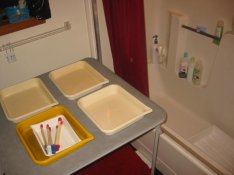
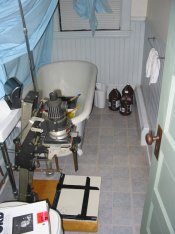
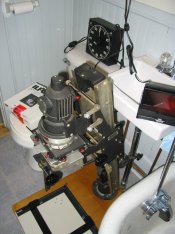
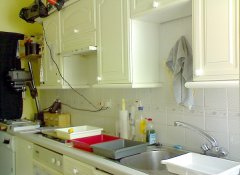
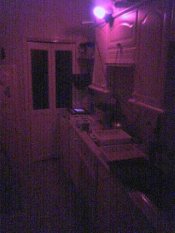
I have used wardrobes a lot for darkrooms; they get hot and humid quickly. Many a bathroom has been converted by using three pieces of timber running the length of the bath, on this I hold the dishes, which ran in a row behind the enlarger. Usually the basin is used for washing the prints.

All of my lady friends usually complained about the bathroom being dominated by the photographic equipment, one didn’t, she is now my wife!

Mick.
 

Marco B

Subscriber
Joined
Jan 13, 2005
Messages
2,729
Location
The Netherla
Format
Multi Format
My bathroom darkroom

OK Jason, so you're looking for some idea's and images of a genuine bathroom darkroom... Well, since up to now nobody actually posted some pictures, I'll help you out ;-) as I am not to embarrassed about the setup... I think it's a pretty decent darkroom in it's own right. I'm happy with it...

I realize my bathroom is somewhat "non-standard", and that I have been pretty lucky to be able to use such a space. The bathroom is irregular in that is completely enclosed in my small home, hence no windows and therefore no need to blind anything before each printing session. In addition, since the bathroom doesn't feature a toilet, and the former bathtub has been replaced by a less space consuming shower, there is actually plenty of space left, allowing me to make a permanent enlarger setup (actually, I even have two ;-) in there). So also no need to haul in and out a cart with an enlarger. Just pull the door close, and I am up-and-running. Total size of the "bathroom / darkroom" is about 2.2 * 2.5 meters (7' * 8' that is???)

So here it is:
BD1.jpg


Notice I managed to create a pretty large permanent workbench, made from a regular tabletop reinforced with an extra 2.5 cm wooden plate, to hold the 40+ or so kilo's of the Durst Laborator 1200 and 670BW enlargers.
Also notice I cover up both of my enlargers using plastic bags after each printing session to reduce dust load and maybe some humidity.
As you can see, it's still a fully functional bathroom, with the washing machine below the workbench. My printing "rocks" when it spins :D

BD2.jpg


Enlarger heads revealed. Also notice the two 18W fluorescence lighting on the back wall. There is another 36W fluorescence on the left. The 18W's are 6500K, the 36 W is 4200K, mixing into something close to daylight (about 5200K). I regularly switch these on during printing for proper control of correct contrast and printing. This has proven invaluable to me and was one the biggest improvements after the initial setup.
I also have two darkroom safe lights: an Ilford 902 safe light, visible above the L1200, which I use for regular multigrade printing, and a small red safe light bulb (visible in between the fluorescence tubes) for use with liquid photo emulsion (Rollei Black Magic requires red safe lighting).

BD3.jpg


The "wet section"... 35*45cm tray setup. Notice I managed to cramp in another small workbench in between the ventilation shaft and the wall enclosing my shower. Developer furthest in the back, than stop and fix.

BD4.jpg


50*60cm tray setup. Notice the laundry basket actually doubles as support for the fixing tray. Well, you wanted a genuine bathroom darkroom! ;-)

BD5.jpg


The "washing" section. The thermostatic shower supplies 20 degrees water year round.

BD6.jpg


Papers, chemicals and empty film boxes... Notice the bathroom ventilator. It draws in fresh air through the bathrooms door (I'll go into that with the next images) and keeps moisture levels to an acceptable level. This ventilator is always on during printing and showering, keeping the climate comfortable both for me and the enlargers. Despite three years of printing and showering, no apparent issues with corrosion or mould on the enlargers optics. I make sure the bathroom ventilator runs for another 15 minutes or so after showering...

BD7.jpg


To get even more bench space, I have fitted another tip-up bench to the wall opposite of the shower, behind the bathroom door. As you can see, I have cut the bench in 45 degrees angle. This allows me to open the door even when the bench is up. This is a nice feature both for safety and convenience.
Also notice the black ventilation grid on the left in the bathroom door. Using insulation tape and strips and black paint, I have managed to make the door practically light safe. However, this also meant poor ventilation. I therefore created a hole in the bathroom door (that actually should have been there in the first place, considering it's an enclosed bathroom!), and covered it up with these grids. However, this is not enough for light safety, so I created an internal "light-block" using black matting carton. This allows fresh air to flow in freely (drawn in by the bathroom ventilator) but effectively blocks all light.

BD8.jpg


The workbench up, ready to print. Notice the door opening nicely.

BD9.jpg


RC drying section on washing lines. I dry the FB prints on glass outside the bathroom. Also notice the other 36W fluorescence tube and Ilford safe light and multigrade head.

That's it...

Marco
http://www.boeringa.demon.nl
 
Last edited by a moderator:

Bluechapel

Subscriber
Joined
Apr 19, 2007
Messages
48
Location
Southwest Ok
Format
35mm
In a pinch I used to wash prints (11x14 and 16x20) by slapping them to the wall of my shower and aiming the head at them. Smaller ones were done hunched over the bathtub. (makes my back hurt even remembering those days.) I should point out that even though I had 10,000 sq. ft (75 yr old department store), money was tight so for a year I had a darkroom/bathroom/kitchen combo.
 

David A. Goldfarb

Moderator
Moderator
Joined
Sep 7, 2002
Messages
19,974
Location
Honolulu, HI
Format
Large Format
You're welcome to use the photos of my last dark/bathroom in the Darkroom Portraits thread starting here--

(there was a url link here which no longer exists)

If I have a chance I'll try to post some shots of the new setup, but it looks like we're moving again in a few months, so I'll be packing it up again.
 

Snapshot

Member
Joined
Jan 10, 2007
Messages
913
Location
Toronto, Ont
Format
Multi Format
There are some pretty nice bathroom setups in this thread. I use my laundry room for my setup and it's been quite effective. Actually, it appears to be really more of a darkroom with a washer and dryer.
 
Joined
Oct 25, 2004
Messages
1,057
Location
Westport, MA
Format
Large Format
I've printed a bit using only a bathroom.
(there was a url link here which no longer exists)
Hope that link works. I used a rolling cart with enlarger, trays for printing in the tub. I'd sit on the toilet and print like that. Pretty convenient.
I'd also wash prints in the tub as well, using a deep rubbermaid bin under the faucet.
 

eddie gunks

Member
Joined
Dec 14, 2005
Messages
1,156
Location
Saugerties,
Format
Large Format
a few quick digi shots
 

Attachments

  • IMG_2374.JPG
    IMG_2374.JPG
    58.6 KB · Views: 616
  • IMG_2375.JPG
    IMG_2375.JPG
    36.7 KB · Views: 535
  • IMG_2376.JPG
    IMG_2376.JPG
    45 KB · Views: 535

ignatiu5

Subscriber
Joined
Feb 16, 2007
Messages
334
Location
Philadelphia, USA
Format
Medium Format
Hi JBrunner,

I just started printing at home in the last year. My setup gets shuttled in and out of the only bathroom (about 5’ x 8’) in my apartment. Setup for prints takes about 5 minutes, for loading film into daylight tanks about a minute. I picked up a couple of vinyl topped 2’ x 4’ folding tables and use one for an Omega B22XL enlarger and one for chemistry trays in the tub. Sitting on the toilet seat, I can reach everything without moving around, and in reality, once the rig is set up, there isn’t anywhere to move to anyway. Making it light tight was pretty easy since there are no windows. Two sheets of matboard butted end to end are velcroed to the door casing with a rolled bathmat at the door’s bottom edge.

It’s not pretty, but it works.

I didn’t know if posting digital snaps here would be a faux pas, so if you are interested, you can see ugly pics of the setup here where I did 11x14 for the first time at home yesterday: http://www.flickr.com/photos/69621487@N00/sets/72157603884970987/

Hope that helps,

ignatiu5
 

Sanjay Sen

Member
Joined
Mar 7, 2005
Messages
1,246
Location
New York, NY
Format
Multi Format
Posting digi pics is okay in threads where the point is to illustrate something - like this one where you show your bath/darkroom setup.
 

Ronda F.

Member
Joined
Mar 6, 2008
Messages
2
Format
35mm
I am in the process of setting up my first every darkroom using equipment bought at ebay. I have a second hand enlarger on a printer stand that I can push into the bathroom. So far I figured out that I can set a plywood board across the bathtub.

The hardest part seems to be making it dark enough. I don't want to lose the window, since it has stained glass I did many years ago when I took a class. I am attempting to use black core foam-core board to block the window. The door has a lot of light coming in around it. Does anyone here have suggestions? I am not much of a carpenter, so it would have to be simple.

I am taking a photography class at the local community college, and that is what has inspired me.
 

Gary Holliday

Member
Joined
Apr 12, 2006
Messages
824
Location
Belfast, UK
Format
Medium Format
For your door and bathroom window, you can buy some PVC blackout material. Attach the material around the frame with sticky velcro. Hook velcro on the blackout material and cloth velcro on the door frame. The blackout material can be easily removed when necessary.
 

CBG

Member
Joined
Nov 21, 2004
Messages
889
Format
Multi Format
I too had a darkroom in a bathroom, maybe thirty five years ago. There were a couple of not too commonly done things that made it workable.

The first was light-proofing the window, a low horizontal window hinged at the top that opened outwards. Just inside the casing there was a small "step" that surrounded the window that allowed me to snugly fit a removable panel to darken the room.

Just in front of the "step", at the top, there was a small metal slotted plate that was, I think, designed to allow a screen to latch. I used it to help hold the panel in place. Into that plate went a small metal bit I fitted into an "arm" I constructed with fittings for two safelights.

The arm was maybe two feet long, and by it's weight, levered against the panel to keep it tight. It was a very clean installlation. There were no pieces affixed to the building and everything was removable with no screw holes etc. The panel fitted very tightly and let almost no light in so I could work in daytime.

I built a rolling stand for the enlarger. Actually, built it into the baseboard frame of the enlarger, a 45 MC series, so they became a unit, and the space under the enlarger became rolling storage. Likewise a small sink was made as a rolling unit.

Both rolling units went elsewhere when not in photographic use.

Washing without a dedicated print washer was by fill and dump washing. I don't remember where I first read that Kodak specified for washing by continuous flow, a certain number of complete changes of water, but I took that to heart and applied the concept to fill and dump. I filled a small plastic tub and agitated the prints in it for something like a minute, dumped it completely and refilled. Then, repeat, repeat , repeat... If I recall, Kodak specified something like ten(?) complete changes of water, but someone here will know for sure. It was in one or another pamphlet. There was a test using a dye to see how completely the water got changed.

It worked like a charm. I have never really trusted any washer that doesn't do complete dumps, so this system felt like a safe and reliable way to wash prints.

Best,

C
 

CBG

Member
Joined
Nov 21, 2004
Messages
889
Format
Multi Format
The door has a lot of light coming in around it. Does anyone here have suggestions? I am not much of a carpenter, so it would have to be simple.

A towel up against the bottom of the door is a time honored light-proofing technique. Cheeeep. Easy.

Best,

C
 

TheTrailTog

Subscriber
Joined
Mar 27, 2007
Messages
862
Location
Maine
Format
Multi Format
It ain't pretty and I really can't offer much insight as I'm about as newbie as they come but, here's some pics of my bathroom. Doesn't get much more basic than this. One of my big things was it needed to be quick and easy to set-up and breakdown as this is the only bathroom in our apartment. The sink and toilet is my, ahhh, "dry side"...LOL The window is covered with 2 thick contractor trash bags to block out the light. The kitchen sink is right outside the bathroom door and that's where I do my print washing. I've been keeping my prints in a sink full of water until I'm done printing. Then I put them in the washer while I clean up. Once it's broken down, I hang my prints to dry from hangers and binder clips around the halo over the tub.

BTW - Are you going to be covering any dodging and burning techniques in that DVD? I could use the help :sad:
 

Attachments

  • IMG_0006.jpg
    IMG_0006.jpg
    144 KB · Views: 608
  • IMG_0007.jpg
    IMG_0007.jpg
    152 KB · Views: 560
Last edited by a moderator:

Andy K

Member
Joined
Jul 3, 2004
Messages
9,420
Location
Sunny Southe
Format
Multi Format
Here's my converted kitchen darkroom. Poor images, but you get the idea. I work from left to right along the counter. The fourth tray this side of the sink is my print washer. I put prints in it and run the tap into the tray until the end of the printing session.
 

Attachments

  • DR1.jpg
    DR1.jpg
    62.3 KB · Views: 581
  • Darkroom1.jpg
    Darkroom1.jpg
    46.8 KB · Views: 530
  • PhotosDrying.jpg
    PhotosDrying.jpg
    41.8 KB · Views: 571
OP
OP
JBrunner

JBrunner

Moderator
Moderator
Joined
Dec 14, 2005
Messages
7,429
Location
PNdub
Format
Medium Format
Wow. Thanks guys. This is a great thread!
 
OP
OP
JBrunner

JBrunner

Moderator
Moderator
Joined
Dec 14, 2005
Messages
7,429
Location
PNdub
Format
Medium Format
BTW - Are you going to be covering any dodging and burning techniques in that DVD? I could use the help :sad:

It's a basics DVD, so there is a simple example of dodge and burn on the print that is made, but nothing more complicated. 80 minutes hasn't turned out to be as much time as I thought!

Might be in the "advanced" DVD, or perhaps it would make a good youtube segment.
 

Trey

Member
Joined
Dec 24, 2007
Messages
87
Location
NYC
Format
35mm
I'll be printing tomorrow, so I'll try to remember to get a couple of shots for you.

As for washing, I use a tray which I've punched holes in (and which is also cracked) and simply run water into it from the bathtub.
 

Don Wallace

Member
Joined
Jun 12, 2006
Messages
419
Location
Ottawa, Cana
Format
Large Format
As with most folks here, I never photographed the bathroom setup (I now have a permanent darkroom). With only one bathroom and a wife who thinks she has to bathe EVERY day, the emphasis was on speed of setup and takedown. Among the many things I found very handy was a plastic bin (like the Tupperware kind everyone fills with kids toys). At the end of a session, I simply through all the wet equipment in there to get it out of the bathroom quickly. I rinsed it first, of course, and then just let nature dry everything until the next session. One more tip: after a session during which I accidentally pulled my plywood bathtub cover and dumped everything all over the place, I nailed some 1x2's on the bottom to act as guides so it would never slip again. The main advantage of the bathroom setup is that you don't have to walk to far to pee.
 

arigram

Member
Joined
Sep 21, 2004
Messages
5,465
Location
Crete, Greec
Format
Medium Format
No wonder I have the feeling that something's missing every time I use the bathroom...
 

TheTrailTog

Subscriber
Joined
Mar 27, 2007
Messages
862
Location
Maine
Format
Multi Format
...Among the many things I found very handy was a plastic bin...

Couldn't agree more. I have one of those big Rubbermaid bins that I use for storing all my mixed chemicals, open bottles, and other wet supplies. Keeps everything nice and safe when not in use. I usually rinse my trays, tanks, etc and leave them to dry over night in the sink though before putting them in the bin.
 
Photrio.com contains affiliate links to products. We may receive a commission for purchases made through these links.
To read our full affiliate disclosure statement please click Here.

PHOTRIO PARTNERS EQUALLY FUNDING OUR COMMUNITY:


Ilford ADOX Freestyle Photographic Stearman Press Weldon Color Lab Blue Moon Camera & Machine
Top Bottom