
I have a very close half bath downstairs at home and, for just starting out, works very nicely. I keep a short stool handy outside the door for setting tank, spools, opener, scissors when loading, sit on it in front of the sink while processing (small enough to fit between the sink and the wall, chair is too cumbersome) and for standing on to hang the film from the small piece of mechanics wire that I jammed into the trimming between the upper wall and the ceiling. Hopper lid down to hold bottle and chems while mixing. The sink is recessed and has walls on three sides, great for leaning ready-to-pour chem bottles against for UBER-easy access. Also holds thermometer for checking/maintaining water temp (I just use tap/take a drink first to test for city chemicals in water). Moved bathroom type supplies to the hall closet just outside and now I can store all of my processing gear neatly under the sink in the cabinet. No printing yet so, well, no printing yet. If you want some pics let me know and next time I go, I'll have the wifey take a few while I'm at it.
-
Welcome to Photrio!Registration is fast and free. Join today to unlock search, see fewer ads, and access all forum features.Click here to sign up
You are using an out of date browser. It may not display this or other websites correctly.
You should upgrade or use an alternative browser.
You should upgrade or use an alternative browser.
Bathroom and other Temporary/Makeshift Darkrooms
-
A
- Thread starter JBrunner
- Start date

Recent Classifieds
-
For Sale FS: Fujinon 250mm f/6.7 Lens
- Started by B.S.Kumar
-
For Sale Kodak Ektachrome Infrared EIR aka Aerochrome
- Started by YoIaMoNwater
-
Want to Buy Old Kodak 101 roll film
- Started by blee1996
-
For Sale Schneider Kreuznach Super Angulon MC 120mm f8
- Started by RoboRepublic
-
Sold JOBO MultiTank 2 2521 4 X 5
- Started by Inayat Noor
Forum statistics
In a few other threads it's become apparent that a lot of us work or have worked in various kinds of temporary darkrooms, dark/bathrooms and such, so I've decided to make this thread a sticky and broaden the title a bit. It started as a query to help jbrunner make a video about setting up a temporary space to do darkroom work, but there is a lot of useful information in this thread.
I have employed a couple of Ikea Antonius carts. The smaller four shelf model has all my darkroom equipment & is the right height for my enlarger. When I turn my bathroom into my temporary dark room I wheel my cart in & we are very quick to get going. Seeing this has worked so good for me. I got a much larger model to put all my camera gear in. There is also many different types of drawers available. I have also found using a towel at the bottom of the door a smart move. And my bathroom window has shutter so its fully blacked out.
I've started another thread about working efficiently in this kind of space, and how to reduce the setup time, which is often a barrier to darkroom work--
(there was a url link here which no longer exists)
(there was a url link here which no longer exists)
I don't know if it counts as a real makeshift darkroom, but about 50-60 years ago, these rooms served as some sort of shower room in the school:
(there was a url link here which no longer exists)
stuff like the big basin and the shower heads clearly show its history.
(there was a url link here which no longer exists)
stuff like the big basin and the shower heads clearly show its history.
- Joined
- Jul 19, 2009
- Messages
- 204
- Format
- Medium Format
I have employed a couple of Ikea Antonius carts. The smaller four shelf model has all my darkroom equipment & is the right height for my enlarger.
What type of enlarger are you using? Wondering if this cart will support a D2 in a safe/stable way... Appreciate any insight you can give.
What type of enlarger are you using? Wondering if this cart will support a D2 in a safe/stable way... Appreciate any insight you can give.
I put my D-II on a regular rolling typewriter table, but I added a second set of four rubber feet, thinner than the feet on the baseboard, so that it would sit squarely on the table with the baseboard hanging over the front and rear edges of the table without sliding, and since these additional feet are thinner than the original ones, I didn't have to remove them to put the enlarger on the larger table in my current darkroom, where it is now.
What type of enlarger are you using? Wondering if this cart will support a D2 in a safe/stable way... Appreciate any insight you can give.
My enlarger is a 1950's British make Gnome. So she is built with heavy iron, the Ikea cart does shake if you bump it but seems strong enough to support up to the average mans weight.
I used steel shelving that I accessed from "Storables", a US chain store, to construct a roll-able cart for my Omega D6. They will cut the posts to order without charge, so you can customize the height.
I went this route because:
1) The enlarger is heavy (especially the baseboard!). The cart is, necessarily, strong!;
2) The baseboard is 18" x 34", so I needed a cart big enough to hold the whole thing;
3) I need to be able to roll the cart plus enlarger through a normal bathroom door. As the enlarger has an extended column, I needed a cart that is only 21" in height.
The steel shelving plus castors cost me just over $100.00 USD. I needed an additional piece of 1/2" plywood as well, on the top.
It will probably outlast me .
.
Here is a link to the Storables website:
http://www.storables.com/Shop/Shelving/Steel-Shelving/
I went this route because:
1) The enlarger is heavy (especially the baseboard!). The cart is, necessarily, strong!;
2) The baseboard is 18" x 34", so I needed a cart big enough to hold the whole thing;
3) I need to be able to roll the cart plus enlarger through a normal bathroom door. As the enlarger has an extended column, I needed a cart that is only 21" in height.
The steel shelving plus castors cost me just over $100.00 USD. I needed an additional piece of 1/2" plywood as well, on the top.
It will probably outlast me
.Here is a link to the Storables website:
http://www.storables.com/Shop/Shelving/Steel-Shelving/
Thank you all for your wonderful posts.
I'm in process myself to built a make-shift darkroom in my bathroom, and your posts have inspired me very much. I live in a two-bedroom apartment with only a small bathroom, and so far I have placed the enlarger on the toilet and I could manage to have four 8x10" trays on the floor under the shower.
I'm still contemplating how to improve this, as it is not the most comfortable to work in, and your input has led me to believe that working in layers is the best approach. By working in layers I mean to put up some sort of shelf system on wheels where the top shelf will house my enlarger and then maybe four shelves under each other with different trays, e.g. developer, stop, fix and water bath. The Ikea antonius system seems obvious for this, although I really want something that I can collapse and store away as my space in generally is limited.
Interesting answers all... I posted a couple of pix of my portable darkroom earlier.
And I am going to include the toolbox idea for my own use.
Once the print is fixed, you may move it to a light area in a tray. Add some soak water after you get it there.
A washer can be placed most anywhere.
Use a tray ladder if the dark space is really cramped or resort to a drum processor which will work for RC paper.
A washer can be placed most anywhere.
Use a tray ladder if the dark space is really cramped or resort to a drum processor which will work for RC paper.
- Joined
- Jul 19, 2009
- Messages
- 204
- Format
- Medium Format
Anyone looking for a darkroom sink option, here's an idea I had...

(there was a url link here which no longer exists)
Basically, I want to use an inexpensive plastic cart with a raised edge as a shallow sink, using a water supply that comes from the wall (or a hose) and cutting a drain into it, using hose to route the outflow to my drain in the floor.
I will post updates on how it works in a few months if/when I get this thing up and running.
Looking to buy the cart locally or from www.uline.com, which has a house brand that's much less expensive than Rubbermaid.
EDIT: Elsing, laboratory/industrial supply sites might have carts that meet your needs, too...seen a bunch while poking around the net for my stuff.
Also, anyone have an idea for a cheap enlarger stand? Saw some workstands for drill presses, etc, but it seems expensive. Might try a stack of milk crates four-square and several high, taped or otherwise banded together...thoughts? Also considering kitchen carts or the like.
- Joined
- Sep 7, 2010
- Messages
- 85
- Format
- 35mm RF
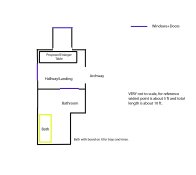
Ok guys I have a challenge, I have a small hallway space outside of my bathroom which I want to use for printing (Bathroom itself is too small) but one side is an open archway.
Any ideas on a cheap easy way to block off the arch so thats its light tight but still able to walk through without dismantling whatever is blocking the arch?
Attached is a rough outline of my plans, sealing off the doors/window is easy enough (Doors are pretty tight already and the windows has a blackout Velux Blind on it) but the archway is giving me problems.
Attachments
Jay:
You might want to move this to your own separate thread - it would be much easier to find that way.
Can you change the size of your enlarger table in order to fit it into the "nook" behind where you currently have it positioned?
That would allow two smaller tables - one at each end of the arch.
You might want to move this to your own separate thread - it would be much easier to find that way.
Can you change the size of your enlarger table in order to fit it into the "nook" behind where you currently have it positioned?
That would allow two smaller tables - one at each end of the arch.
- JayGannon
- Deleted
- JayGannon
- Deleted
Bathroom Darkroom
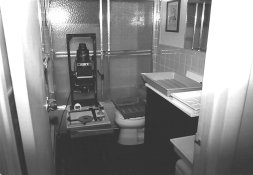
See photo. 6.5 x 5.5 ft. space. Not shown is a chair to sit down on in front of the enlarger, plastic to protect the vanity from chemicals, Delta red safelight bulb (in regular light socket), and a Time-O-lite timer and footswitch. A paper safe is placed beneath the chair. Of course the window had to be blocked. I use the darkroom only at night.
Developer is on the toilet, stop bath and fixer on the sink, and water in the tray on the hamper (all 11x14 trays). I can't use the bathroom sink to wash because of the trays so when the print goes in the water tray, I leave the darkroom and wash the print in the kitchen sink. This works well, I've been using this setup for years but I am thinking of building a darkroom in the basement.
Attachments
- Joined
- Sep 24, 2002
- Messages
- 1,021
I use to live in a studio apartment. I had my enlarger permanently on top of a low dresser (I used to pile t-shirts on top of the board and move them when I wanted to use it). I had a square tub (around 3 feet on a side) in the bathroom and Iwould put a piece of pine (around 12" wide) across the top with my trays set up on it. I would put the wash tray in the bottom of the tub and let the faucet run into it.
Having recently moved into a house, I was trying to figure out how to put a proper darkroom into my laundry room. Reading this made me remember the extra bathroom down in the basement (that I have yet to use). I'm figuring on a table for the enlarger and then an extension to the already sizeable countertop by the sink for wet process.
Dark out curtains? Print at night to stack the deck.

- Joined
- Jul 19, 2009
- Messages
- 204
- Format
- Medium Format
I am excited. In my new house, my stuff arrived after 2 months of waiting, and now I just need some small stuff before getting this whole thing set up! The plastic cart looks like it's going to work quite well as a makeshift shallow sink.
Having a local woodworker fab up an enlarger stand, cheap.
Splurged on a new 220v/50hz Gralab timer, because I wanted something that'd keep good time on the local electricity. Might wall-mount it over the sink for use when tray developing film and paper, and use my old Time-o-Lite on the enlarger...even though the electricity will result in timing errors compared to the clock, everything's based off of increments on a test strip, so it really doesn't matter for printing.
Darkroom doors and ventilation will still be a challenge. There's a small exhaust fan out the window and I bought some louvers to install in the panel I'm securing over the window, but I'm concerned that without some kind of intake into the darkroom from outside, the fan might burn itself out. I think I have a workable plan to compensate for this, but it'll cut down on the amount of air actually being sucked out of the darkroom. C'est la vie.
Been almost 15 years since I last stepped foot in a darkroom. Got back into shooting and processing film, and was scanning my negs, but had nowhere to print. This is gonna be cool.
Just got my kit
I just got a complete darkroom kit from a long-time developer who can't find the time any more. Durst F60 (it will do the 6x6s from my 1948 Zeiss Ikonta), timer, safelight, trays, washer, focuser, a bunch of jugs and all kinds of accessories, all for $80. The really good thing is that it's a bathroom system that has been in use and not a bunch of stuff a guy accumulated. It took 4 months of watching Craig's list to get just the right system at just the right price.
It's going into an internal bathroom with no windows but good ventilation. The Durst will sit on the vanity, the trays on plywood over the tub, the washer in the Laundry room across the hall. I was thinking of cutting a terrycloth towel into strips sewn end to end and stuffed around the door.
I've been scanning slides and negs for a few years, but I had printed almost nothing in the last year. I realized it was because after 30 years programming computers I just can't stand to spend more time in front of a keyboard and monitor at home.
- Joined
- Dec 23, 2010
- Messages
- 46
- Format
- 35mm RF
My darkroom, which is still somewhat in progress is made of my bedroom and the bathroom. There is a hallway connecting the two with only one door to the living room and the rest of the apartment. I put dark cloths in the door way with clamps you can buy from home depot. I use blue masking tape to close some corners and etc.
I just got a stainless steel table, 2'x4'x3', with wheels from ebay for $135 with shipping. It has a wire shelf below the main table top, where I put all my chemicals and etc.
My LPL 7451 sits in my room, on top of an Ikea drafting table that my friend gave to me. It has these triangle legs with a small shelf near the floor. I put all my paper there. I put focuser, and etc, enlarger accessories around my enlarger. I have a rotor cutter right next to the baseboard.
I have a Thomas duplex safelight in the hallway, so, no safe light in the bathroom. Thomas light is bright enough that I can see fairly well in the bathroom.
I put all my chemicals in on the stainless steel table. I expose, I walk over, and I develop the print.
One of the trickiest component is the ventilation. I got a vent from Home Depot, plus fold out tubing, I basically put the vent right next to the stop and fixer. The exhaust tube actually runs into my bedroom, out of my window. I had to do some tricky cutting of foam board and darkroom plastic sheets.
That's pretty much it. I still need to tweak a few things here and there. I want the place to be completely dark, so, I can print during the day. Which has been somewhat difficult.
- Joined
- May 28, 2005
- Messages
- 528
- Format
- 4x5 Format
I've had two darkrooms in a bathroom with only the toilet and sink. One was under a stairway. That's about as small as it gets.
Worked rather well for 8x10. Maybe that's where I got in the habit of printing small.
In both cases, I made a table to go over the toilet and placed the enlarger, timer, dodging/burning tools, grain focuser on that table. The paper safe went on the seat of the toilet, so that it was handy to the enlarger. I used a Durst 600 enlarger in the bathroom under the stair, and I had room for a D2 in the second bathroom darkroom.
If I recall, I cut a sheet of plywood that went across the sink. One could cover it with sheet vinyl to protect the surface and improve the appearance. I must have had blocks on each corner to raise it just above the height of the sink. This gives enough surface for three 8x10 trays. (D, S, F.) You might consider using a citric acid stop bath in so small a space. Of the three chemicals, it's the stop that gives off the strongest odor, especially that Kodak stuff. (Highly caustic.) I made fresh developer for each session and stored the stop and fixer in appropriately sized containers. These, and other darkroom utensils could be stored in drawers and in the cupboard below the sink. I did not have good temperature control of my developer, and in those days, I didn't care! A Zone VI compensating, developing timer would rectify that. I removed this plywood for developing film. There's usually enough space on either side of the sink for developing tanks, etc.
One nice thing about bathrooms, they usually have fans. If the small bathroom is being used ongoing for a darkroom, one might consider installing a lightproof vent in the door. This would much improve ventilation. (It's hard to exit air, if there's little or none entering the area.)
I hung a single safelight in the center of the ceiling and ran the cord down through open hooks to the plug that all bathrooms have. That way, I could remove the safelight, when I was done. The hooks weren't all that obtrusive, so I left them when the darkroom wasn't in use.
To make the darkroom light-tight, I hung a simple, removable curtain rod well above the door frame outside the darkroom. That worked quite well. The curtain was wide enough to prevent light from entering from the sides, and the black cloth was long enough so that the curtain would sit on the floor a little. I took care to make sure that the cloth was thick enough to prevent light from getting through. If the door opens out to the exterior, one could put the curtain inside the darkroom. Of course, the door was closed when printing or developing film.
After a printing session, I could put all this stuff away in a storage area.
I have a dedicate darkroom now but will not have a print washer for a long time, I put the print in a plastic basket available at any dollar store and use the sink faucet on low pressure 20 degree water to rinse the print off, i do it a few minutes, then let the basket overflow for a few, then rinse the entire surface area again. Very water inefficient, but given i only print 10 prints a week maximum, its not the end of the world.
| Photrio.com contains affiliate links to products. We may receive a commission for purchases made through these links. To read our full affiliate disclosure statement please click Here. |
PHOTRIO PARTNERS EQUALLY FUNDING OUR COMMUNITY:  |