Autochromes...

Recent Classifieds

Forum statistics

Threads
199,079
Messages
2,785,918
Members
99,801
Latest member
Rick-temporary
Recent bookmarks
0
Joined
Aug 7, 2014
Messages
186
Location
Grand Rapids, MI
Format
Large Format
I made a little progress in the past week, and got a tiny bit of color response!

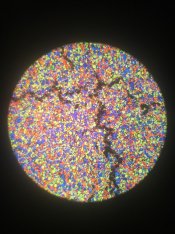
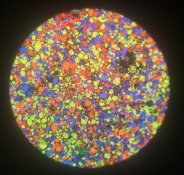
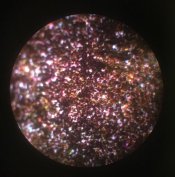
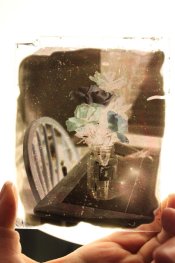
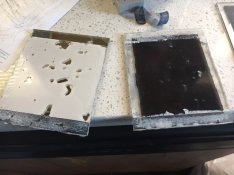
I've managed to get a hold of the original autochrome dyes, and dyed unsorted starch grains accordingly. I may need to modify the recipe slightly, as the green was a bit on the yellow side, giving the screen a heavy yellow cast. Overall though the grains look pretty good.

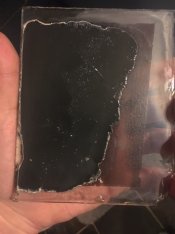
For some reason the second varnish I made is causing 'wrinkles' to appear over the starch, and is lifting the charcoal from the interstitial spaces in between the grains. I found a laquer of just amyl acetate and nitrocellulose sealed the starch better than the original autochrome formulation (though ultimately this was a poor idea, as the photographic emulsion refuses 100% to bind to the nitrocellulose, causing the emulsion to flake off as it dried).

I've found that in most cases there are small holes in the second varnish allowing the starch to get wet during processing. I probably need to work on my coating technique (right now I'm just pouring them collodion style). Over the next week I'm going to remix my second varnish more authentically (no amyl acetate nitrocellulose laquer) and see how it behaves. I might put some more damar resin into the first varnish to see if I can get it stickier, in hopes of it holding on to the charcoal more strongly during second varnish coating.

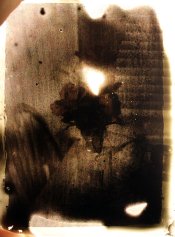
There was no fog in the emulsion this time. I cleaned all my glassware thoroughly and omitted ammonia from the recipe. I managed to make a panchromatic emulsion with ~1 ISO sensitivity. I'll work on upping the speed when the rest of the kinks are worked out.

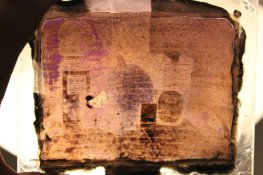
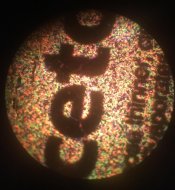
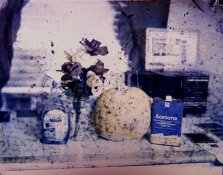
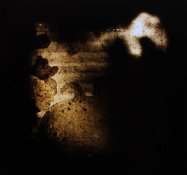
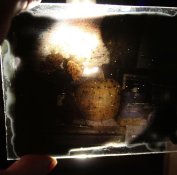
As I only had a single plate in this batch sealed with the second varnish instead of the cellulose laquer, I only had one autochrome to test. I exposed 2 stops longer than the normal glass plate I had poured, though it probably should have been more like 3-4 stops.

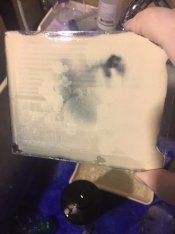
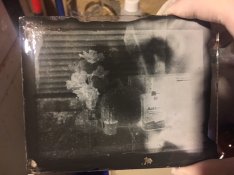
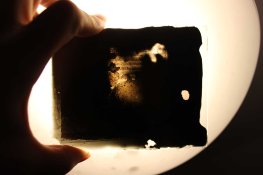
After some heavy photoshopping, one can see that I did indeed record color! I think the next immediate goal is to figure out these issues I'm having with the second varnish.... because right now I'm not confident any of these plates could withstand the processing time for a proper reversal processing.
 

Attachments

  • 23215610_10155780099913428_1272362002443625827_o.jpg
    23215610_10155780099913428_1272362002443625827_o.jpg
    336.4 KB · Views: 231
  • 23231429_10155780099818428_8744527578879434786_n.jpg
    23231429_10155780099818428_8744527578879434786_n.jpg
    75.9 KB · Views: 237
  • 23275644_10155780099898428_460866082067165654_o.jpg
    23275644_10155780099898428_460866082067165654_o.jpg
    570.6 KB · Views: 232
  • wrinkle.jpg
    wrinkle.jpg
    601.6 KB · Views: 255
  • beforevarnish.jpg
    beforevarnish.jpg
    194.5 KB · Views: 236

Photo Engineer

Subscriber
Joined
Apr 19, 2005
Messages
29,018
Location
Rochester, NY
Format
Multi Format
Nitrocelullose will need a subbing of some sort to help gelatin to adhere to it. I don't have a formula OTOMH, but it is a combined water and oil based material. Also, original autochromes rolled each of these layers to prevent separation and promote adhesion without wrinkles.

Looking good.

PE
 
Joined
Aug 7, 2014
Messages
186
Location
Grand Rapids, MI
Format
Large Format
Good afternoon everyone!

I had some more success - Over the last week I've been experimenting with "my" second varnish (the one using nitrocellulose laquer, that I outlined in an earlier post). I improved my technique a bit - allowing ~2-3mL of the solution to sit on a PERFECTLY level plate as a meniscus while it dries. The resulting coating is sufficiently thin and adequately prevents leaks into the starch (each screen was tested by allowing the plate to sit in water for an hour). I still get wrinkles, but they're not that bad (and kind of a low-priority problem right now).

The presence of the damar resin in the second varnish seems to sub the layer well, I haven't had a single issue with gelatin adhesion while using that recipe.

I was able to get a pretty decent color "negative" with normal processing. 20 minutes @ f/5.6 (EV 7) seemed to do the trick. The inverted image still needs a good amount of color balance adjustment to get it to look good. I attached some microscope pictures of the pumpkin and the blue portion of the acetone can.

I tried my hand at reversal processing with sulfuric acid and potassium permanganate, though that was much less successful - the image seemed to bleach out (it was hard to tell), though the reversal bath seemed to take good chunk of the emulsion with it! I've never reversal processed anything before, so there's probably a few things here and there I need to learn. I might work with a dichromate based bleach instead for the immediate future.

For the emulsion that remained, after second development, it was totally opaque. My best guess is: the emulsion is too thick, so that there are a good amount of silver halides "in the back" that remain unexposed after exposure, which end up forming a "sheet" over the reversed image. The Lavédrine and Gandolfo autochrome mentions that the emulsion on original autochromes was only about 4 microns thick!

Assuming my assumption is correct - what would be a good (and hopefully easy) method of reducing emulsion thickness? The first thing that pops into my head is to water it down a bit - 1:1 or 1:3 maybe...
 

Attachments

  • 23473218_10155804134248428_39152539327551253_n.jpg
    23473218_10155804134248428_39152539327551253_n.jpg
    86.1 KB · Views: 232
  • 23561392_10155804134243428_6175739528695162816_n.jpg
    23561392_10155804134243428_6175739528695162816_n.jpg
    84.1 KB · Views: 219
  • IMG_9056s.jpg
    IMG_9056s.jpg
    146.4 KB · Views: 243
  • IMG_90561s.jpg
    IMG_90561s.jpg
    188 KB · Views: 231
  • reversal.JPG
    reversal.JPG
    137.3 KB · Views: 237
  • IMG_90562s.jpg
    IMG_90562s.jpg
    270.2 KB · Views: 266

Photo Engineer

Subscriber
Joined
Apr 19, 2005
Messages
29,018
Location
Rochester, NY
Format
Multi Format
That reversal bath will remove emulsion. Use the dichromate version and make sure that you harden the emulsion before processing. If you got these images, then the emulsion is not too thick. There is just a problem with the process.

PE
 
Joined
Aug 7, 2014
Messages
186
Location
Grand Rapids, MI
Format
Large Format
That reversal bath will remove emulsion. Use the dichromate version and make sure that you harden the emulsion before processing. If you got these images, then the emulsion is not too thick. There is just a problem with the process.

PE

Hey PE. Thanks for the feedback. I whipped up some dichromate bleach. To be honest, I've never reversal processed anything before, let alone glass plates. But it seemed to work! I was able to visibly see the silver from first development bleach away... however, after bleaching for 2 minutes, the surface of the plate seemed milky with halides (e.g. no "holes" where the the silver was). No issues during bleaching, so I suppose my emulsion was sufficiently hardened from the chrome alum... After second development, the result is much the same as my previous attempt - completely opaque!

Considering it takes a good 5-10 minutes to fully fix the emulsion during normal processing, my guess here is that I rushed through the bleaching step way too fast. I'll go much longer tomorrow, perhaps 15 minutes or so? In fact, I'll probably expose a stop longer and extend first development too... after all that, SOMETHING has to reverse, right? :D
 

Craig

Subscriber
Joined
Apr 8, 2004
Messages
2,347
Location
Calgary
Format
Multi Format
Why not experiment with reversal processing conventional B&W films first and then adapt that process to your plates?
 

thuggins

Member
Joined
Jan 12, 2008
Messages
1,144
Location
Dallas, TX
Format
Multi Format
This doesn't meet the "made from scratch" aspect, but how impervious are the dyes of developed E6 film? If they can stand up to the chemicals, you could print out a Bayer pattern of the appropriate size and photograth it with e.g. Provia. Develop and dry the film, them put a B&W emulsion over it. Modern Dufay film.
 
Joined
Aug 7, 2014
Messages
186
Location
Grand Rapids, MI
Format
Large Format
Why not experiment with reversal processing conventional B&W films first and then adapt that process to your plates?

I haven't worked with film in a few years. I don't think I have any extra laying around ¯\_(ツ)_/¯

In all seriousness though, I think my reversal bleach is working as intended. Note that in the attached image, the dark areas are not residual silver, it's the screen itself unobscured by the silver halides.

With my last plate I tried to get a real dense negative to reverse. 1h20m exposure, 35 minute development, 10 minute bleach. Still it was nearly opaque!

I think I did inadvertently prove my theory about the emulsion being too thick, though -- I had forgotten, but I really messed up coating on this plate. It was really lumpy, parts being too thick and parts being very very thin. The thin parts did end up reversing as normal, while the thicker areas remain completely opaque. It seems the light is just too weak to penetrate and expose the silver halides at the back (outside) of the emulsion, which ends up forming an opaque layer over the reversed image. Not very much color response here, but I'm not surprised considering the exposure. I'm going to dilute the remaining emulsion 1:3 and see if that makes any difference.
 

Attachments

  • afterclearing.JPG
    afterclearing.JPG
    124.4 KB · Views: 158
  • beforebleach.JPG
    beforebleach.JPG
    92.4 KB · Views: 170
  • IMG_9061.jpg
    IMG_9061.jpg
    71.3 KB · Views: 162
  • IMG_9061crop.jpg
    IMG_9061crop.jpg
    111.6 KB · Views: 167

Photo Engineer

Subscriber
Joined
Apr 19, 2005
Messages
29,018
Location
Rochester, NY
Format
Multi Format
No chromogenic dye will stand up to the B&W reversal bleach. This includes C41 and E6.

If you get a good negative image that forms colors, the coating is not too thick.

PE
 
Joined
Aug 7, 2014
Messages
186
Location
Grand Rapids, MI
Format
Large Format
I think it is -- refer to my highly technical drawing. The Lavédrine and Gandolfo book seems to back this point up. From page 153:

"The average of all of the analyses carried out on many photographs shows that the photographic image - positive or negative - uses no more than 25% of the silver bromide contained in the emulsion, and that the other 75% is normally eliminated in the fixing step. This means that if the same quantity of silver salts were to be used in the Autochrome's light sensitive layer as in other types of photographic plate, the reversal step would result in leaving 50% of the unexposed silver bromide in the emulsion, which would cause a tremendous degree of darkening in the image. It therefore is essential to closely control the thickness and regularity of the emulsion layer and to produce a very thin emulsion [approximately 4 microns]."
 

Attachments

  • highlytechnicaldrawing.png
    highlytechnicaldrawing.png
    23.9 KB · Views: 130

Craig

Subscriber
Joined
Apr 8, 2004
Messages
2,347
Location
Calgary
Format
Multi Format
You need a precise method of laying down emulsion.

Can they be sprayed? There are gauges for the auto refinish industry that can measure the thickness of paint that is on a car, perhaps that can be used here to measure emulsion thickness? The modern basecoat technology is a very thin (0.0004") colour layer, followed by a much thicker (0.002") clearcoat.
 

Photo Engineer

Subscriber
Joined
Apr 19, 2005
Messages
29,018
Location
Rochester, NY
Format
Multi Format
Spray coating of an emulsion is not advised. Control is too difficult for the most part and evaporation is a problem. Remember that the auto industry uses chambers for this kind of work.

PE
 
Joined
Aug 7, 2014
Messages
186
Location
Grand Rapids, MI
Format
Large Format
Latest experiment. Reversal processed. I'm surprised, the color actually looks pretty well balanced. The picture is unedited, but was dark enough that it needed to be illuminated via a slide projector to see the image.

I tried a thinner emulsion (coating the plate with 2mL of emulsion instead of 20). Transparency is better, but not yet ideal. Due to the low volume of liquid, the emulsion gels up pretty quickly, barely giving me enough time to spread it on the plate. I think with the next batch of screens, I'll coat them via mold coating as seen in this video. They state they can get about a 10 micron coating with their emulsion -- mine should have a bit higher water content, and will hopefully be closer to our target of 4 microns.

Almost there!
 

Attachments

  • 23966887_1527812647300957_7470955569688346624_n.jpg
    23966887_1527812647300957_7470955569688346624_n.jpg
    81.6 KB · Views: 217

Photo Engineer

Subscriber
Joined
Apr 19, 2005
Messages
29,018
Location
Rochester, NY
Format
Multi Format
I am too, and I just sent a note to the GEH (GEM) gurus about this.

I think that we could help a lot with coating quality.

PE
 
Joined
Aug 7, 2014
Messages
186
Location
Grand Rapids, MI
Format
Large Format
Can't speak for others, but I'm following this thread with great interest...
Always encouraging!

I am too, and I just sent a note to the GEH (GEM) gurus about this.

I think that we could help a lot with coating quality.

PE

Awesome! Keep me posted! I just picked up some Rain-X, and I'm pouring a few more screens tonight. Hopefully I'll get to try out this mold coating technique sometime tomorrow.

Here's another digitally inverted shot. I mixed new starch, which is much more neutral in tone so the "positive" required less color correction. I keep forgetting to filter the emulsion before coating -- I expect that's the cause of those white holes?
 

Attachments

  • 23844419_187250955162930_937948356657214260_n.jpg
    23844419_187250955162930_937948356657214260_n.jpg
    166.9 KB · Views: 195
  • 24059126_187250951829597_2466314585994564392_n.jpg
    24059126_187250951829597_2466314585994564392_n.jpg
    65 KB · Views: 188

Gerald C Koch

Member
Joined
Jul 12, 2010
Messages
8,131
Location
Southern USA
Format
Multi Format
Some of the charm of the process is that the dyes are not perfect.
 

Nodda Duma

Member
Joined
Jan 22, 2013
Messages
2,685
Location
Batesville, Arkansas
Format
Multi Format
Following. This is great progress.


I might have missed it: What size plates are you making with 2ml of emulsion? 4x5?
 
Joined
Aug 7, 2014
Messages
186
Location
Grand Rapids, MI
Format
Large Format
Following. This is great progress.


I might have missed it: What size plates are you making with 2ml of emulsion? 4x5?

Yup! I'm working with 4x5 for the immediate future.

No luck yet with the 'mold coating' technique. The emulsion seemed to prefer to stick to the Rain-X treated glass, rather than the screen. It could be something wrong on my part though -- perhaps I'll practice with some water & gelatin in the light...

Edit:

I think I'm just going to heat up the emulsion to 50C or so, coat, and pour it off collodion style. Let's see how that goes...
 

Attachments

  • IMG_2240.JPG
    IMG_2240.JPG
    99.9 KB · Views: 147
Last edited:

Nodda Duma

Member
Joined
Jan 22, 2013
Messages
2,685
Location
Batesville, Arkansas
Format
Multi Format
Yup! I'm working with 4x5 for the immediate future.

No luck yet with the 'mold coating' technique. The emulsion seemed to prefer to stick to the Rain-X treated glass, rather than the screen. It could be something wrong on my part though -- perhaps I'll practice with some water & gelatin in the light...

Edit:

I think I'm just going to heat up the emulsion to 50C or so, coat, and pour it off collodion style. Let's see how that goes...

That's how I coat mine, although I only heat to 45C. Would love to take a whack at coating a couple, but I don't have a panchromatic emulsion recipe. :smile:
 
Last edited:
Joined
Aug 7, 2014
Messages
186
Location
Grand Rapids, MI
Format
Large Format
That's how I coat mine, although I only heat to 45C. Would love to take a whack at coating a couple, but I don't have a panchromatic emulsion recipe. :smile:

It's EZPZ as long as you've got some erythrosine and pinacyanol laying around. I go through the one I'm currently using here, if you're interested.

Here's a reversal processed result of the 'pour off' method. Still a bit too dark, but we're getting there! I think I might experiment a bit with spin coating (I happen to have hoarded a 78rpm record player just for this!), maybe we can get a thinner, more uniform coating that way. My exposures are a bit long right now, which might account for the somewhat washed colors.
 

Attachments

  • IMG_9069s.jpg
    IMG_9069s.jpg
    289.5 KB · Views: 161
Photrio.com contains affiliate links to products. We may receive a commission for purchases made through these links.
To read our full affiliate disclosure statement please click Here.

PHOTRIO PARTNERS EQUALLY FUNDING OUR COMMUNITY:


Ilford ADOX Freestyle Photographic Stearman Press Weldon Color Lab Blue Moon Camera & Machine
Top Bottom