What Is Your Home Made Darkroom Item?

On the edge of town.

A
On the edge of town.

  • 6
  • 3
  • 98
Peaceful

D
Peaceful

  • 2
  • 11
  • 226
Cycling with wife #2

D
Cycling with wife #2

  • 1
  • 3
  • 97
Time's up!

D
Time's up!

  • 1
  • 1
  • 92

Recent Classifieds

Forum statistics

Threads
198,262
Messages
2,771,954
Members
99,582
Latest member
hwy17
Recent bookmarks
0

Denverdad

Member
Joined
Apr 20, 2009
Messages
316
Location
Superior, Co
Format
Medium Format
Easily one of most if not the most interesting gadget in this thread. Thanks for posting.

Thanks! You might be interested to know that the gizmo that holds the strip of film is actually built (in part) from a 120 film canister:
25196287882_79acd38d2e_c.jpg


This construction is quite convenient as it provides a way to hold and store the strip in complete darkness prior to developing, and just slips onto the bottom of the rod when ready. You can even use the canister(s) directly for processing further steps, which is nice for keeping the chemistry volume low.

The biggest challenge with all of this was the film's tendency to curl or else get too bendy when trying to force it straight. The solution I came up with here simply accommodates the natural curl of the film rather than fighting it, with the strip sitting up against the rubber disk bolted to the canister lid, and then being secured with a rubber band.
 

samcomet

Subscriber
Joined
Feb 4, 2008
Messages
378
Location
Sydney, Australia
Format
35mm RF
I was reading a book about printing and had came across this very interesting home made extractor with light bluff made of wood. The author goes on to show how to make a paper safe with wooden planks that will completely block off the light. Not long ago I recall a post in this forum about safelight was paint with red paint have been in service for many years. I was amaze at how a little work around can be so helpful without having to go out and spend money on those item. It really save a lot of money. Of cause, I suppose anybody who would undertake such a task will need some tools at hand to have it all put together, consider this aspect, I do have some tools at my disposal. I want to explore the possibility of how far people will go to hand made the item they use in the darkroom? Will you show me yours?

I have a 4 door Restime paper safe with only 1 failsafe plastic clip-lock to keep the doors from opening inadvertently. To use all 4 containers I needed one more clip-lock. I scanned the one I had on a flatbed as a 2D image and extruded it into 3D via Photoshop. Then I had the file converted into a 3D printable file and emailed it to Holland where they printed it for me and sent it back. Total time was one week at a total price of a few dollars. This was years ago before 3D printers were so ubiquitous.
cheers,
Sam
 

eli griggs

Member
Joined
Nov 15, 2005
Messages
3,833
Location
NC
Format
Multi Format
I built an eight foot enlarging bench, a base stand for a four foot darkroom sink, the assembly for the sink drain down to a five gallon water bottle, for my darkroom in a carpeted bedroom, never spilled so much as a drop.
I've moved since then and have made a dc12 volt drain system with a Harbor Freight bilge pump, car battery and household wall switch, so I can run a hose from the darkroom to a bathroom, for draining the sink by-way-of the holding bucket.
I sewed blackout curtain backing for a window frame/velcro to keep out the sunlight when working in the wet. I made a blackout curtain for my doorway.
If you try to make your own curtain for a window, using blackout material, be aware, the stitching holes will let through more light than you'd think. This is because the material has a synthetic rubber coating on one side, which does no close up like a fabric does. I dealt with this by using strips gaffer tape. I also made the window curtain about three inches to wide on each side, as velcro can allow bright light to pass through. The velcro is set back those three inches and the extra material acts as a baffle to keep any light from coming through.
I've made paper safes, drying screens and rack, negative holders, out of mat board and will try my hand with aluminum plate, for my 5x7 and 4x5 omega enlarger. Likewise, I will try to make a 16 mm board for my Valloy.
I had two, three centimeter thick, base boards made, for my 5x7 and the Leica Valloy II, which shares the bench, with the two big omegas; rock solid.
I took an inexpensive, folding cloths closet and made it into a film drying cabinet, which is folded up and stored when not in use.
Plus the usual odds and ends like dodging and burning in wands, etc.
 

eli griggs

Member
Joined
Nov 15, 2005
Messages
3,833
Location
NC
Format
Multi Format
I forgot to mention that those 3 cm baseboards are granite. I also made a magnetic stir-plate out of a old silver chest.
 

paul ron

Member
Joined
Jan 22, 2004
Messages
2,706
Location
NYC
Format
Medium Format
to kill the fungus on lens cells n cases, ive decided to build a uv fungus killer using a sterilizer uv bulb.

i made a box n mounted the sterilizer tube on the lid. i incorporated a magnetic reed switch on the lid to ensure the buld is off incase the lid is opened while the unit is on.

im sure for someone cleaning one or two lenses may not need this, but i can now process several lenses or even an entire camera at a time.
 

Kshaub103

Member
Joined
Oct 8, 2015
Messages
41
Location
Ohio
Format
Large Format
a base stand for a four foot darkroom sink, the assembly for the sink drain down to a five gallon water bottle, for my darkroom in a carpeted bedroom, never spilled so much as a drop.
I've moved since then and have made a dc12 volt drain system with a Harbor Freight bilge pump, car battery and household wall switch, so I can run a hose from the darkroom to a bathroom, for draining the sink by-way-of the holding bucket.

This is the kind of idea I was looking for my darkroom that current doesn't have water. Do
U have any photos of your system.
 

tedr1

Member
Joined
Feb 3, 2016
Messages
940
Location
50 miles from NYC USA
Format
Multi Format
The high (exorbitant?) prices for large printing easels encouraged me to try DIY when I recently needed a 16x20 easel. I have some 16x20 picture frames that are made from four sections with connecting links hidden in the corners, this allows one long piece of the frame to be removed leaving a three sided rectangular frame. This rests on the enlarger baseboard, the glass (acrylic) drops away from the frame front a small distance and allows the printing paper to be slid into the glass channel, the paper is restrained around the edges by the lip of the frame and is flat and suitable for printing. Along the edge where the frame is absent I lay a ruler on the paper edge to make it flat. It works brilliantly, and cost nothing as I already had the spare frame.
 

samcomet

Subscriber
Joined
Feb 4, 2008
Messages
378
Location
Sydney, Australia
Format
35mm RF
Just made a copy of the Falcon Print Positioner from photos I found on the net and in B & H catalog. It is no longer sold as Falcon closed many years ago but I found a clear acrylic t-square and made metric scales ala the scales I found in said photos. It accurately positions a print left to right in the centre of the matte board and positions the print top to bottom off centre but in the correct "optical centre" which give the bottom of the matte slightly heavier weight.
 

removed account4

Subscriber
Joined
Jun 21, 2003
Messages
29,833
Format
Hybrid
my home made item for the past few years is
full city roast sumatran robusta coffee beans
cooked in a wok on a burner in my driveway
that i use for sumatra based caffenol coffee
developer. i don't make washing soda
or vitamin c, but i add them together
and add 1oz dektol ( or ansco 130 or ? /L

its not HARDWARE but SOFTWARE
 

bergytone

Member
Joined
Sep 8, 2014
Messages
168
Location
Grand Haven,
Format
Multi Format
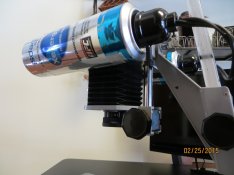
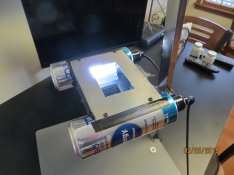
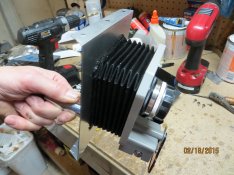
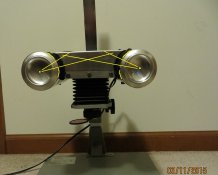
I put together a paper negative enlarger which I documented here on the forum last spring. Works amazingly well. It's muck like an opaque projector. Now I've just got to shoot more paper negatives!

enlarger 2.jpg enlarger 3.jpg enlarger frame 3.jpg front view.JPG enlarger 1.jpg
 

gone

Member
Joined
Jun 14, 2009
Messages
5,505
Location
gone
Format
Medium Format
The thing w/ darkroom stuff is that it's pretty easy to make most of it. If you buy it, the price per piece w/ shipping can cost a fortune! Trays can be found at Walmart or even the Dollar Tree, safelights are either a $5 red bulb from Freestyle (order it when you do your chemical/paper order and avoid shipping costs) or bike LED taillights w/ some extra Ruby lith just to be sure, gloves can take the place of tongs, cut down plastic jar lids or mat board can be used for lens boards, a 135mm or longer camera lens makes a surprisingly good print focuser, $4 glass thermometer can be used for film or prints, and mat boards or most anything can be used for neg carriers on most enlargers. If you print RC papers, all you need is a piece of string and clothes pins to dry them.

I have a frosted house bulb in the enlarger that I took the writing off w/ alcohol, and while there's a proper enlarger bulb coming, I think the illumination on this one w/ a diffuser enlarger is quite good. If you look in thrift stores you can find 11x14 picture frames w/ backs that have tabs that hold the picture in (like the one below) simply by twisting them. These make great print easels, as you take the back off, place your paper in the frame emulsion side up, put the back on, and twist the tabs closed. When you flip it and place it on the enlarger base you have a nice, flat paper, and the frame gives you a small border on the print.

https://www.google.ca/search?q=phot...=JntGV5CxB8XhmwHXl4OQBA#imgrc=I6XJy-DqxCbPoM:
 
Last edited:

calebarchie

Member
Joined
Jul 25, 2014
Messages
675
Location
Australia 2680
Format
Hybrid
^ Things like that are overkill complex for what they are due to their age. Simply get a cheap slim-line LED lightbox and cover it with rubylith and maybe some bluetak or just sit in on the table.

Here is some stuff of mine.

attachment.php
attachment.php

1x1m portable darkroom tent, whole thing packs down to a large duffel bag/camping equipment bag. Collapsible table, drying racks and shelfs, small UV lightbox that also acts as a baseboard for the enlarger, all ventilated and lightproof, only can be opened/closed from inside! Washing is done outside.

attachment.php


Vertical slot processor to fit nicely in that space next to timer. Darkroom is a lot more full now.
Everything is a work in progress, I will be soon getting rid of the lightbox and enlarger in favor of more compact alternatives.
Also working on a lot more projects yet so little time.

Merry Christmas all!

Had to pack the darkroom up today, this is what it folds down to... Since I am moving I will be re-designing some aspects of it, stay tuned...

13552530_1789597107941567_1978518084_n (1).jpg
 

M Carter

Member
Joined
Jan 23, 2013
Messages
2,147
Location
Dallas, TX
Format
Medium Format
I took two beseler lensboards and made a "besalign" lens board for my 67c, as it doesn't have as many alignment controls as a big enlarger. Now very easily printing 16x20 that's sharp corner to corner.

My other favorite - my main darkroom counter is a big section of kitchen cabinets. I made one of the top drawers into a paper-safe drawer. So much quicker and handier than a paper safe or fiddling with boxes and bags.

And not so much DIY, but those red LED bulbs are the best safelight bulbs I've ever used. Stick 'em in any old fixture and my darkroom seems almost as bright as day (I have three or four of 'em going) - massive improvement in enjoying printing (especially long-dev time lith prints). Super handy for coating big canvases with liquid emulsion, too.
 

MattKing

Moderator
Moderator
Joined
Apr 24, 2005
Messages
52,481
Location
Delta, BC Canada
Format
Medium Format

CMoore

Subscriber
Joined
Aug 23, 2015
Messages
6,210
Location
USA CA
Format
35mm
Ah.....i see. Thanks for that link, I will give one (maybe two) of these a try.
Thanks Again
 

M Carter

Member
Joined
Jan 23, 2013
Messages
2,147
Location
Dallas, TX
Format
Medium Format
Yes that's the one. I have 3 of my 5x7 safe lights fitted with this bulb and two pieces of Rosco gel #19 fire along with one piece of diffuser. Works great.

I use them bare with no problems, no red gels needed with my papers. There was a thread here where I overlaid the spectrum of the bulb with Ilford's sensitivity chart for one of their papers - no overlap. They're also fine with my "red-light-only" papers. Just one of the best no-brainer, best-thing-ever, super-value darkroom purchases.
 

guangong

Member
Joined
Sep 10, 2009
Messages
3,589
Format
Medium Format
My latest homemade darkroom equipment was to make a revolving disk to support a Lomo reel for developing Super 8 and 16mm movie film. I used a revolving swivel intended for sculpture. Works just fine. The best way to put 50 and 100 ft of film on a reel for development.
 
Joined
Mar 21, 2006
Messages
839
Location
mid-Missouri
Format
Pinhole
I use them bare with no problems, no red gels needed with my papers. There was a thread here where I overlaid the spectrum of the bulb with Ilford's sensitivity chart for one of their papers - no overlap. They're also fine with my "red-light-only" papers. Just one of the best no-brainer, best-thing-ever, super-value darkroom purchases.
The thing that startled me was the amount of light coming out that bulb. Even with 2 sheets of #19 gel (minus the diffuser) it was so bright I was concerned. But my dark area right now is only 54" sq., couldn't get the advised 4' minimum distance.
 

Ron789

Subscriber
Joined
Nov 17, 2014
Messages
353
Location
Haarlem, The
Format
Multi Format
Just finished installing an electric circuit that automatically switches the safelight off at the moment the enlarger switches on, and vice versa... enlarger off = safelight back on. Some timers have this feature built-in but my favourite timer - Gossen Sixtolab - does not. So now I can use the Sixtolab with the light switching the way I prefer it: complete darkness during focusing and exposing.
 
Photrio.com contains affiliate links to products. We may receive a commission for purchases made through these links.
To read our full affiliate disclosure statement please click Here.

PHOTRIO PARTNERS EQUALLY FUNDING OUR COMMUNITY:


Ilford ADOX Freestyle Photographic Stearman Press Weldon Color Lab Blue Moon Camera & Machine
Top Bottom