What Is Your Home Made Darkroom Item?

Sonatas XII-56 (Life)

A
Sonatas XII-56 (Life)

  • 0
  • 1
  • 132
Mother and child

A
Mother and child

  • 3
  • 1
  • 830
Sonatas XII-55 (Life)

A
Sonatas XII-55 (Life)

  • 1
  • 1
  • 2K
Rain supreme

D
Rain supreme

  • 4
  • 0
  • 2K

Recent Classifieds

Forum statistics

Threads
199,820
Messages
2,797,187
Members
100,044
Latest member
los_brewskis
Recent bookmarks
0

Bill Burk

Subscriber
Joined
Feb 9, 2010
Messages
9,383
Format
4x5 Format
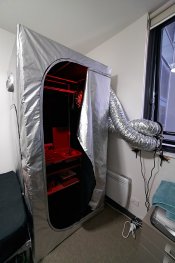
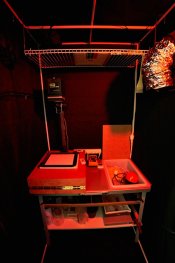
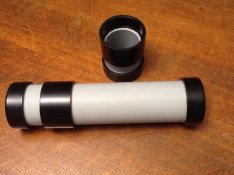
Lots of things to see in my darkroom...

http://www.classicbwphoto.com/classicBWphoto/Darkroom.html
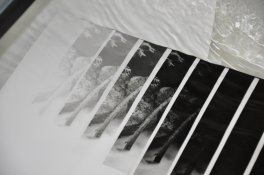
... also, a print drying blotter stack...
http://www.classicbwphoto.com/classicBWphoto/Print_Drier.html
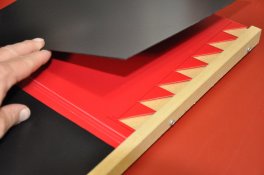
... And some cropping guides...
http://www.classicbwphoto.com/classicBWphoto/Crop_Guide.html
... Also, search my name (Reinhold) for lots of DIY hints here...
http://www.film-and-darkroom-user.org.uk/forum/showthread.php?t=9309

Have fun
Reinhold

Hi Reinhold,

Have you ever made one of these? From Popular Science Nov 1945 - ILLUMINATED RACK SILHOUETTES PHOTOGRAPHIC DODGERS IN DARKROOM

https://books.google.com/books?id=bCEDAAAAMBAJ&pg=PA187&dq=photographic+dodgers&hl=en&sa=X&ved=0ahUKEwjTm4WIzvXJAhUI5GMKHYUFD78Q6AEIMDAA#v=onepage&q=photographic%20dodgers&f=false
 

calebarchie

Member
Joined
Jul 25, 2014
Messages
692
Location
Australia 2680
Format
Hybrid
^ Things like that are overkill complex for what they are due to their age. Simply get a cheap slim-line LED lightbox and cover it with rubylith and maybe some bluetak or just sit in on the table.

Here is some stuff of mine.

attachment.php
attachment.php

1x1m portable darkroom tent, whole thing packs down to a large duffel bag/camping equipment bag. Collapsible table, drying racks and shelfs, small UV lightbox that also acts as a baseboard for the enlarger, all ventilated and lightproof, only can be opened/closed from inside! Washing is done outside.

attachment.php


Vertical slot processor to fit nicely in that space next to timer. Darkroom is a lot more full now.
Everything is a work in progress, I will be soon getting rid of the lightbox and enlarger in favor of more compact alternatives.
Also working on a lot more projects yet so little time.

Merry Christmas all!
 

Attachments

  • darkroom1.jpg
    darkroom1.jpg
    342.3 KB · Views: 1,487
  • darkroom2.jpg
    darkroom2.jpg
    337.1 KB · Views: 1,427
  • IMG_5574.JPG
    IMG_5574.JPG
    224.9 KB · Views: 1,404

Wayne

Member
Joined
Jul 8, 2005
Messages
3,621
Location
USA
Format
Large Format
Wow...lol! Nice port-a-darkroom! :laugh:

^ Things like that are overkill complex for what they are due to their age. Simply get a cheap slim-line LED lightbox and cover it with rubylith and maybe some bluetak or just sit in on the table.

Here is some stuff of mine.

attachment.php
attachment.php

1x1m portable darkroom tent, whole thing packs down to a large duffel bag/camping equipment bag. Collapsible table, drying racks and shelfs, small UV lightbox that also acts as a baseboard for the enlarger, all ventilated and lightproof, only can be opened/closed from inside! Washing is done outside.

attachment.php


Vertical slot processor to fit nicely in that space next to timer. Darkroom is a lot more full now.
Everything is a work in progress, I will be soon getting rid of the lightbox and enlarger in favor of more compact alternatives.
Also working on a lot more projects yet so little time.

Merry Christmas all!
 

Sirius Glass

Subscriber
Joined
Jan 18, 2007
Messages
50,500
Location
Southern California
Format
Multi Format
I want one!
I want one!
I want one!
I want one!
I want one!
I want one!
I want one!
I want one!
I want one!
I want one!
I want one!
I want one!
I want one!
 

calebarchie

Member
Joined
Jul 25, 2014
Messages
692
Location
Australia 2680
Format
Hybrid
I had seen a lot of photo of this portable darkroom. Perfect for me but very expensive. This is a dream workspace for me.


Sent from my iPhone using Tapatalk

It is not the nova, cost me 100AUD and a little ingenuity.

I want one!
I want one!
I want one!
I want one!
I want one!
I want one!
I want one!
I want one!
I want one!
I want one!
I want one!
I want one!
I want one!

Cheers, but this is out of necessity. Living on campus in a 4x3m shoebox with 5 other flatmates.
 

aoresteen

Member
Joined
Jun 8, 2004
Messages
661
Location
Newnan, GA,
Format
Multi Format
I made my own 70mm developing tank. Holds a 70mm x 15 foot length of film loaded on a standard 70mm SS reel.

70mm tank 1.jpg

Made from an Omega print drum.
 

Rick Jones

Member
Joined
Feb 9, 2004
Messages
127
Location
Maryland
Format
Multi Format
With two enlargers and one digital timer I got tired of switching enlarger power cords so fabricated a switching box with two female plugs controlled by a three way toggle switch on top. Now a flip of the switch allows my timer to control either the Valoy II or D2V.
 

RalphLambrecht

Subscriber
Joined
Sep 19, 2003
Messages
14,704
Location
K,Germany
Format
Medium Format
I was reading a book about printing and had came across this very interesting home made extractor with light bluff made of wood. The author goes on to show how to make a paper safe with wooden planks that will completely block off the light. Not long ago I recall a post in this forum about safelight was paint with red paint have been in service for many years. I was amaze at how a little work around can be so helpful without having to go out and spend money on those item. It really save a lot of money. Of cause, I suppose anybody who would undertake such a task will need some tools at hand to have it all put together, consider this aspect, I do have some tools at my disposal. I want to explore the possibility of how far people will go to hand made the item they use in the darkroom? Will you show me yours?

I made my own steptest printer and published its design in several places:smile:
 
Joined
Mar 30, 2011
Messages
2,147
Location
NYC
Format
Multi Format
The usual small stuff for me. Mat board neg carriers, lens board for my durst, mdf base for my 4x5 durst enlarger with leveling legs, baseboard for my 6x7 lpl, gridded alignment guides for my easels, etc that I can't think up right now.


Sent from my iPhone using Tapatalk
 

Luis-F-S

Member
Joined
Sep 19, 2013
Messages
774
Location
Madisonville
Format
8x10 Format
I'm about to make 6x17 and 5x7 inserts for a De Vere 5108 negative holder. Ian

Ian, don't know if you know, but DeVere made a 6x17 insert. I got one with my 5108. Don't know if I'll ever use it, but you never know....L

IMG_0473.JPG
 
Last edited by a moderator:

John Koehrer

Member
Joined
Apr 3, 2004
Messages
8,277
Location
Aurora, Il
Format
Multi Format
Couple of negative masks for Focomat ll, 6X7 & 6X9 .031 plastic cut with X-acto knife & painted flat black.
 

jsmithphoto1

Member
Joined
Dec 19, 2013
Messages
127
Location
Chattanooga, TN
Format
Multi Format
Does this qualify as darkroom? It's my prototype. Homemade film "scanner". I drilled a hole in the top in which I place a strobe. The 2 pieces of glass are separated by about 3 strips of duct tape (enough room for the negative to slide through without scratching and curling up). There is a piece of cardstock in the back to serve as the white background. I use my Nikon D7000 to photograph the negative with an aperture of f/22. The strobe (light source) is set to the lowest possible power. The converting is done in Photoshop. I get great "scans" of a decent size and this works great because I develop myself since there are no minilabs around here anymore. I hate the thought of paying $13 for singles :/
attachment.php
attachment.php
This "scan" is of 8 year expired Kodak GOLD 100 with the LOMO Diana F+.
 

Attachments

  • DSC_9603-1.jpg
    DSC_9603-1.jpg
    428 KB · Views: 939
  • DSC_9426-1.jpg
    DSC_9426-1.jpg
    946.4 KB · Views: 935

Fr. Mark

Member
Joined
Sep 4, 2013
Messages
121
Format
Multi Format
Print or sheet film soak washer. Contact printing frames. UV light source. Repurposed various glass and plastic trays for photo use. Sheet film developing tanks to go with 8x10 stainless dip/dunk development frames. NB lexan or polycarbonate needs special glue. PVC glue won't do it. Enlarger lens boards. Modified a film reel for 16 mm/110 then sold it. I like negatives measured in inches not mm. After I got rid of it I realized an opaque projector could be used for enlarging paper negatives. Oops. Coffee filters can be used in filtering photo chemicals (New Cyanotype process requires this). Bike tail light as a fairly safe light of not shone directly on Ortho film or paper. Enlarger film carrier for 110 film from cardboard. I've also built cameras incl. bellows, tripod, pinholes, light modifiers, and I plan to wire up some optical slaves to put a bunch of old flash units back to work. If the light is bright enough, a pinhole can be used in place of reading glasses...I still want to build a few cameras and film holders/plate holders. And make my own plates. And printing papers/tissue.
 

RalphLambrecht

Subscriber
Joined
Sep 19, 2003
Messages
14,704
Location
K,Germany
Format
Medium Format
OK Ivan,

You are approaching this the wrong way. This thread may be great for sharing ideas, but if you want to make something for yourself it requires some imagination. Be resourceful and build what you require, there are no 'ready-made' kits for this kind of stuff.

For LED safelights be sure to use the single correct wavelength diodes rather than an RGB type bulb. LEDs have a greater bandwidth but they should be ok for shorter times/bw only.

The raspberry pi is a platform much like an arduino or beagle board but more of a mini computer than a microcontroller. They can be used for a variety of maker projects.

Again, your imagination is the limit so start using that brain of yours!

Careful, red LEDs even at the right wavelength can ha fairly intense lightingand can cause paper fogging if too close or if exposure is too long.Always conduct a safelight test before using for fine prints:smile:
 

calebarchie

Member
Joined
Jul 25, 2014
Messages
692
Location
Australia 2680
Format
Hybrid
Careful, red LEDs even at the right wavelength can ha fairly intense lightingand can cause paper fogging if too close or if exposure is too long.Always conduct a safelight test before using for fine prints:smile:

Of course, the same safelight principles and precautions apply regardless of LED or not.

Should also note that depending on the quality of the diode and it's manufacturing process it may leak even some yellow light. Always a good idea to use a CD to check.
 

mdarnton

Member
Joined
Mar 4, 2008
Messages
463
Location
Chicago
Format
35mm RF
I haven't read the whole thread yet--sorry if I'm duplicating other people's ideas:

I made a proofing neg carrier for my D2V by hinging two pieces of glass together with black masking tape, then adding tape tracks on the inside of the bottom sheet that would align three strips of 35mm film between them, centered relative to the lens. This allowed me to make enlarged proofs, nine 35mm frames at once, on an 8x10 sheet of paper. I made it long enough that I could slide it sideways to do the other half of the strips without having to realign the film.

Another DIY for the same enlarger was a low cabinet for it so that the baseboard was at about waist level for large enlargements, with a large riser box to boost the easel up to a comfortable working level for the smaller prints I usually made. That way I could keep the whole enlarger low, but work with small prints at a higher level where I didn't have to bend over and ruin my back to focus.

Another: stainless steel bicycle spokes bend to make additional dip rods for stainless steel reels.

Another: a piece of paper with borders marked in pen so that I didn't have to turn the light on to see where to set the easel for print sizes I commonly used--just put in the paper and move the masks to the lines. On one easel I reserved for one client's regular work in several odd sizes I did this directly on the easel's white background.

Dodging tools: a piece of brass wire with a spiral like a key ring bent into each end, and a bunch of black paper pieces cut to various sizes and shapes to slip into the spiral, or cut to shape at the moment as needed.

For production work, a low shelf just over the developer where I could place a stack of exposed paper, then flip-flip-flip pieces down into the developer with one hand while agitating with the other. I could handle 100 8x10 sheets at a time in a deep tray this way.
 

Todd Barlow

Subscriber
Joined
Aug 9, 2004
Messages
510
Location
Ontario
Format
Multi Format
DIY Localized Test Strip Printer

DIY Localized Test Strip Printer
I have posted a series of 15 photos in a Flicker Album titled "DIY Darkroom Localized Test Strip Printer" showing my DIY project for a localized test strip printer.

Use it to show different exposure times in the same area of the negative being printed and or same exposure with different contrast settings to dial in your exposure and contrast settings

https://www.flickr.com/photos/c330shadowcatcher/sets/

Not as nice looking as Chris Woodhouse's design as shown in Way Beyond Monochrome but it does the job.

Inexpensive
Useful
Easy to make

All the best

Orignal APUG posting: (there was a url link here which no longer exists)

Todd
 

Attachments

  • DSC_0006 (1024x680).jpg
    DSC_0006 (1024x680).jpg
    315.6 KB · Views: 219
  • DSC_0776 (1024x680).jpg
    DSC_0776 (1024x680).jpg
    302.8 KB · Views: 212

f/stopblues

Member
Joined
Oct 6, 2005
Messages
214
Location
Midwest
Format
Multi Format
I made a drop-table for my Beseler 45M and now a new one for my Beseler 45V-XL. The standard baseboard sits at counter height, but can be removed to expose on a secondary baseboard about 18 inches lower. That secondary one is made of plywood with a thin steel sheet over the top, painted matte grey. I use that steel sheet to use strip magnets for aligning paper, then other magnets to hold the paper like an easel. The result is a quick way to hold flat big paper of any odd dimension. Clean borders can be masked with the magnets, but I usually just cover them during framing.
 

Josef Guay

Member
Joined
Sep 14, 2003
Messages
28
After 'upgrading my homemade paper flasher to a LED light I realized that my GraLab timer has some 'stray current' that had no impact on a 4 watt incandescent bulb, but lite the LED light. I made may own timer for it using a Sestos timer that I purchased at Amazon for less than $30.00. One downside is that it some numbers are green and need to be covered to prevent paper fogging. I had a spare red filter for that purpose.
 

Attachments

  • DYI Timer.jpg
    DYI Timer.jpg
    332.8 KB · Views: 291
Photrio.com contains affiliate links to products. We may receive a commission for purchases made through these links.
To read our full affiliate disclosure statement please click Here.

PHOTRIO PARTNERS EQUALLY FUNDING OUR COMMUNITY:


Ilford ADOX Freestyle Photographic Stearman Press Weldon Color Lab Blue Moon Camera & Machine
Top Bottom