Reversal RA-4 experiment thread.

Frank Dean,  Blacksmith

A
Frank Dean, Blacksmith

  • 3
  • 2
  • 12
Woman wearing shades.

Woman wearing shades.

  • 0
  • 0
  • 23
Curved Wall

A
Curved Wall

  • 5
  • 0
  • 69
Crossing beams

A
Crossing beams

  • 9
  • 1
  • 92
Shadow 2

A
Shadow 2

  • 5
  • 1
  • 66

Recent Classifieds

Forum statistics

Threads
198,837
Messages
2,781,656
Members
99,724
Latest member
jesse-m
Recent bookmarks
0

Photo Engineer

Subscriber
Joined
Apr 19, 2005
Messages
29,018
Location
Rochester, NY
Format
Multi Format
I would not use the E6 FD for this. These chemicals are there to adjust the image structure of an 18 or so layer product. Color paper has 6 and has no need of extensive image structure or color correction methods. I would stay away from D76 types or any with lots of solvent. The DPTA is only a chelating agent to remove any metal salts in water if you don't used distilled water.

D72 (Dektol) is my go-to developer for this.

PE
 

dale116dot7

Member
Joined
Jun 24, 2016
Messages
39
Location
Calgary AB
Format
35mm
Filter was C100, 10 seconds.
DSC_5560.jpg
 

dale116dot7

Member
Joined
Jun 24, 2016
Messages
39
Location
Calgary AB
Format
35mm
The test target is on the left, I shot it on Velvia 50 in daylight (on my wood deck), processed in Fuji 6 bath E6 chemistry. The projected slide looks very close to the target. The reversal print is on the right. Then I tried reversal RA4 with 10 seconds of exposure in a C760 set to C100, FD Ilfosol3 9:1 for 90 seconds at 20C. Reexposed for a minute with a 60 watt tungsten bulb maybe 6 or 8 inches away. Maybe FD should have been longer or warmer? The rest was Tetenal RA4 at 35C. Some colours look close to right but I am a bit confused why the grey strip colours look like it does. I was actually pretty happy that I got anything at all given that I have never printed colour before this. I did shoot both side by side with a Nikon digital to post it. I thought I should work on the process using a target first and once that is good, try some subject matter. Probably I need to get some additives to tweak FD, and mix up some Dektol. I have some of the chemicals (potassium bromide, sulfite, H2SO4, carbonate) but no thiosulfate. I usually use HC110 for film and Dektol for B&W prints but I ran out.
 

RPC

Member
Joined
Sep 7, 2006
Messages
1,628
Format
Multi Format
Something that really made it easier for me to color balance the print was to mix my own Dektol (D-72) for FD and use sodium chloride as the restrainer instead of potassium bromide the formula calls for. After all, RA-4 papers are considered chloride papers. Before this, I could not balance the print easily with enlarger filtration settings, but it was much easier with the chloride. YMMV. Crossover was still a problem but seemed improved, but it was definitely easier to make the middle gray in the gray scale gray. You might try this, varying the amount to see what works best for you.
 

dale116dot7

Member
Joined
Jun 24, 2016
Messages
39
Location
Calgary AB
Format
35mm
Thanks, PE + RPC! I will try those out probably tomorrow night. I can try the filter pack change and Dektol right away. I don't have all of the chemicals needed to mix my own. Unless adding chloride to stock Dektol works I will need to order up the chemicals and that will take some time, but i'll start with PE's suggestions which I can do fairly quickly.
 
Joined
Aug 2, 2009
Messages
147
Location
Alberta, Canada
Format
Multi Format
My issue with the process was the mottling. Fuji mottled a lot, Kodak mottled a little less.

Here are some of my own reversal notes for anyone interested to see what I was up to.
RA-4 http://www.flickr.com/groups/1350656@N25/discuss/72157629953833667/
B&W Paper http://www.flickr.com/groups/1011045@N21/discuss/72157642870149194/
B&W Film http://www.flickr.com/groups/b-w-reversal-process/discuss/72157642202798444/

About 3 years ago, I stumbled onto a coincidence with reversal processing B&W papers that gave me what appeared to be, identical mottling.

My potassium permaganate bleach was a day past shelf life (very short life). It clearly didn't bleach properly, but I continued on. When I re-exposed, I was surprised to see that familiar mottling show up. Just like I see in the RA-4 reversal process.

My life got much busier since then, so I haven't had a chance to experiment with it. But one of you may have occasion to try a PP bleach mixed in there.
 

Photo Engineer

Subscriber
Joined
Apr 19, 2005
Messages
29,018
Location
Rochester, NY
Format
Multi Format
Reversal imaging on RC support has been plagued for years by mottling, from slight to very great. Kodak spent a lot of time and money on fixing the problem. Presently I see slight mottle, but as you note, Fuji's is worse. That agrees with the work of others.

I wish I had a fix for this, but I think it will always be there. That is why busy nature scenes with little sky or other shots with little uniform areas are best.

PE
 
Joined
Aug 2, 2009
Messages
147
Location
Alberta, Canada
Format
Multi Format
I wish I had a fix for this, but I think it will always be there.

I have to agree. The last hope I have is that my weak potassium permaganate bleach / mottling in B&W paper reversal observation is not a coincidence and may have something to with the problem. This observation happened a few years ago already and I haven't made it a priority to try it out, but I vow to experiment more with RA-4 reversal this spring / summer. And put my thoughts on this to rest.
 

Photo Engineer

Subscriber
Joined
Apr 19, 2005
Messages
29,018
Location
Rochester, NY
Format
Multi Format
You might find the use of a Ferricyanide bleach then fix a useful process sequence, but then you need a clearing bath after the CD with washes.

PE
 

dale116dot7

Member
Joined
Jun 24, 2016
Messages
39
Location
Calgary AB
Format
35mm
Dektol 3+1 for 2:00 was the ticket for me, the colours dialed in very easily. I've been using Arista paper and I do get a bit of uneven tone in a pure blue sky, though not too bad. As far as I can tell Endura only comes by the roll which is a bit inconvenient though I suppose not a show-stopper, I might have to get some of that. The print is quite high in contrast but with the right subject, I think this will work nicely. In some ways I like the high contrast and high saturation but I think I'd need to keep reversal printing in mind while taking the photo in the first place. Velvia as a source starts out with very bright colours, the reversal process seems to exaggerate everything a bit. The colour balance with Dektol worked quite well with C=0, M=90, Y=70 (Omega C760, 8 seconds). To me it looks like scenes that highlight small patches of pure colours should look good - lit bridges, Christmas lights, perhaps buildings with many small sections of vibrant and distinct colours. A pure sky was 'just ok' though - the blue looked very blue, but the uneven lightening of the tone here and there is a bit distracting, exactly as everybody else here had mentioned. The print also had an interesting look before bleaching. Thanks again!!
 

dale116dot7

Member
Joined
Jun 24, 2016
Messages
39
Location
Calgary AB
Format
35mm
The light side of the branches blew out a bit on the print and the focus is a touch soft, but I think it's pretty close.
 

Attachments

  • IMG_0570.JPG
    IMG_0570.JPG
    613.1 KB · Views: 304

bvy

Member
Joined
Jul 22, 2009
Messages
3,285
Location
Pittsburgh
Format
Multi Format
The contrast and saturation is insane! Not a criticism of your work; I think it's just the nature of the beast. It's the same problem I (and others) have had. For some things, it will work nicely. Portraits would be a challenge though.
 

dale116dot7

Member
Joined
Jun 24, 2016
Messages
39
Location
Calgary AB
Format
35mm
I'll look through those for sure. This one came out much better and I scanned it instead of taking a photo of it. I followed your developing directions much more carefully this time and mixed a fresh batch of Dektol and stop bath. The biggest change was 30 seconds for the first stop instead of 10 or 15 seconds I was doing before. Definitely a high contrast print and a bit of dodging in the middle would probably make this better and closer to what I imagine it should be, though I think I prefer the high contrast of the print.

Scan of print:
2017-02-14-0003.jpg

Scan of slide:
2017-01-23-0006.jpg
 

dale116dot7

Member
Joined
Jun 24, 2016
Messages
39
Location
Calgary AB
Format
35mm
That looks very nice, thank you for posting it - I didn't see this one before. I'll try doing a realistic shot like this and see how close I can get it using the various methods you and others have (very generously) posted here. One thing I do notice is that the water coming out of the CD rinse has quite a magenta colour to it and also during re-exposure the paper starts having a bit of a pink look to it (it's white with a grey image right after the first rinse). Are these things to be concerned about that I might be doing something wrong? Thanks again!
 

Photo Engineer

Subscriber
Joined
Apr 19, 2005
Messages
29,018
Location
Rochester, NY
Format
Multi Format
During re-exposure, you are forming Silver and halide molecules by interaction with light. This is often colored. Also, sensitizing dyes can be seen at this point.

There is no wash after the CD. Go into the blix. However, that said, a wash after the CD is pink due to the formation of oxidized color developer.

PE
 

himself

Member
Joined
Apr 8, 2011
Messages
513
Format
Multi Format
So I've been working with this process for in-camera images for a little while, and while I'm fairly happy with how the colours are coming out, I'm a little unhappy with having to use so many filters in front of the lens, as you can imagine having so many surfaces that attract dust and general uncleanliness means that there is a little loss of quality in the final image.

And so I've been wondering if there's a way to get down to 1, or 2 filters instead? I've tried printing my own filter, but despite getting a decent colour correction, the acetate isn't clear enough and is similar to using a large stack of filters.

Does the collective mind have any suggestions? I'm thinking of maybe trying a heavy orange gel, which would normally be too strong, but could I then bring it back with a couple cyans, or would I just end up back where I am, but via a different route?

all the best,
Dafydd
 

RPC

Member
Joined
Sep 7, 2006
Messages
1,628
Format
Multi Format
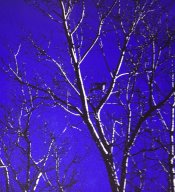
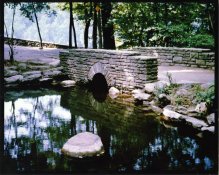
I have been experimenting with this process lately and have been producing some very good results with Endura paper. Color, highlight and mid-tone contrast is very good but shadows are contrasty. Below are some scans of prints I have made. I have an old, cheap flatbed scanner, and the scans, at least on my screen, are contrastier than the actual prints, but colors are close. The scans have not been manipulated by me in any way other than cropping and resizing.

scan 1.jpg scan 2.jpg scan 3.jpg scan 4.jpg scan 5.jpg scan 6.jpg color chart.jpg

The prints shown are from Kodachrome slides, except the color chart which is Astia.

As has been discussed earlier in this thread, the first developer is critical to making the reversal process work well. I am no chemist, just a darkroom experimenter, but I have formulated a first developer that works very well, that is similar to Dektol (D-72) with a couple of changes. Potassium carbonate is used in place of sodium carbonate, as I currently don't have any on hand, and sodium chloride is used in place of the potassium bromide used in D-72 for the restrainer. Here is the formula:

distilled water, 125F 500ml
metol 3 grams
sodium sulfite 45 grams
hydroquinone 12 grams
potassium carbonate 80 grams
sodium chloride 2 grams
add distilled water to make 1 liter

Sodium carbonate may work just as well, but I found that with potassium carbonate, this developer has to be diluted 1:6 to get the lowest crossover, instead of the usual 1:2 or 1:3 when Dektol is used. Best quality is also obtained by the right amount of restrainer, sodium chloride. Bromide may give similar results if the right amount is used, but chloride gave better results than when I used Dektol, which uses bromide.

Here is the process, @ 68F:

1. 1st developer 2:00
2. stop bath :30 (1-2% acetic acid)

remaining steps done in room light

3. wash 1:00
4. re-exposure 1:00
5. color developer 2:00
6. bleach-fix 2:00
7. wash 2:00-3:00

The first developer should be used one-shot as it seems to quickly degrade with use. With a 5x7 tray, I use at least 100 ml per print, enough to keep it covered when agitated during development. If a drum is used I would use 100 ml if possible. Diluted 1:6, this is only about 14 ml of stock solution for each print. I use distilled water to dilute. For color developer I use Kodak RA-RT developer-replenisher. Regular RA-4 developer can be used at the nomal temperatures. For re-exposure I hold the print 6-8 inches from a 100 watt tungsten light bulb.

Typical filtration for prints with my Super Chromega D is 0C, 0M, 115 Y, with occasional small amounts of C or M added. Typical exposure was 7 seconds @ f8 for 5x7. This process needs quite a bit more exposure than normal RA-4 printing, and f-stop changes do not seem to have as large of an affect as normal RA-4 printing. Due to some crossover, it is best to get the exposure the best you can, then adjust color balance.

Considering this is a cross-process, and slides are not masked, I am quite pleased with the results. Certainly there are improvements to be made, and I plan to do more experiments in the future as time allows. The only disappointment was that I have not yet got it to work as well with Fuji CA II paper. Prints are overly saturated and contrasty. I plan to try more experiments to solve this problem in the future, and I encourage others to experiment. It is sad that Endura is no longer sold in cut sheets, since it works great for this process, and many of us who have any, have a very limited supply left. A word of caution: if your Endura is expired, as some of mine is, you will get much poorer images as it seems to affect both images formed, negative and positive, causing the problem to compound.
 
Last edited:

himself

Member
Joined
Apr 8, 2011
Messages
513
Format
Multi Format
I'm travelling at the moment and was wondering something about this process.

So I don't have any RA4 developer where I am, and I was thinking could I in theory develop a bunch of prints in the b/w developer, stop and wash them - and then just hang on to them for a little while (as negatives) before taking them somewhere to do the colour dev/blix stages, and if so, realistically how long can I leave the prints between stages?

Or is there a reason why this wouldn't work?

I realise that there's no real necessity to do them like this, and I could really just wait and do them start to finish, but if I already have a working solution of b/w developer and time, it would be super convenient if I could do both sets in separate batches.

This is of course assuming I have my filtering and exposures nailed down and repeatable.
 
Photrio.com contains affiliate links to products. We may receive a commission for purchases made through these links.
To read our full affiliate disclosure statement please click Here.

PHOTRIO PARTNERS EQUALLY FUNDING OUR COMMUNITY:


Ilford ADOX Freestyle Photographic Stearman Press Weldon Color Lab Blue Moon Camera & Machine
Top Bottom