Reversal print processing video..new approach

Fantasyland!

D
Fantasyland!

  • 3
  • 1
  • 32
perfect cirkel

D
perfect cirkel

  • 2
  • 1
  • 107
Thomas J Walls cafe.

A
Thomas J Walls cafe.

  • 4
  • 4
  • 180

Recent Classifieds

Forum statistics

Threads
198,741
Messages
2,780,161
Members
99,689
Latest member
BSAbbott
Recent bookmarks
0

DonF

Member
Joined
Jul 19, 2016
Messages
285
Location
Saint Charles, Il
Format
Large Format
Here's a brief video of the second processing after bleaching and fogging under the lamp. Joe, except for the more complete bleaching with the R-9 dichromate bleach, the pre-second development image looks much like that in your second video, a faded positive image. I found that the positive slowly appears over a minute or two during the fogging process. Unless that is seen during fogging, the image will not appear in the second development.


Regards,

Don
 

DonF

Member
Joined
Jul 19, 2016
Messages
285
Location
Saint Charles, Il
Format
Large Format
I'm not sure about why a ferricyanide bleach would not work for the process. It seems like Photo Engineer posted something a while back on that. Perhaps he'll chime in.

I'm trying to figure out the quality factors with an "ideal bleach" so I can eliminate variables with the peroxide.

After some additional experiments today, I have learned:

- Both developments should be to completion, with the first development rendering a more dense negative than would be used for a paper negative. If the image goes all black on the first development, the exposure is wrong!

- Use a strong developer. I used Dektol 1 + 1. Trying to control density by controlling development time or with weak developer doesn't work well. The light areas (dark on the negative) must fully develop to bleach correctly.

- Bleach until you get as light an image as possible. The dichromate bleach makes the print go white in seconds, but peroxide will take longer and likely not yield the same level of bleaching. There is no advantage to bleaching beyond the maximum result.

- Work under safelight condition until the print is in the fixer (except for second exposure). Use graded paper so safelight doesn't fog (no VC paper).

- When fogging by the second exposure, a faint positive image with visible mid-tones needs to be present. This takes a couple of minutes of illumination under a 60 watt equivalent daylight balanced LED flood lamp for me. It is almost impossible to over-expose the fogging step. Don't use sunlight, as solarization may occur.

- Develop the second time until no more density appears. Problems with low contrast are from bad exposure/not developing first time completely/not fogging enough.

Those are my conclusions to date. I think they will apply to peroxide bleaching as well.

Results are very contrasty. Graded #2 paper is the lowest contrast I could find. Pre-flashing will likely help, but working out that is for the future once I get the process worked out.

The scans are RGB, not grayscale, so any color cast would show. The whites are great. Too contrasty, but I expected that.

Best,

Don
 
OP
OP
Peter Schrager

Peter Schrager

Subscriber
Joined
Jul 19, 2004
Messages
4,158
Location
fairfield co
Format
Large Format
If graded #2 paper is the lowest you can buy some expired out of date paper..it will likely give you more like a grade #1 or less
 

DonF

Member
Joined
Jul 19, 2016
Messages
285
Location
Saint Charles, Il
Format
Large Format
Here are some daylight shots with the dichromate bleach. I used my previous findings for the first two.

This exposure is exactly that recommended by Joe for the Arista #2 glossy paper: In EV14 light (hazy sun) f/11 at 1/2 second. Exposed as ISO 1.5. Looks good!
img345_web.jpg


Overexposed from above by two stops: f/8 at 1 second, EV14 light. Way too light.
img346_web.jpg


Here is my best peroxide print of the same scene, same lighting from last week:
img339_web.jpg


Here is what happens when the first development is not done to completion. The paper was totally white after the bleach, but after fogging and second development, the highlights were not bleached completely. F/11 at .5 sec, same as the good print above. I think the mottling Joe saw (as did I) with the peroxide bleach is from undeveloped highlights from the first development. The undeveloped silver halide survives the bleaching and gets re-exposed in the fogging step, causing the mottling, similar to what is seen here.
img347_web.jpg


Regards,

Don
 
Last edited:

NedL

Subscriber
Joined
Aug 23, 2012
Messages
3,388
Location
Sonoma County, California
Format
Multi Format
Hi Don, and all,

I've been experimenting with this in the past week or so but am going in some different directions:
  • I am using very weak LPD as my first developer, until I like what I see ( but I agree that if you don't get blacks, there will be trouble )
  • I am using VC RC paper
  • I am using weak drugstore 3% H2O2.
  • I am using CA stop bath ( and rinses in water ) prior to bleaching, so that the pH does not change so abruptly in the gelatin.
  • There is a substantial amount of control over contrast using contrast filters for the 2nd exposure, but I agree it needs to be plenty.
  • weak Farmer's reducer does wonders for the highlights at the end. ( so called "proportional", not "cutting", I think )
Still trying to dial in the details, but it's working pretty well and I'm getting prints that I like. Will write more soon when a few more details are better understood!

Edit: I just realized that I left out what might be the most important difference: I'm bleaching for an hour or two instead of just a few minutes. This might make my approach less attractive for some people. I don't care how long the bleaching takes because I rarely make paper negatives more than one or two at a time.
 
Last edited:

pentaxuser

Member
Joined
May 9, 2005
Messages
19,933
Location
Daventry, No
Format
35mm
Joe is an excellent presenter which many are not. Well done, Joe, it was enjoyable to watch. Nothing to do with the process but the two big drawbacks for a newcomer to this paper neg to positive process compared to sheet film seems to be 1. the very low speed of the paper which makes anything except "still life" impossible 2. The inability to enlarge.

In practical terms if you need say an 8x10 print or 10x12/11x14 print then how much better is a LF 8x10 or larger camera with RC paper than a MF camera with 120 film and an enlarger?

pentaxuser
 

himself

Member
Joined
Apr 8, 2011
Messages
513
Format
Multi Format
mornin' all,

so after seeing Joe's video and also lamenting the current lack of Harman Direct Positive, I've also been experimenting with using peroxide bleach. My results so far have been mixed, but getting steadily worse..

I was originally hoping to use this process as a semi daylight process, so that I could use the second development in demonstration, and but the initial image, as you can see, ended up a little grey. Despite looking (in real life) pretty well exposed, I wasn't getting any white highlights. In the mean time Joe had figured out that he wasn't getting any whites because of overexposure on the second exposure..
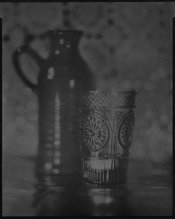
rev 1.jpg

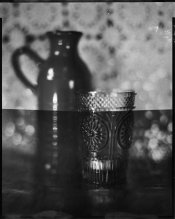
great! so off I go with a new exposure to the darkroom, and just as expected by cutting down the second exposure I get some whites. Image 2 is a test image with 2 exposures (1 stop difference, but one is the same as in image rev1) and was processed in the darkroom and re-exposed under enlarger, f8 for 8 seconds.
rev 2.jpg

and so now I'm thinking, this is great.. so off I go another new exposure, then back to the darkroom and with the same processing technique (re-exposure time) I look aghast at another grey image.
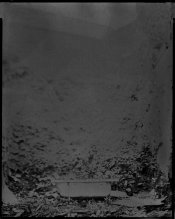
rev 3.jpg

I've since tried fixing a couple variables I thought might have been the problem between image 2 and 3. New bleach, new dev, different exposure, but everything just kept coming up grey. And so today I tried a test print with different exposures (on the second exposure) and get this:
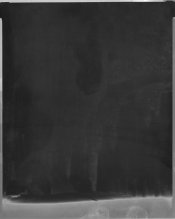
rev 4.jpg

It hasn't even reversed has it?

I'm making progress of sorts, I guess, but now I'm a little unsure where to go from here. After Don's latest update I can now only think that not enough developing at the beginning is what's causing the problem, however my process has been consistent throughout - a little background on that, I'm using 8x10 Ilford Multigrade RC (shot at iso 1.5), Ilford Multigrade Dev 1:9, 12% peroxide (plus 1 tsps citric acid per 100mm). Bleaching seems to be working and paper is almost completely white before re-exposing. Everything is currently being done under safelight (which I also tested wasn't fogging the paper).

There have been a few more images than I've posted here, most are just slight variables of image 1 or 3, until today where I got nothing.

I'm not sure if this information is any good to anyone... maybe just as a cautionary tale of something, but of what tho', I'm unsure.

all the best,
Dafydd
 

DonF

Member
Joined
Jul 19, 2016
Messages
285
Location
Saint Charles, Il
Format
Large Format
I suspect the issue with the muddy prints is insufficient fogging during the second exposure. I was having similar issues until I:

- Got the exposure correct.
- First-developed to completion, leaving a fairly dense but clear negative image.
- After bleaching to a white (or nearly so) print, fog until a faint image with clearly visible mid-tones appears.

The second exposure takes about 2 minutes with a 60-watt (equivalent) LED daylight-balance flood bulb, moving the print around about 1-2 feet from the bulb.

None of Joe's videos shows the print immediately after removal from the bleach under darkroom conditions. He was working under room light after bleaching, which became part of the second exposure. I would expect the print was all-white or nearly so before the secondary fogging exposure.

You can clearly see the dim positive image on the paper before the second development in Joe's videos. That likely only appears after a period of exposure to room light.

I think the very brief exposure to the enlarger lamp for fogging that Joe is using is too short by far. The second exposure determines the density of dark areas in the positive print, so underexposing here will give poor density. Although, seems to be getting good results with his controlled and brief second exposure.

Cutting down the second exposure time would only improve the whites if there was either undeveloped exposed silver halide in the highlights from the first development or if the camera exposure was too little to begin with, My theory is that unless the first development is done to completion, dark areas in the negative image will have some undeveloped exposed silver halide remaining. Bleaching only affects the developed exposed silver, leaving some areas in the bleached image still sensitive to light. These area get re-exposed along with the unbleached highlights in the negative image and darken in the second developer, muddying the image or causing the mottling we've seen.

Just my ramblings....feel free to correct any misconceptions!

Best,

Don
 

himself

Member
Joined
Apr 8, 2011
Messages
513
Format
Multi Format
Don,

that's interesting, and but my initial prints (the first print in my post) were re-exposed in daylight (but first dev and bleach in the darkroom), stood by a window, so I should think it got plenty of exposure. so could it be that too much exposure and not enough exposure would result in the same muddy final image?

in terms of developing, I was originally developing them for a longer than standard (because of a hunch I had left over from doing in camera reversal colour paper prints), but reducing the development time doesn't seem to have made an overall difference either way.

So for now, considering I've regressed to having no final image, I'll have to try going the other way and exposing more.

Thanks!
 

DonF

Member
Joined
Jul 19, 2016
Messages
285
Location
Saint Charles, Il
Format
Large Format
I'm curious if you are seeing the faint positive image appear on the bleached paper during the second exposure?

I think an extremely long second exposure will darken the highlights some, but very slowly. I did see that identical exposures with flash produced a somewhat darker image if I extended the second exposure by a minute or so.

Don
 

himself

Member
Joined
Apr 8, 2011
Messages
513
Format
Multi Format
To be perfectly honest, my darkroom isn't bright enough to see, what I assume you' mean is a pretty subtle change.
But I didn't see any faint positive when doing it in daylight tho'.. could it be your light bulb is brighter than a Welsh afternoon? : )
 

DonF

Member
Joined
Jul 19, 2016
Messages
285
Location
Saint Charles, Il
Format
Large Format
It's not that subtle and easily seen under the 60-watt LED lamp I'm using for the second exposure!

Here's what it looks like just before I developed it (from a completely white image from the bleach):

IMG_5936_web.jpg
 

himself

Member
Joined
Apr 8, 2011
Messages
513
Format
Multi Format
oh ok.. so no, nothing like that.
And just so I'm clear, this is after re-exposing, after bleaching to (mostly) white in Peroxide?
 

DonF

Member
Joined
Jul 19, 2016
Messages
285
Location
Saint Charles, Il
Format
Large Format
Right! It's almost like watching a salt print (printing out process) slowly appear, but fainter. I needed to see the midtones before stopping the second exposure and developing. That gave an almost perfect result.

This is with the complete bleaching of the dichromate bleach. I don't think the peroxide gets to the point of an all white paper, but it should be at least a creamy color with a faint image visible. I would think a similar darkening of the image would be evident.

After developing the paper shown above, I got this:
img342_web.jpg
 

himself

Member
Joined
Apr 8, 2011
Messages
513
Format
Multi Format
ok, so I'll give this a go when I get the darkroom again.
what strength Peroxide are you using? my images bleach to almost completely white
 

DonF

Member
Joined
Jul 19, 2016
Messages
285
Location
Saint Charles, Il
Format
Large Format
I'm using Joe's latest recommended dilution of 15%. The previous images example were made with potassium dichromate R-9 bleach, the toxic, but standard, formula for reversal. I plan to transition to peroxide once I get the variables figured out with an "ideal" bleach.

Don
 
Last edited:

himself

Member
Joined
Apr 8, 2011
Messages
513
Format
Multi Format
ok, so I'm only using 12% and bleaching for about 3 minutes. I'm getting almost a completely white page from a very dense negative.
 

removed account4

Subscriber
Joined
Jun 21, 2003
Messages
29,832
Format
Hybrid
hi himself
like nedL, i'm using household bleach i've done a few, varying success
my last one was a big print ( a 5x7 i did yesterday )
i dump and refill the the tray partway through the bleach process. unlike joe and donF
3% takes hours rather than minutes. i'd rather not deal with strong peroxide, besides
i don't mind waiting around... sometimes i expose a paper negative in the sun for
2-13 hours i don't mind waiting around for the print to bleach.
ymmv of course ...
john
 
Last edited:

DonF

Member
Joined
Jul 19, 2016
Messages
285
Location
Saint Charles, Il
Format
Large Format
hi himself
like nedL, i'm using household bleach i've done a few, varying success
my last one was a big print ( a 5x7 i did yesterday )
i dump and refill the the tray partway through the bleach process. unlike joe and donF
3% takes hours rather than minutes. i'd rather not deal with strong peroxide, besides
i don't mind waiting around... sometimes i expose a paper negative in the sun for
2-13 hours i don't mind waiting around for the print to bleach.
ymmv of course ...
john

Not to promote a more toxic process, but as a point of comparison, the Kodak R-9 bleach formula (potassium dichromate and sulfuric acid) bleaches the dense negative snow white in about 8 seconds.

Don
 
Last edited:

NedL

Subscriber
Joined
Aug 23, 2012
Messages
3,388
Location
Sonoma County, California
Format
Multi Format
... snow white in about 8 seconds.Don

:D What's the big hurry?! Just kidding. I totally understand that not everybody wants to wait around for results.

"slow photography" is good too.

The cool thing is that there are a bunch of us trying to make it work, and having fun doing it.
 

DonF

Member
Joined
Jul 19, 2016
Messages
285
Location
Saint Charles, Il
Format
Large Format
:D What's the big hurry?! Just kidding. I totally understand that not everybody wants to wait around for results.

"slow photography" is good too.

The cool thing is that there are a bunch of us trying to make it work, and having fun doing it.

Agreed!

Heh....well, it is kind of cool to watch do its thing, after the slow fade of peroxide. It makes processing time on-par with wet plate collodion, with the advantage of not having to lug a darkroom around with the camera!

I looked like a spaceman when I mixed the dry dichromate and battery acid in the garage with respirator, face shield, glasses, apron, rubber gloves.......My neighbor stopped by to inquire.

After in solution, the stuff is not too nasty to handle, but must be disposed of correctly and not flushed down the drain, even when exhausted. The bright orange color goes green when exhausted, but the stuff seems to last forever.

The thing is that the ingredients are cheap. 32 ounces of battery acid (35% sulfuric acid) for 8.00 USD and 13.00 for 8 ounces of potassium dichromate, which will make gallons of bleach. The quart of hydrogen peroxide 35% is $24.00 shipped from Amazon and makes only a half gallon, with poor shelf life.

I mixed per the Kodak R-9 formula: Add 9.5 grams of potassium dichromate to 700ml water. Slowly add 34ml of 35% (SG=1.265) battery acid/sulfuric acid SLOWLY to the dichromate solution and mix thoroughly. Add additional distilled water to make 1000ml. READ AND FOLLOW ALL SAFETY SUGGESTIONS BEFORE FOOLING WITH THIS STUFF, ESPECIALLY THE DICHROMATE POWDER!!!!!

Oh, you must rinse and "clear" the orange-stained paper in a clearing solution of 5% sodium sulfite before the second exposure

Being green has a financial burden, but is much kinder to the environment! I look forward to switching to the peroxide bleach, but have learned a lot eliminating the bleaching issues from the process. Few people have bothered to post any samples of their work, or any details other than approximate development times and chemical formulas.

Don
 
Last edited:

removed account4

Subscriber
Joined
Jun 21, 2003
Messages
29,832
Format
Hybrid
Not to promote a more toxic process, but as a point of comparison, the Kodak R-7 bleach formula (potassium dichromate and sulfuric acid) bleaches the dense negative snow white in about 8 seconds.

Don

hey don
i didn't look at it as anyone promoting a more toxic process .. im a scardy cat so i don't really want to deal with certain chemicals, even though
they probably aren't that bad... 8 seconds is light light-speed ! as said i don't mind waiting around, to be honest i don't really have much better to do :smile:

The cool thing is that there are a bunch of us trying to make it work, and having fun doing it.

:smile: its like crowd sourced photography !
 

Gerald C Koch

Member
Joined
Jul 12, 2010
Messages
8,131
Location
Southern USA
Format
Multi Format
One should not attempt to save the partially used bleach. Should it start to decompose the bottle will explode. The bottles used for concentrated hydrogen peroxide have a pressure relief vale in the cap.

I am a bit concerned that 35% peroxide is available over the counter. I have seen a demo where a drop was placed on a small pile of sawdust. The sawdust immediately caught fire. Had more peroxide been used the might have been an explosion. I have taught chemistry for several years and during this tine witnessed several bad accidents. All it takes is a moments inattention.
 
Last edited:
Photrio.com contains affiliate links to products. We may receive a commission for purchases made through these links.
To read our full affiliate disclosure statement please click Here.

PHOTRIO PARTNERS EQUALLY FUNDING OUR COMMUNITY:


Ilford ADOX Freestyle Photographic Stearman Press Weldon Color Lab Blue Moon Camera & Machine
Top Bottom