-
Welcome to Photrio!Registration is fast and free. Join today to unlock search, see fewer ads, and access all forum features.Click here to sign up
You are using an out of date browser. It may not display this or other websites correctly.
You should upgrade or use an alternative browser.
You should upgrade or use an alternative browser.
Post your pinhole photographs here
-
A
- Thread starter Sirius Glass
- Start date


Recent Classifieds
-
For Sale B&W King 5x7 Stainless Steel Film Developing Tank
- Started by Jammoh
-
For Sale Darkroom Safelights
- Started by davela
-
For Sale Jobo Expert 3006 Tank for six 4x5 or 5x7 negatives
- Started by Jammoh
-
For Sale FS: Fujinon 250mm f/6.7 Lens
- Started by B.S.Kumar
-
For Sale Kodak Ektachrome Infrared EIR aka Aerochrome
- Started by YoIaMoNwater
Forum statistics

Thank you! The building is an old church in Sedgwick Maine that was recently restored. The light was good - not too sunny not too cloudy. I didn't make a note of how long the exposure was. The ONDU comes with an exposure chart. You read the light at your ISO (400 in my case) and aperture at F22. I had a film processor develop the film. I don't have the darkroom equip to process sheet film at home.
Cheers
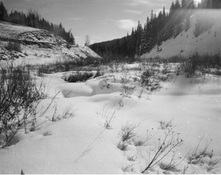
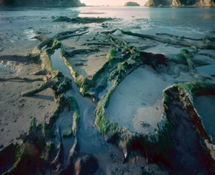
Interior, Oregon 2025 Ilford Delta 100, ID-11 8.5 minutes developing time. 3 hour 45 minute exposure, 3 1/4” “Leonardo” pinhole camera.
That's a great crazy image. I really like the viewfinder that most pinhole cameras come with.
Imagine that your eye is where the hole is and project a frame around what it would see. How crazy is that? I love what you did with it. It's truth about where, exactly, you are.
Having lived in Portland and married a Portland woman, the fact that this image is "Interior, Oregon" is just wonderful. I lived in a very cold apartment on 39th (now Cesar Chavez) that had a wood stove which had a copper coil in it that heated water. That was extremely interior. Wish that I had made it into a camera.
The outrageousness of this image deserves our honest respect. Perspective is everything. Pinhole is a perspective engine. It's fun to make cameras that produce endless surprises. Our eye can NEVER see like that. Just try to put your eye in that place!
That’s a great result for a first pinhole attempt, strong mood, nice tonal range, and the softness really suits the church scene.My first successful attempt at a pinhole photograph. I used an Ondu 4X5 Rise large format. I used a filmback from my graphlex and the film was FPP Mummy 400 BW Negative Film. I am pleased considering I really have no idea what I am doing...
View attachment 414243
Interior, Oregon 2025 Ilford Delta 100, ID-11 8.5 minutes developing time. 3 hour 45 minute exposure, 3 1/4” “Leonardo” pinhole camera. f/263.
Larry Bullis wrote:
"That's a great crazy image. I really like the viewfinder that most pinhole cameras come with.
Imagine that your eye is where the hole is and project a frame around what it would see. How crazy is that? I love what you did with it. It's truth about where, exactly, you are.
I could not find any pictures of your pinholecamera with the viewfinder on it."
Please post a picture with your comment to use the viewfinder!
Recent image from Little Desert National Park. 4x5 /60 mm pinhole using Macophot IR820 with R72 filter. Ended up being 25 min exposu

4x5 FP4, Rodinal, homemade camera:

Nice!


It's the point. The "viewfinder" is your imaginative placement of your visualization at the point where that tiny hole is and project the frame out from that point using the geometry that is built into the camera. It is a very abstract skill. You can never place your eye at exactly that point. You could even argue that there is a point in your eyeball that would have to be located there. And you would have to move the camera out of the way so your head could be there. But the eyeball itself even moves, so you might have to wonder just where IS that magic point.Larry Bullis wrote:
"That's a great crazy image. I really like the viewfinder that most pinhole cameras come with.
Imagine that your eye is where the hole is and project a frame around what it would see. How crazy is that? I love what you did with it. It's truth about where, exactly, you are.
I could not find any pictures of your pinholecamera with the viewfinder on it."
Please post a picture with your comment to use the viewfinder!
I have made cameras that have the hole placed at an angle toward the edge of the camera and include a vastly wide angle. I was once photographing Wall Street from the steps of Federal Hall in New York City very early in the morning, so early that it seemed like no one was around. I was more or less "dancing" what I thought the frame would be, moving my arms around. I heard someone behind me say "what are you doing". Turning around, I saw a man wearing a Smokey the Bear hat and a forest uniform that had epaulettes, braided gold ropes. It was the Chief Ranger, sort of an admiral in the National Park Service. We had a rather fun conversation. He got what I was doing.
Sometimes I draw what I think is going on. But those eccentric cameras are pretty much designed to confound the senses. I love to challenge myself that way. Other people might not think it's fun. I do.
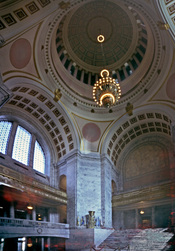
Considering the viewfinder issue, here's an example of a particular problem. I wanted to make an image that gave something of the feeling of being inside the Washington State Capitol Rotunda. I thought that if I built a camera that would photograph a space from the horizon to the zenith, it might do the job. I made the camera so the bottom (actually top of the film) would be perpendicular to the ground plane, but about 1/3 of the way up (down) the film would have to curve. If you look at the image, you can see that the vertical structure is correctly rectilinear, but the upper part of the space, the dome etc, is compressed. The center point of the top of the image is directly above the camera. The viewfinder is to visualize that geometry.
Ansel talked about "previsualization". To do that as he taught took some study and practice. That's the viewfinder.
Ansel talked about "previsualization". To do that as he taught took some study and practice. That's the viewfinder.
Attachments
Yippee!
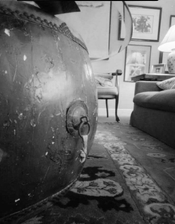
This is my first pin hole picture (well, that was exposed correctly). I bought a f250 8x10 and a box of edu 100 film. Managed to calculate the exposure correctly at about 45minutes. Wanted a little more of the water spurt, but hey I got the sun and everything else. Had the try pod in the pool about half a meter from the lions head.
View attachment 206053
From your description, it seems to me that what you really have is not a pinhole but a photo sieve (multiple pinholes close together creating overlapping pinhole images).
The trade-off for increased light-gathering power with zone plates and photon
sieves is a reduced depth of field and a loss of image quality, which is a result of larger apertures and overlapping pinhole images. Nevertheless, for many photographers, the unique image characteristics of these special apertures more than make up for all their disadvantages. The same is true for pinhole images in general. They are well worth a try. Your beautiful images are clear evidence of that!
It's the point. The "viewfinder" is your imaginative placement of your visualization at the point where that tiny hole is and project the frame out from that point using the geometry that is built into the camera. It is a very abstract skill. You can never place your eye at exactly that point. You could even argue that there is a point in your eyeball that would have to be located there. And you would have to move the camera out of the way so your head could be there. But the eyeball itself even moves, so you might have to wonder just where IS that magic point.
I have made cameras that have the hole placed at an angle toward the edge of the camera and include a vastly wide angle. I was once photographing Wall Street from the steps of Federal Hall in New York City very early in the morning, so early that it seemed like no one was around. I was more or less "dancing" what I thought the frame would be, moving my arms around. I heard someone behind me say "what are you doing". Turning around, I saw a man wearing a Smokey the Bear hat and a forest uniform that had epaulettes, braided gold ropes. It was the Chief Ranger, sort of an admiral in the National Park Service. We had a rather fun conversation. He got what I was doing.
Sometimes I draw what I think is going on. But those eccentric cameras are pretty much designed to confound the senses. I love to challenge myself that way. Other people might not think it's fun. I do.
Thanks for your succinct post Larry. Your photographs are amazing!. After using my pinhole camera off an on for 30 years I have a pretty good visualization of my “”viewfinder”. That camera has a 3” focal length for 4x5 film. I just acquired a 1 1:2” focal length camera which I have only used once. The wide angle camera is somewhat forgiving.
The “not knowing” what the exact image will be is the Surrealist element of chance at play.
I am working toward a new smaller pinhole with .001 bras shim stock. My current pinhole is .005 mm in .003 brass.
I’m currently working with cyanotype.
The "Not Knowing" thing is an endless source of fun. However, you can stack the deck in your favor. For example, in the Federal Hall example I mentioned, on the way there I passed a hardware store and bought a pocket level, which I still carry daily 45 years later. Every camera I've built since then has levels built in. Maybe you noticed in the images of the ghost forest that the horizons, being very close to the top, all were aligned to the grid. Not one of them was leveled in photoshop; they were all leveled in the field.
I can't tell you how thin my pure silver pinhole material is. I start with .003 and beat them with a ball-peen hammer, which stretches the metal and produces a dome with the hole hopefully in the center. I'm sure that they are ridiculously thin. In some of my graduate work back in the dark ages I did a lot of photo etching which I fabricated into small sculptures and jewelry. I don't do much of that anymore, but it's handy in making pinholes. Silver is great, because it is so easily worked and blackens beautifully with selenium toner.
How do you make your pinholes? Do you have special tools like a microscope?
The "Not Knowing" thing is an endless source of fun. However, you can stack the deck in your favor. For example, in the Federal Hall example I mentioned, on the way there I passed a hardware store and bought a pocket level, which I still carry daily 45 years later. Every camera I've built since then has levels built in. Maybe you noticed in the images of the ghost forest that the horizons, being very close to the top, all were aligned to the grid. Not one of them was leveled in photoshop; they were all leveled in the field.
I can't tell you how thin my pure silver pinhole material is. I start with .003 and beat them with a ball-peen hammer, which stretches the metal and produces a dome with the hole hopefully in the center. I'm sure that they are ridiculously thin. In some of my graduate work back in the dark ages I did a lot of photo etching which I fabricated into small sculptures and jewelry. I don't do much of that anymore, but it's handy in making pinholes. Silver is great, because it is so easily worked and blackens beautifully with selenium toner.
How do you make your pinholes? Do you have special tools like a microscope?
Your silver sheet process for your pinholes sounds like an artist's work. I never considered silver for pinhole material. My process has been much less sophisticated. All the pinholes that I have made in the past have been in .003 brass. To make the pinhole I use the point of a sewing needle. I cut off the top inch or so, and insert the point in a pencil eraser. That gives the point stability. I carefully pierce the brass, then I repeat from the other side using a stiff backing. Then I use 500 carborundum paper and carefully sand the emerging pinhole. I repeat the process side to side until I have a clear pinhole in thinner metal.
I now have some .002 and .001 brass sheets, a new sharp fine point sewing needle, and finer carborundum paper. So I'm ready to make a new pinhole.
But, lately I have been putting time into printing with cyanotype. It's more like I have been wrestling with it. Here's a recent print.
The "Not Knowing" thing is an endless source of fun. However, you can stack the deck in your favor. For example, in the Federal Hall example I mentioned, on the way there I passed a hardware store and bought a pocket level, which I still carry daily 45 years later. Every camera I've built since then has levels built in. Maybe you noticed in the images of the ghost forest that the horizons, being very close to the top, all were aligned to the grid. Not one of them was leveled in photoshop; they were all leveled in the field.
I can't tell you how thin my pure silver pinhole material is. I start with .003 and beat them with a ball-peen hammer, which stretches the metal and produces a dome with the hole hopefully in the center. I'm sure that they are ridiculously thin. In some of my graduate work back in the dark ages I did a lot of photo etching which I fabricated into small sculptures and jewelry. I don't do much of that anymore, but it's handy in making pinholes. Silver is great, because it is so easily worked and blackens beautifully with selenium toner.
How do you make your pinholes? Do you have special tools like a microscope?
I'm impressed, their pinholes are incredibly small!
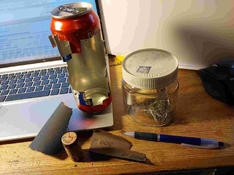
Here's my pinhole-making workshop.......
An aluminum beer can, needles, and a ballpoint pen (for indenting the aluminum where I'll place the needle tip). I also use 800-grit for smoothing the pinhole crater..
Finally, I scan the pinholes and measure the diameter using the software GIMP. This shows whether the hole is perfectly round (or not).
My smallest pinhole so far is 0.17 mm.
Attachments
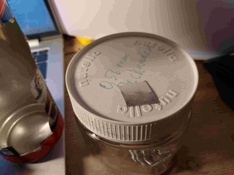
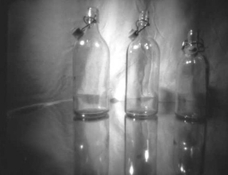
My beloved 3 bottles - photographed with my (provisional  ) smallest DIY pinhole camera. Matchbox - large - pinhole camera ("Zündholzschachtel - gross").
Image format 40x50mm. f90. F25mm. Image angle 105 degrees - calculated with the
) smallest DIY pinhole camera. Matchbox - large - pinhole camera ("Zündholzschachtel - gross").Image format 40x50mm. f90. F25mm. Image angle 105 degrees - calculated with the
PINHOLE PHOTOGRAPHY AND CAMERA DESIGN CALCULATORS on www.mrpinhole.com.
Distance bottles to camera aprox. 20cm !!! Contact print from a papernegative, Ilford Multigrad IV (ISO 6).Attachments
After I sold my 4x5 Ebony I had a few boxes of film so bought a Harman Walker 4x5 pinhole camera when I needed something for a short road trip. I don‘t have a scanner for sheet film so this is just a iPhone shot against the light box. I was surprised how sharp a pinhole can be. The tones will be much better than this sample once properly scannned.
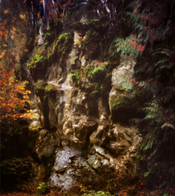
Benton Springs.

Benton Springs.
one more

Your silver sheet process for your pinholes sounds like an artist's work. I never considered silver for pinhole material. My process has been much less sophisticated. All the pinholes that I have made in the past have been in .003 brass. To make the pinhole I use the point of a sewing needle. I cut off the top inch or so, and insert the point in a pencil eraser. That gives the point stability. I carefully pierce the brass, then I repeat from the other side using a stiff backing. Then I use 500 carborundum paper and carefully sand the emerging pinhole. I repeat the process side to side until I have a clear pinhole in thinner metal.
I now have some .002 and .001 brass sheets, a new sharp fine point sewing needle, and finer carborundum paper. So I'm ready to make a new pinhole.
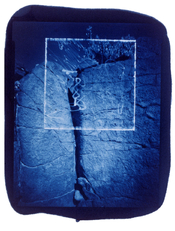
But, lately I have been putting time into printing with cyanotype. It's more like I have been wrestling with it. Here's a recent print.View attachment 416788
What paper are you using?
What paper are you using?
I’ve tried Strathmore printmaking paper which is horrible, so I’m using some old Cranes cover. Waiting on some Hahnemühle paper. I know the cranes is buffered..I am treating with citric acid.
what paper are you using? Are your final prints digital or analog?
I’ve tried Strathmore printmaking paper which is horrible, so I’m using some old Cranes cover. Waiting on some Hahnemühle paper. I know the cranes is buffered..I am treating with citric acid.
what paper are you using? Are your final prints digital or analog?
I haven't done cyanotypes for a few years, and even then, I had not done them back to 1991. Then, I did a large number of them from 4x5 and 8x10 pinhole negatives, exposed to subject matter and then reloaded into the camera and exposed again in total darkness using a bare light bulb to draw with. For that exposure, I used a matte box attached to the camera to provide a limited field for the drawing.
Then, I printed them on Arches 88, which was different from the Arches 88 I'm printing on these days with my Canon printer. That version of Arches 88 was a waterleaf paper, which means that it was not sized at all. It was basically like a blotter, I guess you could say. The current version of that paper that I'm using is treated with a coating that enables digital printing.
My method at that time was to pour the solution on the paper and let it spread out through the fibers so it soaked all the way through. Moving the puddle of solution around to control it was a bit challenging. Drying it could take a long time so I built a box with three muffin fans to create a negative pressure. One side of the box was glass. Outside of that were several infrared heat lamps. I didn't want it to take days to dry. That method enabled me to print later in the same day. I really liked the long scale that I could get; very rich prints.
One serious problem with that method was that it took a very long time to wash the prints. If I didn't get it all out, stains would eventually appear around the image. I probably would not do it that way now because it requires using too much water. We live in a different world now.
Now I'm in a different situation. I have very limited darkroom access and vastly diminished space of any kind. I've turned my attention to my 65 year collection of images, much of it completely new to me, and gone totally digital for my production. It's a new life.
Attachments
I haven't done cyanotypes for a few years, and even then, I had not done them back to 1991. Then, I did a large number of them from 4x5 and 8x10 pinhole negatives, exposed to subject matter and then reloaded into the camera and exposed again in total darkness using a bare light bulb to draw with. For that exposure, I used a matte box attached to the camera to provide a limited field for the drawing.
Then, I printed them on Arches 88, which was different from the Arches 88 I'm printing on these days with my Canon printer. That version of Arches 88 was a waterleaf paper, which means that it was not sized at all. It was basically like a blotter, I guess you could say. The current version of that paper that I'm using is treated with a coating that enables digital printing.
My method at that time was to pour the solution on the paper and let it spread out through the fibers so it soaked all the way through. Moving the puddle of solution around to control it was a bit challenging. Drying it could take a long time so I built a box with three muffin fans to create a negative pressure. One side of the box was glass. Outside of that were several infrared heat lamps. I didn't want it to take days to dry. That method enabled me to print later in the same day. I really liked the long scale that I could get; very rich prints.
One serious problem with that method was that it took a very long time to wash the prints. If I didn't get it all out, stains would eventually appear around the image. I probably would not do it that way now because it requires using too much water. We live in a different world now.
Now I'm in a different situation. I have very limited darkroom access and vastly diminished space of any kind. I've turned my attention to my 65 year collection of images, much of it completely new to me, and gone totally digital for my production. It's a new life.
Interesting image, and beautiful cyanotype! I am still working with digital scans and prints. The cyanotypes are an adventure into basic photography. I understand the small space issue.
| Photrio.com contains affiliate links to products. We may receive a commission for purchases made through these links. To read our full affiliate disclosure statement please click Here. |
PHOTRIO PARTNERS EQUALLY FUNDING OUR COMMUNITY:  |