-
Welcome to Photrio!Registration is fast and free. Join today to unlock search, see fewer ads, and access all forum features.Click here to sign up
- Home
- Forums
- Analog Workflow Forums (100% Analog/Traditional)
- Analog Equipment
- Camera Building, Repairs & Modification
You are using an out of date browser. It may not display this or other websites correctly.
You should upgrade or use an alternative browser.
You should upgrade or use an alternative browser.
Pix of your home-built cams here please
-
A
- Thread starter nick mulder
- Start date


Recent Classifieds
-
Want to Buy Nikon F2 black camera
- Started by ediz7531
-
Want to Buy Sekonic l-308 lumisphere
- Started by jwd722
-
For Sale Vacuseal Vacuum Press 4468H
- Started by oficinouno
-
For Sale Paper Safes and glossy photo paper
- Started by oficinouno
-
For Sale Nikon d810, RRS bracket, battery charger and 3 batteries..$800
- Started by ChrisK
Forum statistics
- Status
- Not open for further replies.
OP
OP
- Joined
- May 15, 2005
- Messages
- 1,212
- Format
- 8x10 Format
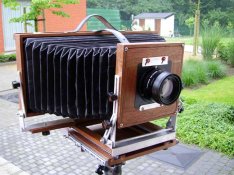
yep, thats a pretty fine specimen
- Joined
- Sep 5, 2004
- Messages
- 1,264
- Format
- Plastic Cameras
Thanks for the kind words. Just glad to be finally done with the son of a bitch!
OP
OP
- Joined
- May 15, 2005
- Messages
- 1,212
- Format
- 8x10 Format
Colin Graham said:Thanks for the kind words. Just glad to be finally done with the son of a bitch!
Yeh, I know how you feel - I spent a long time on mine and the bellows were offensive to put it mildly - and I've used it three times since!
I'm now making parts for 16mm cine cameras like intervalomters, crystal sync cct's etc... - my big project is to make a motion control rig - hopefully I'll use that more than 3 times (;
I still think tho that the lessons learnt were *well* worth it
Colin your camera is fantastic. I am a woodworker and I have built a similar camera in Cherry and it is nice. I used brass which brought the weight up though. I made it some twenty years ago when I had very few tools. Now I have a large shop in which I am going to build a 5x7 clamshell folding type camera again. I worked on the design and filled a note book with designs and found that in the end this kind of camera almost has to be a triple extension design. I started out with the wish list of movements and features and it became ultra complex. In the end it's a combination of mandatory movements and ergonomic function. Once the worker does a rack and pinion it's easier to get it closer to perfection the next time. In fact the first camera is closer to a prototype so I am looking forward to the work ahead. I was luck to buy a new Canham bellows for a 5x7 with 26 inches of extension. I haven't designed a camera around a bellows before, it should be interesting. Today I set up my Kodak 2D 5x7 and looked at it. It's built like a brick outhouse. I can see where they were going with the design. Today it's lighter but still stronger. So many of the field cameras have a sag when fully extended. I would like to make one more rigid and keep the smooth focus. On seeing your camera I will have to rethink the wood. Maybe purple heart or zebra wood? I am not sure the Cherry Oak and Mahogany will do now. Beautiful camera you should be very proud, it's quite an accomplishment to be able to make an instrument of that high precision.
Regards,
Curt
Regards,
Curt
- Joined
- Dec 14, 2004
- Messages
- 1,128
- Format
- Multi Format
OP
OP
- Joined
- May 15, 2005
- Messages
- 1,212
- Format
- 8x10 Format
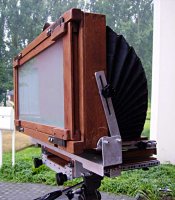
thats a fair amount of tilt you've got there (;
nice work
nice work
- Joined
- Dec 14, 2004
- Messages
- 1,128
- Format
- Multi Format
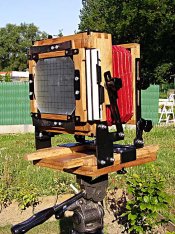
Dan Fromm said:Cute. How do you time exposures?
A packard shutter is on its way to daddy. I built the front box large enough to accommodate it.
Up till then, I'll use paper since the film has not arrived yet.
G
- Joined
- Dec 14, 2004
- Messages
- 1,128
- Format
- Multi Format
Oops, I did it again
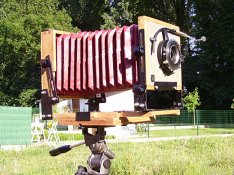
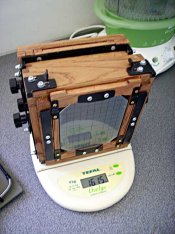
Lightweight 4x5" field camera (1615 gram). I made the camera to have a light and compact field camera for our trip to Bretagne (starting next wednesday). To keep the weight down, I evaluated all movements that I use a lot and decided to limit movements to keep the weight down.
I promise this will be the last camera I will build this year.
It is built out of oak and aluminium and includes:
- friction lock focussing
- rotating back
- rear and front tilt, back twist and front rise/fall
The bellows is made out of bookbinders linen/leatherette. It turns out to be a bit on the stiff side.
Building time: about 2 weeks. I think I'm getting a hand of it
The camera is here shown both with a Schneider Symmar convertible, both focussed at 1500mm and 265mm.
Attachments
argus said:I promise this will be the last camera I will build this year.
Don't worry. Only another five and a half months to go!!
Steve.
Looks really good.
I have built one 5x4" camera which I am fairly pleased with but it does not fold up. It is my intention to build a lightweight folding camera like this one fairly soon. Did you build from plans (are they available anywhere?) or do you use my method of designing whilst building?
Steve.
I have built one 5x4" camera which I am fairly pleased with but it does not fold up. It is my intention to build a lightweight folding camera like this one fairly soon. Did you build from plans (are they available anywhere?) or do you use my method of designing whilst building?
Steve.

wish I could get argus to make me a 12x20
well done argus. yet again.
well done argus. yet again.
- Joined
- Jan 24, 2005
- Messages
- 279
- Format
- Multi Format
I sure feel humbled by some of the creations here!
but, here is my 4x10 pinhole camera made from a modified Compact Disk Box Set..
inside the camera with paper negative inside.. Dead Link Removed
front of camera showing the shutter and 'lens' Dead Link Removed
rear of camera showing its snazzy looks! Dead Link Removed
only good for one shot at a time!
due to the racks that used to hold CD's this camera also works great for 4x5 sheet film which fits snugly against the rear of the camera..
http://images.depressing.org/art/115340106942d1d25baf341.jpg one of the 4x10 shots on ilford MGIV RC glossy paper negative, printed on mgIV fb
http://images.depressing.org/art/191964517342d1d23d16cbe.jpg a 100% crop of the above image (from a 300dpi scan of the print) to show the relative sharpness
Dead Link Removed 4x5 image from the same camera using a different lens that is less sharp..
Dan Fromm
Member
- Joined
- Mar 23, 2005
- Messages
- 6,956
- Format
- Multi Format
Hmm. Its hard to judge sharpness from small digitized images, but yours are sharper than I'd have have expected. How did you choose the pinhole's size?
Remember, if a home-made camera does what you want, it isn't ugly.
Cheers,
Dan
Remember, if a home-made camera does what you want, it isn't ugly.
Cheers,
Dan
- Joined
- Jan 24, 2005
- Messages
- 279
- Format
- Multi Format
Dan Fromm said:How did you choose the pinhole's size?
Cheers,
Dan
I worked with the camera for over a year and built many many pinholes until I was able to get one that appeared 'sharp enough' i.e. very small
If you are geek minded like some of us,,,,maybe not me,,,you can find a fascinating discussion (With cartoons) of how to determine correct pinhole size from an engineers perspective at:
http://photondetector.com/blog/2006/03/28/pinhole-size/
You have to download the .pdf file to see it. It is for guys with calculator holsters, but maybe the rest of us can glean something from it.
As far as I know there are two age old formulae for determining pinhole size.
.0073 times the square root of the focal length (I use this one and it works well for focal legths near the same length as the diagonal of the film).
The other is Lord Rayleighs formula 1.9 times the square root of the focal length times the wavelength of light you want to bring to focus at that focal length.
But then, why not just go to :
http://www.pinhole.cz/en/pinholedesigner/
and let the computer do all those nast calculations for you?
Just for clarification, this formula for calculating the optimum pinhole size measures the focal length in inches not millimeters.barryjyoung said:.0073 times the square root of the focal length
narsuitus said:Just for clarification, this formula for calculating the optimum pinhole size measures the focal length in inches not millimeters.
It shouldn't make any difference. Measure the focal length in inches, the hole size will be in inches. Measure it in millimetres, the hole size will be in millimetres.
Steve.
- Joined
- Jan 24, 2005
- Messages
- 279
- Format
- Multi Format
seeing as I have no easy way of cutting or measuring a hole so small I enjoy simple guesswork!
yay pinholes
yay pinholes
Haven't built a whole camera (yet) but I've built a couple of lenses for my 8x10 field camera.
picture of 400mm lens with f16 stop installed: (there was a url link here which no longer exists)
picture taken with same: (there was a url link here which no longer exists)
picture of 400mm lens with f16 stop installed: (there was a url link here which no longer exists)
picture taken with same: (there was a url link here which no longer exists)
seeing as I have no easy way of cutting or measuring a hole so small I enjoy simple guesswork!
yay pinholes
Oh yes, we do indeed have a way of both cutting and measuring pinholes.
1. Get the book by Jim Shull entitled "The Hole Thing". What a great book! Your library can inerlibrary loan a copy for you if they don't have it. I sometimes see them on bookfinder.com and on ebay.com.
2. If you cannot get the book because like me you are too tired cold or scared to do so, then get ye to the nearest fabric store and buy an assortment of hand sewing needles. Measure the needle with a micrometer or go to any machine shop where they will happily measure the needles for you and write the diameter on the handy masking tape tabs you have already attached to the needles so they don't have to.
3. Push the desired needle eye first into a pencil eraser which is still attached to the pencil. It makes them muche easier to handle that way. Try to make it coaxial with the pencil which is now the handle for the needle.
4. Put a piece of aluminum foil onto a piece of cardstock (Cap'n Crunch boxes are made from the industries finest card stock). Press the neddle into the foil while spinning the handle (pencil). This will make a very nice and perfectly round hole of the diameter you desire. If you believe this statement skip step 5 and imediately begin making breathtaking opinhole images.
5. Oh ye of little faith. If you just HAVE to measure the pinhole, it can be done using a microscope. Focus the microscope on your calibrated needle. Tape a piece of velum (special drawing paper made from sheep intestines or something) over the eyepiece of a standard light microscope. mark the shadow cast on the velum by the needle. replace the needle with the pinhole and voila! you can compare the diameter of the calibrated needle to the diameter of the pinhole. Clever huh?
Good luck.
Barry you just killed pinholes for me. God why do you people have to be so damn technical about everything? To me the beauty of a pinhole is in the soft image not another technical excersice is getting the perfect super sharp image creating pinhole. I use a regular lens for that.
I just use a PIN and put a HOLE in some metal and put that on a box or a tube and have fun. Getting out the microscope to measure the hole just takes all the fun out of it for me.
I just use a PIN and put a HOLE in some metal and put that on a box or a tube and have fun. Getting out the microscope to measure the hole just takes all the fun out of it for me.
- Status
- Not open for further replies.
| Photrio.com contains affiliate links to products. We may receive a commission for purchases made through these links. To read our full affiliate disclosure statement please click Here. |
PHOTRIO PARTNERS EQUALLY FUNDING OUR COMMUNITY:  |