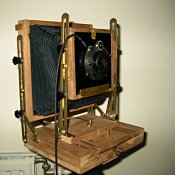
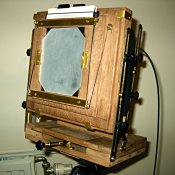
Pix of your home-built cams here please

Sparrow.jpg

A
Sparrow.jpg

  • 1
  • 0
  • 40
Orlovka river valley

A
Orlovka river valley

  • 4
  • 0
  • 90
Norfolk coast - 2

A
Norfolk coast - 2

  • 5
  • 1
  • 84
In the Vondelpark

A
In the Vondelpark

  • 4
  • 2
  • 163
Cascade

A
Cascade

  • sly
  • May 22, 2025
  • 9
  • 6
  • 140

Recent Classifieds

Forum statistics

Threads
197,840
Messages
2,765,444
Members
99,487
Latest member
Nigel Dear
Recent bookmarks
0
Status
Not open for further replies.
OP
OP
nick mulder

nick mulder

Member
Joined
May 15, 2005
Messages
1,212
Format
8x10 Format
barryjyoung said:
Interesting idea the twin rails. Great thinking
Barry Young
Tis a good idea yes, very easy to build as you dont have to fiddle with wrapping a clunky collar system around you rail, however the idea isn't mine - got it from another home job that I found on the net (cant find it right now) but from memory I think I have copied it quite substantially..

All due respect and thanks to that individual -

I forgot to mention I am yet to make the little bits that swivel and hold on the lensboard, GG and backs - the tape is doing nicely in the meantime ...

also ahould note:

2 lessons learned:

>1. Got to make sure my front frame is bigger than my bellows or the standard (up and downy bit) will rub on it with large tilts on the front

>2. Have to design a release system for the bellows, as with it all bunched up when focused on infinity I cant get any movement wot-so-eva - ie. no shifts with architectural photography ! which is what got me interested in view cams in the first place .. :tongue: ah well tho, have used swing for macro so its not all a waste of time

ok three lessons >> Bellows are a right pain in the behind
 
OP
OP
nick mulder

nick mulder

Member
Joined
May 15, 2005
Messages
1,212
Format
8x10 Format
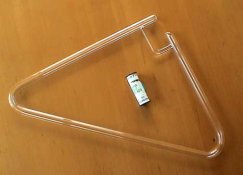
For the alt. process type people:

heres another little job i got into

Went to the chemistry dept's glass blowing lab the other day to get a peice of broken coating rod glass 'fused' into something not so sharp - got talking to the guys there about photography and pt/pd printing and coating rods - they baulked at the cost of the one I had bought in and offered to make me one for free - I had the idea of a three in one just the night before... about 30 mins later it was done (well, ok it did spend the night in an oven).

looks funny yes, with that little bent bit however it works great.

I am only using it for coating cyantotype emulsions for pencil drawing reproduction at the mo' as 8x10 coat is the smallest size on it, and I'm only up to a 4x5 camera so far
 

Attachments

  • coating-rod.jpg
    coating-rod.jpg
    11.8 KB · Views: 662

Dan Fromm

Member
Joined
Mar 23, 2005
Messages
6,798
Format
Multi Format
I'm glad to see that two square tubes with spacers work so nicely. That was about the third design I came up with for the base of my tandem rig. I'd have done it, but came across some very inexpensive t-slotted extrusion that required less drilling and cutting.

Cheers,

Dan
 
OP
OP
nick mulder

nick mulder

Member
Joined
May 15, 2005
Messages
1,212
Format
8x10 Format
Dan Fromm said:
I'm glad to see that two square tubes with spacers work so nicely. That was about the third design I came up with for the base of my tandem rig. I'd have done it, but came across some very inexpensive t-slotted extrusion that required less drilling and cutting.

I thought I'd need to put in some film shim's to make the spacers just a tad thicker than the bits the bolts for the standards went through (as they were cut from the same piece of plastic/nylon/teflon(?) stuff) - but it turns out they run just fine for focusing ...

I'm going to look into rack and friction drives maybe - but it might just be extra work (and weight) for little gain ...

Hmmmm, anyone built an enlarger ? same sort of issues ?
 

photomc

Member
Joined
Jul 20, 2003
Messages
3,575
Location
Texas
Format
Multi Format
Nice job with the glass..we used to do this all the time when I was in Army working in a lab. Never worried about glass tubes if they broke we just made new ones...now most medical labs can't have open flame in them, but then they have pretty much stopped using the old types of glass ware, everything is done by a machine/analyser.


nick mulder said:
heres another little job i got into

Went to the chemistry dept's glass blowing lab the other day to get a peice of broken coating rod glass 'fused' into something not so sharp - got talking to the guys there about photography and pt/pd printing and coating rods - they baulked at the cost of the one I had bought in and offered to make me one for free - I had the idea of a three in one just the night before... about 30 mins later it was done (well, ok it did spend the night in an oven).

looks funny yes, with that little bent bit however it works great.

I am only using it for coating cyantotype emulsions for pencil drawing reproduction at the mo' as 8x10 coat is the smallest size on it, and I'm only up to a 4x5 camera so far
 

Andy Tymon

Member
Joined
Apr 15, 2004
Messages
68
Format
Multi Format
Hi guys, thanks for the comments on the camera. Hey Nick nice camera, you will be glad you have that flexibillity to go up in formats, the larger you go the larger you want to go!
Doh, forgot to mention the movements on the camera front has swing shift and tilt rear has tilt and some swing and the weight is 7.5lbs and 24'' of extension. I shot my first sheet of film with it over the weekend and so far so good, though I did underestimate depth of field,it really is shallower on 8x10.

Barrie don't underestimate rabies tags, inyears to come when this camera ends up on epay , people will ask "does it still have it's tags, cause these cameras really bite" :smile:
 
OP
OP
nick mulder

nick mulder

Member
Joined
May 15, 2005
Messages
1,212
Format
8x10 Format
Andy Tymon said:
Hey Nick nice camera, you will be glad you have that flexibillity to go up in formats, the larger you go the larger you want to go!


speaking of flexible - I was playing with the tilts last night - heh, I can get the lens to actually be pointing away from the film (;

just need to get a lens with that sort of coverage ...
 
Last edited by a moderator:

barryjyoung

Member
Joined
Jul 31, 2005
Messages
426
Location
Patterson MO, USA
Format
ULarge Format
New pics uploaded to Technical Gallery

Today John and Andrew Austin came to Edmonds to work on the baseboards of the 8x10 field cameras they are building from scratch with the Seattle Camera Makers. Starting with rough lumber that had been jointed on one side and resawn on a table saw at Steve Allen's house, they had glued up flat panels for the baseboards when they left this afternoon. There are pics of the process the wood went through in the APUG Technical Gallery Nice work you guys.

Barry Young
 

gma

Member
Joined
Mar 10, 2004
Messages
788
Location
Texas
Format
Multi Format
You can see pictures of the 4x5 view camera I built in 1968 at Dead Link Removed

The Jon Grepstad website.

gma
 
OP
OP
nick mulder

nick mulder

Member
Joined
May 15, 2005
Messages
1,212
Format
8x10 Format
first pic (I didn't ruin in the processing) is in the tech gallery ...

(there was a url link here which no longer exists)
 

John Bartley

Member
Joined
Sep 12, 2004
Messages
1,386
Location
13 Critchley
Format
8x10 Format
barryjyoung said:
Today John and Andrew Austin came to Edmonds to work on the baseboards of the 8x10 field cameras they are building from scratch with the Seattle Camera Makers. Starting with rough lumber that had been jointed on one side and resawn on a table saw at Steve Allen's house, they had glued up flat panels for the baseboards when they left this afternoon. There are pics of the process the wood went through in the APUG Technical Gallery Nice work you guys.

Barry Young

Barry,

Would you be kind enough to keep updating us with fresh pictures of the construction process please? Another interest of mine (and many others here I bet) is amateur woodworking and I'd love to see how these projects progress.

cheers
 

barryjyoung

Member
Joined
Jul 31, 2005
Messages
426
Location
Patterson MO, USA
Format
ULarge Format
Hi John:

I will keep posting pics every time we do some work. Then when the new pics from each session are posted I will take down the old ones to keep from wasting APUG bandwidth.

Barry

John Bartley said:
Barry,

Would you be kind enough to keep updating us with fresh pictures of the construction process please? Another interest of mine (and many others here I bet) is amateur woodworking and I'd love to see how these projects progress.

cheers
 

John Bartley

Member
Joined
Sep 12, 2004
Messages
1,386
Location
13 Critchley
Format
8x10 Format
barryjyoung said:
Hi John:

I will keep posting pics every time we do some work. Then when the new pics from each session are posted I will take down the old ones to keep from wasting APUG bandwidth.

Barry

Thank you Barry
 

John Bartley

Member
Joined
Sep 12, 2004
Messages
1,386
Location
13 Critchley
Format
8x10 Format
barryjyoung said:
they had glued up flat panels for the baseboards when they left this afternoon. There are pics of the process the wood went through in the APUG Technical Gallery Nice work you guys.
Barry Young

Barry,

In the picture of the assembled baseboard, there seems to be a foam being squeezed from between the plys. I'm guessing it's the glue. Can you tell us what type of glue you are using and possibly the brand name? Would I be right in suspecting a urethane glue?

cheers and thank you
 

barryjyoung

Member
Joined
Jul 31, 2005
Messages
426
Location
Patterson MO, USA
Format
ULarge Format
Hi John:

The glue you see squeezed out is Titebond polyureathane glue that John Austin used. Another member Steve Allen also used poly glue. I prefer Titebond aliphatic resin (yellow) glue myself since it never moves the parts after I have them positioned. But I would be the first to admit that poly is stronger. I have up to this point used epoxy for everything camera related, but for the baseboard I saw no need.

Barry Young
cameramaker.com


John Bartley said:
Barry,

In the picture of the assembled baseboard, there seems to be a foam being squeezed from between the plys. I'm guessing it's the glue. Can you tell us what type of glue you are using and possibly the brand name? Would I be right in suspecting a urethane glue?

cheers and thank you
 

John Bartley

Member
Joined
Sep 12, 2004
Messages
1,386
Location
13 Critchley
Format
8x10 Format
barryjyoung said:
Hi John:

The glue you see squeezed out is Titebond polyureathane glue that John Austin used. Another member Steve Allen also used poly glue. I prefer Titebond aliphatic resin (yellow) glue myself since it never moves the parts after I have them positioned. But I would be the first to admit that poly is stronger. I have up to this point used epoxy for everything camera related, but for the baseboard I saw no need.

Barry Young
cameramaker.com

Thank you again.

cheers
 

claytume

Member
Joined
Jun 2, 2004
Messages
279
Location
Wellington,
Format
Med. Format Pan
barryjyoung said:
Barry Young
cameramaker.com

Barry

I just visited your website and am impressed with what you guys are up to. I hope the work rolls in and becomes a successful enterprise.

I have a question for you........how far will you go taking on oddball one of a kind jobs? I ask because I always have jobs like this to be done but have trouble finding anyone with the expertise, equipment and desire to take on the challenge of a one off that no one else has dreamed up!

Clayton
 

barryjyoung

Member
Joined
Jul 31, 2005
Messages
426
Location
Patterson MO, USA
Format
ULarge Format
Hi Clayton, thank you for visiting my website, now there are three of us who have been there. You, me and my mom.

As to oddball work. if it is photo related it is less because I love photo equipment more than I love my dog. If it is non photo related (like parts for your vintage Octavian motorcycle) the price goes way up because if I were to need to make stuff I was not fascinated with I can draw really great camera plans while my CNC machine is busily making me some really good coin making intricate airplane and spacecraft parts.

If it is work that is truly custom and one time, it is expensive. This is because all the set up and learning curve stuff eveyone tells you about must be applied to that one part. People who are not familiar with machining are usually amazed that it can take two or three days days to make the tooling and to set up an operation that takes 10 minutes to run. Often the run time is free and the set up is all you pay for. So that is why the "one off" part can be a very expensive proposition. On the other hand, some parts that may SEEM custom do not require an oddball set up, custom tooling, or custom fixturing. If I can hold it with standard clamping and workholding stuff I have on hand, and if it does not require that I grind a custom profile cutter, and if you don't need it from some whacko material only found in one particular village in some extremely remote section of the far flung Isles of Langerhans or Teirra Del Fuego or something, and if you do not need it to be accurate within 2.6 millionths of an inch, and if it doesn't have too many compound angles for me to actually have to think about, and if you don't absolutely have to have it last week, and if the coffee is freshly brewed and in my cup, then it isn't too expensive even though it is something we both know I will never make again.

On the other hand, if you and the other Ermanox collectors out there need a shutter release button for that extremely rare camera, I can not make you too great a deal because the only other ermanoxes out there are in museums who have their own machinists on staff for just such an emergency and therefore I will never make another. However, if there is the inkling of a chance that I can ever sell one of those rare doohickey's I will do everything I can to make as much of the pain of set up expense get spread out over as many parts as possible. I mean that. I am willing to eat a lot of the set up expense to try and build a line of goods that people will buy. I really meant that about being customer driven. Another thing. I have done a lot of nondisclosure work for private individuals and also for government agencies that don't have names but only have acronyms nobody ever heard of. If you want to patent your idea, I am your guy. I never ever let out a peep.

So, there is one really long winded answer to a very simple question, sorry about that, my first editor is rolling over in his grave as I write this. I hope it answered some of what you asked me.

Now the short version. Send me an email with all the info you have and I will try to make you happy. What are you making anyway?

Thanks for the inquiry.

Barry Young
cameramaker.com


claytume said:
Barry

I just visited your website and am impressed with what you guys are up to. I hope the work rolls in and becomes a successful enterprise.

I have a question for you........how far will you go taking on oddball one of a kind jobs? I ask because I always have jobs like this to be done but have trouble finding anyone with the expertise, equipment and desire to take on the challenge of a one off that no one else has dreamed up!

Clayton
 

Laurent

Subscriber
Joined
Oct 15, 2004
Messages
1,829
Location
France
Format
Multi Format
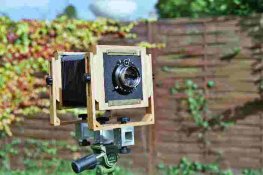
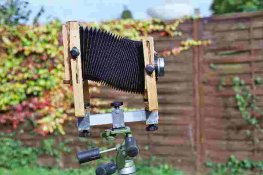
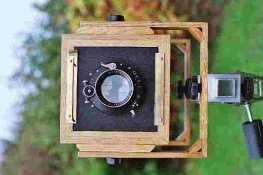
My home built camera, Jon Grepstad's design

Hi,

before updating the article (sorry the veeeeerrrrrrryyyy long delay since the first draft), here are some pics of my camera.

It works fine, the focus is right on the film plane, is light tight...

As soon as I have finalized the french article, I'll update the english one.

Cheers
Laurent
 

Attachments

  • Photo06_6_small.jpg
    Photo06_6_small.jpg
    14.8 KB · Views: 814
  • Photo07_7_small.jpg
    Photo07_7_small.jpg
    16 KB · Views: 637
  • Photo14_14_small.jpg
    Photo14_14_small.jpg
    14.6 KB · Views: 583
OP
OP
nick mulder

nick mulder

Member
Joined
May 15, 2005
Messages
1,212
Format
8x10 Format
Laurent said:
Hi,

before updating the article (sorry the veeeeerrrrrrryyyy long delay since the first draft), here are some pics of my camera.

It works fine, the focus is right on the film plane, is light tight...

As soon as I have finalized the french article, I'll update the english one.

Cheers
Laurent

thats a very crisp bellows - did you make it yourself ? If so what are the materials ? have you also a longer rail for macro ? or are you keeping it short so its not a hassle in carrying ?

cheers for the pics - all good !
 

claytume

Member
Joined
Jun 2, 2004
Messages
279
Location
Wellington,
Format
Med. Format Pan
Barry

I appreciate the time and effort you put in to respond to my question, it helps understanding where you're coming from. I've had custom equipment built in the past and realise the project can get out of hand for many reasons. I'll send you an email with some ideas I have to get better use out of my large format camera.....sorry I don't have one of those Octavian motorcycle thingies.

While we're talking motorcylces...........yesterday the movie "The World's Fastest Indian" was released. This is a locally made movie (in NZ) about an old guy that rebuilt his 1920's Indian into a 170mph speed machine.......he ran it on the Salt Flats in the 60's & 70's...........now Barry......if you could build me one of these??

cheers
Clayton
 

Laurent

Subscriber
Joined
Oct 15, 2004
Messages
1,829
Location
France
Format
Multi Format
Hi Nick,

no, the bellows is not DIY. It is a used Cambo bellows I got for a decent price ( 100 € ) and it's mint.

Laurent
 

barryjyoung

Member
Joined
Jul 31, 2005
Messages
426
Location
Patterson MO, USA
Format
ULarge Format
Sorry Clayton. I am barely keeping up with what I am doing now.

Barry Young


Clayton[/QUOTE]
While we're talking motorcylces...........yesterday the movie "The World's Fastest Indian" was released. This is a locally made movie (in NZ) about an old guy that rebuilt his 1920's Indian into a 170mph speed machine.......he ran it on the Salt Flats in the 60's & 70's...........now Barry......if you could build me one of these??

cheers
Clayton[/QUOTE]
 

argus

Member
Joined
Dec 14, 2004
Messages
1,128
Format
Multi Format
Cambara II
Built: 10/2005 (wood needs to be oiled yet)
- Takes lenses from 135 - 300mm
- bellows allow limited movements with 150mm lens (A bag bellows may be needed); no practical limits with longer lenses
- Rotating back
- Geared focussing; the adjustment knob is removable
- Quickfix for setting front standard at optimum position for 150mm & 210mm lenses.
 

Attachments

  • cambara-II-00.jpg
    cambara-II-00.jpg
    81.6 KB · Views: 783
  • cambara-II-01.jpg
    cambara-II-01.jpg
    65 KB · Views: 609
  • cambara-II-02.jpg
    cambara-II-02.jpg
    100.3 KB · Views: 618
Status
Not open for further replies.
Photrio.com contains affiliate links to products. We may receive a commission for purchases made through these links.
To read our full affiliate disclosure statement please click Here.

PHOTRIO PARTNERS EQUALLY FUNDING OUR COMMUNITY:


Ilford ADOX Freestyle Photographic Stearman Press Weldon Color Lab Blue Moon Camera & Machine
Top Bottom