Pix of your home-built cams here please

Sparrow.jpg

A
Sparrow.jpg

  • 1
  • 0
  • 61
Orlovka river valley

A
Orlovka river valley

  • 6
  • 0
  • 118
Norfolk coast - 2

A
Norfolk coast - 2

  • 5
  • 1
  • 116
In the Vondelpark

A
In the Vondelpark

  • 4
  • 3
  • 200
Cascade

A
Cascade

  • sly
  • May 22, 2025
  • 9
  • 6
  • 180

Recent Classifieds

Forum statistics

Threads
197,846
Messages
2,765,595
Members
99,487
Latest member
Nigel Dear
Recent bookmarks
1
Status
Not open for further replies.

epatsellis

Member
Joined
Jan 1, 2006
Messages
926
Format
Multi Format
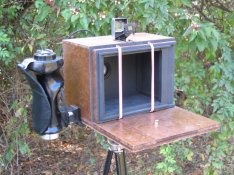
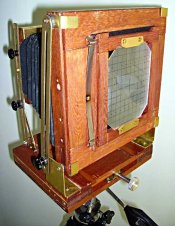
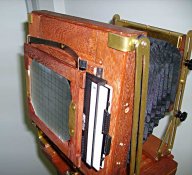
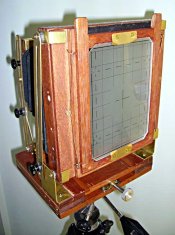
I didn't say it was going to be pretty! actually I only worked abut 6 hours on it saturday, and as soon as the coffee kicks in, I'll go back at it today. At one time I had a B+J 8x10 Commerical (technically I still own it, if I can find the person that borrowed it, 3 lenses (165 angulon, 305 Caltar/ilex and a 355 G-claron), my 4x5 with a 180 Sironar-N, all my light meters, etc. Some friend, huh?) Some of the design of the B+J is clever, not elegant, but clever in a 'let's make lots of cameras cheap" way. the standards are dirt simple. On my camera, I'm just going with geared back focus, front focus is get it close and lock it, so that makes it a little easier, I'm not going for super accurate, just a box with film at one end and lens at the other, mostly plywood and some 1" thick cherry I had left over from a project a few years ago. Hell, I'm not even T&G'ing the bed, butt joints, glue and screw. If it wasn't so cold, I'd probably machine most of the parts out of .125" aluminum on my CNC router, but it's in an unheated buiding and it might hit 30 today. I haven't CNC'd my mill yet, and I hate manual milling. I fugure by time I get a few hundred sheets pulled, I'll have designed a far better field camera in my head and then I'll take some time to build it.


erie
 
OP
OP
nick mulder

nick mulder

Member
Joined
May 15, 2005
Messages
1,212
Format
8x10 Format
CNC huh .. home made ? I'm in the process of making one with steppers and servos (using both to see which I prefer working with) - firstly it's just going to be a dremel style quick and lightweight job but that will help me make a bigger one with proper milling bits ...

One thing I love about tools is that you can make better tools with them (because we add our hands and brains into the system I guess)
 

epatsellis

Member
Joined
Jan 1, 2006
Messages
926
Format
Multi Format
psuedo home made, router was a 1988 vintage cybermation (8'x12') that I retrofitted a software based controller to. I've since done a half dozen retrofits and it's a respectable second income.

erie
 

barryjyoung

Member
Joined
Jul 31, 2005
Messages
426
Location
Patterson MO, USA
Format
ULarge Format
I am currently preparing to convert my minimill to CNC. I sent out requests for quotes to 5 water jet cutting companies and the cost of having two sheets of brass parts cut out exceeded the costs of converting my milling machine. Not to mention that if I ever move a hole location or anything, there would be another programming charge. So, it makes sense to mill the parts from stacked sheets at home instead.

I am almost certainly going to use Xylotex driver and 269 oz./in. stepper motors with a CNCfusion set of ballscrews and mounts.

I envision stacking some blanks of sheet barass clamped onto a fixture, then drilling the holes for screws etc. then screwing through the holes into the fixture. At this point the clamps can be removed and the periphery cut.

I spent about 400 hours making all of the CAD drawings for the camera parts, so pretty much just have to add toolpaths to the existing drawings and start cutting once the conversion is done.

The nice thing about a CNC mill in the garage is that it will also cut the wood pieces making the cost of the kits I intend to sell very low.
 

epatsellis

Member
Joined
Jan 1, 2006
Messages
926
Format
Multi Format
Quick update, I hate making bellows, and I've only got 1/2 of the stiffeners glued up. I've got a basically working camera, less focusing rack & pinion, as I can't find the racks I stashed away just-in-case. may just decide to go with some mxl belting screwed down and a couple of mxl pulleys engaging it. Total time so far, approx. 9 hours, I should have this pig done within 20...

erie
 
OP
OP
nick mulder

nick mulder

Member
Joined
May 15, 2005
Messages
1,212
Format
8x10 Format
barryjyoung said:
I am almost certainly going to use Xylotex driver and 269 oz./in. stepper motors with a CNCfusion set of ballscrews and mounts.

I was keen for a stepper set up also but was going for a Unipolar system (not as powerfull no, but easier to find cheaper steppers for them) - ...but now I'm getting interested in DC motor/encoder set ups..

take a look at this thread:

Dead Link Removed

some interesting specs on this driver... and it still uses the same step/dir stuff you get from mach3, turboCNC etc...
 
OP
OP
nick mulder

nick mulder

Member
Joined
May 15, 2005
Messages
1,212
Format
8x10 Format
barryjyoung said:
Very cool, but beyond my current electronics confidence level
It is being offered as a fully assembled unit by someone is that forum for about $100 US per axis ... but you also need motors and encoders.

Your Bipolars tho have a good torque rating so you should be goin for gold -

I am going to build a home-built 2D dremel style mill to begin with and then use that to make a 3D mill style mill and use that to build a stronger one ... and so on and so on
 

epatsellis

Member
Joined
Jan 1, 2006
Messages
926
Format
Multi Format
yes, but a gecko 320 cost about $20 more than that and it's plug and play.
granted youre limited to 80v and 20a, but that's 1.6Kw!

erie
 
Last edited by a moderator:

epatsellis

Member
Joined
Jan 1, 2006
Messages
926
Format
Multi Format
Just a quick update, due to work, time spent since my last posting, 15 mins. Ground my glass this morning, only thing I could find was valve grinding paste (way too coarse, though if you add a little water and keep grinding, it gets finer.) got a respectable glass, then went to cut it and it cracked down the middle, 15mins shot to hell, this time I'm cutting it first. Zero progress on bellows, though a quick note on the material I'm using. I have some ripstop here, and I own a sign shop and have tons of 2mil vinyl, notably matte black. Now self adhesive vinyl won't stick to nylon, however if you lightly coat it with pliobond (or any other adhesive, I'd imagine), let it dry, then it sticks like there's no tomorrow, and the entire cover/vinyl sandwich is about 6-10 thou thick, ideal for bellows. Using index card for stiffeners, it should work well. (famous last words) That assumes that my quick figuring on the back of an envelope jives with reality, either that or the bellows won't compress and nest all the way, either way, I will have a camera done well within my 20 hour self-alloted time frame, and my not self-alloted budget of $30.00 above and beyond what I had lying about.

erie
 

epatsellis

Member
Joined
Jan 1, 2006
Messages
926
Format
Multi Format
Ok, here's what you get when you give up 2 weekends worth of TV watching.....total time so far, about 18 hours.


erie
 

Attachments

  • DSC00003.JPG
    DSC00003.JPG
    98.8 KB · Views: 726
OP
OP
nick mulder

nick mulder

Member
Joined
May 15, 2005
Messages
1,212
Format
8x10 Format
excellent!
 

barryjyoung

Member
Joined
Jul 31, 2005
Messages
426
Location
Patterson MO, USA
Format
ULarge Format
Nice work erie:

for no more time than you put in, what you have there is outstanding.
 

epatsellis

Member
Joined
Jan 1, 2006
Messages
926
Format
Multi Format
Nick,
(not so) funny thing is, I've now ground 2 pieces of ground glass for it, the first cracked when I cut it to size after grinding it, so logic says cut it first. Second glass came out great, even ruled some pencil lines on it, got up this morning and moved the camera, forgetting the glass was on the base and managed to drop the glass a few inches, just enough for it to break in 3 pieces. Between that, the woodworking store I've been buying all my clamping knobs from closing and still trying to figure out a quick and easy spring for the back, it's been a trying experience.

erie

p.s. Barry, I've got a ton of suggestions for little bits and parts that should take no time to make, but could potentially save anyone else building a lot of time.
 

barryjyoung

Member
Joined
Jul 31, 2005
Messages
426
Location
Patterson MO, USA
Format
ULarge Format
Please insert in an electronic envelope and e-mail them, any ideas you have will be looked at very closely. Or,,,,tell us here. I am sure the Seattle Camera Makers are not the only ones who could benefit from your wisdom. Thanks!

p.s. Barry, I've got a ton of suggestions for little bits and parts that should take no time to make, but could potentially save anyone else building a lot of time.[/QUOTE]
 

AZLF

Member
Joined
Feb 12, 2006
Messages
359
Location
Tucson, Az.
Format
Multi Format
Fixed focus wide angle 4x5

Wow. What an amazing array of beautifully crafted hand made cameras. My own foray into making a camera was less ambitious than most I see here. At the time I made my unit I owned two Omega 4x5 view cameras. An E and a D model. I had built cases for both of them and joyfully carted them to Gate's Pass and other notable sites here in the southwest (around Tucson,Az.) trying to catch some of the stunning vistas that I had seen (when I did not have a camera with me of course). This worked out well enough for a while but soon I started wanting a 4x5 camera that I could take with me on my motorcycle. Both of the Omegas were too bulky when in their cases to take with me along with the Bogen tripod, and film,and dark cloth,and...I'm sure yoyu all know the story. What I needed was a field camera but I had pretty much spent what I could afford at the time on completing my existing 4x5 system.
I decided to build a fixed focus 4x5 wide angle camera using parts from my Omega E and my Schneider Super Angulon 90mm f-8 lens. The only thing I really needed from the E model was the ground glass/film back which easily detatched from the main body and could just as easily be returned. I used African Imbuya for the frame and lens board with Oak corner accents to cover the dowels firming up the outer frame. The lens board slides tightly into the outer frame and when the back had been milled to recieve the ground glass/film back I assembled the pieces and set the focus for the lens and the position of the lens board. It all worked out very well and I shot a few test shots with it.

However that's about all I ever did with the camera. Shortly after I finished it I chanced upon a deal for a Crown Graffic with lens which packed up even smaller than the one I had built.

Anyway here are some pics of my camera. I thought it turned out pretty well.
 
Last edited by a moderator:

DannL

Member
Joined
Jan 11, 2006
Messages
586
Location
Oklahoma
Format
Multi Format
Although I'm fairly new to the forum, I can probably still make everyone here laugh. It took me three tries to get to this point on this unit. Built around the idea of a studio camera, such as a Century Studio or a smaller Scovill Elite View, I think I'll take a breather from building and head out and use this thing.

Lens/shutter is from a Kodak Autographic No. 3A with the rear elements removed. Acid etched gg and laser printed overlay between glass plates. Designed around an Eastko 8x10 film holder. Homemade bellows w/square corner folds.

All comments / questions are surely welcome.

The camera . . .
http://www.wwwconnect.net/sony/woody1.jpg
http://www.wwwconnect.net/sony/woody2.jpg

First output on Ilford MGIV RC Deluxe paper cut to 4x5.
http://www.wwwconnect.net/sony/8x10-1.jpg
http://www.wwwconnect.net/sony/8x10-2.jpg
 

Ray Heath

Member
Joined
Dec 29, 2005
Messages
1,204
Location
Eastern, Aus
Format
Multi Format
homemade camera and question

g'day
i'm also new here and thought you might be interested in my home made camera
my own design after seeing images of a simple box camera
i have never seen a LF camera up close and to say i designed this is actually a stretch, i made it up as i went along

i am now building a fixed focus extreme wide angle model, i have a question

how do i calculate the focus distance for hyperfocal focusing
my lens is a simple magnying glass of 110mm focal length which i calculate is roughly equivalent to a 17mm fisheye on 35mil

so, hyperfocal focusing distance for 110mm at say f64?
 
Last edited by a moderator:

Frank R

Member
Joined
Jan 30, 2006
Messages
351
Format
Large Format
Ray, I solved the focal length problem by building a telescoping box. I then focused on infinity and marked the inner box with a pencil so i could return it to that position later. If I wanted to, I could focus on different objects at known distances and mark the box for each one.

If you just need the dimension for a fixed focus camera, you may try the same thing by using a cardboard box with nesting lid. Mount the ground glass and lens on the box and move them in and out until focused on infinity. Then measure the box and use the dimensions for your camera.

Shown below is the one I made last summer. The lens is a 127 Raptar salvaged from a Polaroid 110. I added the viewfinder and the tailboard later.

The tailboard makes it too awkward. If I built another one I would use a different system to keep the inner box parallel with the outer box.
 

Attachments

  • camera_1.jpg
    camera_1.jpg
    65.2 KB · Views: 521
  • camera_3.jpg
    camera_3.jpg
    80.4 KB · Views: 587

paul ewins

Member
Joined
Jan 5, 2006
Messages
446
Location
Melbourne, A
Format
4x5 Format
A couple of modified cameras

Hi all,
since it came up in another thread I've got organised enough to document a couple of my projects.

As mentioned in the 6x12 thread, this one is a Kodak 3A folder modified into a 6x14 panoramic:
http://members.optusnet.com.au/~paulewins/resources/3a_panoramic.htm

This one is little less obvious. I bought a Speed Graphic to get a few spare parts and found myself with most of the body left over. The broken shutter was removed, the leather replaced and I'm in the process of building a spring back specifically for grafmatics. Oh,and it has been modified so that it is portrait format, not landscape.
http://members.optusnet.com.au/~paulewins/resources/yellow_graphic.htm

There are a few other projects to be added at some stage; another 6x14 panoramic (not finished) built around a Mamiya RB 67 magazine, half plate to 4x5 adapters and some darkroom stuff.
 

argus

Member
Joined
Dec 14, 2004
Messages
1,128
Format
Multi Format
Hi all,

I modified the springback system for the Cambara II (homebuilt).

The 5x7 (13x18) back got springs made out of hard welding rod. The rod can be bent in shape and gives enough tension to firmly hold the filmholder in place.

The 4x5 reducing back has a more conventional spring system, with springs cut out of (I can't find the English word) a tool used to apply glue on walls.
 

Attachments

  • achterwand-4x5.jpg
    achterwand-4x5.jpg
    50.7 KB · Views: 440
  • achterwand-4x5-cassette02.jpg
    achterwand-4x5-cassette02.jpg
    59.8 KB · Views: 381
  • achterwand-5x7.jpg
    achterwand-5x7.jpg
    43.5 KB · Views: 347
  • achterwand-5x7-cassette.jpg
    achterwand-5x7-cassette.jpg
    56.1 KB · Views: 361

Colin Graham

Member
Joined
Sep 5, 2004
Messages
1,264
Format
Plastic Cameras
I finally finished the bellows. Thanks to barryjyoung for resource for bellows material!
The hard part was the back, figuring out how to hide the torsion springs in the woodwork. Works great.
 
Last edited by a moderator:

argus

Member
Joined
Dec 14, 2004
Messages
1,128
Format
Multi Format
wow Colin,

that looks great!
Is it 4x5? I bet you can add a 5x7 back on the camera.

G
 

Colin Graham

Member
Joined
Sep 5, 2004
Messages
1,264
Format
Plastic Cameras
argus said:
wow Colin,

that looks great!
Is it 4x5? I bet you can add a 5x7 back on the camera.

G
Thanks Argus-
I made it a bit too small for a 5x7 back-kind of kicking myself. Oh, well.. A good reason to make another one I guess!
 
Status
Not open for further replies.
Photrio.com contains affiliate links to products. We may receive a commission for purchases made through these links.
To read our full affiliate disclosure statement please click Here.

PHOTRIO PARTNERS EQUALLY FUNDING OUR COMMUNITY:


Ilford ADOX Freestyle Photographic Stearman Press Weldon Color Lab Blue Moon Camera & Machine
Top Bottom