-
Welcome to Photrio!Registration is fast and free. Join today to unlock search, see fewer ads, and access all forum features.Click here to sign up
You are using an out of date browser. It may not display this or other websites correctly.
You should upgrade or use an alternative browser.
You should upgrade or use an alternative browser.
Jobo ATL-2 rebuilding project
-
A
- Thread starter Fred of Wisconsin
- Start date
Recent Classifieds
-
For Sale Uline Bags for 4x5 Holders // Help Deplete my extra stock
- Started by x.rasenas
-
For Sale Filmomat Light Film Processor w/ Paterson Tank Adapter.
- Started by Jessxi
-
For Sale 3 x wooden stereoscopes for 7 x 3 1/2" cards __ 3D
- Started by Manual Camera
-
For Sale 35mm Film- Ilford Xp2 & Kentmere 200 (SOLD)
- Started by Jessxi
-
Want to Buy Shen Hao 6x17 camera
- Started by ediz7531
Forum statistics
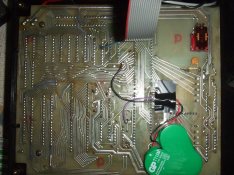
How can traces get interrupted? (Other than chemical spill and resulting corrosion.)
We actually also want to know, how could it be.
We have 2 ideas:
chemistry leaking
and/or
it is result of inaccurate transportation (got machine head from Germany by track)
I read all this thread with great interest, as an owner of a good old ATL1. It should have a sort of Jobo User Group !
I repaired myself a now rather consequent list of failures, mainly in the ATL-1 head, with the help of Jobo maintenance manual, and with the rest of my long gone learned electronics skills...
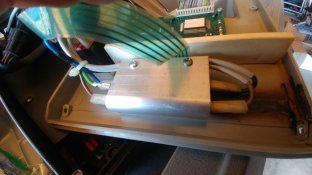
The CPP2 part looks like, right now, as under: ) I am waiting a spare 12V relay, the one triggering the 220V cold water valve seems not closing any more. I solved (temporarly ?) also a problem around the Op Amplifier feeding the Analog-to-digital converter with the bath temperature.


More generally, I have a problem of water or damp in the CPP2 head, even with a good amount of silicon cement around the lid. I wonder if a part can be missing at the rear, and if the rear vent should be really let opened.
It would be great if someone can post here a photo showing of how the lid is at the rear on his/her ATL1/ATL2/CPP2 processor..
Regards,
Raphael
I repaired myself a now rather consequent list of failures, mainly in the ATL-1 head, with the help of Jobo maintenance manual, and with the rest of my long gone learned electronics skills...
The CPP2 part looks like, right now, as under: ) I am waiting a spare 12V relay, the one triggering the 220V cold water valve seems not closing any more. I solved (temporarly ?) also a problem around the Op Amplifier feeding the Analog-to-digital converter with the bath temperature.
More generally, I have a problem of water or damp in the CPP2 head, even with a good amount of silicon cement around the lid. I wonder if a part can be missing at the rear, and if the rear vent should be really let opened.
It would be great if someone can post here a photo showing of how the lid is at the rear on his/her ATL1/ATL2/CPP2 processor..
Regards,
Raphael
Hey all, happy to report that I managed to repair my ATL-1 and get it fully working! Turns out the problem was that the backup battery for storing program memory had degraded and leaked onto the circuit board, ruining some traces. As a result the signal from one of the hall sensors on the chemical distributor system was not getting routed properly, and the arm would just seek for the zero position endlessly. As anyone who has worked with one of these machines knows, if it can't find the zero position, it won't do anything else. I bridged the interrupted traces with some new wire and the machine now finds the zero position properly. Just ran my first rounds of film on it, and it's working perfectly. I need to get it into my studio to plumb it for rinsing, and I still want to try to develop some replacement control circuitry—both for the CPP2 and the ATL head—for longevity purposes. I have an extra ATL-1 head for spare parts that I will probably play around with.
Unrelated question: does anyone know the details of the motor upgrades for the CPP2? I sort of wanted to try the ATL motor upgrade, but CatLabs has been singularly unhelpful with the details of that upgrade. I know that you need to swap in a beefier motor, and that the existing power and control circuitry would need to be replaced as well. I'm pretty sure I could engineer my own rotational circuit if I knew what motor to buy, and I'd be happy to share whatever I ended up making.
Unrelated question: does anyone know the details of the motor upgrades for the CPP2? I sort of wanted to try the ATL motor upgrade, but CatLabs has been singularly unhelpful with the details of that upgrade. I know that you need to swap in a beefier motor, and that the existing power and control circuitry would need to be replaced as well. I'm pretty sure I could engineer my own rotational circuit if I knew what motor to buy, and I'd be happy to share whatever I ended up making.
The replacement motor for the CPA2 is the Nidec/Valeo 403 304 with the long shaft....and looking at the pictures from Raphael, it'd fit the CPP2 too.Unrelated question: does anyone know the details of the motor upgrades for the CPP2? I sort of wanted to try the ATL motor upgrade, but CatLabs has been singularly unhelpful with the details of that upgrade. I know that you need to swap in a beefier motor, and that the existing power and control circuitry would need to be replaced as well. I'm pretty sure I could engineer my own rotational circuit if I knew what motor to buy, and I'd be happy to share whatever I ended up making.
I'm in the process of replacing my CPA2 motor with the above, but it'll be a couple of weeks before it arrives and gets installed.
Before i committed to a new motor, i setup a replacement 24v DC PSU with a PWM motor controller with variable speed control and reversing mechanism to keep me going. It worked fine, but it's clear that the motor has seen better days, hence the upcoming replacement.
Mike
The replacement motor for the CPA2 is the Nidec/Valeo 403 304 with the long shaft....and looking at the pictures from Raphael, it'd fit the CPP2 too.
I'm in the process of replacing my CPA2 motor with the above, but it'll be a couple of weeks before it arrives and gets installed.
Before i committed to a new motor, i setup a replacement 24v DC PSU with a PWM motor controller with variable speed control and reversing mechanism to keep me going. It worked fine, but it's clear that the motor has seen better days, hence the upcoming replacement.
Mike
Where did you source the Nidec/ Valeo motor from?
I only ordered it today, so will wait until i receive it before advising on the supplier.
Mike
Mike
With "replacement" you mean "upgrade"?The replacement motor for the CPA2 is the Nidec/Valeo 403 304 with the long shaft.
Technically, both.......i'm replacing my old motor with a new one that was used by Jobo to upgrade the later processors.With "replacement" you mean "upgrade"?
Mike
Hi,
Have you already checked what's your current CPP2 model ?
Regards,
Raphael
Backup battery leaks is the very first problem I also solved with my ATL-1 head. Out of curiosity, what have you used as battery replacement ?Hey all, happy to report that I managed to repair my ATL-1 and get it fully working! Turns out the problem was that the backup battery for storing program memory had degraded and leaked onto the circuit board, ruining some traces. As a result the signal from one of the hall sensors on the chemical distributor system was not getting routed properly, and the arm would just seek for the zero position endlessly. As anyone who has worked with one of these machines knows, if it can't find the zero position, it won't do anything else. I bridged the interrupted traces with some new wire and the machine now finds the zero position properly. Just ran my first rounds of film on it, and it's working perfectly. I need to get it into my studio to plumb it for rinsing, and I still want to try to develop some replacement control circuitry—both for the CPP2 and the ATL head—for longevity purposes. I have an extra ATL-1 head for spare parts that I will probably play around with.
Unrelated question: does anyone know the details of the motor upgrades for the CPP2? I sort of wanted to try the ATL motor upgrade, but CatLabs has been singularly unhelpful with the details of that upgrade. I know that you need to swap in a beefier motor, and that the existing power and control circuitry would need to be replaced as well. I'm pretty sure I could engineer my own rotational circuit if I knew what motor to buy, and I'd be happy to share whatever I ended up making.
Have you already checked what's your current CPP2 model ?
Regards,
Raphael
Hi,
Backup battery leaks is the very first problem I also solved with my ATL-1 head. Out of curiosity, what have you used as battery replacement ?
Have you already checked what's your current CPP2 model ?
Regards,
Raphael
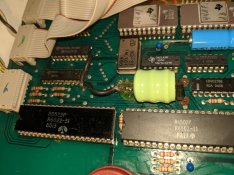
I ended up using this battery (https://batteryguy.com/varta+3|60dk-replacement-battery.html), which doesn't quite fit the space so you need to extend it with a bit of wire. I also hot glued to the board so it would stay put.
My CPP2 is actually part of my ATL-1, and from the serial number it should have the first motor upgrade in it. The motor is still going strong, but eventually I'd like to stick that 3rd upgrade motor in there if I can.
Attached a photo of my repair job below.
Hi Mr @pwadoc
Thank you for your reply, and description of your solution.
I changed also completely from the original form factor of the NVRAM battery. I retrieved a photo of my own repair in 2008 :
I was lucky enough to find this 3.6V NiMh battery spare in an electronic consumer store (I think it was intended primarly for a wireless phone), and it was flat enough to fit between the back of CPU PCB (sticked with double sided adhesive) and the power supply PCB. And since all these years, the programs stay well stored without a glitch !
Regards,
Raphael
Regarding your testing of swapping out the CPU board and the processor working after that you have pretty much zeroed in on an issue. The ICs are all programed and are unique to each generation of processor. Yes they are generic but still need to be programed.
As I watched the video.. it was looking to me like you could have had a power supply issue. The rotation motor is rated for 24 volts and with the motor running at the high speed like I saw in the video I would have suspected a voltage failure in the supply. Their are two relays that control the speed and direction of the rotation motor. Relays #3 & 4 and I have had to replace relay 4 on a power supply board to clear up a rotation issue.
I very recently needed to replace the SET/RUN switch on an ATL-2 Plus recently with errant programming issues and those issues cleared with the replaced switch. Just a thought.
Regarding your replacing of the CMOS battery. That battery's function is to retain the programs that you place into the program channels. I presume you installed a new 3.6v 1/2AA Lithium battery and installed it correctly. Not trying to be sassy but gotta ask the question.
Does your ATL-3 have the automatic filling feature? You can disengage it by placing the #5 dip switch in the down position thus turning that feature off while trouble shooting.
Do you have a service manual for this style processor? The ATL-2 manual is basically the same for information.
How about keeping the head as a parts unit? Most parts will fit your working processors and keeping them going is key also. just a thought.
Hello Fred
I too have a JOBO ATL3 and I believe I have the same issues with the programming. I replaced the 3.6v 1/2AA Lithium battery... and have gone over the board looking for issues such as soldering joins, blown capacitors etc, have removed the KEY switch as it was broken. But the machine when powered up, sits there and does nothing. I turned the power on and off a few times, and the screen sometimes shows 00.01 ... The arm moves up and down. The chemical and water temperature buttons do nothing.. The water for the water bath fills through where the chemical feed is for the film tank. The other strange thing is it use to go crazy before I replaced the battery, and now it does nothing. The machine has been in storage for twenty years. It worked fine twenty years ago. I have a service manual for the machine.
You mention programming the ICs, how to do this, or do you think this is the issue??? I see the gentleman in Moscow has or looks like the same issue with his machine.
Any advice is welcome, if you require more detailed information I'll do my best.
Cheers Regards Raoul
You either need to get a programmed Eprom from Jobo, or a respective datafile. Alternatively you need someone who can read and copy the data of his Eprom. Then you need someone to print that data onto your Eprom again.
And then you need to be lucky to find out that the Eprom actually was the culprit...
And then you need to be lucky to find out that the Eprom actually was the culprit...
You either need to get a programmed Eprom from Jobo, or a respective datafile. Alternatively you need someone who can read and copy the data of his Eprom. Then you need someone to print that data onto your Eprom again.
And then you need to be lucky to find out that the Eprom actually was the culprit...
AsX
Hey thanks for the reply.
I have stripped the machine down to nuts and bolts, as I have had to address some issues from corrosion and a crack in the water bath. (Have fixed most of these issues, although some of the motors for the pumps might need replacing... another question for the wise, where do I get these motors ???) But the big issue is the control board looks guilty of failure, hence the question, is it the programmed chips (Eprom's)...
Jobo in Germany; do they still have these Eprom's? I contacted Jobo in Germany last week, they sent me a very good pdf service manual but I assumed they didn't have parts, maybe my assumption is wrong. Have you ever programmed one of these ICs or Eprom's ??? And or do you know anyone with the data????
Cheers Raoul
Sorry, but I got no idea beyond what I wrote above. Jobo should be technically in state to either provide a data file or an already programmed Eprom. Whether they would be willing and at what price, I don't know...
Giday
Yhea good call. I appreciate the comment that it might not even be the Eprom... I'll send Jobo an email and see what transpires. Thanks again. In your opinion if it isn't the Eprom, what would you think is the issue, if you have any ideas they are welcome?
Cheers Raoul
Yhea good call. I appreciate the comment that it might not even be the Eprom... I'll send Jobo an email and see what transpires. Thanks again. In your opinion if it isn't the Eprom, what would you think is the issue, if you have any ideas they are welcome?
Cheers Raoul
Hello Fred
I too have a JOBO ATL3 and I believe I have the same issues with the programming. I replaced the 3.6v 1/2AA Lithium battery... and have gone over the board looking for issues such as soldering joins, blown capacitors etc, have removed the KEY switch as it was broken. But the machine when powered up, sits there and does nothing. I turned the power on and off a few times, and the screen sometimes shows 00.01 ... The arm moves up and down. The chemical and water temperature buttons do nothing.. The water for the water bath fills through where the chemical feed is for the film tank. The other strange thing is it use to go crazy before I replaced the battery, and now it does nothing. The machine has been in storage for twenty years. It worked fine twenty years ago. I have a service manual for the machine.
You mention programming the ICs, how to do this, or do you think this is the issue??? I see the gentleman in Moscow has or looks like the same issue with his machine.
Any advice is welcome, if you require more detailed information I'll do my best.
Cheers Regards Raoul
Hello there!
I am gentleman in Moscow who got the same problem.
Our trouble was in broken key microchip. Unfortunately , this microchip is out of stock and we spent about 3 month to:
--find some microchip analog to replace
--find same microchip ( was borrowed from working machine) to read microprogramm3
--find programming device to programm
--make some changes on board
Now it works!
Giday Mate / Gentleman in Moscow
How is Russia today, good I hope. Hey thanks for the contact and state of play.
You mention a broken key micro chip. Good to know you fixed the problem.
I have a question: did you make a backup chip? and or do you have the programmed data? As I understand; your machine now works 100%... very good work.
Im in a small town in New Zealand and its not so easy to find anything for a Jobo ATL3 in New Zealand. I know a good man in New York who is a genius with these things, he mentioned a micro chip. I'll call him tomorrow. Id appreciate any advice on what to do or how to proceed.
Cheers Regards Raoul
Giday Mate / Gentleman in Moscow
How is Russia today, good I hope. Hey thanks for the contact and state of play.
You mention a broken key micro chip. Good to know you fixed the problem.
I have a question: did you make a backup chip? and or do you have the programmed data? As I understand; your machine now works 100%... very good work.
Im in a small town in New Zealand and its not so easy to find anything for a Jobo ATL3 in New Zealand. I know a good man in New York who is a genius with these things, he mentioned a micro chip. I'll call him tomorrow. Id appreciate any advice on what to do or how to proceed.
Cheers Regards Raoul
Raoul, I will ask our technician contact you.
Raoul, I will ask our technician contact you.
Giday Mate / Gentleman in Moscow
Thank you for taking the time to contact your technician. Please ask when he has a moment to make contact, thank you.
As I understand you have sorted the JOBO ATL3 so it works 100%, and it was the control board micro chip, (Eprom). This makes sense as my machine seems to have the same issues you had. I hope its the micro chip.
Are you running colour E6 or C41 or BW. Im mainly interested in BW and E6. Twenty years ago I used the ATL3 often and it did a very clean E6. If your running colour are you using Kodak or Fuji... these are the only options in New Zealand, Russia and Europe most likely will have other options.
Well thanks again. Regards Raoul
Good morning from Milwaukee WI USA.. I realize this can be a long response but this is how I would do the first line of troubleshooting of your issue.
With my rebuilding projects I have not experienced any defective or broken e-proms but I have had to replace the SET/RUN switch on 1 board. The processor was very erratic when the defective switch was still installed and I was able to resurrect the processors by harvesting the switch from an older ATL board. The parts that Jobo uses are basic across most of the ATL 2/3 platforms.
With taking the processor apart and replacing the memory battery by any chance wasn't reinstalled backwards by accident? Gotta ask
Now the other item I would look at more closely is ALL the connectors that needed to be unplugged then reconnected to be able to turn the processor back on. Look very closely at ALL of the the ribbon cable board connectors for any bent or smashed pins preventing contact paying attention to the locking socket connector on the bottom edge of the control board. On more than one occasion I have found damaged connector pins because it is to do than one thinks. If you find a damaged connector use EXTREME caution on straightening them or they will break then you will be hunting for a replacement connector.
With everything taken apart inspect both of the ribbon cable connectors for any damage from the Display board (94018) to the control board (94019). If their is no damage reassemble the control board to the display board then move to the side back of the board where the connections are made to the Control Head Interface board (94017) ribbon cable connection. If you find no damaged pins reassembly making sure you have the 2 power wires (red and black) on the top corner spade connectors in the proper spots. Once you are sure everything is normal with the connections on the backside of the control board remount the board. With the main control board reassembled reconnect the ribbon cable from the Interface board (94015) to the control board.
That would be my very first step to troubleshooting erratic board behavior if I believed it was working prior to the issue and having taken the boards out to make a repair to one.
I hope this helps. Stay safe and healthy.
Fred
With my rebuilding projects I have not experienced any defective or broken e-proms but I have had to replace the SET/RUN switch on 1 board. The processor was very erratic when the defective switch was still installed and I was able to resurrect the processors by harvesting the switch from an older ATL board. The parts that Jobo uses are basic across most of the ATL 2/3 platforms.
With taking the processor apart and replacing the memory battery by any chance wasn't reinstalled backwards by accident? Gotta ask

Now the other item I would look at more closely is ALL the connectors that needed to be unplugged then reconnected to be able to turn the processor back on. Look very closely at ALL of the the ribbon cable board connectors for any bent or smashed pins preventing contact paying attention to the locking socket connector on the bottom edge of the control board. On more than one occasion I have found damaged connector pins because it is to do than one thinks. If you find a damaged connector use EXTREME caution on straightening them or they will break then you will be hunting for a replacement connector.
With everything taken apart inspect both of the ribbon cable connectors for any damage from the Display board (94018) to the control board (94019). If their is no damage reassemble the control board to the display board then move to the side back of the board where the connections are made to the Control Head Interface board (94017) ribbon cable connection. If you find no damaged pins reassembly making sure you have the 2 power wires (red and black) on the top corner spade connectors in the proper spots. Once you are sure everything is normal with the connections on the backside of the control board remount the board. With the main control board reassembled reconnect the ribbon cable from the Interface board (94015) to the control board.
That would be my very first step to troubleshooting erratic board behavior if I believed it was working prior to the issue and having taken the boards out to make a repair to one.
I hope this helps. Stay safe and healthy.
Fred
Hello all.. I figured it is time to check in once again. Since my first Jobo ATL-2 rebuild I have been keeping busy with more rebuilds. To this date I have now restored / rebuilt a total of 4 ATL's and I am finishing up on an ATL-3 complete head.
My first journey was the ATL-2 that I had posted here and with help and suggestions from those on this site I was able to bring a processor back to life and looking almost as good as the day it was purchased new.
After that I was gifted an ATL-2 PLUS and that one was a bit more challenging. The processor was worn out and should have been a parts processor but I do NOT give up easily and I wasn’t going to give up on the ATL-2 PLUS either. Through due diligence
  and being just plain stubborn the ATL-2 PLUS is processing my film here.
 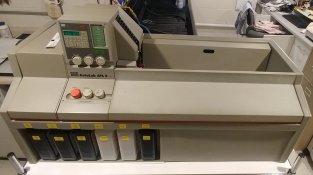 It is a beautiful processor and works like it should. I needed to rebuild it from the ground up from the control head, lift arm, chemical distribution, power supply, program board and such. This processor gave me a real education.
After the ATL-2 Plus my 3rd was an ATL-3000 European version (220V 50hZ)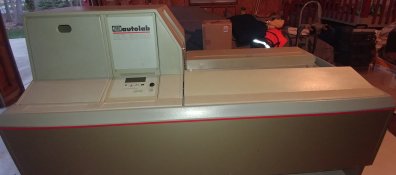 that I found in Illinois and that processor was physically huge in size! The 3000 took me about 2 months to rebuild and then it took about another 100 hours of calibrations and running mock processes to make sure it was going to hold up and not blow out the power line filters anymore. Something I discovered was how to modify many of the components and boards to be able to use standard USA 220V 60hZ power. Something I did discovered was that most of the cause of the failures with the 3000 processor was traced back to a power supply that steps up the voltage from 110 US to 220 EURO. Life got much easier once I started to convert the processor to 220V 60hZ U.S. power and it began to show real progress with regards to running processes. I am very happy that the 3000 processor
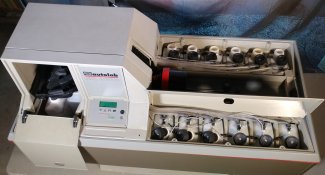 was passed onto a younger photographer setting up a film processing service in the southwestern part of our country and I wish him all the best on his venture ahead. My personal preference is still the more mechanical ATL 2 and 3 series of processors. They are MUCH easier to troubleshoot.
My 4th rebuild was an earlier version ATL-2 with the horizontal tank rocking action e-prom.
 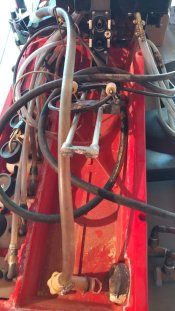 I would like to find a later e-prom to upgrade that processor and change the rocking action to a “FULL SET” option. This find was a unique processor because the person who had it was also trying to repair this processor but due to his health conditions had to abandon it. This ATL-2 processor was all present but was a greater basket case than the earlier ATL-2 PLUS. The earlier modifications someone made to the processor and multiple dead circuit boards this ATL-2 needed to have multiple control boards trouble shot. After devising a way to test the components on the nonfunctional boards coupled with many early mornings studying the schematics and formulating a repair process then finding replacement equivalents I was able to bring this processor back to life.
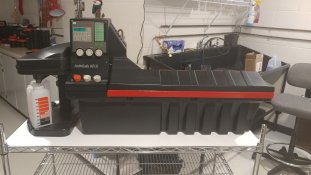
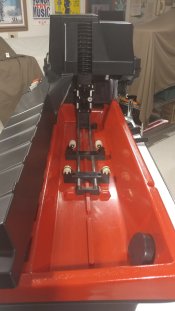 I think I have devised a way to “rebuild” a power supply (aka transformer or relay board) based on the symptoms of the processor behavior. It works for my repair methods.
Now to my 5th rebuild.. It started life as an ATL-3 but was brutally hacked apart by someone sometime ago and I think they were trying to reinvent what the processor was designed to do. It came to me from New Mexico in a cardboard box in many pieces but luckily the control head came with all the major parts. I have been repairing circuit boards and rebuilding the head as a “spare” that can be a drop-in for any of the ATL 2/3 processors. It can be an ATL-2, or an ATL-2 PLUS (which is how I am presently configuring it) or it can be put back into use as an ATL-3 with adding the additional chemical supply lines. Either way once this head is done plans are to break the head down its components and placed in a box for who knows when.
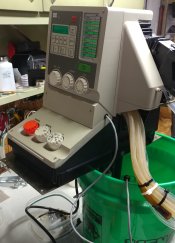 Most likely my children will have to dispose of it when my time comes.
I have attached a few images of the various processors from when I received them to finished machines.
Thru this process of rebuilding assorted processors I have amassed a large supply of spare parts and I at this time I am most likely able to rebuild nearly any ATL series processor that comes across my life right now. I am able to rebuild a power supply 100% including the European relay blocks that I had ordered out of UK with new components to get a non-functioning power supply back to working order again.
My wife thinks I need to get some professional help!
Stay safe and healthy in today's world.
My first journey was the ATL-2 that I had posted here and with help and suggestions from those on this site I was able to bring a processor back to life and looking almost as good as the day it was purchased new.
After that I was gifted an ATL-2 PLUS and that one was a bit more challenging.
 The processor was worn out and should have been a parts processor but I do NOT give up easily and I wasn’t going to give up on the ATL-2 PLUS either. Through due diligence
  and being just plain stubborn the ATL-2 PLUS is processing my film here.
  It is a beautiful processor and works like it should. I needed to rebuild it from the ground up from the control head, lift arm, chemical distribution, power supply, program board and such. This processor gave me a real education.
After the ATL-2 Plus my 3rd was an ATL-3000 European version (220V 50hZ)
 that I found in Illinois and that processor was physically huge in size! The 3000 took me about 2 months to rebuild and then it took about another 100 hours of calibrations and running mock processes to make sure it was going to hold up and not blow out the power line filters anymore. Something I discovered was how to modify many of the components and boards to be able to use standard USA 220V 60hZ power. Something I did discovered was that most of the cause of the failures with the 3000 processor was traced back to a power supply that steps up the voltage from 110 US to 220 EURO. Life got much easier once I started to convert the processor to 220V 60hZ U.S. power and it began to show real progress with regards to running processes. I am very happy that the 3000 processor
 was passed onto a younger photographer setting up a film processing service in the southwestern part of our country and I wish him all the best on his venture ahead. My personal preference is still the more mechanical ATL 2 and 3 series of processors. They are MUCH easier to troubleshoot.
My 4th rebuild was an earlier version ATL-2
 with the horizontal tank rocking action e-prom.
  I would like to find a later e-prom to upgrade that processor and change the rocking action to a “FULL SET” option. This find was a unique processor because the person who had it was also trying to repair this processor but due to his health conditions had to abandon it. This ATL-2 processor was all present but was a greater basket case than the earlier ATL-2 PLUS. The earlier modifications someone made to the processor and multiple dead circuit boards this ATL-2 needed to have multiple control boards trouble shot. After devising a way to test the components on the nonfunctional boards coupled with many early mornings studying the schematics and formulating a repair process then finding replacement equivalents I was able to bring this processor back to life.
 I think I have devised a way to “rebuild” a power supply (aka transformer or relay board) based on the symptoms of the processor behavior. It works for my repair methods.
Now to my 5th rebuild.. It started life as an ATL-3 but was brutally hacked apart by someone sometime ago and I think they were trying to reinvent what the processor was designed to do. It came to me from New Mexico in a cardboard box in many pieces but luckily the control head came with all the major parts.
 I have been repairing circuit boards and rebuilding the head as a “spare” that can be a drop-in for any of the ATL 2/3 processors. It can be an ATL-2, or an ATL-2 PLUS (which is how I am presently configuring it) or it can be put back into use as an ATL-3 with adding the additional chemical supply lines. Either way once this head is done plans are to break the head down its components and placed in a box for who knows when.
 Most likely my children will have to dispose of it when my time comes.
I have attached a few images of the various processors from when I received them to finished machines.
Thru this process of rebuilding assorted processors I have amassed a large supply of spare parts and I at this time I am most likely able to rebuild nearly any ATL series processor that comes across my life right now. I am able to rebuild a power supply 100% including the European relay blocks that I had ordered out of UK with new components to get a non-functioning power supply back to working order again.
My wife thinks I need to get some professional help!
Stay safe and healthy in today's world.
Attachments
After the ATL-2 Plus my 3rd was an ATL-3000 European version (220V 50hZ) View attachment 256926 that I found in Illinois and that processor was physically huge in size! The 3000 took me about 2 months to rebuild and then it took about another 100 hours of calibrations and running mock processes to make sure it was going to hold up and not blow out the power line filters anymore. Something I discovered was how to modify many of the components and boards to be able to use standard USA 220V 60hZ power. Something I did discovered was that most of the cause of the failures with the 3000 processor was traced back to a power supply that steps up the voltage from 110 US to 220 EURO. Life got much easier once I started to convert the processor to 220V 60hZ U.S. power and it began to show real progress with regards to running processes.
What in this processor made it prone to fail due to a different mains frequency?
I assume all time based functions were controlled by an own, independant clock which is based on a quartz. Thus no interference from mains frequency on this part.
All the ATL processors work with either 50 or 60Hz power sources because the transformer board takes care of the actual clocking voltage. The different power frequency was not the original issue. The transformer on the ATL-3000 power supply is both a 50 or 60 Hz supply where it makes the difference involves the pump motor and the power filter. The failure issue was the use of the external power supply to step-up the voltage from 120v US to 220 EURO. The previous owner had purchased a low cost unit off of eBay and when I finally took a serious look at the stand alone external power unit I discovered that the supply was not supplying the required voltages to the two main leads of which one was 120v the other was 50v. With the odd voltages, the stock power cord on the step-up voltage device and the adapters supplied with the unit it wasn't passing the neutral (ground) line thru to the processor. The unbalanced power being supplied into the processor plus the lack of the the neutral circuit greatly over stressed the power filter capacitor and continued to make it blow out.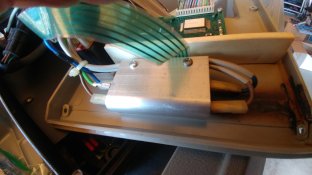
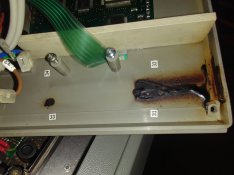
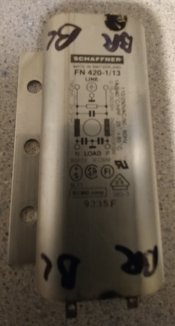
I hope this helps clear your question up.


I hope this helps clear your question up.
| Photrio.com contains affiliate links to products. We may receive a commission for purchases made through these links. To read our full affiliate disclosure statement please click Here. |
PHOTRIO PARTNERS EQUALLY FUNDING OUR COMMUNITY:  |


