Jobo ATL-2 rebuilding project

Green room

A
Green room

  • 2
  • 0
  • 6
On The Mound

A
On The Mound

  • 4
  • 0
  • 45
Sinclair Lewis

A
Sinclair Lewis

  • 6
  • 1
  • 59
Street Art

A
Street Art

  • 3
  • 5
  • 106
Time a Traveler

A
Time a Traveler

  • 6
  • 3
  • 101

Recent Classifieds

Forum statistics

Threads
198,226
Messages
2,771,315
Members
99,578
Latest member
williechandor
Recent bookmarks
0
OP
OP
Joined
Jan 1, 2020
Messages
44
Location
Milwaukee, WI
Format
Medium Format
LOL. We took the ferry to Milwaukee a couple years ago when my wife had to go there for training. She hates Chicago traffic, plus her employer paid for it. Win/win for me :smile:.

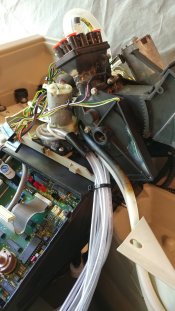
Hi Tim.. I am making some headway with the ATL-2 PLUS. I've get the transformer board rebuilt and I am waiting on one more discrete part for it. I replaced the large black power filter on the interface board because I was suspicious of that being the root cause of the catastrophic failure on the transformer board components. I hope to electrical test it sometime next week and move on from their. I hope all is well with you and your family and it was GREAT meeting and talking with you.
 
OP
OP
Joined
Jan 1, 2020
Messages
44
Location
Milwaukee, WI
Format
Medium Format
Good afternoon all.. I have my shirt sleeves rolled up, my magnifying goggles on and have been deep into the world of Jobo rebuilds with two more projects. Project one is an ATL-3000 that was toasted literally by the power filter that took out several main components. Currently I am waiting on a part being shipped in from the UK and ti should be here within the week. My second rebuilding project is an ATL-2 PLUS. That processor is a challenge but after nearly a 100 hours of disassembly and then many assorted repairs and re-assembly I now have it in the wet testing phase which it seems to passed electrically but needs more mechanical work and at this time I am waiting on two parts as those issues cropped up during the testing. My wife thinks I should seek professional help. Here is a picture story of the project as it has been proceeding.. Thanks to all.:smile:.. ATL-2PLUS first home.jpg ATL-2PLUS repair process 1 - cleaning.jpg ATL-2PLUS repair process 2 - cleaning.jpg ATL-2PLUS repair process 5- cleaning.jpg ATL-2PLUS repair process 3- cleaning.jpg ATL-2PLUS blown power supply.jpg ATL-2PLUS repair process 4- cleaning.jpg ATL-2PLUS repair process - lift arc gear start.jpg ATL-2PLUS repair process - lift arc gear mid repair.jpg ATL-2PLUS repair process - lift arc gear near completed.jpg ATL-2PLUS repair process - head repairs 1.jpg ATL-2PLUS repair process - first wet test.jpg ATL-2PLUS repair process - after 100 hours of work.jpg
 

Attachments

  • ATL-2PLUS repair process - head repairs 1.jpg
    ATL-2PLUS repair process - head repairs 1.jpg
    971.6 KB · Views: 507
OP
OP
Joined
Jan 1, 2020
Messages
44
Location
Milwaukee, WI
Format
Medium Format
Hello all.. I guess I can say that I have been busy with the two additional Jobo ATL rebuilding projects. In May I rescued an ATL-3000 that had been represented as a “working” processor. NOT!!

The ATL-2 Plus has been ongoing repairs as I run many on going wet tests. I do not think there is another item to fix on this processor anymore with this latest tear down... While doing an extensive repetitive wet run simulating an E-6 process I noticed liquid leaking from the lift arm. My feelings shrunk and I figured “why not” and with that I began to take the head apart for the umpteenth time. I did some research on the lift arm and priced a new and used replacement lift arm (OUCH) of which I then decided on diving into the lift arm to see how it is put together. After careful disassembly down to the last screw and glued part I did a thorough cleaning of every part. Inspection of all the lift arm components especially those factories assembled components I found the cause of the leak. It was a failed glued joint located in the inner tunnel workings of the pivot point of the arm and a gasket that is used to prevent liquids flowing back and down onto the power supply sections of the processor. I came up with a way to repair the flawed joint besides just puddling sealer on the joint and individually wet tested the repaired the part of which it is again solid and leak proof again. I am back into the re-assembly mode and expect to begin moving forward with some additional wet testing later this weekend. Since the COVID pandemic I have spend A LOT of time putzing in my work area and these Jobo’s do take a lot of time. I am attaching a few more images of the ATL-2 Plus.. one image is the failed gasket and leaking tube joint and the other two are the processor running programs.

Lift arm leak area 1.jpg ATL-2PLUS working 1.jpg ATL-2PLUS working 2.jpg

I have been scouring the web for the back bottle cover to complete the processor so if anyone knows of a machine for parts or just the cover I would appreciate the information. Likewise if anyone has ANY parts that you would like to dispose of I would add them to my growing collection of salvaged working parts. I am now getting quite a few decent parts for the next rebuild should such an opportunity come up.

The ATL-3000 is now compete in the repair and reassembly.

Thanks all...
 

mshchem

Subscriber
Joined
Nov 26, 2007
Messages
14,460
Location
Iowa City, Iowa USA
Format
Medium Format
You folks are preserving civilization. We live in a "Mad Max" post apocalypse world when it comes anything darkroom. I hope this terrible virus is beat soon, and the economies of the world come back. I bought a new CPP3 about a year back, I have 4 other Jobos but my only CPP2+ was used hard before I got it, I cleaned it up, a new switch etc. I wanted something new that hopefully will outlast me.
I have 5 enlargers set up currently. My wife is an artist so she's understanding, even if she doesn't really understand. :smile:
It's kinda like collecting steam engines :laugh:
Best Regards Mike
 
OP
OP
Joined
Jan 1, 2020
Messages
44
Location
Milwaukee, WI
Format
Medium Format
Thanks Mike.. My wife doesn't understand the darkroom draw but I am allowed to putz on this stuff because it keeps my mind active since I retried. I am into another rebuilding of a Jobo ATL and this one is/was an ATL-3. All I was able to get of the original processor was the head with no body, cabinet or any chemical supply hoses. They were ALL cut from the person who I received it from.

I have attached a photo of the ATL-3 heads present state.. I started going thru the head piece by piece as I do and I am evaluating the feasibility of rebuilding the head as a back-up or if someone should need a rebuilt head for a project. I have gotten to the point of tearing down entire lifts and rebuilding them from the ground up and it makes a rebuild/rehab easier.
ToreDown ATL-3 v2.jpg


I am sort of doing a Dr. Frankenstein and taking from my parts boxes from all the different processor I have now rebuilt and creating a processing creature that resembles an ATL-2 Plus from an operational point.

Here is where I am in need of any help I can receive because I have kinda hit a dead end on some of the items I am trying to find.. I am trying to locate an e-prom from a dead or junk ATL-2 Plus so that I can start to modify the main controller board. A donor board would be helpful and if anyone has a board that has little or no hope and are willing to ship or sell I will work with you on a fair compensation for the board. This will be my forth processor rebuild now and I find I enjoy the challenges they present and hunting for the parts…worldwide.

Everyone take care.. stay safe and healthy.. catch you again.
 

Jeff st Onge

Member
Joined
Jul 11, 2020
Messages
1
Location
New york
Format
35mm
Is it worth buying a jobo Atl2 + a d what would be a good price to pay. I'm not sure if it even works.
 

VVN_777

Member
Joined
Jul 12, 2020
Messages
15
Location
TA
Format
Medium Format
Thanks Mike.. My wife doesn't understand the darkroom draw but I am allowed to putz on this stuff because it keeps my mind active since I retried. I am into another rebuilding of a Jobo ATL and this one is/was an ATL-3. All I was able to get of the original processor was the head with no body, cabinet or any chemical supply hoses. They were ALL cut from the person who I received it from.

I have attached a photo of the ATL-3 heads present state.. I started going thru the head piece by piece as I do and I am evaluating the feasibility of rebuilding the head as a back-up or if someone should need a rebuilt head for a project. I have gotten to the point of tearing down entire lifts and rebuilding them from the ground up and it makes a rebuild/rehab easier.
View attachment 250003

Fred , Can I ask you 2 questions, please?

1. How did you clean boards so perfectly ?
2. How did you clean machine itself ( I mean plastiс body) ?
It looks like new!

We are restoring our ATL3 now and will be appreciated for any advices !

Thanks!
 
OP
OP
Joined
Jan 1, 2020
Messages
44
Location
Milwaukee, WI
Format
Medium Format
Hello… nice to hear that others are working on restoring these processors.

Regarding the circuit boards… If they are basically dusty I use just compressed air. If the dust and grime is stuck on but removes fairly easily with some rubbing I use a very stiff natural hair paint brush (mine is 2.5 inches wide or 63.5mm) and an 80% or greater solution of Isopropyl alcohol and flood the board surface with the alcohol then work the surface with the brush followed by an alcohol rinse and blowing the board dry with the compressed air. If the board is REALLY dirty and full of grime and some corrosion I use a product called “Simple Green” sprayed sparingly on the board, worked into the grime on the board with the brush, rinsed off with steam distilled water then blown dry with the compressed air. I then follow the distilled water rinse with an isopropyl alcohol rinse and again blow the board dry with the compressed air and allow the board to dry for about 24 hours before doing any more to it.

When I make a component replacement or repair I use a “no clean” flux and then I make sure that I spot clean the area of the repair with the isopropyl alcohol and make sure all the flux has all been removed.

Regarding how I clean the plastic parts. That is all dependent on the type of staining it is being either chemical or water.

Complete disassembly of all the components.. A good washing with warm water and a good dish washing soap. I use Cascade. If that was not sufficient then I put the component into a plastic container that will hold what I am trying to clean and use a 4 part water to 1 part muriatic acid for a wash. The acid is usually sufficient at removing all the calcium hard water, rust and other stains and residue and it will clean up most photo chemistry that has NOT stained into the plastics.

For spot cleaning anything on the processor I use primarily Isopropyl Alcohol on almost everything.. I actually use a 99% pure alcohol and it is my best cleaning agent.

I hope this helps.
 

VVN_777

Member
Joined
Jul 12, 2020
Messages
15
Location
TA
Format
Medium Format
Thanks a lot for quick and detailed respond , Fred!
 
Last edited:

VVN_777

Member
Joined
Jul 12, 2020
Messages
15
Location
TA
Format
Medium Format
98342301_2491965484467395_2294229902976614400_n.jpg
104681204_3275079429222173_954278076834217377_n.jpg

We hope to connect these two parts and get working processor as well
 
OP
OP
Joined
Jan 1, 2020
Messages
44
Location
Milwaukee, WI
Format
Medium Format
NICE! I love a challenge like the processor I see and you will too. From what I can see in the photo's the unit is basically complete which is the FIRST hurdle now it is just one item at a time.. Get yourself a repair manual and roll up your sleeves. If you need a repair manual for the ATL-3 reach out to me with your email address and I will see how I can help.
 

VVN_777

Member
Joined
Jul 12, 2020
Messages
15
Location
TA
Format
Medium Format
Thank you, Fred!

We have 3 more ATL's (3 ,2000, 2200) and some parts . We also have ATL 2/3 service manual.

And 2 new questions :

1. May be , by any chance you have ATL2000 SERVICE manual ? Can't find it. Jobo can't help too...

2. We tested ATL-3 machine head bought on Ebay and pictured in my previous post.
I could make short video of issue for you.
When we push buttons , nothing happened , we only can make lift up/down. And continuous sound sounds.

Our technician thinks some micro-circuits are out of order. But which one?....

Here are our working ATLs

WhatsApp Image 2020-06-08 at 22.33.44.jpeg
 

Lachlan Young

Member
Joined
Dec 2, 2005
Messages
4,893
Location
Glasgow
Format
Multi Format
@VVN_777 have you had a look at this service manual?

Edit: read your post more thoroughly, and yes you have.

My own sense of the differences between the generations of ATL is that they seem relatively minor & relate to upgrades of electrical/ mechanical parts (likely to handle the Expert Drums), along with some programming changes (RA-4 replacing EP-2). It should be fairly easy to trace the circuit & resolve the problem (unless it's a no longer made IC) - there's just quite a lot of 'stuff' in a fairly small space.

Further thought: could it be the CMOS battery that has died & is causing all the other problems?
 
Last edited:

VVN_777

Member
Joined
Jul 12, 2020
Messages
15
Location
TA
Format
Medium Format
[

My own sense of the differences between the generations of ATL is that they seem relatively minor & relate to upgrades of electrical/ mechanical parts (likely to handle the Expert Drums), along with some programming changes (RA-4 replacing EP-2). It should be fairly easy to trace the circuit & resolve the problem (unless it's a no longer made IC) - there's just quite a lot of 'stuff' in a fairly small space.

Absolutely. But. if we see for ex ,,10 microcircuits on the board , we must understand which one is out of order and needs to be replaced.
Most of then are cheap and available but we need replace them one-by-one ...
 

Lachlan Young

Member
Joined
Dec 2, 2005
Messages
4,893
Location
Glasgow
Format
Multi Format
Absolutely. But. if we see for ex ,,10 microcircuits on the board , we must understand which one is out of order and needs to be replaced.
Most of then are cheap and available but we need replace them one-by-one ...

If it's been sitting for 10+ years, I'd suspect the CMOS battery as the cause of trouble before any IC.
 

VVN_777

Member
Joined
Jul 12, 2020
Messages
15
Location
TA
Format
Medium Format
If it's been sitting for 10+ years, I'd suspect the CMOS battery as the cause of trouble before any IC.

Thanks, it partially helped!
But need more advises


Jobo1.jpg Jobo2.jpg


Problem is in CPU board. If we replace it to same everything works perfectly

Dip switch 3 in no sensors position for test

Main motor rotates in one direction only sometimes to left side , sometimes to right.

CPU, RAM, ROM, PROM, VIA Ics are in working condition

Probably , one of Integrated Circuit is not healthy

Will be appreciated for any help.
 
OP
OP
Joined
Jan 1, 2020
Messages
44
Location
Milwaukee, WI
Format
Medium Format
Regarding your testing of swapping out the CPU board and the processor working after that you have pretty much zeroed in on an issue. The ICs are all programed and are unique to each generation of processor. Yes they are generic but still need to be programed.

As I watched the video.. it was looking to me like you could have had a power supply issue. The rotation motor is rated for 24 volts and with the motor running at the high speed like I saw in the video I would have suspected a voltage failure in the supply. Their are two relays that control the speed and direction of the rotation motor. Relays #3 & 4 and I have had to replace relay 4 on a power supply board to clear up a rotation issue.

I very recently needed to replace the SET/RUN switch on an ATL-2 Plus recently with errant programming issues and those issues cleared with the replaced switch. Just a thought.

Regarding your replacing of the CMOS battery. That battery's function is to retain the programs that you place into the program channels. I presume you installed a new 3.6v 1/2AA Lithium battery and installed it correctly. Not trying to be sassy but gotta ask the question.

Does your ATL-3 have the automatic filling feature? You can disengage it by placing the #5 dip switch in the down position thus turning that feature off while trouble shooting.

Do you have a service manual for this style processor? The ATL-2 manual is basically the same for information.

How about keeping the head as a parts unit? Most parts will fit your working processors and keeping them going is key also. just a thought. :smile:
 

VVN_777

Member
Joined
Jul 12, 2020
Messages
15
Location
TA
Format
Medium Format
Fred, I have redirected all info to our technician , will notify you about results
Yes, we have service manuals for ATL2/3 (got it with our first ATL-3)


THANKS A LOT!
 

Lachlan Young

Member
Joined
Dec 2, 2005
Messages
4,893
Location
Glasgow
Format
Multi Format
@VVN_777 I'd second Fred's comments - the bits that tend to fail are often the electromechanical parts, which can then cause a whole sequence of odd behaviour up the chain. In general with Jobo's I've found the failures are more often motors/ pumps/ sensors etc long before any central IC chip controls - but because they are relatively 'dumb' machines, if a failing part inputs garbage data, it can cause seemingly impossible to diagnose chaos.
 

pwadoc

Member
Joined
Mar 12, 2019
Messages
98
Location
Brooklyn
Format
Multi Format
This is an awesome project. I am currently in the process of fixing a problem with one of the hall sensors in the air distributor system for my ATL-1, which from what I can tell is very similar to the ATL-2. I've learned a lot about how the processor works, and the actual functionality is pretty simple. I'm wondering if it's possible to build a device that would interface with the hardware of most of the ATL models, since the actual pumps/motors and sensors are generally the same, and if they do differ it's a matter of voltage.

One weird thing I did notice about the ATL-1/2/3 is that the lift motor uses an entirely different voltage/amperage for raising than it does for lowering. I'm wondering they they didn't just use PWM to slow the motor down when lowering. Maybe something about the limitation of the electronics available at the time?

My repair in progress (trying to determine when the failure is isolated to the sensor, or if there's something going on further up on the control board).
jobo-smaller.jpg
 

VVN_777

Member
Joined
Jul 12, 2020
Messages
15
Location
TA
Format
Medium Format
Regarding your testing of swapping out the CPU board and the processor working after that you have pretty much zeroed in on an issue. The ICs are all programed and are unique to each generation of processor. Yes they are generic but still need to be programed.

As I watched the video.. it was looking to me like you could have had a power supply issue. The rotation motor is rated for 24 volts and with the motor running at the high speed like I saw in the video I would have suspected a voltage failure in the supply. Their are two relays that control the speed and direction of the rotation motor. Relays #3 & 4 and I have had to replace relay 4 on a power supply board to clear up a rotation issue.

I very recently needed to replace the SET/RUN switch on an ATL-2 Plus recently with errant programming issues and those issues cleared with the replaced switch. Just a thought.

Regarding your replacing of the CMOS battery. That battery's function is to retain the programs that you place into the program channels. I presume you installed a new 3.6v 1/2AA Lithium battery and installed it correctly. Not trying to be sassy but gotta ask the question.

Does your ATL-3 have the automatic filling feature? You can disengage it by placing the #5 dip switch in the down position thus turning that feature off while trouble shooting.

We found root of issues.

Few traces on main board was interrupted + one of IC ( Sn74188 ) is dead
Hope to restore soon
 
Photrio.com contains affiliate links to products. We may receive a commission for purchases made through these links.
To read our full affiliate disclosure statement please click Here.

PHOTRIO PARTNERS EQUALLY FUNDING OUR COMMUNITY:


Ilford ADOX Freestyle Photographic Stearman Press Weldon Color Lab Blue Moon Camera & Machine
Top Bottom