Film Speed and Development Test (Excel spreadsheet supplied)

A window to art

D
A window to art

  • 0
  • 0
  • 20
Bushland Stairway

Bushland Stairway

  • 4
  • 1
  • 67
Rouse st

A
Rouse st

  • 6
  • 3
  • 107
Do-Over Decor

A
Do-Over Decor

  • 1
  • 1
  • 115

Recent Classifieds

Forum statistics

Threads
199,240
Messages
2,788,395
Members
99,840
Latest member
roshanm
Recent bookmarks
0
Joined
Jan 7, 2005
Messages
2,634
Location
Los Angeles
Format
4x5 Format
Perhaps this Schaefer thing is what I'm missing. I've never quite understood how to accurately find an EI when contacting in the camera. Suppose I'm targeting a fixed density of .1 above B+F, how do you relate a meter reading of a white card target to densities produced through the step wedge?

Michael, it's all pretty straight forward, although Schaefer made a wrong assumption. The process is the same as with a sensitometer which is just an accurate exposure device. Opacity is incident light / transmitted light. Density is the log of Opacity. Metered camera exposure is 8 / ISO. Opacity comes from the step tablet and incident light is based on the metered camera exposure. These are the two variables needed to calculate the transmitted light for a given step tablet density. Transmitted light = Incident Light / Opacity. The film speed equation is 0.80 / Hm. What the exposure needs to be for a certain film speed is 0.80 / ISO.

I decide which step I want to be the speed point, then determine the exposure necessary to achieve it. This becomes my standard exposure for a given speed film.
 

Bill Burk

Subscriber
Joined
Feb 9, 2010
Messages
9,330
Format
4x5 Format
Metered camera exposure is 8 / ISO. Opacity comes from the step tablet and incident light is based on the metered camera exposure. These are the two variables needed to calculate the transmitted light for a given step tablet density. Transmitted light = Incident Light / Opacity. The film speed equation is 0.80 / Hm. What the exposure needs to be for a certain film speed is 0.80 / ISO.

So, basically 1/10th the light arithmetically from the metered camera exposure... Or 1.0 logarithmically speaking, 3 1/3 stops down from the metered point. Was it just chosen to be easy to be remembered?
 
Joined
Jan 7, 2005
Messages
2,634
Location
Los Angeles
Format
4x5 Format
So, basically 1/10th the light arithmetically from the metered camera exposure... Or 1.0 logarithmically speaking, 3 1/3 stops down from the metered point. Was it just chosen to be easy to be remembered?

The ratio between the speed point and metered camera exposure is what links film speed to camera exposure. As Connelly writes, "It is evident that the relationship between the sensitometric measure of exposure Hm and the photographic exposure requirement Hg must be determined." It being exactly Δ1.0 log-H may have involved some rounding or maybe not. It could just as easily be Δ1.3 log-H from the fractional gradient speed point if that speed method was still the standard. Part of the ISO speed constant is a compensation for a change in the color temperature of the test exposure, from simulated sunlight to simulated daylight. Otherwise the ratio would be 8.4x or Δ0.925 log-H.
 

gmfotografie

Member
Joined
Feb 6, 2013
Messages
61
Location
Austria
Format
Medium Format
Hi,

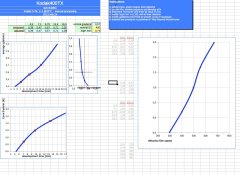
i have now finished my tests.. finally after determining the EI (ISO320) I adjust die logH min until that the development intersect with the Development-Time...
In my Case ISO320 must be N Development.... Is this approach okay ?
 

Attachments

  • 2013-03-31_18-25-04.jpg
    2013-03-31_18-25-04.jpg
    141.6 KB · Views: 159

Chuck_P

Subscriber
Joined
Feb 2, 2004
Messages
2,369
Location
Kentucky
Format
4x5 Format
Looking at the Effective Film Speed graph, it looks like to me that the line reaches 0.0 at EI 500 for "N".
 

gmfotografie

Member
Joined
Feb 6, 2013
Messages
61
Location
Austria
Format
Medium Format
my fault. i dont change the logH min to 0,64 in my case.


But I have to fight another problem.

Verifying my Tests:

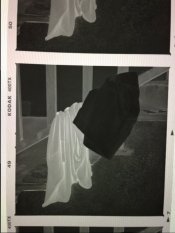
Yesterday I photographed a white sock and a black shirt; daylight.
I measured the black shirt (V 2.8 1/30) and the white sock (V 11,7 1/30 )
Therefore the contrast of this scene is about 5 stops

I put the shirt on zone III (2.8 1/125); the socks should be shift to Zone VIII (according the contrast of 5 stops)

After Developing the negative with my determined development time of 9,75 (N) I got the black shirt with a density of about 0,17 and the white sock about 1,02ß!

????

I´m confused... The shirt should be about 0,37 and the sock about 1,30, or ?

best michael
 
Last edited by a moderator:
Joined
Jan 7, 2005
Messages
2,634
Location
Los Angeles
Format
4x5 Format
my fault. i dont change the logH min to 0,64 in my case.


But I have to fight another problem.

Verifying my Tests:

Yesterday I photographed a white sock and a black shirt; daylight.
I measured the black shirt (V 2.8 1/30) and the white sock (V 11,7 1/30 )
Therefore the contrast of this scene is about 5 stops

I put the shirt on zone III (2.8 1/125); the socks should be shift to Zone VIII (according the contrast of 5 stops)

After Developing the negative with my determined development time of 9,75 (N) I got the black shirt with a density of about 0,17 and the white sock about 1,02ß!

????

I´m confused... The shirt should be about 0,37 and the sock about 1,30, or ?

best michael

It sounds like the processing is fine. A five stop range with one point at 0.17 would place the upper exposure value around 1.03. If the lower point is placed at 0.37, the higher point should fall close to 1.30. This means you are underexposing for what you want.

The WBM test only calculates relative speed, not actual. Simply adjust the EI until you obtain what you want. My calculations show it to be about 1 2/3 stops. Now, I did a test once with black, gray, and white targets. The results with the gray and white targets worked as expected. The results with the black target were lower than expected. One possibility is that different materials can reflect invisible parts of the spectrum, like infrared, differently which can affect the meter reading. Do another test and try it a 1/2 stop increments. Double check the exposure off a gray card. Remember to open up 1/2 stop from the reading.
 

wiedzmin

Subscriber
Joined
Jan 22, 2012
Messages
113
Location
New Jersey
Format
Multi Format
Hi,

i have now finished my tests.. finally after determining the EI (ISO320) I adjust die logH min until that the development intersect with the Development-Time...
In my Case ISO320 must be N Development.... Is this approach okay ?

Hi,

I'm trying to understand better film test based on WBM. If you do not mind I have few questions.
You said that your EI = ISO 320 but in attached file in cell L9 you have 400.

in pdf description to WBM test regarding graph av. gradient vs relative log exposure I found that:

"..In the upper right-hand graph (fig.7c), the average gradient
is plotted against relative log exposure. A black horizontal
line marks the chosen normal average gradient. A red vertical
line marks the corresponding relative log exposure. Its position
is unfortunately not automatic. Estimate the relative
log exposure required for the red and black line to intersect
the curve, and enter that value into cell ‘L10’."..


Like I understand we should modify value in cell L10 until red and black line intersect with each other and the curve. Is that correct?
In attached file they do not intersect with the curve. You wrote later that you corrected log min to 0.64 - I'm assuming to make them intersect?, did you modify your EI as well or yours is 400?

thank you
Tomasz
 

wiedzmin

Subscriber
Joined
Jan 22, 2012
Messages
113
Location
New Jersey
Format
Multi Format
ok I understand.
You need to retest effective iso speed because your N development time was not correct?
 

gmfotografie

Member
Joined
Feb 6, 2013
Messages
61
Location
Austria
Format
Medium Format
so i did the retest on a white and a black shirt.
i setup the iso speed for the 400tx, put the shirt on zone 3 and take photos changing the aperture half steps ( 80mm cfe).

a full stop lower than the recommended film speed i get the black shirt with 0,37 and the white with about 1,27 :smile:


thank you all for your help
 
Joined
Jan 7, 2005
Messages
2,634
Location
Los Angeles
Format
4x5 Format
Michael, would you mind posting the image from the shirt test?

Also, could you explain why you had specific densities in mind for your Zone III and Zone VIII?
The shirt should be about 0,37 and the sock about 1,30, or ?"
 
Last edited by a moderator:

gmfotografie

Member
Joined
Feb 6, 2013
Messages
61
Location
Austria
Format
Medium Format
I assumed that zone 3 is in the range of about 0,37 (the value 0,37 is also an average value of the black shirt).
For me its clear, all those tests with the step wedges dont come up with the reality. So i will check in reality.

My next steps are just photographing and see how I feel watching my negatives.
But as a start those labor-tests are great.

best michael
 

Attachments

  • image.jpg
    image.jpg
    41.2 KB · Views: 150
Last edited by a moderator:

Chuck_P

Subscriber
Joined
Feb 2, 2004
Messages
2,369
Location
Kentucky
Format
4x5 Format
I assumed that zone 3 is in the range of about 0,37 (the value 0,37 is also an average value of the black shirt).
For me its clear, all those tests with the step wedges dont come up with the reality.

There are just 2 specific points on the curve that can be very closely controlled by you------the speed point, or the point that will define the effective speed that is found (in the ZS, it is a short range of 0.9D to .11D at Zone I)------and, the upper density limit that defines your "normal" development target (for me, it's in the range of 1.25D to 1.35D at Zone VIII). IMO, it is somewhat, for lack of a better way of putting it, pointless to be concerned about a specific density between those points----those points that determine the shape of the curve between the two target points, are very much dependent on the film and development combination, just my opinion.
 

markbarendt

Member
Joined
May 18, 2008
Messages
9,422
Location
Beaverton, OR
Format
Multi Format
There are just 2 specific points on the curve that can be very closely controlled by you------the speed point, or the point that will define the effective speed that is found (in the ZS, it is a short range of 0.9D to .11D at Zone I)------and, the upper density limit that defines your "normal" development target (for me, it's in the range of 1.25D to 1.35D at Zone VIII). IMO, it is somewhat, for lack of a better way of putting it, pointless to be concerned about a specific density between those points----those points that determine the shape of the curve between the two target points, are very much dependent on the film and development combination, just my opinion.

I actually think there is a more important point for many of us, and I believe it can be reliably controlled, the midtone point.

As a matter of course it s really nice when the midtone point we choose in the scene carries through to the mid tone point we want in a print with our enlarger set "normally". This allows easy printing pegged to what is for many of us our most important subject matter.

For many of us as long as our shadows and highlights fall "appropriate to support our subject" and in the film's easily printable range, we're happy.

What I'm saying is that I can shoot and develop to control the density of whatever single point I choose, whatever point works in my system.
 
Joined
Jan 7, 2005
Messages
2,634
Location
Los Angeles
Format
4x5 Format
I actually think there is a more important point for many of us, and I believe it can be reliably controlled, the midtone point.

As a matter of course it s really nice when the midtone point we choose in the scene carries through to the mid tone point we want in a print with our enlarger set "normally". This allows easy printing pegged to what is for many of us our most important subject matter.

For many of us as long as our shadows and highlights fall "appropriate to support our subject" and in the film's easily printable range, we're happy.

What I'm saying is that I can shoot and develop to control the density of whatever single point I choose, whatever point works in my system.

I don't think there should be any arbitrarily derived density to key the printing on. Since there is no direct correlation between a specific negative density and a print reflection density why apply restrictive conditions to the process when they are not required. From The Theory of the Photographic Process, "Because of variation in subject matter and in the geometry of scene lightling, the optimum printing times for negatives are not predicted with complete success by any known printing time formula or any known automatic method of measuring the negatives."
 
Joined
Jan 7, 2005
Messages
2,634
Location
Los Angeles
Format
4x5 Format
Couldn't agree more. Another reason why I don't like minimum time to maximum black (in addition to the inherent problems with that test), and other print time "formulas".

Totally agree with you on that one especially when you consider how the fractional gradient / Delta-X Criterion works.
 

markbarendt

Member
Joined
May 18, 2008
Messages
9,422
Location
Beaverton, OR
Format
Multi Format
Since there is no direct correlation between a specific negative density and a print reflection density why apply restrictive conditions to the process when they are not required.

Because it makes darkroom work easier and faster.

If you were shooting a movie or studio portraits or 2000 shots documenting a family trip would you not want your exposures to be as consistent as possible to minimize your work in the darkroom?

Zoning only differs from my thought in the point it picks to peg.

This really isn't my idea either, it's root s in Dunn & Wakefield's exposure manual.
 
Joined
Jan 7, 2005
Messages
2,634
Location
Los Angeles
Format
4x5 Format
Because it makes darkroom work easier and faster.

If you were shooting a movie or studio portraits or 2000 shots documenting a family trip would you not want your exposures to be as consistent as possible to minimize your work in the darkroom?

Zoning only differs from my thought in the point it picks to peg.

This really isn't my idea either, it's root s in Dunn & Wakefield's exposure manual.

Mark, this more a question of not taking things to the extreme. Where in Dunn?
 

wiedzmin

Subscriber
Joined
Jan 22, 2012
Messages
113
Location
New Jersey
Format
Multi Format
I'm sorry for being off the current topic but I have a questions regarding film test based on WBM in general. I tried to read all threads about the subject but still a few aspect of the method are not clear for me.
I'm referring to the method described in the WBM 2nd edition pages 214 - 224 and pdf document + xls spreadsheet ( Dead Link Removed Film test procedure)

1. Exposure
I'm using 31 steps stouffer transmission projection step wedge, size like 120 film

Photographing step wedge using window, light table or slide copier (I'm aware about flare issue etc)

What would be the best way to measure correct exposure? Cameras I'm using do not have built in light meter. Take a reading from diffused "light source" (window, light table, slide copier) without step wedge and use it as exposure? Should it be adjusted or use exact light meter reading? or maybe take a reading with step wedge in place - which part of the step wedge should be used to read exposure (120 size step wedge is quite small)?


2. Densitometer (how to read densities for development time tests and effective film speed test)

In pdf document I found on page 4:

"My densitometer has a calibration
button to ‘zero’ out the measurements,
because it does not have an internal light
source of known intensity for transmission
density readings. In other words, it
can be used with different light sources
and allows for relative and absolute density
measurements. If your equipment has a similar feature,
then take the first reading with nothing in the light path,
push the ‘zero’ button, and then, continue to take all the
measurements.
This will enable you to measure the ‘base+fog’
density of the test negatives. If you ‘zero’ the measurements
to a blank piece of the film before taking any readings,
then all base+fog densities are equalized, and you would
be unaware of any fog increase due to development time.

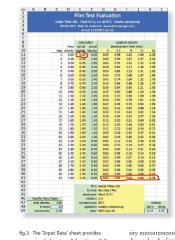
but on the same page there is a Fig. 3 (please see attached) where densities for test negatives starts from 0.02, 0.03 therefore (in my opinion) could not be measured with densitometer zero out with nothing in the light path.

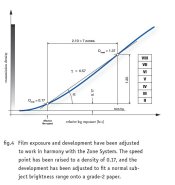
Also on the page 4. (pdf) there is a Fig. 4 (attached) which shows D min = 0.17 - is it 0.17 above base + Fog? Should densitometer be zero out on base + Fog or with nothing in the light path to correctly read film speed test?

Should I zero out densitometer with nothing in the light path or on film base (in case of step wedge on step 1 ?) ?

thank you
Tomasz
 

Attachments

  • Fig3.jpg
    Fig3.jpg
    118.4 KB · Views: 145
  • Fig4.jpg
    Fig4.jpg
    39.6 KB · Views: 148
Joined
Jan 7, 2005
Messages
2,634
Location
Los Angeles
Format
4x5 Format
so i did the retest on a white and a black shirt.
i setup the iso speed for the 400tx, put the shirt on zone 3 and take photos changing the aperture half steps ( 80mm cfe).

a full stop lower than the recommended film speed i get the black shirt with 0,37 and the white wit Zone System Placement copy.jpg h about 1,27 :smile:

Michael, now that you've achieved your goal. I'm going to show you why it's wrong. Not that you can't make quality prints with what you have, or that I'm suggesting changing anything you're doing. It's just that what you think is happening, isn't. What your test shows is not about film speed, but about testing procedures.

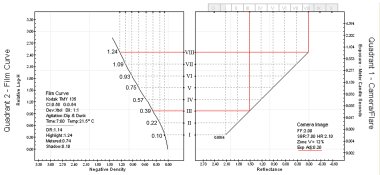
The first two quadrant curve represents pretty much what you are observing. The film is processed to a CI 0.58. Zone I is placed at 0.10 over Fb+f. Zone III has a density of 0.39 and Zone VIII has a density of 1.24.

Zone System Placement copy.jpg

But you might have noticed that in order for Zone I to fall at 0.10, the exposure had to be increased by 2/3 stop. This is why Zone System EIs usually are tested at 1/2 the ISO. What would happen if the exposure wasn't adjusted?

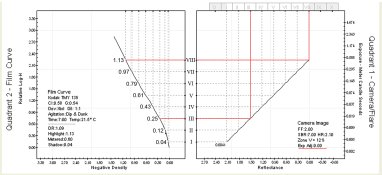
Zone Placement 2 copy.jpg

This looks a little like your first field test. Take off another 1/3 stop of exposure and the results are almost identical. In effect, these two examples graphically illustrate your two tests. So, why doesn't the shadow exposure fall at the speed point when testing at the ISO speed?

In order for film speed to related to the metered exposure, the relationship between the speed point and where the metered exposure falls needs to be known. As most are aware, black and white film speed is measured in the shadows while the exposure meter measures the mid-tone. Because meters measure the mid-tone, certain assumptions about the shadows have to be made. The Zone System has Zone I falling 4 stops below the metered exposure. Tone reproduction standard model has it falling 4 1/3 stops below. The speed point of 0.10 over Fb+f; however, only falls 3 1/3 stops below the metered exposure point. Basically, the two methodologies use two different ranges when measuring the difference between the metered exposure and the speed point. Why is there a difference between the two when the shadows have practically the same relationship with the metered exposure?

Something else to consider, there isn't a direct correlation between a specific negative density and print reflection density. There isn't a target density for a Zone and not just because a zone is a range.
 
Last edited by a moderator:

markbarendt

Member
Joined
May 18, 2008
Messages
9,422
Location
Beaverton, OR
Format
Multi Format
Mark, this more a question of not taking things to the extreme. Where in Dunn?

I'll get to Dunn here in a second.

What I'm getting at is that; for a given film, given a certain amount of exposure, and processed in a given process, we get a given result.

The only real controls we have over the curve are " which film" and "how to process it". Once we decide on these the shape of the curve becomes a given.

It seems to me CPorter is describing not just the print range he expects to put on paper, but also, given the tight limits he suggests, where it will land on the paper. In fact the specific negative density range he picked, roughly .1 to 1.3, is only truly relevant if the target paper and enlarger exposure are givens. I'd even hazard a guess that CPorter may have normal/starting enlarger settings where he can straight proof his negatives on his normal paper. He may even consider negatives that don't fall normally onto the paper to be over or under-exposed.

Tight exposure and processing control of our films makes darkroom work easier by placing our subject matter where it will carry through nicely to the paper under "our normal conditions" with little or no adjustment.

This is where I come to Dunn's thoughts.

It appears to me that CPorter, like many others, uses the the general precepts described in section B "still monochrome photography" of chapter 1 in the 3rd edition; the darkest part of the subject matter defines the exposure settings and the difference between the darkest and lightest defines the processing.

My sensibilities and preferences are more as Dunn describes in section C "motion picture and colour work".

While the exact placement of subject matter from zone I and VIII in the scene appears very important to CPorter for his prints, that style of subject placement is normally a secondary consideration to me. The subject matter I want to land perfectly on my paper are mid to upper-tone subjects like faces. Chasing face exposure settings in the enlarger from frame to frame in my printing is truly frustrating for me. I do also expect a certain contrast rate for my shots but most times I don't care at which point specific subject matter ends up in zone III or zone II.

For any important shot I peg my mid-tones to the curve as carefully as CPorter does to his chosen peg.

I don't believe that CPorter and I disagree about the shape or sensitivity of a given film curve, we simply have differing expectations of what we expect to peg in our prints.
 
Joined
Jan 7, 2005
Messages
2,634
Location
Los Angeles
Format
4x5 Format
For a second there, I thought you were going to tell me to expose for the shadows and develop for the highlights. I don't have time to go into this now, but I never said that there shouldn't be consistency in exposure. Your argument is a straw man.

Two quick comments about the WBM examples. In the Film Test Evaluation chart, the actual log-H should be relative log-H. And maybe I'm missing something, but the other example has the log-H range as 1.21 (7stops /Zones) but indicates this covers Zone II to Zone VIII or 6 stops in the Δ1.20 density range, which is actually on the high end for a Δ2.20 log-H luminance range.
 

Chuck_P

Subscriber
Joined
Feb 2, 2004
Messages
2,369
Location
Kentucky
Format
4x5 Format
..........the darkest part of the subject matter defines the exposure settings and the difference between the darkest and lightest defines the processing.

Well, it's the basic expose for the shadows, develop for the highlights scenario............It's primarily the "placed" luminance value in the scene that determines the camera settings (not always the darkest part)..........and, of course, it's where the most desired textured or slightly textured high value "falls" on the gray scale that dictates processing. By controlling the shadows with exposure and highlights with development, the mid-tones are sure to fall as predicted on the gray scale relative to the "placed" luminance value and be quite manageable and easily manipulated in printing. That's why I don't bother with concerning myself with specific density values between the "effective" speed point at Zone I and the calibration value that defines my "normal" development time, which is a target density of 1.3D at Zone VIII.
 
Photrio.com contains affiliate links to products. We may receive a commission for purchases made through these links.
To read our full affiliate disclosure statement please click Here.

PHOTRIO PARTNERS EQUALLY FUNDING OUR COMMUNITY:


Ilford ADOX Freestyle Photographic Stearman Press Weldon Color Lab Blue Moon Camera & Machine
Top Bottom