• Welcome to Photrio!
    Registration is fast and free. Join today to unlock search, see fewer ads, and access all forum features.
    Click here to sign up

Colour Negative / Slide and the Zone System

Wilhelmine

H
Wilhelmine

  • 0
  • 0
  • 7
JcI_colina.jpg

H
JcI_colina.jpg

  • 0
  • 0
  • 50

Recent Classifieds

Forum statistics

Threads
203,074
Messages
2,849,440
Members
101,637
Latest member
Yashica FX-3 fix
Recent bookmarks
0
Alan, I have boxes of these and have none of the appropriate series scanned. It would take me hours to do this. Sorry.

PE
 
Guys, I was saying that a good scanner will adjust properly to over and under exposures just as we would with printing. And, you can do more with software as well as with dodging and burning. Bottom line? You get good results with color negative film over a wide exposure range and you have little to no color shift.

PE

OK I understand now.

And I always understood about the wide range of possible exposures that lead to acceptable color prints.
 
Another thing about exposure "from the hip". How do you get consistent results?
Well shooting from the hip does create negatives that create wild (ugly) contact sheets. The film's latitude though allows room for accurate tone placement through varied print exposure.

Instead of worrying hard about exposure at the camera, you worry about print exposure.
 
Yor approach sounds a little bit like that of my orthopedic surgeon; he screwed a plate in my arm to repair a fracture after I fell off a ladder. His advice: don't fall off a ladder.
 
I can think of a Vuescan workflow that involves a series of steps and neutralizing the film mask, as well as matching the density of a particular patch on the chart that might take the scanner introduced variables out of the equation, but discussing that here on APUG wouldn't be appropriate.
 
Yor approach sounds a little bit like that of my orthopedic surgeon; he screwed a plate in my arm to repair a fracture after I fell off a ladder. His advice: don't fall off a ladder.

Same thing happened to me, in a wilderness first aid class the instructor was explaining the scenario where you cut your fingers while slicing salami... the advice... get pre-sliced salami. It struck a funny bone with me because I had always "enjoyed" cutting chunks of salami when out backpacking... it was part of the wilderness experience for me. But I had cut my finger on the last trip. So now I get pre-sliced.
 
Reminds me of a Don Martin cartoon on slicing salami! :D

Your finger is on the scale. No it isnt. Yes it is. Hahahah.

PE
 
Another thing about exposure "from the hip". How do you get consistent results?

How about the worse option: Autoexposure in the camera where every exposure is "correct" yet the continual changes in exposure harm "continuity" and risk mistakes in shutter speed (aperture priority like the Pentax ES and OM-4 that I use). I am quite enjoying manual cameras these days and I tend to shoot in sets with all the same shutter speed and f/stop.

This weekend, after taking the test series, I metered a difficult scene. The band was playing their competition on a field half-covered by the shade of the bleachers in the setting sun. I explored the scene with spotmeter during the performance of the band before us... I could see that half my shots would be in that shade, and half would be in direct sun. I metered for the darkest shadow in the shade and placed it on Zone II. The whitest whites in sun would still fall within the latitude for overexposure... So instead of changing the f/stop back and forth, I set the camera once and paid attention to the kids.
 
Yor approach sounds a little bit like that of my orthopedic surgeon; he screwed a plate in my arm to repair a fracture after I fell off a ladder. His advice: don't fall off a ladder.
Actually it's just a choice about how to do the work and the tools.

Like using a Holga for effect.

Like using an RB at f/4 and 1/400th all day with Portra 800 for effect.
 
How about the worse option: Autoexposure in the camera where every exposure is "correct" yet the continual changes in exposure harm "continuity" and risk mistakes in shutter speed (aperture priority like the Pentax ES and OM-4 that I use). I am quite enjoying manual cameras these days and I tend to shoot in sets with all the same shutter speed and f/stop.

This weekend, after taking the test series, I metered a difficult scene. The band was playing their competition on a field half-covered by the shade of the bleachers in the setting sun. I explored the scene with spotmeter during the performance of the band before us... I could see that half my shots would be in that shade, and half would be in direct sun. I metered for the darkest shadow in the shade and placed it on Zone II. The whitest whites in sun would still fall within the latitude for overexposure... So instead of changing the f/stop back and forth, I set the camera once and paid attention to the kids.

Same here. I'd rather just set an exposure that I know will be OK for the shadows and enjoy being there instead of futzing around with the camera.

Alan, If you have trouble getting good colors from Ektar, then you're going to have trouble getting good colors from pretty much any CN film. In that respect, Ektar isn't that much different from any other CN film. As for exposing from the hip, in practice it's not that big of a deal. Yes, you have to look at each image and adjust it, but in a wet dark room, when you're making a wet print, unless you've spent a lot of time carefully exposing every frame out in the field, you're going to be adjusting to get a good print there too. Same thing, different tools. It's not that big of a deal.

As for showing bracketed shots with skin tones and color charts. Sorry. I don't have any simply because it's not really that necessary. Once you've got how the film behaves figured out, you stop worrying about it and go take pictures. For example, attached is some throw away shots I took of my kids out in the backyard over summer vacation on the same Fujica GW690 camera (which is 100% mechanical, and full manual) and Ektar 100. I didn't go running around with a light meter and sweating how the colors would look based on how I would expose or any of that malarky. It was middle of the afternoon, so I set it to f/8 and 1/250 and simply enjoyed spending time out in the backyard with my kids taking pictures. There really isn't anything wrong with any of the colors in any of those shots. There's no weird skin tones, and the colors look great. Anybody who had those negatives and where making wet prints of them wouldn't have a single issue getting a great print with great color. It's just not that big of a deal to get the exposure *exactly* right.
IMG_LR_20161031-0723-4050-8160-161031073884.jpg
IMG_LR_20161031-0723-4070-8160-161031073885.jpg
IMG_LR_20161031-0723-4090-8160-161031073886.jpg
IMG_LR_20161031-0723-4110-8160-161031073887.jpg
IMG_LR_20161031-0723-4120-8160-161031073888.jpg
 
Guys, I was saying that a good scanner will adjust properly to over and under exposures just as we would with printing. And, you can do more with software as well as with dodging and burning. Bottom line? You get good results with color negative film over a wide exposure range and you have little to no color shift.

PE

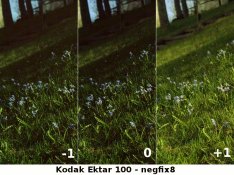
There are, however, several stops of GOOD latitude in color neg, on each side of normal. And, I have done it with people in it with a color chart included in the scene. So, I'm not giving you smoke and mirrors here. This IS a real test. And the prints were "locked balance and exposure time" with only f stop as the variable.

PE

Which is why rating color neg at a lower EI than box speed works well for many kinds of film? Then the image is placed towards the upper part of the curve away from the toe, where thins get murky. Then hybrid processing just adjusts at the scanning/printing stage.
The advice from these online labs is "expose heavily" as dense negatives are desired. Then the 400H exposed at EI100 bright airy contax 645 is taken care of with density adjustment.

That's related to the other long topic about brutally overexposing B&W and Zone system is dead talk.

I've seen "push ektar 2-3 stops" just 'cause, and as you said pushing can have funny effects with color neg. Admittedly, these results look rather good; but then it is not printed optically. Ektar is a curious film, I've gotten very neutral and natural results up to madly crazy at the recommended box speed, pushing it and expose it weirdly I do not dare.
I know that my flatbed flukes at dense negatives and slides, but properly box speed exposed negs sing; otherwise it's blown highlights or shadows and some color casts.
 
It might be that the inter image effects are causing some problems here. It would require an extensive test to determine that though. I doubt if such was engineered into the film though.

What it would mean is that some colors are overcorrected and too bright.

PE
 
The general curves don't tell it all. You need to look at the dye curves. If you're underexposed to begin with, and have an uncorrected significant color temp issue as well, the particular affected dye layer is going to be geometrically way out of sych with the other two, shoving it disproportionately low. I've heard this explained in detail by Hollywood cameramen who deal in films far less fussy than Ektar. But if you're still skeptical, do what I did.
Shoot a bunch of 8x10 Ektar and try printing it. You'll either cry "Uncle" or be took broke to proceed. I was forced to learn the ropes and now get remarkable results with this film. Not perfect, but good enough to fool people into thinking they were done on chrome film. Clean colors, even neutrals, in hue categories that are almost impossible to achieve with traditional color neg film. And, of course, exposure range than chromes. But this is not a good choice of film if you shoot from the hip exposure-wise. Porta 400 is more forgiving in that respect if you still need some "snap".
 
I remind APUG users of the member who posted this shortly after Ektar came out.

PE
 

Attachments

  • Ektar 100 test.jpg
    Ektar 100 test.jpg
    154.2 KB · Views: 118
It might be that the inter image effects are causing some problems here. It would require an extensive test to determine that though. I doubt if such was engineered into the film though.

What it would mean is that some colors are overcorrected and too bright.

PE

If you're referring to the images of my kids I posted, those where with a new process I'm still shaking down. Looking at them critically, I see several things that I still need to address. It's not totally 100% right just yet, but not so far out of whack that I'm going to abandon it and try something else.
 
Modest overexposure in order to get excessive blue (or actually, inaccurate homogenizing of blues) out of the shadows under a blue sky via overexposure is a convenient trick, but nowhere near as hue accurate as using the correct warming filter relative to the color temperature to begin with. Working with mixed lighting - some in deep shade and some in open sun - it a trickier problem. I mention blue simply because it's the most
common complaint with Ektar outdoors. People complained when Manet and Monet painted shadows blue too; but in their case, related hues weren't
squeezed together, undifferentiated. One of the most graphic cases of this color temp shift in Ektar blue reproduction due to underexposure occurred
when I took a wide-angle, wide-aperture sky shot in Hawaii (very clear air) without a center filter, and the relatively consistent blue sky (in nature)
drifts all the way from cyan to purple in the neg, from center to corners, due to the falloff in exposure. In other words, it didn't just darken toward
the corners but exhibited a strong hue shift. I could cite many other examples, though in this one instance, I kinda liked the effect.
 
My point is that expecting a negative to straight print properly without that first gimme adjustment is like expecting every lotto ticket to win.
You can improve your odds of winning the lottery by properly exposing the negative in the first instance. Printing a minimum exposure for maximum black contact sheet will tell you which negatives will be easy to print and which will be more difficult. It will also tell you how accurate you metering, or your eye if you are not using a meter, actually is, and perhaps more importantly, how consistent your exposure is.
 
Photrio.com contains affiliate links to products. We may receive a commission for purchases made through these links.
To read our full affiliate disclosure statement please click Here.

PHOTRIO PARTNERS EQUALLY FUNDING OUR COMMUNITY:


Ilford ADOX Freestyle Photographic Stearman Press Weldon Color Lab Blue Moon Camera & Machine
Top Bottom