Building a huge shutter for large format lenses

CK341

A
CK341

  • 0
  • 0
  • 43
Plum, Sun, Shade.jpeg

A
Plum, Sun, Shade.jpeg

  • sly
  • May 8, 2025
  • 2
  • 0
  • 66
Windfall 1.jpeg

A
Windfall 1.jpeg

  • sly
  • May 8, 2025
  • 5
  • 0
  • 56
Windfall 2.jpeg

A
Windfall 2.jpeg

  • sly
  • May 8, 2025
  • 1
  • 0
  • 54
Marsh, Oak Leaves.jpeg

A
Marsh, Oak Leaves.jpeg

  • sly
  • May 8, 2025
  • 1
  • 0
  • 53

Recent Classifieds

Forum statistics

Threads
197,612
Messages
2,761,963
Members
99,418
Latest member
IntellectualBoy
Recent bookmarks
0
OP
OP
Joined
Feb 26, 2024
Messages
54
Location
Finland
Format
Multi Format
Okay, I did this kind of side project/ testing solenoid for shutter controll. Wollensak verito lens shutter is controlled electronically with a cable. Lens and shutter is unmodified of course. So nothing old is ruined.

Minolta slr camera's flash sync is used as a clockwork for solenoid, and its connected to diy circuit board.
Circuit takes 13v from battery and puts it trough a 12k ohm resistor, to minolta camera, and it comes back to drive a mosfet, and the mosfet then takes battery voltage also, and drives the car's relay (orange part).
There's also safety diode between relays coil, and a resistor from mosfets gate to ground to keep it stable.

The solenoid is taking a juicy 25 amps from the litium ion motorbike battery, voltage being 9.9v at the solenoid. So its 250w power. I dont want to use any stronger wires or the power will go up even more.

Solenoid simply pushes the wire release and return springs pulls it back when solenoid is not energized anymore. Shutter, solenoid and cable release has their own return springs as well.

I am pretty happy with performance of this thing. It works, and i got linear exposure in test photos taken every stop with times 1/2 to 1/30s on minolta slr.

I tried 1/60s but the pulse was so short that the relay didnt have enough strenght to open shutter fully. So 1/30s is shortest. BUT the actual time may be shorter since the wollensak shutter doesnt open imediadly when minolta slr sync time starts.

Solenoid does kick a bit for sure, but the remote mounting and cable drive takes it away quite nicely.

Maybe something like this could be used to drive the big shutter as well. Delete or help shutter shake problem with bicycle brake cable actuation method :D
 

Attachments

  • IMG_20241006_214947.jpg
    IMG_20241006_214947.jpg
    376.8 KB · Views: 63
  • IMG_20241006_214058.jpg
    IMG_20241006_214058.jpg
    649.3 KB · Views: 66
  • IMG_20241006_231521.jpg
    IMG_20241006_231521.jpg
    514 KB · Views: 62
OP
OP
Joined
Feb 26, 2024
Messages
54
Location
Finland
Format
Multi Format
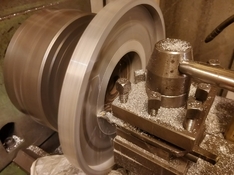
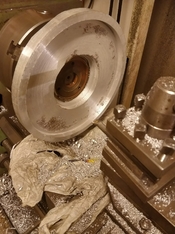
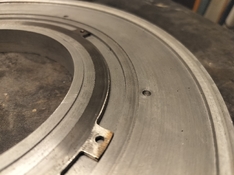
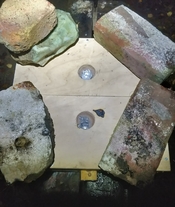
Project is still going, I managed to cast the shutter main body piece.

This is very crude casting, but it saved me a ton of work not having to finish and polish the model piece at all. I left plenty material to be machined away, that should correct rough surfaces.

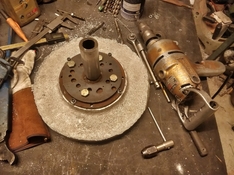
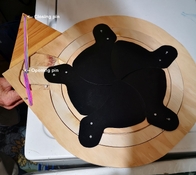
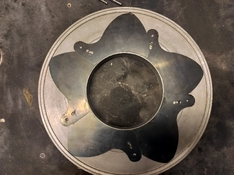
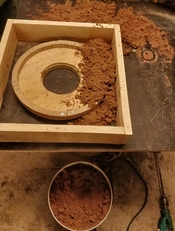
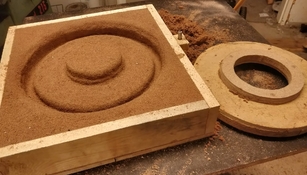
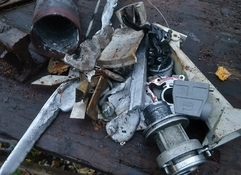
There's some images on steps of the casting process, they are kinda self explanatory. The third picture is showing the scrap aluminium material that become the shutter.

Now the casting has been on heat treatment in oven, to make it better to machine. And when machined, then this project is starting to take a shape. At least if I measured things correctly.

This casting sand is also "homemade", composed of sand blasting sand, bentonite clay dust from kitty litter, and water. Its reusable and very cheap.
 

Attachments

  • IMG_20241027_212131.jpg
    IMG_20241027_212131.jpg
    530.8 KB · Views: 40
  • IMG_20241027_171806.jpg
    IMG_20241027_171806.jpg
    456.8 KB · Views: 46
  • IMG_20241027_170508.jpg
    IMG_20241027_170508.jpg
    390.9 KB · Views: 41
  • IMG_20241027_165917.jpg
    IMG_20241027_165917.jpg
    536.6 KB · Views: 38
  • IMG_20241027_160353.jpg
    IMG_20241027_160353.jpg
    451.5 KB · Views: 40
  • IMG_20241027_020120.jpg
    IMG_20241027_020120.jpg
    494.3 KB · Views: 35
  • IMG_20241027_013201.jpg
    IMG_20241027_013201.jpg
    443.5 KB · Views: 35

Donald Qualls

Subscriber
Joined
Jan 19, 2005
Messages
12,104
Location
North Carolina
Format
Multi Format
OP
OP
Joined
Feb 26, 2024
Messages
54
Location
Finland
Format
Multi Format
Attaching the casting to lathe with small threads and screws and starting the machining. Under the rough cast surface there is nice aluminium with no air pockets or porosity.
Also the casting were not too small anywhere, so that worked out nicely.

On the last photo the shutter opening and shutter body inner dimension is on size already. I am holding one of the shutter leaves there to show how it fits nicely. The opening is 141mm actually, i wanted that its 140 for sure :D

Next up is machining a pocket for the ring part, and to cover that, make some kind of steel sheet cover, that has just slots where pins for leafs poke trough. Similarly than in shanel 5 shutter.

The shutter looks pretty large on outer diameter, but it can't be any smaller since the leafs has to have enough space to open fully. Outer wall can be taken down couple of mills thinner of course.
 

Attachments

  • IMG_20241102_183841(1).jpg
    IMG_20241102_183841(1).jpg
    410.2 KB · Views: 60
  • IMG_20241102_180743.jpg
    IMG_20241102_180743.jpg
    464.4 KB · Views: 48
  • IMG_20241031_201216.jpg
    IMG_20241031_201216.jpg
    627.1 KB · Views: 55
  • IMG_20241031_195142.jpg
    IMG_20241031_195142.jpg
    830.7 KB · Views: 64

Donald Qualls

Subscriber
Joined
Jan 19, 2005
Messages
12,104
Location
North Carolina
Format
Multi Format
Wow, that is one old drill motor you have there (in the first picture). Good to see someone who takes care of their tools.
 
OP
OP
Joined
Feb 26, 2024
Messages
54
Location
Finland
Format
Multi Format
Wow, that is one old drill motor you have there (in the first picture). Good to see someone who takes care of their tools.
Yes :D I was wondering if anyone notices the drill. Its black & decker 1/2" general duty. Its fun to revive and use some old tools and especially when they can be had cheaply/ saved from scrap.
 

NiallerM

Member
Joined
Sep 18, 2024
Messages
62
Location
France
Format
4x5 Format
How have things panned out? One thing that I don't think was mentioned in all of this is not to be overly anal with regard to measured speed. I know from research that even Copal shutters supplied byy Sinar with their Sinaron lenses had a factory tolerance of 30% in terms of the precision of the timing stated. It sounds crazy, but really represents only up to a third of a stop eitherway - fine on film with latitude.

It's funny to think of how precisely engineered all of their gear is, but that there is such latitude in what feels like a critical element.
 
OP
OP
Joined
Feb 26, 2024
Messages
54
Location
Finland
Format
Multi Format
Hey, thanks for asking! Some progress has been made with the shutter. I have been thinking that it would be cool to make some kind of video updates too, or even build series of some kind.
Especially when shutter is in testing, everyone would be able to see and hear how it moves and operates etc.

Okay, thats pretty large tolarance indeed. I wonder if there's certain temperature ranger where this tolerance is met.
At the moment I really don't have any way to measure shutter time. Ofc its possible to compare its exposure against known lens/shutter. Or maybe 240fps video could be used to analyse the speed?

One thing about short shutter time, is that the exposure starts when shutter opens even slightest bit, then it is effectively an aperture that gets larger and larger. And same thing when its closing.
I have no idea how long those times will be, and how much they add to the exposure. At least small opening at start/end lets very little light trought, so that helps.
 

Dan Fromm

Member
Joined
Mar 23, 2005
Messages
6,789
Format
Multi Format


koraks

Moderator
Moderator
Joined
Nov 29, 2018
Messages
20,969
Location
Europe
Format
Multi Format
His price list indicates it's 'discontinued'. Not to worry - an actually better implementation can be built based on clear instructions for a fraction of the cost:
 

Dan Fromm

Member
Joined
Mar 23, 2005
Messages
6,789
Format
Multi Format
His price list indicates it's 'discontinued'. Not to worry - an actually better implementation can be built based on clear instructions for a fraction of the cost:
You missed my point, which is that the OP should educate himself about leaf shutter efficiency and testing shutter speeds. There's a large literature on both.
 

NiallerM

Member
Joined
Sep 18, 2024
Messages
62
Location
France
Format
4x5 Format


They look interesting. I'll likely go through them. That said, I'm not hugely concerned with the precision of my shutter on the SINAR. I can manage a third of a stop (or at least the film can) without issue. It just intrigued me to find in the whole process some areas where there is wiggle room. Well, except with reversal film, I guess.

Its an area of wiggle room which might give the OPer some relief when it comes to timing the exposure.
 

Dan Fromm

Member
Joined
Mar 23, 2005
Messages
6,789
Format
Multi Format
A point often comes across best if it's explicitly stated. An old fashioned and somewhat uncreative approach, I know, but it does work fairly well most of the time.

Hmm. Moderators here don't like statements that say, even indirectly, that a poster is ignorant. Directing a poster to sources of information it needs is safer.
 

koraks

Moderator
Moderator
Joined
Nov 29, 2018
Messages
20,969
Location
Europe
Format
Multi Format
@Dan Fromm There's a big expanse of possibilities of getting the message across that doesn't involve implying ignorance. How about "hey, there's some wiggle room when it comes to shutters. Here's a link about building a shutter tester, but the underlying theory is relevant to your project; maybe it's useful." The moderators here would certainly not intervene on something like that.
 
OP
OP
Joined
Feb 26, 2024
Messages
54
Location
Finland
Format
Multi Format

Thanks! That is the answers, on what i was wondering about and more. Have to take this in consideration when trying to figure shutter speed out.
That will take some doing tho, to get that far with project :D .

I have never thought shutter times as kind of an estimates/average of the exposure time, and kinda varying with aperture and shutter time selected, too. If I even understood that correctly, that stuff got kinda complicated quick.
 
OP
OP
Joined
Feb 26, 2024
Messages
54
Location
Finland
Format
Multi Format
They look interesting. I'll likely go through them. That said, I'm not hugely concerned with the precision of my shutter on the SINAR. I can manage a third of a stop (or at least the film can) without issue. It just intrigued me to find in the whole process some areas where there is wiggle room. Well, except with reversal film, I guess.

Its an area of wiggle room which might give the OPer some relief when it comes to timing the exposure.
Yes, that is true, there is a lot of variables that can make difference of third of a stop. I think my shutter has pretty good chances to be consistent enough, since its pretty simple and electronic timing device is used.
But I will not probably make it fully electronic. It would be nice to have some mechanical shutter speed and bulb mode.
 
OP
OP
Joined
Feb 26, 2024
Messages
54
Location
Finland
Format
Multi Format
His price list indicates it's 'discontinued'. Not to worry - an actually better implementation can be built based on clear instructions for a fraction of the cost:
Thanks! That's interesting thread and would be useful tool for other shutters too. I have kinda full hands on projects tho, so ill have to start with more basic ways of testing.
 

Jimskelton

Member
Joined
Jan 16, 2023
Messages
46
Location
Alberta, Canada
Format
Large Format
This is quite the project! I don't have a metal shop, but have access to a wood one, so was curious as to what was possible. Someone asked me about making an 8" leaf shutter, which is a little big for a 3D printer, so tried making a prototype out of wood with vinyl blades. The shutter itself is very doable, but the actuating mechanism is of course the big challenge. Manual operation, unless it was by cable, would introduce a lot of vibration. A solenoid is the option discussed here but it needs to be quite powerful and would require lots of power and trickier to control electronically, and as in previous posts, would work best if mounted remotely to reduce vibration making it more complicated. A servo could work, and would be inexpensive and wouldn't be difficult to control with an arduino, and would likely be able to do shutter speeds 1/4 second or slower.

So here's another idea. 2 springs connected to the shutter ring, one strong enough to overcome the other while the shutter is open. The stronger spring is held taut with a pin. The shutter is closed and another pin is used at the shutter ring to hold the shutter closed. Pull that pin to open the shutter, then pull the first pin to close it. Conceptually it works with rubber bands, and I think 2 solenoids could be used in place of the pins. Here's a video of how it would work: 8 inch shutter operation test . The shutter gets "cocked" by installing the hold back pin and opening spring with its closing pin. I did another video with a shutter tester manually pulling the pins: Slow motion leaf shutter test and it's interesting to note how slow my reflexes are. Ideally, the fastest shutter speed would bounce back from open, instead of bouncing open, then closing. It looks like it could achieve a nominal shutter speed of 1/10 or a little bit faster.

A variation on this which would require less spring force on the opening spring could be a method to dynamically engage the closing spring on the actuator, then to pull the closing spring to the open position and hold it that way with a closing pin. Insert the opening pin at the actuator and stretch the opening spring to a pin that somehow releases the spring once it's open (an important unresolved detail). Then pulling the pin on the closing pin to close the shutter.
 

Attachments

  • Closed.jpg
    Closed.jpg
    232.3 KB · Views: 24
  • Open.jpg
    Open.jpg
    200.5 KB · Views: 24
Last edited:
OP
OP
Joined
Feb 26, 2024
Messages
54
Location
Finland
Format
Multi Format
This is quite the project! I don't have a metal shop, but have access to a wood one, so was curious as to what was possible. Someone asked me about making an 8" leaf shutter, which is a little big for a 3D printer, so tried making a prototype out of wood with vinyl blades. The shutter itself is very doable, but the actuating mechanism is of course the big challenge. Manual operation, unless it was by cable, would introduce a lot of vibration. A solenoid is the option discussed here but it needs to be quite powerful and would require lots of power and trickier to control electronically, and as in previous posts, would work best if mounted remotely to reduce vibration making it more complicated. A servo could work, and would be inexpensive and wouldn't be difficult to control with an arduino, and would likely be able to do shutter speeds 1/4 second or slower.

So here's another idea. 2 springs connected to the shutter ring, one strong enough to overcome the other while the shutter is open. The stronger spring is held taut with a pin. The shutter is closed and another pin is used at the shutter ring to hold the shutter closed. Pull that pin to open the shutter, then pull the first pin to close it. Conceptually it works with rubber bands, and I think 2 solenoids could be used in place of the pins. Here's a video of how it would work: 8 inch shutter operation test . The shutter gets "cocked" by installing the hold back pin and opening spring with its closing pin. I did another video with a shutter tester manually pulling the pins: Slow motion leaf shutter test and it's interesting to note how slow my reflexes are. Ideally, the fastest shutter speed would bounce back from open, instead of bouncing open, then closing. It looks like it could achieve a nominal shutter speed of 1/10 or a little bit faster.

A variation on this which would require less spring force on the opening spring could be a method to dynamically engage the closing spring on the actuator, then to pull the closing spring to the open position and hold it that way with a closing pin. Insert the opening pin at the actuator and stretch the opening spring to a pin that somehow releases the spring once it's open (an important unresolved detail). Then pulling the pin on the closing pin to close the shutter.
Thats really cool! I wonder on what use requires 8" opening? Thats big! It looks to be moving very nicely and fast at the 1/10s.
Hmm, i think the wollensak studio shutter has a bit similar system, 2 levers working opposite each other, with stronger and weaker springs, but it only has bulb mode.
Youre right, the solenoids and servos might be quite limiting/troublesome. The remote cable solenoid thing is not very nice in the field. Its getting to a territory where shutter actuator needs its own tripod :D.

I have been thinking these same problems quite a bit, and have come to pretty similar idea. Taking the power to the shutter actuation from spring. Enabling having the fastest shutter time and bulb mode without any electronics.
Then the shutter can be made to stay open longer with a small solenoid, for different shutter times.
 

Jimskelton

Member
Joined
Jan 16, 2023
Messages
46
Location
Alberta, Canada
Format
Large Format
With your metal design, you should be able to use strong metal springs to achieve fast opening/closing times, and perhaps achieve shutter speeds upward to 1/60 at least. My wooden prototype can't take too much force... Cocking the shutter would be basically pulling the strong spring over the closing solenoid pin. You would also want a way to keep the shutter open easily for focusing/framing.

To control the closing shutter, you would need a way to time the exposure. If you place a shutter open switch that detects when the shutter is tripped, you can use an arduino to time it, then activate the shutter closing solenoid after the exposure is complete. It's not difficult programming and arduino and they're inexpensive.
 
OP
OP
Joined
Feb 26, 2024
Messages
54
Location
Finland
Format
Multi Format
With your metal design, you should be able to use strong metal springs to achieve fast opening/closing times, and perhaps achieve shutter speeds upward to 1/60 at least. My wooden prototype can't take too much force... Cocking the shutter would be basically pulling the strong spring over the closing solenoid pin. You would also want a way to keep the shutter open easily for focusing/framing.

To control the closing shutter, you would need a way to time the exposure. If you place a shutter open switch that detects when the shutter is tripped, you can use an arduino to time it, then activate the shutter closing solenoid after the exposure is complete. It's not difficult programming and arduino and they're inexpensive.
Yeah! I will write to my next post what ive been thinking for the spring system. It would be super awesome to hit 1/60 without shaking the thing apart. Your shutter also maybe probably have lighter components relative to the size.

I would have room to mount arduino and small battery to the front of the shutter, to keep it so that everything needed shutter to work, is one single unit. But that is something that will be a project on its own and have to look up later.
 
OP
OP
Joined
Feb 26, 2024
Messages
54
Location
Finland
Format
Multi Format
Here is some progress thats been made:

First picture, the ring part is embedded on its final place. Above the embedded ring part, there's another embedded feature, that is for the cover of the ring part. That will make the whole surface flat, for the leaves to glide against. The most outer features of the shutter body, are for centering and mounting the top piece, where the lens will be mounted. The top piece and ring cover piece will be next on to do -list.

2. and 3. pictures are just test fit, to see how it looks. I also made holes for the pins to the shutter body, but those are not good and I have to make those again. -luckily its easy enough just do another holes next to those failed ones.
New holes will go trough the top piece, all the way to the body. They will be very sturdy and also stiffen the structure.

For the actuation of the shutter ive been thinking not using powerful solenoid like i first wanted to do.
New idea is to have a spring that is wound around an axle, so like a spring powered motor. A bit like a clock would have. And that spring powered axle can turn a crank shaft, that would trough a connecting rod, turn the shutter's ring part and use the shutter that way.

Then the shutter would open and close with one rotation of the spring driven mini crank shaft. So without interruption it would operate in its fastest time naturally. For the other the shutter times, the movement could be stopped to open position with some kind of latch mechanism -just keeping the shutter open for needed time before letting it to continue closing. And that latch could be actuated with cable for bulb mode, or solenoid and electronic timer.

One big benefit would be naturally smooth accerelation and slowing of crank, like a piston in a engine, it moves fastest in the 90 degree mark, but at start and near the end, the leverage ratio changes and slows it down before coming to a stop and changing direction -and closing the shutter in this case.

Second benefit would be that if id make the crank part have some kinda way to adjust the stroke lenght, i could have shutter open any amount i want, and that would work as an aperture, or have faster times with smaller lenses.

Third nice thing would be ability to use fastest time and bulb mode without any electronics.

I haven't done any prototyping or testing on the drive mechanism and don't know if its good idea or works like that. What do you think about this idea?
 

Attachments

  • IMG20250227125740.jpg
    IMG20250227125740.jpg
    443.8 KB · Views: 22
  • IMG20250227125759.jpg
    IMG20250227125759.jpg
    839.8 KB · Views: 24
  • IMG20250227125952.jpg
    IMG20250227125952.jpg
    596.3 KB · Views: 22

Jimskelton

Member
Joined
Jan 16, 2023
Messages
46
Location
Alberta, Canada
Format
Large Format
So, a mechanism like this?
IMG_0163.JPG

This may work, and I like the idea of the shutter slowing down at the apex before the blades are completely open to reduce bounce and the forces on the leaf pins, as well as decelerating before closing. Linear springs would apply a lot of force to the pins and leafs especially when it bottoms out open and closed and shorten their lives. What I'm wondering about is whether you will be able to develop enough torque to get the speed you need. Also, what kind of holding/stopping mechanism would you use? This would have to be necessarily strong to take the force of stopping the piston arm/spring. I suppose the trip mechanism could be a simple pin holding the flywheel back which is pushed out of the way to trip the shutter. A spring loaded pin on the other side could catch the hole as it comes around 360 degrees. Or something like that. It's going to be a bit complex designing/machining...
IMG_0164.JPG


You have a machine shop, right? So you should be able to machine the necessary parts to do this. I don't have access to a metal shop though I do have a 3d printer, but I'm sure 3D printed parts would not stand up to the forces in this system.

I think I would make the crankshaft, attach a spring to it, wind it up and see how fast it can make it spin 360 degrees when released. Most phones can do slow motion video so that'll give you an idea of how fast it is. If it has the necessary speed, then you could connect it to the shutter ring to see whether it has enough torque.
 
Photrio.com contains affiliate links to products. We may receive a commission for purchases made through these links.
To read our full affiliate disclosure statement please click Here.

PHOTRIO PARTNERS EQUALLY FUNDING OUR COMMUNITY:


Ilford ADOX Freestyle Photographic Stearman Press Weldon Color Lab Blue Moon Camera & Machine
Top Bottom