-
Welcome to Photrio!Registration is fast and free. Join today to unlock search, see fewer ads, and access all forum features.Click here to sign up
- Home
- Forums
- Analog Workflow Forums (100% Analog/Traditional)
- Analog Equipment
- Camera Building, Repairs & Modification
You are using an out of date browser. It may not display this or other websites correctly.
You should upgrade or use an alternative browser.
You should upgrade or use an alternative browser.
Build a shutter tester for Focal Plane shutters - Cheap, Easy & it Works
-
A
- Thread starter Niglyn
- Start date


Recent Classifieds
-
For Sale 6 antique French pneumatic shutters _ Guerry
- Started by Manual Camera
-
For Sale Voigtländer Nokton Classic 35mm/1.4 with Leica M-mount
- Started by Klaus Mähring
-
For Sale Voigtländer Bessa R2 Special Edition Olive Green
- Started by Klaus Mähring
-
For Sale FS: Horseman Cable Release
- Started by B.S.Kumar
-
Sold SOLD!
- Started by B.S.Kumar
Forum statistics
Niglyn
Member
Hello, I'm new here and I got my Arduino V2 key. I can't DM because I'm new. Thank you very much for the building information. It's great !
Hi, DM set.
ltbphoto
Subscriber
I'm having a bit of trouble getting my Arduino tester up and running. With the alignment utility the sensors are always in the 'seen' state, even with the sensor boards unplugged. I do have the red LED on the sensor boards illuminated and have checked that the sensor is oriented correctly.
Checking the voltage between the GND and the D2/D3 (sensor signal inputs), I get about +1 V with the laser not shining on the sensor and 0 V with the laser illuminating the sensor. This seems backwards to me.
I did note some references to an old/new sensor configuration with backwards wiring but I didn't see any reference to how to check for which version or how to handle if I have the wrong version. I apologize if I've missed those notes somewhere, I did try searching this thread but may have been using the wrong keywords.
Niglyn
Member
Itbphoto, hi, no problem with missing anything. With 37 pages, there is a lot of chatter.
Your volage readings are not correct.
You should see 0V or 5V. Not any other voltage.
Disconnect the wires on D2 and D3.
(Leave the 5V & 0V wires connected to the sensor modules)
Measure between the 5V and 0V pin on the sensor module, you should see 5V
Measure between the 0V pin and centre pin on the sensor (or end of wire)
This should be either 0V or 5V.
Then with the Laser on the sensor (or another strong light), you should see
this voltage reverse, so if it was 0V, it should now be 5V. Or if it was 5V, it should now be 0V.
My thoughts are,
a) Not getting 5V and 0v to the sensor module (hence first step to measure the voltage on the sensor module)
b) Your sensor modules are part of the faulty batch, where the pull-up resister on them has not been connected correctly.
(Go back though the pages here, there are photos showing the difference between the good & bad boards & how to correct them).
c) The sensors have damaged the sensors, which is easily done if they are connected the wrong way round, or 5V & 0v was crossed at some point.
d) The input pins on the Arduino D2 & D3 have been damaged.
To test the Arduino module itself, you will need to connect a 10k resister to D2 or D3. The other end of which, using a piece of wire, connect to 0V. The test screen will show 'seen' or blocked' (sorry, I cannot remember which)
Moving the wire to 5V, the display should toggle and show the other value, (blocked or seen).
ENSURE the pin is connected with a 10k resister in series. Putting 5V directly into pin will damage the Arduino.
Please post back with your results & findings.
ltbphoto
Subscriber
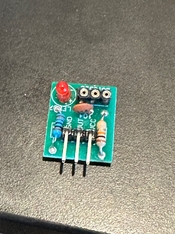
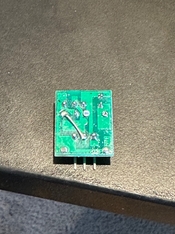
That was very informative, thank you. It was the sensor boards, which is a bit concerning as I have a mix of AliExpress and Amazon sourced sensors - they all have the same issue with the 10k resistor not being connected to anything.
I found the easiest fix was to fully replace that resistor and use the excess lead to bridge to the signal pin. Trying to wrestle a tiny wire onto the board and solder it into place was an adventure.
I found the easiest fix was to fully replace that resistor and use the excess lead to bridge to the signal pin. Trying to wrestle a tiny wire onto the board and solder it into place was an adventure.
Attachments
Niglyn
Member
Hi, glad you found the issue.
I have ordered a couple of sets of the sensor module recently, from different suppliers. Neither had this fault.
This is one issue with using AliExpress, there is no way to feed back quality problems, or probably for them to care.
Ali use a similar business model to amazon. Central warehouse to hold different suppliers stock and probably like amazon, they hold the same product from different suppliers in one bin, so one cannot trace the source.
Also having issues with the expansion board for The Shutter Tester. Originally there was just one type, so all good.
However there are now different manufacturers making 30 pin, 38 pin 22.5mm and 25mm boards.
They seem to have all got mixed up, so at the moment at least, it is a bit pot-luck which one is sent.
Whilst I have always got a refund without issue, it then means another 8 day wait for another board.
I thought moving to a 25mm board & ESP32 Rev4 board might be the answer, ordered one, but the expansion board is a slightly different size and the drilled holes far too small to line up and fit the same 3mm bolts as the tft screen.
I can easily make a 3d printable universal expansion board mounting frame. It would fit onto the existing 3mm tft mounting bolts & then the expansion board can fit to this (user to drill mounting holes to suit their board)..
This does of course require the builder to have a 3d printer.
Wmd2501
Member
I would be grateful for the key for arduino V2. I am unable to DM as I am new here.
Almost finished putting together a set up whicb hopefully will do horizontal and vertical shutters. I will see how it goes. I have used mechanical switches to switch between the 2 pairs of lasers/sensors that are required. And I have housed the sensors and lasers in the 3d print files from git hub. Does anyone have any 3d printing files they would be willing to share that house the arduino screen and arduino? Apologies if I have missed this.
Almost finished putting together a set up whicb hopefully will do horizontal and vertical shutters. I will see how it goes. I have used mechanical switches to switch between the 2 pairs of lasers/sensors that are required. And I have housed the sensors and lasers in the 3d print files from git hub. Does anyone have any 3d printing files they would be willing to share that house the arduino screen and arduino? Apologies if I have missed this.
Niglyn
Member
I would be grateful for the key for arduino V2. I am unable to DM as I am new here.
Almost finished putting together a set up whicb hopefully will do horizontal and vertical shutters. I will see how it goes. I have used mechanical switches to switch between the 2 pairs of lasers/sensors that are required. And I have housed the sensors and lasers in the 3d print files from git hub. Does anyone have any 3d printing files they would be willing to share that house the arduino screen and arduino? Apologies if I have missed this.
Hi, will send you a DM.
There is a newer 3d printed sensor enclosure, uploaded a day or so ago. This gives better sensor alignment. It has 'V2' printed on it.
You only need to re-print the main box, the other parts are all the same.
I removed the old how to assemble the sensors in the enclosure document because I though the vero board was too messy.
I have re-made the internal connections using strip board, much easier and neater. On my to-do list is to update the how-to document.
As for switching between H/V yes it should be easy enough with a switch, I think just switching the centre output of the sensor should work. Leave the + & 0V of all four sensors connected. This way you will only need a total of 2 resisters and two capacitors.
As for a 3d printed case for Arduino, another thing on my to-do list
 ) Hopefully it should not be too long, will start designing today )
Niglyn
Member
Hi all,
here is a quick sketch of an enclosure for the Arduino based tester. Any good?

here is a quick sketch of an enclosure for the Arduino based tester. Any good?
Wmd2501
Member
Hi all,
here is a quick sketch of an enclosure for the Arduino based tester. Any good?
View attachment 419326
Looks great. I will report back when I have completed the build.
Niglyn
Member
Hi, by popular request, a 3d printable enclosure for the Arduino version of The Shutter Tester is now available.
Files are on Github.
Sensor & Laser enclosures use the same 3d print files as the ESP32 version & can be found in that sub-directory on Github.
Picture shows parts facing downwards, as they would be printed.
Assembly guide will follow.

Files are on Github.
Sensor & Laser enclosures use the same 3d print files as the ESP32 version & can be found in that sub-directory on Github.
Picture shows parts facing downwards, as they would be printed.
Assembly guide will follow.
Last edited:
crispernaki
Member
Hello Niglyn et al:
It's a few revisions behind on the 3D enclosures you provided, but here is a picture of another one of your test fixtures out in the world.

It's a few revisions behind on the 3D enclosures you provided, but here is a picture of another one of your test fixtures out in the world.
Niglyn
Member
Hi, that looks, well, ingenious  I like the old cupboard door used as a frame
I am waiting for somebody to 3d print the case and expansion board mounting frame & take some build photos for me, as I need some photos for the build documents.
My 3d printed case uses the pcb, so does not use the frame.
Just writing the 3d print build document now, which includes the case & sensor & Laser enclosure. Will be on Github later today.
I like the old cupboard door used as a frame I am waiting for somebody to 3d print the case and expansion board mounting frame & take some build photos for me, as I need some photos for the build documents.
My 3d printed case uses the pcb, so does not use the frame.
Just writing the 3d print build document now, which includes the case & sensor & Laser enclosure. Will be on Github later today.
Niglyn
Member
Hi all, I have uploaded some new docs today.
For Arduino, the 3d print files and instructions for the 3d printed case. (sensor & Laser enclosures are the same as the ESP32)
For ESP32 instructions for printing and assembling the 3d printed case sensor & Laser enclosures.
Next up will be 3d print files for a camera holder, to sit on top of the little lifting platform. Will make it easier to keep the camera aligned whilst testing.
As always, thoughts, feedback, grumbles etc.
Niglyn
Member
Not sure if anyone has ordered the little lifting table shown on the parts list?
I have made a platform for it, to hold the camera steady whilst testing. This should make it much easier to position the camera.
The lifting table attaches to the baseboard, either by directly screwing/glueing or using the 3d printed rails, which clip over the lip of the table & are screwed to the baseboard.
3d printed platform has to be glued/screwed to the table top (if screwed, holes must be countersunk).
End-stop is adjustable for different camera widths. M6 x 35mm nut & bolt required.
Niglyn
Member
Here are a few photos of the 3d printed sensor & Laser holders, together with the mini lifting table and camera mount.
Sorry, did not have the 3d printed shutter tester, so the project-box version is shown.
I works really well. Camera is held in the correct position & makes it much easier for multiple tests or for removing & re-placing the camera after adjustment.
The baseboard is an offcut of chipboard flooring. I could make a 3d printed baseplate, with recesses for the parts to drop into, but is this overkill? Happy to make one if there is demand.
Hey,
I'm neaarly finished with buildiung the shutter speed tester. Its a really fun and beginner friendly build! Really thank you so much for that.
I have 2 questions:
Could you please send me the user key (cant dm because im new)?
And do you have any advice on testing focal plane shutters like the ones from old Feds, Zenits, Zorkis etc? I think it could be a problem that there is only a little slit or am I overthinking it?
And did you find a proper solution for the light source? (other than the lasers) Iwas hoping a smart LED light would be sufficient or maybe violet growlights xD
crispernaki
Member
Here are a few photos of the 3d printed sensor & Laser holders, together with the mini lifting table and camera mount.
Sorry, did not have the 3d printed shutter tester, so the project-box version is shown.
I works really well. Camera is held in the correct position & makes it much easier for multiple tests or for removing & re-placing the camera after adjustment.
The baseboard is an offcut of chipboard flooring. I could make a 3d printed baseplate, with recesses for the parts to drop into, but is this overkill? Happy to make one if there is demand.
View attachment 419593View attachment 419594View attachment 419595
I like the frugal approach to three degrees of camera position adjustment freedom.
It's the typical case of conflicting requirements. You want to be able to easily adjust the position of the camera before testing starts, but you also don't want the camera to move after testing starts.
Niglyn
Member
Hey,
I'm nearly finished with building the shutter speed tester. Its a really fun and beginner friendly build! Really thank you so much for that.
I have 2 questions:
Could you please send me the user key (cant dm because I'm new)?
And do you have any advice on testing focal plane shutters like the ones from old Feds, Zenits, Zorkis etc? I think it could be a problem that there is only a little slit or am I overthinking it?
And did you find a proper solution for the light source? (other than the lasers) I was hoping a smart LED light would be sufficient or maybe violet growlights xD
Hi, will send DM, then you can reply.
The Shutter Tester was initially designed to test and repair my Zenit cameras so works perfectly for these & similar cameras.
Join me on facebook Zeint Camera Owners & Repair Club
 www.facebook.com
As for light source, these cheap little Lasers are still the best. The Shutter Tester then runs directly from USB, without added complications.
Smart lights will most probably uses PWM to control the light, which in essence is rapidly switching on/off the light. The Shutter Tester will see these as shutter activations.
Whilst it would be possible to design a different light source, due to the heat from LED COBs and building of power supplies etc, not a route I am going to go down for The Shutter Tester.
I did start work on a design, with The Shutter Tester controlling an LED via PWM to vary the brightness and code to distinguish between the PWM LED flicker and genuine shutter activations. Whilst it worked, as said above, it is getting beyond the realms of 'simple' and I was worried about possible issues with the heat of the LED COB, power supplies etc.
Last edited:
Hi, will send DM, then you can reply.
The Shutter Tester was initially designed to test and repair my Zenit cameras so works perfectly for these & similar cameras.
Join me on facebook Zeint Camera Owners & Repair Club
for all things zenit.
As for light source, these cheap little Lasers are still the best. The Shutter Tester then runs directly from USB, without added complications.
Smart lights will most probably uses PWM to control the light, which in essence is rapidly switching on/off the light. The Shutter Tester will see these as shutter activations.
Whilst it would be possible to design a different light source, due to the heat from LED COBs and building of power supplies etc, not a route I am going to go down for The Shutter Tester.
I did start work on a design, with The Shutter Tester controlling an LED via PWM to vary the brightness and code to distinguish between the PWM LED flicker and genuine shutter activations. Whilst it worked, as said above, it is getting beyond the realms of 'simple' and I was worried about possible issues with the heat of the LED COB, power supplies etc.
Thank you for the DM and your reply.
I was asking because I'm trying to figure out a solution that would be comfortable to use and doesnt involve too many static parts (i would like the tester to be as compact as possible) and i heard multiple times that aligning the laser with the sensor is agony. But i think i will go for something like a sensor that i hold on the film gate, and the lasers will be in some sort of box on which i can put the camera to get the alignment everytime.
Niglyn
Member
Thank you for the DM and your reply.
I was asking because I'm trying to figure out a solution that would be comfortable to use and doesnt involve too many static parts (i would like the tester to be as compact as possible) and i heard multiple times that aligning the laser with the sensor is agony. But i think i will go for something like a sensor that i hold on the film gate, and the lasers will be in some sort of box on which i can put the camera to get the alignment everytime.
Hi, not sure who said aligning the Lasers was agony. Total piece of cake.
If you use the blocks of wood style frame, Hot-glue the modules onto the wood, at the correct spacing.
Lasers are easy to move on the module, only attached by thin wire, so move them for alignment, then a blob of hot-glue to hold them there.
If you look at the guide how to 3d print the sensor enclosure, it shows how to mount the three sensors onto one piece of strip-board. This could be used without the 3d printed enclosure, as an alternate.
Lasers are used for light only & can splash all over the sensor. No need to try and focus to a pin-point.
thats good to know, thank you so much!
Niglyn
Member
Was a horrible foggy day, so gave me time to make a Base for The shutter tester.
Photos below. 3d print files & instructions on Github.


Photos below. 3d print files & instructions on Github.
Unciauncia
Member
Hello! I assembled the tester and need the pass key. Can you please provide one? Can't message because I'm new.
Niglyn
Member
Hello! I assembled the tester and need the pass key. Can you please provide one? Can't message because I'm new.
Hi, DM sent.
| Photrio.com contains affiliate links to products. We may receive a commission for purchases made through these links. To read our full affiliate disclosure statement please click Here. |
PHOTRIO PARTNERS EQUALLY FUNDING OUR COMMUNITY:  |