-
Welcome to Photrio!Registration is fast and free. Join today to unlock search, see fewer ads, and access all forum features.Click here to sign up
- Home
- Forums
- Analog Workflow Forums (100% Analog/Traditional)
- Analog Equipment
- Camera Building, Repairs & Modification
You are using an out of date browser. It may not display this or other websites correctly.
You should upgrade or use an alternative browser.
You should upgrade or use an alternative browser.
Build a shutter tester for Focal Plane shutters - Cheap, Easy & it Works
-
A
- Thread starter Niglyn
- Start date


Recent Classifieds
-
For Sale Fuji GW670 III
- Started by campy51
-
For Sale Hasselblad X Pan w/ 45mm/f4 Lens
- Started by eftones
-
For Sale 6 antique French pneumatic shutters _ Guerry
- Started by Manual Camera
-
For Sale Voigtländer Nokton Classic 35mm/1.4 with Leica M-mount
- Started by Klaus Mähring
-
For Sale Voigtländer Bessa R2 Special Edition Olive Green
- Started by Klaus Mähring
Forum statistics
Niglyn
Member
Niglyn
Member
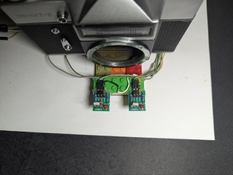
Here are some photos of the new bezel.
stl file will be on github soon, (to replace the current one)
Can also send them by post for those who do not have a 3d printer.
It mounts using the existing TFT fixings and overlaps the TFT screen and project-box cut out, to give a neat look.
Bezel attached to TFT pcb (not mounted in project box)

Side-by-side new bezel and TFT
(note four spacers that fit on top of the TFT mounting holes, so the so the soldered joints on the TFT do not touch the underside of the box)

Rear view, showing the bezel wider than the TFT screen, also wiring for SD card

stl file will be on github soon, (to replace the current one)
Can also send them by post for those who do not have a 3d printer.
It mounts using the existing TFT fixings and overlaps the TFT screen and project-box cut out, to give a neat look.
Bezel attached to TFT pcb (not mounted in project box)
Side-by-side new bezel and TFT
(note four spacers that fit on top of the TFT mounting holes, so the so the soldered joints on the TFT do not touch the underside of the box)
Rear view, showing the bezel wider than the TFT screen, also wiring for SD card
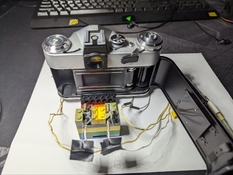
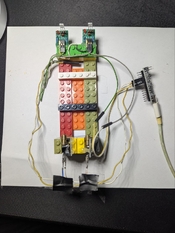
Hi Niglyn! I got my dad's Zenit-E film camera. I replaced the shutter curtains and curtain wires. It's mechanically sound. I'm looking for a way to adjust the shutter speed. I came across your project on GitHub and built myself a tester out of Lego. I downloaded the firmware, but it's asking for the code. Could you share it? I'm attaching a photo of the project and the camera.
Attachments
Niglyn
Member
Hi Niglyn! I got my dad's Zenit-E film camera. I replaced the shutter curtains and curtain wires. It's mechanically sound. I'm looking for a way to adjust the shutter speed. I came across your project on GitHub and built myself a tester out of Lego. I downloaded the firmware, but it's asking for the code. Could you share it? I'm attaching a photo of the project and the camera.
HI, have sent you a DM.
Your Lego looks good
 )
) How did you align the new blinds onto the drum?
They have to be glued EXACTLY in the correct position as all indexing for first and second curtain is all done from the drum.
I have never replaced the curtain material, but I have re-glued many ribbons that have come loose from the drum and rollers.
If only one ribbon has come off, one can easily find the correct alignment, however if both have come off, or replacing the ribbons, then it is almost impossible to align them correctly.
I built a jig to correctly align the curtains. It works very well, but is made of wood and was a one-off.
I am currently designing a new jig, to be 3d printed, specifically for the Zenit shutter curtains.
Please join 'Zenit Camera Club' on Facebook. I am active there and you will find updates for the jig and also in the files section, you will find all of my Zenit camera repair guides.
Please ensure you replace the foam under and around the prism. It degrades into a sticky goo, which must be removed from the prism else it eats into the silvering and destroys it.
As for adjusting the curtains, the service manual recommends 1 1/2 turns tension on the mirror assist spring, and far more tension for curtain one spring, than curtain two.
Without the correct tool to loosen the lock-ring, to adjust spring tension, it is a nightmare to do.
Again I built my own tools for the job.
It is a brass socket that fits over the lock-ring, with the correct splines to locate it. Down the middle fits a thin screwdriver to engage with the adjustment slot on the end of the inner rod.
Good luck, please let me know how you get on.
 www.facebook.com
It took me about a month to learn how to glue and align the curtains. I studied the focal plane shutter from YouTube videos. Once I figured out how the shutter works, the curtains stuck pretty quickly. The mirror drive was more of a problem. It kept catching on the curtain's thread drum and tearing it.
I'm attaching a link to a video that explains the shutter mechanism in detail. It uses a different camera, but the operating principle is the same.
A video of my camera working after assembly.
The video I learned from
p.s. If needed, I can try to record a video with the main points for gluing and aligning curtains.
Niglyn
Member
It took me about a month to learn how to glue and align the curtains. I studied the focal plane shutter from YouTube videos. Once I figured out how the shutter works, the curtains stuck pretty quickly. The mirror drive was more of a problem. It kept catching on the curtain's thread drum and tearing it.
I'm attaching a link to a video that explains the shutter mechanism in detail. It uses a different camera, but the operating principle is the same.
A video of my camera working after assembly.
The video I learned from
p.s. If needed, I can try to record a video with the main points for gluing and aligning curtains.
HI, you are a very clever person to get the curtains back and working correctly.
The video looks like your curtains are correctly aligned.
I won't bother with a jig, people can send the cameras to you
)Niglyn
Member
pcb & 3d parts update
Hello everybody, more applicable to people just starting to make The Shutter Tester....
1) pcb (to replace the breakout board) now available (8 in stock).
Works identically to the current breakout board other than the TFT and ESP32 boards plug directly into it, negating the need to wire the TFT separately. Includes 3d printed mounting bracket.
These are £5.00 plus postage at cost.
2) 3d printed cutting template for the project box. Fits on top of the project box and has the positions of screen and buttons, for easy marking out where to cut & drill.
£1.00 plus postage at cost.
3) Bezel. This mounts over the TFT screen, covering the gap between project-box cut-out and the screen, for a neater look.
£1.00 plus postage at cost.
Note prices are cost price (materials cost, electricity, paypal charges etc).
3d print files are also available on the Github for people to print themselves, if you have your own 3d printer or a local 3d printing service.
pcb (includes all terminals, headers and a mounting bracket not pictured)

screen bezel (screen not included)

cutting template

Hello everybody, more applicable to people just starting to make The Shutter Tester....
1) pcb (to replace the breakout board) now available (8 in stock).
Works identically to the current breakout board other than the TFT and ESP32 boards plug directly into it, negating the need to wire the TFT separately. Includes 3d printed mounting bracket.
These are £5.00 plus postage at cost.
2) 3d printed cutting template for the project box. Fits on top of the project box and has the positions of screen and buttons, for easy marking out where to cut & drill.
£1.00 plus postage at cost.
3) Bezel. This mounts over the TFT screen, covering the gap between project-box cut-out and the screen, for a neater look.
£1.00 plus postage at cost.
Note prices are cost price (materials cost, electricity, paypal charges etc).
3d print files are also available on the Github for people to print themselves, if you have your own 3d printer or a local 3d printing service.
pcb (includes all terminals, headers and a mounting bracket not pictured)
screen bezel (screen not included)
cutting template
Hi everyone. I spent the entire weekend testing and tweaking my camera. I can't get it to work the way I want. The first curtain is always slower than the second. As I understand from this thread. Below are my results. They're far from ideal, but they're the best I could get. If I continue to try to speed up the second curtain, the long exposures will become significantly shorter.
Has anyone managed to set up a shutter similar to the Leica 2? I own a Zenit E.
1/30
PARAMETER Sensor2 Sensor1
Shutter Speed milliS 21.9 22.1
Shutter Speed Seconds 0.022 0.022
Shutter Speed Fraction 1/46 1/45
Curtain Travel MilliS 14.5 14.7
1/60
PARAMETER Sensor2 Sensor1
Shutter Speed milliS 11.9 14.6
Shutter Speed Seconds 0.012 0.015
Shutter Speed Fraction 1/84 1/69
Curtain Travel MilliS 14.0 16.7
1/125
PARAMETER Sensor2 Sensor1
Shutter Speed milliS 6.9 11.7
Shutter Speed Seconds 0.007 0.012
Shutter Speed Fraction 1/144 1/86
Curtain Travel MilliS 13.7 18.4
1/250
PARAMETER Sensor2 Sensor1
Shutter Speed milliS 4.0 8.7
Shutter Speed Seconds 0.004 0.009
Shutter Speed Fraction 1/248 1/114
Curtain Travel MilliS 14.4 19.1
1/500
PARAMETER Sensor2 Sensor1
Shutter Speed milliS 2.2 4.5
Shutter Speed Seconds 0.002 0.005
Shutter Speed Fraction 1/460 1/221
Curtain Travel MilliS 14.3 16.6
Niglyn
Member
Hi everyone. I spent the entire weekend testing and tweaking my camera. I can't get it to work the way I want. The first curtain is always slower than the second. As I understand from this thread. Below are my results. They're far from ideal, but they're the best I could get. If I continue to try to speed up the second curtain, the long exposures will become significantly shorter.
Has anyone managed to set up a shutter similar to the Leica 2? I own a Zenit E.
1/30
PARAMETER Sensor2 Sensor1
Shutter Speed milliS 21.9 22.1
Shutter Speed Seconds 0.022 0.022
Shutter Speed Fraction 1/46 1/45
Curtain Travel MilliS 14.5 14.7
1/60
PARAMETER Sensor2 Sensor1
Shutter Speed milliS 11.9 14.6
Shutter Speed Seconds 0.012 0.015
Shutter Speed Fraction 1/84 1/69
Curtain Travel MilliS 14.0 16.7
1/125
PARAMETER Sensor2 Sensor1
Shutter Speed milliS 6.9 11.7
Shutter Speed Seconds 0.007 0.012
Shutter Speed Fraction 1/144 1/86
Curtain Travel MilliS 13.7 18.4
1/250
PARAMETER Sensor2 Sensor1
Shutter Speed milliS 4.0 8.7
Shutter Speed Seconds 0.004 0.009
Shutter Speed Fraction 1/248 1/114
Curtain Travel MilliS 14.4 19.1
1/500
PARAMETER Sensor2 Sensor1
Shutter Speed milliS 2.2 4.5
Shutter Speed Seconds 0.002 0.005
Shutter Speed Fraction 1/460 1/221
Curtain Travel MilliS 14.3 16.6
Hi, you do not want to increase the tension on the second curtain. Looks to need more tension on the first.
If you read the service manual it states the first blind must have far more tension than the second.
The second should only have enough so that it travels smoothly across the frame on B.
If more adjustment for the first curtain is required, then increase the tension on the mirror lift spring.
Have you serviced the shutter mech? It could be the first curtain is slow to get started, caused by old grease & dirt, it then speeds up towards the end of it's travel.
super-nettel
Member
- Joined
- May 23, 2010
- Messages
- 1
- Format
- 35mm RF
Hi Niglyn,
I started reading your shutter tester pages on photrio several weeks ago. WOW! I've wanted to build a tester for quite some time and may actually get around to it this winter.
I'm most interested in just getting the corrected shutter speeds, and at first thought I could build a simple Arduino based tester using one of your earlier sketches (Snusmumriken's modification of your Ver2.6.9 in message 179 appealed to me since it dispenses with the LCD, although I would probably delete his code to track deviation). However, I see in message 552 (and the V2 operating guide on Github) that the Arduino V2 tester needs to use the LCD for authentication so using just the monitor doesn't sound practical.
Most importantly, do the earlier sketches for Arduino V1 include your "patent-pending computational algorithm" and provide the improved accuracy at high shutter speeds? If not, I will just bite the bullet and build a V2 or ESP32 tester with all the bells and whistles.
Incidentally, I was glad to see Oleg's message about accuracy and shutter testers. I'm about to send a Contax II to him for shutter work if I can figure out whether or not Trump has screwed up shipping cameras back and forth to Europe with his tariffs. The shutter was initially rebuilt by Henry Scherer (California bay area) who made a specialty of repairing all things Contax including pre-war models. Unfortunately, he died a few months ago.
Anyway, thank you for providing so much information and help on the shutter tester.
Douglas
Last edited:
Niglyn
Member
Hi Niglyn,
I started reading your shutter tester pages on photrio several weeks ago. WOW! I've wanted to build a tester for quite some time and may actually get around to it this winter.
I'm most interested in just getting the corrected shutter speeds, and at first thought I could build a simple Arduino based tester using one of your earlier sketches (Snusmumriken's modification of your Ver2.6.9 in message 179 appealed to me since it dispenses with the LCD, although I would probably delete his code to track deviation). However, I see in message 552 (and the V2 operating guide on Github) that the Arduino V2 tester needs to use the LCD for authentication so using just the monitor doesn't sound practical.
Most importantly, do the earlier sketches for Arduino V1 include your "patent-pending computational algorithm" and provide the improved accuracy at high shutter speeds? If not, I will just bite the bullet and build a V2 or ESP32 tester with all the bells and whistles.
Incidentally, I was glad to see Oleg's message about accuracy and shutter testers. I'm about to send a Contax II to him for shutter work if I can figure out whether or not Trump has screwed up shipping cameras back and forth to Europe with his tariffs. The shutter was initially rebuilt by Henry Scherer (California bay area) who made a specialty of repairing all things Contax including pre-war models. Unfortunately, he died a few months ago.
Anyway, thank you for providing so much information and help on the shutter tester.
Douglas
Hi Douglas,
Like everyone else, I fell into the trap of thinking that making a shutter tester was easy.
The early code listed in this thread falls into this trap, but alas as one cannot delete posts, the code lives there for evermore.
It works fine up to around 1/125s after which the ratio of slot width to sensor width starts to give inaccurate results.
The V2 Arduino code does not need an LCD, it can all be done on the PC display (I think from memory, it has been a while since I used the Arduino code).
Yevhenii has just built the Arduino version without LCD and will be able to confirm that it works ok without LCD.
Unfortunately you are in the USA & postage is too expensive, else I would have sent you the new pcb, bezel and cutting template for the ESP32 version.
Good luck with Trump's tariffs
)Hi, you do not want to increase the tension on the second curtain. Looks to need more tension on the first.
If you read the service manual it states the first blind must have far more tension than the second.
The second should only have enough so that it travels smoothly across the frame on B.
If more adjustment for the first curtain is required, then increase the tension on the mirror lift spring.
Have you serviced the shutter mech? It could be the first curtain is slow to get started, caused by old grease & dirt, it then speeds up towards the end of it's travel.
Hi.
I found the Zenit factory manual. It says to tighten the spring of the first curtain (small sleeve) by 6 turns, the second (large sleeve) by 4 turns.
That was the starting point. But in that case, the second curtain was sped up too much. And the first remained slow. At 1/500, I was getting 1/650 on the second sensor and 1/300 on the second.
I loosened the second shutter speed until it started chattering. I tightened the first shutter speed more, but I couldn't speed it up beyond 1/250. Only the slow shutter speeds started creeping up. Instead of 1/60, I was getting 1/120.
I'll try to shoot the film like this and see the results. They worked somehow from the factory.
Hi Niglyn,
I started reading your shutter tester pages on photrio several weeks ago. WOW! I've wanted to build a tester for quite some time and may actually get around to it this winter.
I'm most interested in just getting the corrected shutter speeds, and at first thought I could build a simple Arduino based tester using one of your earlier sketches (Snusmumriken's modification of your Ver2.6.9 in message 179 appealed to me since it dispenses with the LCD, although I would probably delete his code to track deviation). However, I see in message 552 (and the V2 operating guide on Github) that the Arduino V2 tester needs to use the LCD for authentication so using just the monitor doesn't sound practical.
Most importantly, do the earlier sketches for Arduino V1 include your "patent-pending computational algorithm" and provide the improved accuracy at high shutter speeds? If not, I will just bite the bullet and build a V2 or ESP32 tester with all the bells and whistles.
Incidentally, I was glad to see Oleg's message about accuracy and shutter testers. I'm about to send a Contax II to him for shutter work if I can figure out whether or not Trump has screwed up shipping cameras back and forth to Europe with his tariffs. The shutter was initially rebuilt by Henry Scherer (California bay area) who made a specialty of repairing all things Contax including pre-war models. Unfortunately, he died a few months ago.
Anyway, thank you for providing so much information and help on the shutter tester.
Douglas
Hi. I recently built version 2 on Arduino. You can do without the display.
Niglyn
Member
Hi.
I found the Zenit factory manual. It says to tighten the spring of the first curtain (small sleeve) by 6 turns, the second (large sleeve) by 4 turns.
That was the starting point. But in that case, the second curtain was sped up too much. And the first remained slow. At 1/500, I was getting 1/650 on the second sensor and 1/300 on the second.
I loosened the second shutter speed until it started chattering. I tightened the first shutter speed more, but I couldn't speed it up beyond 1/250. Only the slow shutter speeds started creeping up. Instead of 1/60, I was getting 1/120.
I'll try to shoot the film like this and see the results. They worked somehow from the factory.
Hi, which service manual are you using?
I am looking at the genuine repair manual now.
I'm not sure what you mean by 'small sleeve' and 'large sleeve'?
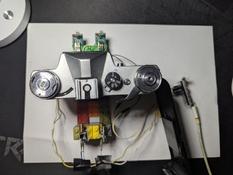
Below, on the right are the two rollers those internal springs are adjusted.
Nearest roller is second blind roller, one at the back is first curtain.
The lock-nuts for these are numbered 140.
The lock nut for the mirror lift & first curtain assist is 181
Hi, which service manual are you using?
I am looking at the genuine repair manual now.
I'm not sure what you mean by 'small sleeve' and 'large sleeve'?
Below, on the right are the two rollers those internal springs are adjusted.
Nearest roller is second blind roller, one at the back is first curtain.
The lock-nuts for these are numbered 140.
The lock nut for the mirror lift & first curtain assist is 181
View attachment 408887
That's right. The long tube controls the second curtain, and the short one, without the bushings that fit on it, controls the first.
I found the repair manual on the website and there is also a spare parts catalog there.
ZENITcamera: ЗЕНИТ-Е -- Инструкция по ремонту
Инструкция по ремонту фотоаппарата ЗЕНИТ-E, русское | Service manual: ZENIT-E SLR camera repair, Russian
I'll add a few words about the mechanism itself. I disassembled it and cleaned out the old grease. I added just a little new grease, as too much grease also slows down the mechanism. The curtain rods are original, taken from donor cameras.
I just tried tightening the spring on the front curtain and the mirror lift. It didn't work.
1/30
PARAMETER Sensor2 Sensor1
Shutter Speed milliS 26.8 23.8
Shutter Speed Seconds 0.027 0.024
Shutter Speed Fraction 1/37 1/42
Curtain Travel MilliS 18.7 15.8
1/60
PARAMETER Sensor2 Sensor1
Shutter Speed milliS 13.7 17.3
Shutter Speed Seconds 0.014 0.017
Shutter Speed Fraction 1/73 1/58
Curtain Travel MilliS 15.1 18.6
1/125
PARAMETER Sensor2 Sensor1
Shutter Speed milliS 8.0 12.5
Shutter Speed Seconds 0.008 0.013
Shutter Speed Fraction 1/125 1/80
Curtain Travel MilliS 13.8 18.3
1/250
PARAMETER Sensor2 Sensor1
Shutter Speed milliS 4.3 9.6
Shutter Speed Seconds 0.004 0.010
Shutter Speed Fraction 1/233 1/104
Curtain Travel MilliS 13.5 18.8
1/500
PARAMETER Sensor2 Sensor1
Shutter Speed milliS 2.7 4.2
Shutter Speed Seconds 0.003 0.004
Shutter Speed Fraction 1/374 1/240
Curtain Travel MilliS 14.2 15.7
elephants?
Member
Hi,
Could you please send me the passcode for the firmware.
Thanks
Could you please send me the passcode for the firmware.
Thanks
Niglyn
Member
Hi all,
I have made a quick video showing the new pcb for The Shutter Tester.
It can be used as an alternate to the breakout board from aliexpress, having the advantage that all the TFT wiring including touch functionality is routed directly on the board, which makes wiring neater and easier.
They are currently available directly from myself.
EdwardLuke
Member
Hi,
I am trying to build my own shutter speed tester, however I have available to me an ESP32-S3 board, rather than as ESP32 board, and as such the supplied firmware assets aren't compatible with my board. Would it be possible to supply S3-compatible firmware or the source code so that I might try and compile it myself?
Many thanks!
Niglyn
Member
Hi,
I am trying to build my own shutter speed tester, however I have available to me an ESP32-S3 board, rather than as ESP32 board, and as such the supplied firmware assets aren't compatible with my board. Would it be possible to supply S3-compatible firmware or the source code so that I might try and compile it myself?
Many thanks!
Hi, thanks for the post.
Firmware is only for the ESP32. It is not designed for other boards. Most likely the register addresses and other mapping will be different and so without extensive re-writing of the source code, it would not function.
The firmware is supplied as a compiled bin file to prevent forking or code changes, which would then be out of my control.
You can get an ESP32 cheap-as-chips on Amazon or Ebay if you do not want the longer delivery time from AliExpress.
Hi.
I am an ESP32 hobbyist and analog camera nut. I built a rudimentary shutter tester a while back but was never happy with the higher speed accuracy. I am now going to build your version and kindle request the applicable keys to the code!. My goal is to build one for myself ( Nikon and Canon with Mamiya and legacy medium format) and one for my brother (Canon and Konica) by the time we meet for Thanksgiving! Appreciate your efforts, expertise, and support (in advance!). Thanks
I am an ESP32 hobbyist and analog camera nut. I built a rudimentary shutter tester a while back but was never happy with the higher speed accuracy. I am now going to build your version and kindle request the applicable keys to the code!. My goal is to build one for myself ( Nikon and Canon with Mamiya and legacy medium format) and one for my brother (Canon and Konica) by the time we meet for Thanksgiving! Appreciate your efforts, expertise, and support (in advance!). Thanks
Last edited:
Niglyn
Member
Hi, you are most welcome.Hi.
I am an ESP32 hobbyist and analog camera nut. I built a rudimentary shutter tester a while back but was never happy with the higher speed accuracy. I am now going to build your version and kindle request the applicable keys to the code!. My goal is to build one for myself ( Nikon and Canon with Mamiya and legacy medium format) and one for my brother (Canon and Konica) by the time we meet for Thanksgiving! Appreciate your efforts, expertise, and support (in advance!). Thanks
The Authorisation Code is generated by the ESP32 itself and based on hard-coding within it, so unique to every device.
The user guide shows you how to load the firmware, which will then generate and display your unique code, which you can then DM to me. By return, I will send your Pass Key.
Niglyn
Member
3D Printed Parts.
Hi all, since getting a 3d printer, I have been catching up on my back catalogue of things to printed.
Nearing the top of the list is a case for The Shutter Tester (currently designing & printing a case for my world weather clock).
So thought I would ask for peoples views on how folks would like it to look & work.
My initial thoughts are for a wedge-shaped box, with the front at an angle of 30 or maybe 45 degrees.
This will make the screen easier to see when sitting on the bench.
| Photrio.com contains affiliate links to products. We may receive a commission for purchases made through these links. To read our full affiliate disclosure statement please click Here. |
PHOTRIO PARTNERS EQUALLY FUNDING OUR COMMUNITY:  |