
Also, did anyone ever pony up the cash to try out the Harman Holo FX plates? I've got an oddball box of old Ilford Nuclear Plates but from what I read, that's the opposite of what's desired in terms of emulsion thickness even if their resolving power is extremely high.
-
Welcome to Photrio!Registration is fast and free. Join today to unlock search, see fewer ads, and access all forum features.Click here to sign up
You are using an out of date browser. It may not display this or other websites correctly.
You should upgrade or use an alternative browser.
You should upgrade or use an alternative browser.
Anyone ever make Lippmann plates?
-
A
- Thread starter BetterSense
- Start date

Recent Classifieds
-
For Sale Set of 3 glass beakers
- Started by Jon Shiu
-
For Sale 4x5 and 5x7 Black and white sheet film
- Started by Peter Schrager
-
For Sale Set of 4 stainless beakers Leedal, Vollrath
- Started by Jon Shiu
-
For Sale Hasselblad Distagon FE 50mm
- Started by Jammoh
-
Want to Buy Jobo CPP-3
- Started by lifeandmylens
Forum statistics
- Threads
- 203,101
- Messages
- 2,849,856
- Members
- 101,668
- Latest member
- JeremiahPeterson
- Recent bookmarks
- 0
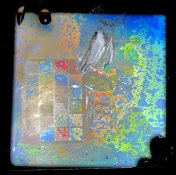
Oh hey it's been a super long time since an update!
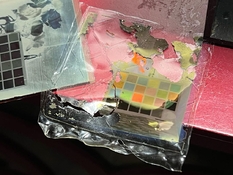
I'm still goofing around with the process on and off. Last night I had the wild idea of just cutting up a piece of aluminized mylar and pressing it against the back of the plate with some foam. There were a ton of air bubbles trapped between the mirror and the emulsion, but... it seems like it worked! The blue areas are where the air was trapped. The rest appear to be genuine Lippmann colors, which can be redshifted by breathing on it, etc. Not every color on the Macbeth chart seems right, but most seem pretty close- I was winging it, and the air-gelatin workflow may need to be modified for metallic reflection Lippmann plates. But from what little I can see, it appears to be true - the colors are brighter and significantly more saturated, at half the exposure time required.
The mylar is quite impermeable to air, so even pulling a vacuum for a few hours did nothing to remove the "bubbles". However, I wonder if a matrix of small pinholes cut with a laser cutter may allow the air to escape. Another option is to use Herbert Ives' silvered celluloid mirrors, since the celluloid will probably be significantly more permeable.
Attachments
Not every color on the Macbeth chart seems right, but most seem pretty close- I was winging it, and the air-gelatin workflow may need to be modified for metallic reflection Lippmann plates. But from what little I can see, it appears to be true - the colors are brighter and significantly more saturated, at half the exposure time required.
The interference contrast is higher because more light is reflected by the metal reflector than by the air-gelatin interface. By the way, a polarization filter may further enhance the interference contrast.
The mylar is quite impermeable to air, so even pulling a vacuum for a few hours did nothing to remove the "bubbles". However, I wonder if a matrix of small pinholes cut with a laser cutter may allow the air to escape. Another option is to use Herbert Ives' silvered celluloid mirrors, since the celluloid will probably be significantly more permeable.
You might breathe or put a small amount of glyerol, sugar etc.. on the emulsion layer, in order to slightly humidify the layer - to optically contact the reflector. But of course, that's causing a bit of swelling to the gelatin layer. A few drops of glycerol etc. should then be added to the final washing step.
Yet another option is to directly coat the recording medium on the aluminized mylar film. The idea was to put a glass or plastic support on the processed AgX layer and gently peal off the mylar sheet. So far the theory. In practice it turned out to be quite a mess.
Incidentally, with a photopolymer "glued" to the reflector it's pretty simple. The panchromatic Bayer/Covestro materials have become easily available - see e.g. http://geola.com/photomaterials-chemistry/. They usually come on a thin piece of polycarbonate film. So you only have to remove the PET release film and apply the tacky photopolymer layer to the aluminized mylar. The main problem I see though is the layer thickness of the Bayer photopolymer, which is said to be in the 20um range.
Ideally, the Lippmann recording layer should be below 2um. That puts pretty tight requirements on the recording material. In order to achieve bright images, It must provide extremely high index modulation. For that reason AgX emulsions ought to be rather "silver-rich" per amount of gelatin. DCG would be an almost ideal candidate when it comes to high index modulation. Historically, dichromated systems have been used for Lippmann photography (e.g. by Lippmann or Neuhauss).
Hey y'all,
Here's a quick little update that I'm quite excited about.
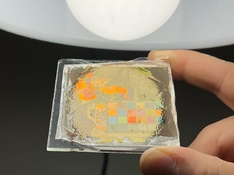
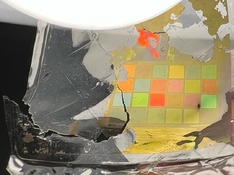
I've had some success coating mirror-polished steel plates with emulsion, developing the image on-mirror, and then stripping the emulsion off. They are genuine metallic Lippmann colors too - with a heavier bias towards red, bright saturated colors that do not require a swelling bath after development.
The real trick here, is to redeposit the image cleanly onto another substrate. I'm still just getting my feet wet with this method here, so there's a lot of experimenting to be done. But I'm pretty excited that this seems to be a viable alternative to mercury. As a second bonus too, cameras would not need major modification to use Lippmann plates, since the emulsion side faces the lens here.
Here's a quick little update that I'm quite excited about.
I've had some success coating mirror-polished steel plates with emulsion, developing the image on-mirror, and then stripping the emulsion off. They are genuine metallic Lippmann colors too - with a heavier bias towards red, bright saturated colors that do not require a swelling bath after development.
The real trick here, is to redeposit the image cleanly onto another substrate. I'm still just getting my feet wet with this method here, so there's a lot of experimenting to be done. But I'm pretty excited that this seems to be a viable alternative to mercury. As a second bonus too, cameras would not need major modification to use Lippmann plates, since the emulsion side faces the lens here.
Attachments
Holy c***, that's fascinating stuff!
To get this clear for me - the image is still embedded inside a gelatin layer/emulsion?
In that case, would an approach work as commonly used in carbon transfer printing? There are a couple of approaches that might be used. The simplest would be to take a sheet of paper, apply a fairly heavy gelatin sizing (around 20g/m2 tends to work well), let dry, then soak the paper for a few minutes and squeegee gelatin-side to your image while it's still on the metal plate. Then allow the paper to dry and hope/pray that the gelatin image sticks to the gelatin-sized paper and releases from the metal plate. This works perfectly fine with gelatin images on glass or PET/mylar film, but I've never tried it with metal.
The real trick here, is to redeposit the image cleanly onto another substrate.
To get this clear for me - the image is still embedded inside a gelatin layer/emulsion?
In that case, would an approach work as commonly used in carbon transfer printing? There are a couple of approaches that might be used. The simplest would be to take a sheet of paper, apply a fairly heavy gelatin sizing (around 20g/m2 tends to work well), let dry, then soak the paper for a few minutes and squeegee gelatin-side to your image while it's still on the metal plate. Then allow the paper to dry and hope/pray that the gelatin image sticks to the gelatin-sized paper and releases from the metal plate. This works perfectly fine with gelatin images on glass or PET/mylar film, but I've never tried it with metal.
Correct, the colors end up being on the "inside", on the bottom of the emulsion facing the mirror.Holy c***, that's fascinating stuff!
To get this clear for me - the image is still embedded inside a gelatin layer/emulsion?
In that case, would an approach work as commonly used in carbon transfer printing? There are a couple of approaches that might be used. The simplest would be to take a sheet of paper, apply a fairly heavy gelatin sizing (around 20g/m2 tends to work well), let dry, then soak the paper for a few minutes and squeegee gelatin-side to your image while it's still on the metal plate. Then allow the paper to dry and hope/pray that the gelatin image sticks to the gelatin-sized paper and releases from the metal plate. This works perfectly fine with gelatin images on glass or PET/mylar film, but I've never tried it with metal.
Thanks for that! I'll admit, I've just been kind of "winging it". The larger diamond pattern is because I've been using sheets of "culinary gelatin" that I've been applying wet, and allowing it to dry.
On a recommendation from Lippmann expert Darran Green, I've been hardening the emulsion in a bath of Kodak SH-1 before trying to transfer, which seems to help a bit keeping the emulsion from ripping. My formalin is quite old and has degraded a bit though, so I'm waiting for some fresh stuff to see how well it really works.
Thanks for the information on carbon transfer - I'll look into it more! A tried-and-true method like that might just be the ticket here!
Correct, the colors end up being on the "inside", on the bottom of the emulsion facing the mirror.
Ah, I see. Is the mirror surface and the interaction between the colors and the mirror essential? I.e. is it a hard requirement that the gelatin image ends up on a mirrored surface in the same way it's originally developed? This may complicate matters.
I've been hardening the emulsion in a bath of Kodak SH-1 before trying to transfer
There are so many ways of hardening a gelatin layer. Potassium alum in an acid environment, chrome alum, dichromate, DAS, formalin, glyoxal, and many others. Take your pick! Potassium alum is probably the safest of the bunch, but it's kind of slow. Chrome alum isn't too bad either in terms of toxicity and environmental impact, and is relatively fast as well as effective.
I don't see how formalin would degrade, to be honest. It's pretty darn stable. You could experiment with the degree of hardening, but really, even a hardened gelatin layer tends to be a bit flimsy once you take it off of its rigid support. A transfer approach such as the one I described is far more reliable. There are variants, including double transfers, where you go to a temporary support and then to a final support in a second step. Many possibilities!
I don't see how formalin would degrade, to be honest. It's pretty darn stable.
Polymerisation, that's the problem. And the solution typically contains some methanol to slow it down. In the end, some white precipitate forms.
@ThePhotoChemist Keep up the good work!
Ah, I see. Is the mirror surface and the interaction between the colors and the mirror essential? I.e. is it a hard requirement that the gelatin image ends up on a mirrored surface in the same way it's originally developed? This may complicate matters.
You need the mirror to be in perfect optical contact with the emulsion -- even the tiniest gap will prevent the interference fringes from getting recorded. You only need it there during exposure though -- back in the day, they would flow mercury behind the plate against the emulsion right before exposure, and drain it right afterward. The easiest method nowadays is to use an air gap, since the difference in refractive index at the air-gelatin boundary reflects 4% of the light back on itself. The tradeoff is that the fringes don't extend as far, so the colors are fainter. That being said, I occasionally get a batch of plates that are insanely bright with a nice dynamic range using air-gelatin only. I just don't know what I did, so I can't make them consistently like that!
With the steel mirror method, you can peel the emulsion off before or after development, just so long as its on there while its getting exposed.
Herbert Ives described a method where he created a flexible silver mirror, by silvering glass and then applying a celluloid varnish. The varnish could be lifted, bringing the silver with it, and laid down on a wet emulsion. After drying, it would be nice and stuck on there for exposure, and then it could be peeled away from the emulsion for development. I had a lot of trouble with it properly stripping the silver off the glass, and then even more trouble stripping it off the delicate emulsion! Aluminized mylar film seemed like it might work pretty well, but I could never get it to "stick" properly, since it's impermeable to water (and if the Lippmann emulsion is left wet too long, you get Oswald ripening and lose the ability to record the fringes).
I think the steel mirror method is probably the way to go, if the kinks can be worked out.
There are so many ways of hardening a gelatin layer. Potassium alum in an acid environment, chrome alum, dichromate, DAS, formalin, glyoxal, and many others. Take your pick! Potassium alum is probably the safest of the bunch, but it's kind of slow. Chrome alum isn't too bad either in terms of toxicity and environmental impact, and is relatively fast as well as effective.
As far as hardening - I use a little bit of chrome alum in the emulsion itself, if nothing else, to help it stick to the glass. In some gelatin-only tests I did on the mirrors, they stripped much more easily, so I'm wondering if it might be giving the emulsion a little bit of unwanted sticking power to the mirror itself. I think the next batch I make, I'll try some tests with no chrome alum, and another set with even more chrome alum, to see if it's making a difference or not! Thanks for the recommendations on other hardeners, I'll look into those as well.
Polymerisation, that's the problem. And the solution typically contains some methanol to slow it down. In the end, some white precipitate forms.
Yeah, I think that's what I've got. There's like an inch of white precipitate in the bottom of the 500mL bottle.
Alright, I am going to briefly bring this thread back from the dead to do my yearly check-in.
I could not reproduce my 2019 results with the standard "Darran Green's" recipe, despite running the same one over and over quite a few times. I started to tweak different aspects of it, trying to retrace my steps and figure out if I accidentally did something "wrong" and deviated from the recipe, inadvertently producing better results. I don't think I'm quite at that level yet, but I have learned quite a few things even compared to a few months ago.
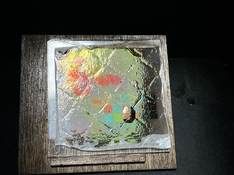
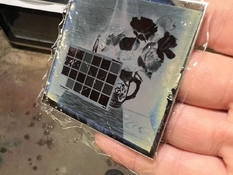
Here is one of the better examples of my magic batch, and is my end goal for what I'm trying to reproduce with this process. It's a bit blueshifted, but finer details can be easily seen, and the white flower is notably not solarized.

It's not easily visible here, especially now with the back of the plate painted black, but of particular note is that the edges of the plate and shadow areas that receive the least amount of light are crystal clear. In my many follow ups, shadow areas were often full of thick silver deposits that still produce a good blacks, with overall good results on the rest of the colors. However, I think the very best examples of Lippmann plates that can be made with the air-gelatin method will probably lack these thicker silver deposits. We'll touch more on this later.
1. The Standard Green Recipe
My goto version of the Lippmann emulsion recipe can be found on Page 13 of "The True Colour of Photography" by Hans Bjelkhagen and Darran Green, document attached to this post. I won't fully write out all the details of the process, but I want to touch on a few things it does here.
1. Heat up 4g gelatin in 100mL of water, until the gelatin has melted (I usually do 40C).
2. Decant 20mL of the gelatin solution to a second beaker.
3. In the 20mL portion, add 680mg KBr and 48mg KI (I use a 1% solution of KI here, so 4.8mL of that)
4. In the 80mL portion, dissolve 1g AgNO3.
5. When the solution has cooled to 35C, add in the halide salt solution to the AgNO3 solution with a syringe over a minute or so.
I ran this recipe many times, but I could not shake off the fact that it was producing extremely high contrast results, with an inability to render more subtle colors. Results typically looked something like this:

For my GP-2, I keep the ammonium thiocyanate in a separate 3% solution. Typically development here is about 7.5mL GP-2 "stock" + 2mL ammonium thiocyanate (3%) + 100mL water, for 4 minutes or so.
I played around with different exposures, development times, ammonium thiocyanate concentrations in GP-2, different pyro developers, filtration, spectral dye concentrations, you name it - but I could not shake the insanely high contrast of these plates, while at the same time even approaching the level of brightness and saturation that I previously got.
Of note, anyone familiar with more standard silver-gelatin emulsions will see that the AgNO3 and halide salt solutions are swapped - typically you add the silver to the halide solution, but it's the other way around in this recipe. Green did this because, even though the halide salts are overall in stoichiometric excess, most of the addition occurs in a solution with an excess of AgNO3. This is used to keep the crystal sizes from growing too large.
2. My "Blue Period" - Halation
I noticed that when I was running these emulsions and precipitating at 35C, they often inevitably had a strong blue tone to them, and it took me a real long time to shake it. I had some good results, but they were the exception, not the rule.

The flowers had a strange red halo around them, in an otherwise overwhelmingly blue image. Yellow filtration did not help cut the blues down, the images remained blue, but actual blue objects in the shot would lose brightness and disappear. Shadow areas were often muddy and indistinct, and I eventually started to wonder if there was just an insane amount of halation happening during exposure. I ran a test by covering half the plate with black construction paper.


Yup, we're getting some insane halation here. Here's how one of the unexposed plates looked in the light compared to a piece of glass.

Yup, that's gonna be no good.
I eventually resolved the issue by realizing I wasn't even running the "standard" recipe correctly to being with. Here's what I was doing:
A: 4g gelatin, 1g AgNO3, 100mL water
B: 680mg KBr, 4.8mL 1% KI, 80 mL water
B into A at 35C
The halide solution had no gelatin in it like the recipe called for. When I readjusted to be more in line with the standard recipe, the blue tones mostly went away, though the shadow areas still had thick deposits of silver.
3. Lower Precipitation Temp
I eventually figured out that crystal clear plates could be obtained every single time by lowering the temperature at which precipitation happens. At 35C, it was often a toss up as to whether the plates would still be somewhat milky or not, but by precipitating at 30C or lower, shadow areas have always been consistently clear. I haven't noticed much of a difference in performance once you're below 30C, but these days I do it anywhere from 26C-28C.

This didn't do much for my contrast issues, the chart and flowers still stubbornly are floating in a black void, but now the plates are starting to look a lot more like my 2019 batch, at least when looking through them.
4. 2x, X into Ag
When experimenting with thin coatings, at one point I found that by diluting the emulsion with a gelatin solution, the gelatin-diluted plates were extremely dim, compared to emulsions only diluted by water. This make sense - the fringe pattern for white light is extremely shallow, and diluting the emulsion 1:1 with a gelatin solution more or less displaces 50% of the AgX from that shallow area. Taking this knowledge, I tried to apply it in the opposite direction - what would happen if we double everything in the recipe except the gelatin? If we keep the dilutions of all the ingredients the same relative to each other except the gelatin, we should be able to cram twice as much AgX into that shallow area, and hopefully produce brighter, faster plates.
The new recipe for this is:
1. Heat up 4g gelatin in 180mL water to 40C until it melts
2. Decant 40mL of the gelatin solution
3. Add 2g AgNO3 to the 140mL portion of gelatin
4. Add 1360mg KBr, 9.8mL 1% KI to the 40mL portion
5. At 28C, add the halide salts into the silver salts. 500RPM magnetic stirring. Addition usually about 1m15s.
The more observant readers here will notice that I'm starting to take more detailed notes, inversely proportional to the amount of hair I have left on my head, due to this process making me want to tear it all out.
This did not help at all with my contrast or speed, but it did produce some very nice plates. Of note, the plates were very bright and very saturated. These "2x" emulsion formulations needed to have the GP-2 slightly modified by backing the ammonium thiocyanate concentration off a bit, perhaps due to the higher availability of silver ions in the emulsion. Normal development for these was 15mL GP-2 "stock" + 2mL 3% ammonium thiocyanate + 100mL water for about 2 minutes.


The results were interesting and temporarily pleasing, but I knew I could do better. Flower subjects worked pretty well, but all the subtle colors were still getting blown out of existence. I have a theory about that...
Here's highly technical diagram.

I have to wonder if, due to the extremely high contrast nature of the emulsion, the wavelengths that fall within a narrow area of the peaks in sensitivity, just become massively overrepresented in the final image by the time the plate has "exposed" and the wavelengths that fall outside of these areas don't really even get a chance to have much action on the plate.
I've hit the image attachment limit, so this post will be continued in the next one.
In 2019 I made a single batch of plates using air-gelatin reflection only, that had incredible brightness, saturation and dynamic range. I only shot maybe a quarter of those plates, having figured "oh hey I guess I've got this process more or less figured out", and focused my time on autochrome experiments. The plates sat for a few months and eventually went bad (bright silver deposits anytime they were developed, kind of like looking at very old b&w prints that weren't stored very well), and any time I tried reproducing that batch, I could only manage not-so-great results. This year I shifted primary focus to see if I could figure out what I did then, and started to absolutely lose my mind. I have one or two plates from my "magic" 2019 batch that I jealously hold onto now to anchor me to my sanity.That being said, I occasionally get a batch of plates that are insanely bright with a nice dynamic range using air-gelatin only. I just don't know what I did, so I can't make them consistently like that!
I could not reproduce my 2019 results with the standard "Darran Green's" recipe, despite running the same one over and over quite a few times. I started to tweak different aspects of it, trying to retrace my steps and figure out if I accidentally did something "wrong" and deviated from the recipe, inadvertently producing better results. I don't think I'm quite at that level yet, but I have learned quite a few things even compared to a few months ago.
Here is one of the better examples of my magic batch, and is my end goal for what I'm trying to reproduce with this process. It's a bit blueshifted, but finer details can be easily seen, and the white flower is notably not solarized.
It's not easily visible here, especially now with the back of the plate painted black, but of particular note is that the edges of the plate and shadow areas that receive the least amount of light are crystal clear. In my many follow ups, shadow areas were often full of thick silver deposits that still produce a good blacks, with overall good results on the rest of the colors. However, I think the very best examples of Lippmann plates that can be made with the air-gelatin method will probably lack these thicker silver deposits. We'll touch more on this later.
1. The Standard Green Recipe
My goto version of the Lippmann emulsion recipe can be found on Page 13 of "The True Colour of Photography" by Hans Bjelkhagen and Darran Green, document attached to this post. I won't fully write out all the details of the process, but I want to touch on a few things it does here.
1. Heat up 4g gelatin in 100mL of water, until the gelatin has melted (I usually do 40C).
2. Decant 20mL of the gelatin solution to a second beaker.
3. In the 20mL portion, add 680mg KBr and 48mg KI (I use a 1% solution of KI here, so 4.8mL of that)
4. In the 80mL portion, dissolve 1g AgNO3.
5. When the solution has cooled to 35C, add in the halide salt solution to the AgNO3 solution with a syringe over a minute or so.
I ran this recipe many times, but I could not shake off the fact that it was producing extremely high contrast results, with an inability to render more subtle colors. Results typically looked something like this:
For my GP-2, I keep the ammonium thiocyanate in a separate 3% solution. Typically development here is about 7.5mL GP-2 "stock" + 2mL ammonium thiocyanate (3%) + 100mL water, for 4 minutes or so.
I played around with different exposures, development times, ammonium thiocyanate concentrations in GP-2, different pyro developers, filtration, spectral dye concentrations, you name it - but I could not shake the insanely high contrast of these plates, while at the same time even approaching the level of brightness and saturation that I previously got.
Of note, anyone familiar with more standard silver-gelatin emulsions will see that the AgNO3 and halide salt solutions are swapped - typically you add the silver to the halide solution, but it's the other way around in this recipe. Green did this because, even though the halide salts are overall in stoichiometric excess, most of the addition occurs in a solution with an excess of AgNO3. This is used to keep the crystal sizes from growing too large.
2. My "Blue Period" - Halation
I noticed that when I was running these emulsions and precipitating at 35C, they often inevitably had a strong blue tone to them, and it took me a real long time to shake it. I had some good results, but they were the exception, not the rule.
The flowers had a strange red halo around them, in an otherwise overwhelmingly blue image. Yellow filtration did not help cut the blues down, the images remained blue, but actual blue objects in the shot would lose brightness and disappear. Shadow areas were often muddy and indistinct, and I eventually started to wonder if there was just an insane amount of halation happening during exposure. I ran a test by covering half the plate with black construction paper.
Yup, we're getting some insane halation here. Here's how one of the unexposed plates looked in the light compared to a piece of glass.
Yup, that's gonna be no good.
I eventually resolved the issue by realizing I wasn't even running the "standard" recipe correctly to being with. Here's what I was doing:
A: 4g gelatin, 1g AgNO3, 100mL water
B: 680mg KBr, 4.8mL 1% KI, 80 mL water
B into A at 35C
The halide solution had no gelatin in it like the recipe called for. When I readjusted to be more in line with the standard recipe, the blue tones mostly went away, though the shadow areas still had thick deposits of silver.
3. Lower Precipitation Temp
I eventually figured out that crystal clear plates could be obtained every single time by lowering the temperature at which precipitation happens. At 35C, it was often a toss up as to whether the plates would still be somewhat milky or not, but by precipitating at 30C or lower, shadow areas have always been consistently clear. I haven't noticed much of a difference in performance once you're below 30C, but these days I do it anywhere from 26C-28C.
This didn't do much for my contrast issues, the chart and flowers still stubbornly are floating in a black void, but now the plates are starting to look a lot more like my 2019 batch, at least when looking through them.
4. 2x, X into Ag
When experimenting with thin coatings, at one point I found that by diluting the emulsion with a gelatin solution, the gelatin-diluted plates were extremely dim, compared to emulsions only diluted by water. This make sense - the fringe pattern for white light is extremely shallow, and diluting the emulsion 1:1 with a gelatin solution more or less displaces 50% of the AgX from that shallow area. Taking this knowledge, I tried to apply it in the opposite direction - what would happen if we double everything in the recipe except the gelatin? If we keep the dilutions of all the ingredients the same relative to each other except the gelatin, we should be able to cram twice as much AgX into that shallow area, and hopefully produce brighter, faster plates.
The new recipe for this is:
1. Heat up 4g gelatin in 180mL water to 40C until it melts
2. Decant 40mL of the gelatin solution
3. Add 2g AgNO3 to the 140mL portion of gelatin
4. Add 1360mg KBr, 9.8mL 1% KI to the 40mL portion
5. At 28C, add the halide salts into the silver salts. 500RPM magnetic stirring. Addition usually about 1m15s.
The more observant readers here will notice that I'm starting to take more detailed notes, inversely proportional to the amount of hair I have left on my head, due to this process making me want to tear it all out.
This did not help at all with my contrast or speed, but it did produce some very nice plates. Of note, the plates were very bright and very saturated. These "2x" emulsion formulations needed to have the GP-2 slightly modified by backing the ammonium thiocyanate concentration off a bit, perhaps due to the higher availability of silver ions in the emulsion. Normal development for these was 15mL GP-2 "stock" + 2mL 3% ammonium thiocyanate + 100mL water for about 2 minutes.
The results were interesting and temporarily pleasing, but I knew I could do better. Flower subjects worked pretty well, but all the subtle colors were still getting blown out of existence. I have a theory about that...
Here's highly technical diagram.
I have to wonder if, due to the extremely high contrast nature of the emulsion, the wavelengths that fall within a narrow area of the peaks in sensitivity, just become massively overrepresented in the final image by the time the plate has "exposed" and the wavelengths that fall outside of these areas don't really even get a chance to have much action on the plate.
I've hit the image attachment limit, so this post will be continued in the next one.
Attachments
Last edited:
5. 2x, Ag into X
So, what causes contrast in photographic emulsions? From my understanding, it mostly comes down to your AgX crystal size distribution. The more uniform your crystal size distribution is, the higher contrast it will be. So, what affects the size distribution? All sorts of things - the relative amount of KI to KBr, stirring speed, and choice of developer. I tried messing around with all 3 to no success, my plates remained stubbornly contrasty. I even started trying to make my own GP-2 formulation, by varying the amount of hydroquinone, and even eliminating it entirely (replacing with ascorbic acid) to no success.
At one point I was examining one of the plates from earlier this year from my "blue period", and well, I apparently was already accidentally doing it!

The plate was from the batch that still suffered quite a bit of halation, but it undoubtedly had a far superior dynamic range than anything I had made for months. This game me an idea... now that I've shown that lower precipitation temps help keep the crystal size down, would swapping the additions of Ag and halide salts produce a more polydisperse crystal size distribution, lower the contrast, and increase dynamic range?
Here's the recipe:
1. 4g gelatin in 180mL water, heat to 40C until melted.
2. Decant 40mL of the solution into a separate beaker.
3. Add 2g AgNO3 to the 40mL portion
4. Add 1360mg KBr, 9.8mL 1% KI to the 140mL portion.
5. Add the AgNO3 to the halide salts with a syringe, about 1m15s addition, 500RPM stirring.
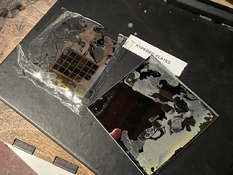
The results were immediately noticeable. Here are two shots for comparison, the first was being 2x X into Ag, and the second being 2x Ag into X.


The second image was about a stop slower, but I didn't really care at this point, I was just so happy to finally get the contrast down. Further batches didn't have the same hit on speed, so it might have just been something else I did, who knows.
Here are a few more examples.


They are quite bright, though the saturation still isn't quite there yet to my 2019 batch, but it's pretty darn close. Honestly, I think with some more careful balancing of the spectral dyes, or in the short term, better filtration, and I should be nearly there.
I should note that for sections 4 and 5, I have been using just pinacyanol and erythrosine as spectral sensitizers, instead of the recommended "B" set of dyes in the original Green recipe. I long suspected that my solution of Green's green (hah) sensitizer, 3,3'-diethyloxacarbocyanine iodide, had degraded since I mixed it up. I no longer believe this - moreover, 3,3'-diethyloxacarbocyanine iodide has a peak somewhat higher in the spectrum compared to erythrosine, and due to my theory earlier about the high contrast plates getting cut off, 3,3'-diethyloxacarbocyanine iodide's "blue green" appearance just looked a bit worse than erythrosine. In the followup batches of Ag Into X, 3,3'-diethyloxacarbocyanine iodide started performing quite as well as I remembered it doing.
6. 1x Ag into X, no gelatin in Ag
I didn't want to go overboard with too many changes at once, so when I decided to switch back to Green's "B" set of spectral sensitizers, as well as 1x the salts again, to see how well those did. I tried to further increase dynamic range by more closely replicating my "blue period" recipe, which was as follows:
1. 4g gelatin in 100mL water, 680mg KBr, 4.8mL 1% KI. Heat to 40C until melted and allow it to cool.
2. 1g AgNO3 in 80mL water
3. Add silver salts into halide salts. 2 50 second additions (don't have a bigger syringe lol) at 500RPM stirring, 27C.
This might have produced an even better dynamic range, but I'm not totally sure, it's pretty close.
Results have been pretty good, though they are notably a bit dimmer, and I have to push development a bit longer to really coax some brightness out of them, resulting in mild fogging in the shadow areas. The plates more or less range from "pretty okay" to "good", and I'm quite pleased with them.


Yellow filtration helps a bit. I don't think the "blues" here are coming from halation this time, as the plates are pretty clear -- rather, I think I just don't have enough spectral sensitizers to balance out the plate's natural response to blue light. In my "blue period" the blues could not be filtered out, whereas here, yellow filtration does help cut them back quite a bit.
The dang white flowers are still solarized.
7. 2x Ag into X, no gelatin in Ag
I tried doubling the previous salts again last night with no luck - the emulsion was so cloudy I ended up dumping it before I even set it to gel up for washing. I might be flying too close to the sun with this one, as far as eliminating other factors that would otherwise keep the crystal sizes down. There could have been a contaminate though, so I will be giving this another go before I write it off completely.
8. MISC Other Stuff
A. I've been using citric acid as a post-development swelling agent instead of glycerin. It's way easier to measure out little bits of the stuff while adjusting it to "tune" it to changes in ambient humidity. Still seems to go bad after a few weeks though, with what looks like stuff growing in it, and needs to be filtered out occasionally.
B. On a recommendation from a paper Darran Green recently shared, I started adding a small quantity of hydroquinone to the emulsion, which apparently acts as an electron acceptor, and greatly boosts speed. By doing this, one can entirely skip the ascorbic acid hypersensitizing step. I'm unsure what effects this may have on the lifespan of the plates, so I've been adding 0.1g of the stuff to my emulsion halfway through coating the plates. I usually have been using up most of the hydroquinone sensitized plates fairly quickly, but at least one week out from coating they show no signs of fog or loss in speed.
C. I didn't mention it earlier, but regardless of the recipe I use, I've usually been diluting the final volume to about 200mL, and coating 25mL of emulsion per 8x10 plate, and then cutting them down to 6x6 format after it's dried. The dilution helps keep the overall coating fairly thin to further avoid halation, and it dries out a lot faster too.
So, that's about where I'm at now. Over the past year this process has turned me into a Sisyphus-like darkroom creature, hellbent on finally getting that boulder to stay perched on top of the mountain, dreaming of making Lippmann plates just as bright and colorful as the ground glass in which we use to focus our cameras. At the very least, I can make plates now a lot better than I could even just a few months ago.
Thankyou for coming to my TEDTalk.
So, what causes contrast in photographic emulsions? From my understanding, it mostly comes down to your AgX crystal size distribution. The more uniform your crystal size distribution is, the higher contrast it will be. So, what affects the size distribution? All sorts of things - the relative amount of KI to KBr, stirring speed, and choice of developer. I tried messing around with all 3 to no success, my plates remained stubbornly contrasty. I even started trying to make my own GP-2 formulation, by varying the amount of hydroquinone, and even eliminating it entirely (replacing with ascorbic acid) to no success.
At one point I was examining one of the plates from earlier this year from my "blue period", and well, I apparently was already accidentally doing it!
The plate was from the batch that still suffered quite a bit of halation, but it undoubtedly had a far superior dynamic range than anything I had made for months. This game me an idea... now that I've shown that lower precipitation temps help keep the crystal size down, would swapping the additions of Ag and halide salts produce a more polydisperse crystal size distribution, lower the contrast, and increase dynamic range?
Here's the recipe:
1. 4g gelatin in 180mL water, heat to 40C until melted.
2. Decant 40mL of the solution into a separate beaker.
3. Add 2g AgNO3 to the 40mL portion
4. Add 1360mg KBr, 9.8mL 1% KI to the 140mL portion.
5. Add the AgNO3 to the halide salts with a syringe, about 1m15s addition, 500RPM stirring.
The results were immediately noticeable. Here are two shots for comparison, the first was being 2x X into Ag, and the second being 2x Ag into X.
The second image was about a stop slower, but I didn't really care at this point, I was just so happy to finally get the contrast down. Further batches didn't have the same hit on speed, so it might have just been something else I did, who knows.
Here are a few more examples.
They are quite bright, though the saturation still isn't quite there yet to my 2019 batch, but it's pretty darn close. Honestly, I think with some more careful balancing of the spectral dyes, or in the short term, better filtration, and I should be nearly there.
I should note that for sections 4 and 5, I have been using just pinacyanol and erythrosine as spectral sensitizers, instead of the recommended "B" set of dyes in the original Green recipe. I long suspected that my solution of Green's green (hah) sensitizer, 3,3'-diethyloxacarbocyanine iodide, had degraded since I mixed it up. I no longer believe this - moreover, 3,3'-diethyloxacarbocyanine iodide has a peak somewhat higher in the spectrum compared to erythrosine, and due to my theory earlier about the high contrast plates getting cut off, 3,3'-diethyloxacarbocyanine iodide's "blue green" appearance just looked a bit worse than erythrosine. In the followup batches of Ag Into X, 3,3'-diethyloxacarbocyanine iodide started performing quite as well as I remembered it doing.
6. 1x Ag into X, no gelatin in Ag
I didn't want to go overboard with too many changes at once, so when I decided to switch back to Green's "B" set of spectral sensitizers, as well as 1x the salts again, to see how well those did. I tried to further increase dynamic range by more closely replicating my "blue period" recipe, which was as follows:
1. 4g gelatin in 100mL water, 680mg KBr, 4.8mL 1% KI. Heat to 40C until melted and allow it to cool.
2. 1g AgNO3 in 80mL water
3. Add silver salts into halide salts. 2 50 second additions (don't have a bigger syringe lol) at 500RPM stirring, 27C.
This might have produced an even better dynamic range, but I'm not totally sure, it's pretty close.
Results have been pretty good, though they are notably a bit dimmer, and I have to push development a bit longer to really coax some brightness out of them, resulting in mild fogging in the shadow areas. The plates more or less range from "pretty okay" to "good", and I'm quite pleased with them.
Yellow filtration helps a bit. I don't think the "blues" here are coming from halation this time, as the plates are pretty clear -- rather, I think I just don't have enough spectral sensitizers to balance out the plate's natural response to blue light. In my "blue period" the blues could not be filtered out, whereas here, yellow filtration does help cut them back quite a bit.
The dang white flowers are still solarized.
7. 2x Ag into X, no gelatin in Ag
I tried doubling the previous salts again last night with no luck - the emulsion was so cloudy I ended up dumping it before I even set it to gel up for washing. I might be flying too close to the sun with this one, as far as eliminating other factors that would otherwise keep the crystal sizes down. There could have been a contaminate though, so I will be giving this another go before I write it off completely.
8. MISC Other Stuff
A. I've been using citric acid as a post-development swelling agent instead of glycerin. It's way easier to measure out little bits of the stuff while adjusting it to "tune" it to changes in ambient humidity. Still seems to go bad after a few weeks though, with what looks like stuff growing in it, and needs to be filtered out occasionally.
B. On a recommendation from a paper Darran Green recently shared, I started adding a small quantity of hydroquinone to the emulsion, which apparently acts as an electron acceptor, and greatly boosts speed. By doing this, one can entirely skip the ascorbic acid hypersensitizing step. I'm unsure what effects this may have on the lifespan of the plates, so I've been adding 0.1g of the stuff to my emulsion halfway through coating the plates. I usually have been using up most of the hydroquinone sensitized plates fairly quickly, but at least one week out from coating they show no signs of fog or loss in speed.
C. I didn't mention it earlier, but regardless of the recipe I use, I've usually been diluting the final volume to about 200mL, and coating 25mL of emulsion per 8x10 plate, and then cutting them down to 6x6 format after it's dried. The dilution helps keep the overall coating fairly thin to further avoid halation, and it dries out a lot faster too.
So, that's about where I'm at now. Over the past year this process has turned me into a Sisyphus-like darkroom creature, hellbent on finally getting that boulder to stay perched on top of the mountain, dreaming of making Lippmann plates just as bright and colorful as the ground glass in which we use to focus our cameras. At the very least, I can make plates now a lot better than I could even just a few months ago.
Thankyou for coming to my TEDTalk.
I've wanted to make Lippman plates since I first read about them (early 1970s?) -- but I don't know if I'll ever have the time, money, and patience to do so. I do love reading about them, though...
Man, that was worthwhile reading @ThePhotoChemist I'm going to need some time to let it sink in.
Have you been in touch with Kees Brandenburg btw?
Have you been in touch with Kees Brandenburg btw?
It sounds like a difficult process of limited displayability, but it seems intriguing in that it appears to reproduce the color spectrum in its entirety rather than using any RGB approach. I'm interested in more details as to how it's done.
beyond me
I've wanted to make Lippman plates since I first read about them (early 1970s?) -- but I don't know if I'll ever have the time, money, and patience to do so. I do love reading about them, though...
Time and patience you'd need sufficient quantities of, but the money part isn't too bad - at least 1g (or maybe 2 now...) of AgNO3 gets me 6 8x10 plates, and each one of those gets me 12 more plates in 6x6 format. Not a bad price for a theoretical 72 shots, all things considered. And I'm hoping all my head-to-wall banging I've been doing will hopefully lower the thresholds of required time and patience eventually, too.
Man, that was worthwhile reading @ThePhotoChemist I'm going to need some time to let it sink in.
Have you been in touch with Kees Brandenburg btw?
I didn't recognize the name right off the top of my head, but it looks like we follow each other on Instagram, and I even commented on a Lippmann plate they made earlier this month! I'll definitely be keeping an eye on their work!
Congratulations and thank you very much for this very informative and impressive post!
Over the years I have come to think the key to improving index modulation of both holographic and Lippmann AgX emulsions is:
- increasing the AgX/gelatin ratio and perhaps,
- switching to mainly AgCl based emulsions.
On these two points see Jeff Blyth, https://d-i-yscience.blogspot.com/2016/04/holograms-on-wine-glasses-and-glass.html?m=1,. That paper refers to an extremely "silver-rich emulsion" based on AgCl. Maybe also important to note the use of acridine orange for spectral sensitization.
In the "Lippmann" case I wonder if converting the remaining AgCl to AgI (much higher R.I.!) would make some improvement. Increased noise might become an issue though.
And then - big unknown still for more than a hundred years, given that Lippmann photography pioneers like Neuhauss were doing research on that very topic already - it remains to be seen whether to bleach or not bleach the layer. Regarding holographic AgX emulsions it is obvious that results obtained from colloidal development are not on par with layers processed with a rehalogenating bleach...
Congratulations and thank you very much for this very informative and impressive post!
Over the years I have come to think the key to improving index modulation of both holographic and Lippmann AgX emulsions is:
- increasing the AgX/gelatin ratio and perhaps,
- switching to mainly AgCl based emulsions.
On these two points see Jeff Blyth, https://d-i-yscience.blogspot.com/2016/04/holograms-on-wine-glasses-and-glass.html?m=1,. That paper refers to an extremely "silver-rich emulsion" based on AgCl. Maybe also important to note the use of acridine orange for spectral sensitization.
In the "Lippmann" case I wonder if converting the remaining AgCl to AgI (much higher R.I.!) would make some improvement. Increased noise might become an issue though.
And then - big unknown still for more than a hundred years, given that Lippmann photography pioneers like Neuhauss were doing research on that very topic already - it remains to be seen whether to bleach or not bleach the layer. Regarding holographic AgX emulsions it is obvious that results obtained from colloidal development are not on par with layers processed with a rehalogenating bleach...
Thanks!
In regards to further increasing AgX content - I did "somewhat successfully" even push more AgX into it with no issues - I guess I'd call it a "3x, X into Ag". The spectral dye concentrations were all off so I didn't really do much with it before wiping the glass to reuse (at the time I was more focused on getting the contrast down, and wasn't super interested pursuing). But I can at the very least say that the plates still didn't show milkiness when viewed in white light. They were starting to darken a bit though, probably due to the sheer amount of AgX and spectral dyes crammed in there, but the were quite clear otherwise. So we might be able to push the ceiling higher in future tests.
The AgCl point is interesting, thanks for sharing that paper. Quite recently I ran across a very old article about Lippmann photography, where it was offhandedly mentioned that AgBrCl emulsions produced quite brilliant results, so there might be something too it. The comparison would have been against AgBr emulsions at the time though, and not AgBrI. I'll link it when I manage to find it again.
I tried bleaching on Jeff Blythe's suggestion to a plate in 2018. The discussion happened in the Lippmann Facebook group, however I'll copy and paste some of the comments here since many members don't use Facebook, and it's quite an interesting discussion.
Jeff Blythe:
I am wondering if your intensification quest is barking up the wrong tree to get more diffraction efficiency. We have learned from holography techniques that bleaching increases diffraction efficiency greatly rather than trying to make developed up silver still darker. Years ago Hans Bjelkhagan made a great Lippmann photo showing how well this works. A formulation that is made from easy-to-get chemicals might be worth trying although it is made for Denisyuk hologram making. It is as follows:"For reflection holograms, I find the most easily obtainable bleach is made as follows:-
20g. Copper sulphate (CuSO4. 5H2O)
80g. Potassium bromide (or sodium bromide)
70 ml Acetic acid
DI to 1 litre.
This is known as a rehalogenating bleach. The bleach does promote grain growth, so the time in the bleach should be minimized. The bleach process should not be allowed to take much longer than about a minute. If there is a very dark area (due to over-developed up silver) that has not gone after about a minute and a half , it is best to stop the bleaching reaction anyway and wash the plate under running tap water . That still dark part will clear in the final bath used next. As this bath does not contain a lot of bromide ions there is no tendency for it to encourage more grain growth.
After rinsing well under tap water, a final bath to prevent “Print Out” is needed.
Anti-Printout stock solution
“Print-out” Is an old term used in photography . It means a darkening occurs in the finished photograph (hologram) in ambient lighting , particularly in sunshine.
40 g. Sodium persulfate (or ammonium or potassium persulfate)
40g. Sodium hydrogen sulfate
DI to 1 litre.
3 minutes in this bath followed by a very brief rinse in DI gives good print-out resistance. (Always make sure that your final rinse water is free from any traces of developer )." But in any case , a bleached Lippmann photo that might "print-out"eventually would not be a serious problem I suppose.
I reported that I tried this out on a dim plate, and though the action that took place during the bleaching matched his description, I did not see any traces of color. Fililpe Alves (@manalokos earlier in this thread) reported a similar failure, and IIRC Darran Green also reported to me via email that he also was not able to see colors. I should note that at the time of my comment, I would have been using a pyro-based developer, not having tried GP-2 until a year later.
Hans Bjelkhagen went on to comment:
Remember that in a Lippmann photograph only very few interference fringes are located at the upper part of the emulsion. Any distortion of the fringes with a chemical process will destroy the information recorded. For colour holograms I use a pre-hardening bath BEFORE development to make sure no distortion takes place throughout the emulsion when bleaching. This is important In particular when a developer not based on pyrogallol is used. Pyrogallol-based developers hardens the emulsion.
Colloidal development using highly diluted developers generates ultrafine silver particles. This processing can produce bright holograms like the old Russian Denisyuk monochrome holograms.
Nick Phillips introduced a third step in processing bleached holograms by treating them in an amidol solution and illuminate them with a lamp above the tray during processing. This created colloidal silver particles in the emulsion with a controlled printout process, resulting in bright stable monochrome reflection holograms. (Colloidal processing does not work for colour holograms since the emulsion must be absolutely clear after processing).
Jeff followed up finally with:
Oh dear! Sorry about that. So that holographic bleach technique does’nt work on those Lippmann colours. That emphasizes just how much more delicate is the fringe structure in the Lippmann process compared to the holographic one. As Hans Bjelkhagen says one needs to rigidify the recording substrate ( gelatin) before taking photo if one is going to use bleaching techniques afterwards. Otherwise bleaching chemistry that will just cause minor wavelength shifts to a monochromatic hologram will apparently ruin the Lippmann photo subtleties. Live and Learn!
That being said, later in that same discussion I posted some links to holographyforum user "Martin" who reported making Lippmann plates by developing in amidol, and then bleaching in a copper bleach. In another post by Martin, he also reports that Neuhauss also successfully used a copper bleach, though at the time I wasn't able to find a source for that at the time. If you have something on hand that I can take a look at, I'd love to read it.
@Hologram, I'm guessing you're quite a bit more familiar with the "holography world" than I am (not a particularly high bar there), so if you see a flaw here and would like me to try something else, I'm all ears! One thing that occurs to me, is that I would not have tried this with a pre-treatment of a formalin based hardener at the time, so that might be worthwhile to look into. I think I still have all the materials on hand to make more of the hardener and copper bleach. Or if you have something else you'd like me to try as well, I'm sure I can source the necessary materials for it.
Jeff mentioned he got a 4x speed increase when using NaCl + dye (instead of KBr), which is quite counterintuitive and against any "photographic wisdom".The AgCl point is interesting...
Thanks for forwarding that FB discussion.
I suspect one problem with rehalogenating bleaches is directly related to the GP colloidal development (perhaps, the contrast thing you mentioned could also be seen in that context?).
In the late 1990s I did quite some testing on the then newly available holographic PFG-03 emulsion from Slavich. Most of the GP developers did poorly with rehalogenating bleaching. One exception though was a iodine bleach:
Iodine.............................10g
KI.....................................1g
Ethyl alcohol...............750ml
Water..........................250ml
I assume in the Lippmann case things may have to be done more gently - maybe through more diluted solutions or the addition of auxiliary "restraining agents" that lower gelatin swelling or the layer from being attacked. That might involve things like glyerols, ethanol, methanol, collagen hydrolisate etc.
Have you ever tried a metol-ascorbate developer like JD-4?
Metol........................4g
Ascorbic acid..........25 g
Sodium carbonate ..70 g
Sodium hydroxide...15 g
One litre water
It was said to work nicely with PFG-03C. It can be used with various rehalogenating bleaches (e.g. "PBU" and alike).
That being said, later in that same discussion I posted some links to holographyforum user "Martin" who reported making Lippmann plates by developing in amidol, and then bleaching in a copper bleach. In another post by Martin, he also reports that Neuhauss also successfully used a copper bleach, though at the time I wasn't able to find a source for that at the time. If you have something on hand that I can take a look at, I'd love to read it.
That user was me. I do not recall the details about the amidol developer anymore but believe it was simply formed by amidol + sodium sulfite. As for Neuhauss he mentioned the bleaches somewhere at the end of his journal. I had made a transcription of his journals and put it online at the holography forum.
@Hologram, I'm guessing you're quite a bit more familiar with the "holography world" than I am (not a particularly high bar there), so if you see a flaw here and would like me to try something else, I'm all ears! One thing that occurs to me, is that I would not have tried this with a pre-treatment of a formalin based hardener at the time, so that might be worthwhile to look into. I think I still have all the materials on hand to make more of the hardener and copper bleach. Or if you have something else you'd like me to try as well, I'm sure I can source the necessary materials for it.
Formaldehyde hardening would certainly be worth a try. Apart from being a rather nasty stuff, it may put a time frame on the usability of the layers though, since the hardening action may go on for weeks.
I seem to remember that this was less of an issue with glutaraldehyde, I do not know.
One thing to try in my opinion would be to test a pure AgCl emulsion and probably, the acridine orange spectral sensitizer.
Some experiments with silver/aluminum leaf
I bought some silver and "imitation silver" leaf last year with the intention of a good ol' "let's just see what would happen". After seeing just now poor (diffuse) of a reflection it made when laminated against bare glass, I never moved forward with it. Recently I was rummaging around in some drawers and saw the packing for them, and figured, eh, why not, I've got some old plates I made a few months ago... let's actually see what happens.
The aluminum leaf was highly resistant to just sticking after merely being smashed against the emulsion. I was trying to avoid water here, since if the emulsion is made wet for too long (several hours), you start to get grain growth due to Ostwald ripening, and the emulsion will begin to cloud up. I cycled through whatever I had on hand and eventually found one that worked - acetonitrile. It evaporated quickly, but left the silver just barely clinging to the emulsion. It could then be further carefully compressed into the plate, until a very diffuse reflection was formed. I wasn't very optimistic that anything at all would happen but to my surprise...

...it worked!


The mirror really only could sharply resolve objects in it from about 6 inches away, and quickly became hazy for anything farther. But the color purity and brightness was undoubtedly improved - the clearest example is the mirror boundary that runs across one of the red flowers, where there was no mirror backing present. The rough nature of the aluminum backing imprinted an not wholly unpleasant texture all across the image.
I quickly jumped the gun and declared this a true metallic-reflection Lippmann, but after further observation and thought, no that's not correct. But it's not a true air-gelatin reflection Lippmann either, at least I think!
Eventually I noted that the plate had blueshifted (metallic-reflection Lippmanns do not require post-processing swelling, air-gelatin Lippmanns do, otherwise they will blueshift). This occurred after mounting, which is how it looks now -


It's nearly impossible to illustrate through digital means - but if you catch the plate at a almost-hitting-reflected-light-but-not-quite, the colors are accurate to how they look in life. But as soon as you actually catch the light, the colors instantaneously blueshift - red becomes orange, green becomes blue, etc. I almost have to conclude that this is a hybrid between air-gelatin and metallic-reflection Lippmanns. I would think there is just enough of an air gap between the aluminum and the gelatin to cause a fresnel reflection, but the aluminum was also close enough to the gelatin to create its own fringe pattern. How bizarre! I did try to do this with genuine silver leaf as well, but I found I could not get it to stick in the same manner.
I moved on to seeing if I could apply the leaf in actual optical contact with the emulsion by using trace amounts of water vapor - just enough to make the gelatin sticky, but not enough to require extended drying times. I filled a beaker with some warm water and placed the plate over it for about 60 seconds, and then adhered the leaf 'as best I could' (not well). It stuck decidedly well, and appeared to be fully dry after only about an hour or so.


The above was an attempt with silver leaf. This seems to be more in line with what a pure metallic-reflection Lippmann would look like - deep reds and no blueshifting at all. For whatever reason though it seems like the contact area took on heavy fog, despite only being in contact with the emulsion for about an hour.

Aluminum leaf applied in the same manner to the moistened emulsion seemed to incur a lot less fog in the contact area - I'm a bit unsure here if there is some degree of fog, or if it's just overexposed.
The results are encouraging, although I think this is the end for the use of different leafing.
The biggest accomplishment here is proving without a doubt that aluminum mirrors do work. It has been long proposed that the thin layer of aluminum oxide was too thick for Lippmann photography and could not work, but I think these results disprove that assertion.
I turn my attention back to the next logical step - aluminized mylar mirror film. I've had a roll sitting around for Lippmann photography essentially as long as I've been experimenting with the process itself, but I never really found a way to get it to stick. Problems especially arise with the use of water, which simply does not evaporate through mylar on any reasonable timescale. Not being able to get it to stick with any other solvent, I've long abandoned it as a feasible method... until I thought about it for 5 seconds and realized I had been missing two of the most obvious solutions this whole time.
1. Cellulose acetate - it has a moderate-permeability, and is very high compared to, say, glass. The emulsion could be coated on an acetate support and the mylar mirror laminated to a gently wetted emulsion and allowed to dry. I tried some test gelatin yesterday and this seemed to work - after placing the mirror-gelatin-acetate sandwich in a bowl of desiccant, it was "probably pretty dry" after 2 hours, and "definitely dry" after letting it sit overnight. The gelatin seemed to have a preference to sticking to the mylar though, so after peeling it this morning, I found that it pretty much delaminated the whole thing away from the acetate - not good.
I'm not terribly familiar with "making film", as I've pretty much always used glass ever since I started all this DIY emulsion making stuff, but I see that cellulose-(probably di-)acetate needs some subbing for optimal results, and furthermore Denise Ross has some great recommendations of her experience with it, so I'll probably try and give that a go to see if that fares better. This is the first time I've ever gotten the mylar mirror to remain in optical contact with gelatin at all though, so I still call it a win.
2. Adding glycerin to the emulsion - To some test gelatin, I added a little bit of glycerin. The exact formula was 2g gelatin, 10mL 1% chrome alum, 100mL water and 0.5mL glycerin. The test emulsion was deposited on some glass and allowed to dry overnight. This worked really well, as the dry gelatin remained fairly tacky, and the mylar mirror could then be immediately laminated to it without the need of any wetting.
In some respects it worked a bit too well, as 12 hours of fan drying in my basement deposited an incredible amount of dust onto the plate, and the mylar didn't really look so good after laminating - imagine 10,000 little "bubbles" where the dust prevented the mylar from making full contact. Better care to avoid dust would be necessary, but that's a problem for later, as I'd like to see if this method even works metallic-reflections first, or if the added glycerin affects the emulsion in any other negative ways. I'm a little concerned I added a bit too much glycerin relative to the gelatin, so I'll probably do some tests to see if I can back it down a bit while still getting the mylar to adhere well.
That's where I'm at now - I've got a few more tests to do first before I try this out with a fresh Lippmann emulsion. I'm optimistic I might be getting somewhere in the quest to achieve a true mercury replacement, but I won't fully get my hopes up quite yet, as I've definitely thought that more than a couple times before.
I did end up buying a bunch of lab-grade NaCl with the intent to try this out, but it's still on my to-do list
I bought some silver and "imitation silver" leaf last year with the intention of a good ol' "let's just see what would happen". After seeing just now poor (diffuse) of a reflection it made when laminated against bare glass, I never moved forward with it. Recently I was rummaging around in some drawers and saw the packing for them, and figured, eh, why not, I've got some old plates I made a few months ago... let's actually see what happens.
The aluminum leaf was highly resistant to just sticking after merely being smashed against the emulsion. I was trying to avoid water here, since if the emulsion is made wet for too long (several hours), you start to get grain growth due to Ostwald ripening, and the emulsion will begin to cloud up. I cycled through whatever I had on hand and eventually found one that worked - acetonitrile. It evaporated quickly, but left the silver just barely clinging to the emulsion. It could then be further carefully compressed into the plate, until a very diffuse reflection was formed. I wasn't very optimistic that anything at all would happen but to my surprise...
...it worked!
The mirror really only could sharply resolve objects in it from about 6 inches away, and quickly became hazy for anything farther. But the color purity and brightness was undoubtedly improved - the clearest example is the mirror boundary that runs across one of the red flowers, where there was no mirror backing present. The rough nature of the aluminum backing imprinted an not wholly unpleasant texture all across the image.
I quickly jumped the gun and declared this a true metallic-reflection Lippmann, but after further observation and thought, no that's not correct. But it's not a true air-gelatin reflection Lippmann either, at least I think!
Eventually I noted that the plate had blueshifted (metallic-reflection Lippmanns do not require post-processing swelling, air-gelatin Lippmanns do, otherwise they will blueshift). This occurred after mounting, which is how it looks now -
It's nearly impossible to illustrate through digital means - but if you catch the plate at a almost-hitting-reflected-light-but-not-quite, the colors are accurate to how they look in life. But as soon as you actually catch the light, the colors instantaneously blueshift - red becomes orange, green becomes blue, etc. I almost have to conclude that this is a hybrid between air-gelatin and metallic-reflection Lippmanns. I would think there is just enough of an air gap between the aluminum and the gelatin to cause a fresnel reflection, but the aluminum was also close enough to the gelatin to create its own fringe pattern. How bizarre! I did try to do this with genuine silver leaf as well, but I found I could not get it to stick in the same manner.
I moved on to seeing if I could apply the leaf in actual optical contact with the emulsion by using trace amounts of water vapor - just enough to make the gelatin sticky, but not enough to require extended drying times. I filled a beaker with some warm water and placed the plate over it for about 60 seconds, and then adhered the leaf 'as best I could' (not well). It stuck decidedly well, and appeared to be fully dry after only about an hour or so.
The above was an attempt with silver leaf. This seems to be more in line with what a pure metallic-reflection Lippmann would look like - deep reds and no blueshifting at all. For whatever reason though it seems like the contact area took on heavy fog, despite only being in contact with the emulsion for about an hour.
Aluminum leaf applied in the same manner to the moistened emulsion seemed to incur a lot less fog in the contact area - I'm a bit unsure here if there is some degree of fog, or if it's just overexposed.
The results are encouraging, although I think this is the end for the use of different leafing.
The biggest accomplishment here is proving without a doubt that aluminum mirrors do work. It has been long proposed that the thin layer of aluminum oxide was too thick for Lippmann photography and could not work, but I think these results disprove that assertion.
I turn my attention back to the next logical step - aluminized mylar mirror film. I've had a roll sitting around for Lippmann photography essentially as long as I've been experimenting with the process itself, but I never really found a way to get it to stick. Problems especially arise with the use of water, which simply does not evaporate through mylar on any reasonable timescale. Not being able to get it to stick with any other solvent, I've long abandoned it as a feasible method... until I thought about it for 5 seconds and realized I had been missing two of the most obvious solutions this whole time.
1. Cellulose acetate - it has a moderate-permeability, and is very high compared to, say, glass. The emulsion could be coated on an acetate support and the mylar mirror laminated to a gently wetted emulsion and allowed to dry. I tried some test gelatin yesterday and this seemed to work - after placing the mirror-gelatin-acetate sandwich in a bowl of desiccant, it was "probably pretty dry" after 2 hours, and "definitely dry" after letting it sit overnight. The gelatin seemed to have a preference to sticking to the mylar though, so after peeling it this morning, I found that it pretty much delaminated the whole thing away from the acetate - not good.
I'm not terribly familiar with "making film", as I've pretty much always used glass ever since I started all this DIY emulsion making stuff, but I see that cellulose-(probably di-)acetate needs some subbing for optimal results, and furthermore Denise Ross has some great recommendations of her experience with it, so I'll probably try and give that a go to see if that fares better. This is the first time I've ever gotten the mylar mirror to remain in optical contact with gelatin at all though, so I still call it a win.
2. Adding glycerin to the emulsion - To some test gelatin, I added a little bit of glycerin. The exact formula was 2g gelatin, 10mL 1% chrome alum, 100mL water and 0.5mL glycerin. The test emulsion was deposited on some glass and allowed to dry overnight. This worked really well, as the dry gelatin remained fairly tacky, and the mylar mirror could then be immediately laminated to it without the need of any wetting.
In some respects it worked a bit too well, as 12 hours of fan drying in my basement deposited an incredible amount of dust onto the plate, and the mylar didn't really look so good after laminating - imagine 10,000 little "bubbles" where the dust prevented the mylar from making full contact. Better care to avoid dust would be necessary, but that's a problem for later, as I'd like to see if this method even works metallic-reflections first, or if the added glycerin affects the emulsion in any other negative ways. I'm a little concerned I added a bit too much glycerin relative to the gelatin, so I'll probably do some tests to see if I can back it down a bit while still getting the mylar to adhere well.
That's where I'm at now - I've got a few more tests to do first before I try this out with a fresh Lippmann emulsion. I'm optimistic I might be getting somewhere in the quest to achieve a true mercury replacement, but I won't fully get my hopes up quite yet, as I've definitely thought that more than a couple times before.
Sorry, I burned out really hard on all photography related matters last fall and never replied - I did try this out, but I had no successes with it at all.Have you ever tried a metol-ascorbate developer like JD-4?
One thing to try in my opinion would be to test a pure AgCl emulsion and probably, the acridine orange spectral sensitizer.
I did end up buying a bunch of lab-grade NaCl with the intent to try this out, but it's still on my to-do list
Wow, this is quite amazing!
I guess it boils down to increased index modulation from a mirror/reflector. Incidentally, having seen the collection of Gabriel Lippmann's original photographs at the Musée de l'Elysée, Lausanne (https://elysee.ch/collections/), I clearly favor the "reflector" method. The sparkling vivid colors are quite impressive. But as we all know Lippmann did it with mercury.
Instead, I wondered about this approach:
- coating an AgX emulsion temporarily on an aluminized PET ("Mylar") sheet etc.;
- once dried, it has to be mechanically secured by laminating a glass plate or some plastic substrate on top of the emulsion layer. This could be done with some epoxy, perhaps some thermosetting stuff. Once that adhesive layer has set, the plate is ready for use.
- After the photographic exposure the Mylar film is carefully pealed off and the emulsion can be processed.
I do know this kind of method works with several photopolymer materials. As for AgX I have no idea whether fogging might become an issue. Moreover, hardening and the addition of a plasticizer have to be tested experimentally. In the context of some lithography related patents I seem to remember that AgX adhesion to aluminum was said to be notoriously weak. Putting an epoxy etc. adhesive might be tricky in respect to bubble formation.
If this method was successful it would probably work with other gelatin based recording materials as well (dichromated, ferric, diazo gelatin).
Wow, this is quite amazing!
I guess it boils down to increased index modulation from a mirror/reflector. Incidentally, having seen the collection of Gabriel Lippmann's original photographs at the Musée de l'Elysée, Lausanne (https://elysee.ch/collections/), I clearly favor the "reflector" method. The sparkling vivid colors are quite impressive. But as we all know Lippmann did it with mercury.
Instead, I wondered about this approach:
- coating an AgX emulsion temporarily on an aluminized PET ("Mylar") sheet etc.;
- once dried, it has to be mechanically secured by laminating a glass plate or some plastic substrate on top of the emulsion layer. This could be done with some epoxy, perhaps some thermosetting stuff. Once that adhesive layer has set, the plate is ready for use.
- After the photographic exposure the Mylar film is carefully pealed off and the emulsion can be processed.
I do know this kind of method works with several photopolymer materials. As for AgX I have no idea whether fogging might become an issue. Moreover, hardening and the addition of a plasticizer have to be tested experimentally. In the context of some lithography related patents I seem to remember that AgX adhesion to aluminum was said to be notoriously weak. Putting an epoxy etc. adhesive might be tricky in respect to bubble formation.
If this method was successful it would probably work with other gelatin based recording materials as well (dichromated, ferric, diazo gelatin).
The post was so good, I seem to have summoned the next evolution Hologram!
Thankyou for the kind words. I also had the extreme displeasure of seeing an original mercury plate made by Gabriel Lippmann, which made me dissatisfied with my work and sent me spiraling down the "mercury alternative" rabbit hole again. I was considering even starting to explore potentially using a mercury-indium alloy, which retains most of the same physical behaviors as mercury does, but with a significantly reduced rate at which it gives off vapor. I do all my work in my house though, so if there's even the slightest chance I can avoid using mercury, it's probably best I explore those options first.
In the interim I'm trying to avoid emulsion transfer, although with any sort of overlayed mirror, it might be necessary to get "perfect" results - since there's always dust or even just uneven emulsion that causes the mirror to lift up slightly around dust. I guess my hopes here is that I can get it "good enough", at least for my tastes. Getting the emulsion to lay flat on the new substrate is a challenge that I never quite figured out either - even just being a little bit off makes it very hard to view the plate. In the transfer post I made here in Oct 2023, you can see one example where I used some cellulose sheet as a part of the "sandwich" I used to move the emulsion - the texture it imparted made the already very tight viewing angle even more tight and hard to see.
Getting the emulsion to peel cleanly was another challenge, but I admit that all my work there focused on peeling post-development, and from memory, pre-development emulsion peels way more easily. If you have any specific ideas on something I could try, I'm definitely all ears!
I think what you say about the emulsion's adherence to aluminum is true - I've been running some tests with using gelatin coated on cellulose acetate. The good news is, the vapor transmission through the acetate support is good enough that the emulsion will dry after a few hours. The bad news is, the mylar delaminates once the emulsion is dry. I did use a lot of chrome alum with these tests though, so I will back it off and see if that helps.
I'm still trying to gauge the minimum glycerin level to add to keep a tacky texture. My initial test worked after drying overnight, but when I came back a couple of days later, it had hardened to the point where it was no longer tacky and the mylar wouldn't stick. I think the chrome alum was still hardening between the initial lamination attempt and the later failed one. Other tests with a higher glycerin level retained their tackiness after several days, which is encouraging.
I had to take a major detour last weekend though, because I got some extremely surprising results with a method I had not expected to work in the slightest. Tim Johnson over in the Lippmann group on facebook suggested I use a metallic pigment used in resin casting - specifically "Let's Resin" brand metallic silver. After some tests, I found the best way to apply it was to fully wet the emulsion, dump a little bit of pigment on, and smear the paste around until the emulsion was about as fully covered as it was going to get. After drying, the pigment creates a very (and I mean very) diffuse looking reflection deposited on the back of the plate. The plate is still quite transparent when viewed by transmitted light.


Well, much to my extreme surprise, it worked, and it looked better than anything I had made in a long time.
The plate was not blueshifted and did not need any post-processing swelling, evidence of a genuine metallic-reflection. In fact, it seemed like it was slightly redshifted at first, although letting it sit out in the air for another 30 minutes or so after it was apparently dry seemed to bring the colors in line.
The reason I had these Lippmann plates sitting around in the first place was because I couldn't get anything good out of them at all with the air-gelatin method, so I just shut them in a papersafe and forgot about them. I've never been able to produce deep reds like this, which is exciting, though it seems like there's a bit of a battle with the plate taking on an overall yellow appearance (my digital camera reduced some of the yellow cast in the previous example). Backing off the development times and shooting with a cyan filter seemed to help with that, without taking too much of a hit to brightness. Dynamic range was improved quite a bit as well
It's hard to remove the mica without scratching the emulsion. Before development I've been using a tray of isopropyl alcohol and a cotton ball - this gets most of it off, but some stays stubbornly stuck on. I've been gently wiping the plate with a gloved finger after development to remove the remaining mica. A "makeup remover" wipe worked really well, but something in it caused the emulsion to fog and barely any color could be seen.
The mica powder is quite messy to work with as well. Various parts of my lab bench have taken on a dazzling metallic sheen, and there was a disturbingly large radius in which I'm finding mica dust deposited on things. I do all the mica work in the fume hood now, which contains the mess if nothing else.
Color brightness and purity have been vastly improved, and it makes the development "goldilocks zone" between color purity and brightness way easier to hit. The exposure times are reduced a bit too, but nothing massive.


That last one, the closeup of the red flowers was a little weird compared to the rest - that one kind of seemed like it had the same duality of behaviors between air-reflection and metallic-reflection Lippman plates. When I initially threw a prism on there, it didn't look so good - the colors were somewhat indistinct. I noticed when I caught the light on the plate at an off-angle, the flower petals were a bit more orange looking than they appeared in direct reflected light. I gave it a quick breath to redshift the plate slightly and then reapplied the prism, and the colors really popped.
We can see that the mica does not achieve full coverage, so that make me wonder if the air-gelatin fresnel reflection is just happening in between the mica particles wherever it can the room. Maybe I just didn't get quite as much mica coverage as I did with the rest of the tests.
Overall this is pretty exciting to me, as I honestly didn't expect this to work in the slightest. It does throw any preconceived notion of what I thought could possibly work out the window, and I'm willing to try anything now. Here's a Lippmann plate made with Rustoleum "Mirror Effect" spray paint.
It worked well wherever the mirror pigment made contact with the emulsion, but I'm probably not going to pursue this much further.
I'll keep goofing with around with things and will report back if I figure out anything cool.
My friends... Mica is the way.


I've found that tipping a dime-sized amount of the mica pigment on a plate after it has been wetted (either out of the hypering bath, or just wetted with distilled water if hydroquinone was added into the emulsion directly) and thoroughly massaging the wet paste around with a gloved finger for a minute or two gets fairly comprehensive coverage, though there is still a lot of light that makes it through the plate when viewed through it. If the chrome alum has had enough time to assert it's full hardening effect, the paste will dry after a couple of minutes, leaving a nice diffuse metallic coating, the excess dust can then be gently brushed off with a soft makeup brush. Applying the mica on plates that had only been dry for a couple hours results in somewhat goopier work, but they still appear to work fine.
After the plates have dried, they can be exposed - that first flower shot was about 20 minutes at f/2.8, EV12, with heavy filtration (30C+20M). The second was 42 minutes after bellows extension, 40C+30M. To develop, first the mica mirror is removed from the plate with a couple of cotton balls soaked with a little bit of 99% isopropyl alcohol. You must be gentle here, as it's quite easy to scratch. The goal is to just get the vast majority of the mica off for the processing chemistry to find its way in - there will still be a thin "film" of mica on the surface that we'll remove later.
I use GP-2, but I keep the ammonium thiocyanate in its separate solution and add it directly to the working solution. Here I used 15mL GP-2 stock + 2mL 3% ammonium thiocyanate + 100mL water, 3 min with agitation, 20ish-C.
The plates are then washed, and fixed with a 5% solution of hypo for a minute. The remainder of the mica can be easily removed with a water-soaked cotton ball and some dish soap during the final wash.
I'm a little confused about what happens next - that very first image of the flowers in the vase, that was straight off the drying rack, using a prism and some toluene in between to index match - I do this to test out how plates will look under a prism, without fully comitting to the messy Canada balsam. Fresh of the rack it looked great. I let it sit and dry for a couple hours while I worked on other stuff - when I went to mount it with Canada balsam, I was terribly disappointed to see that it had blueshifted!
I'm not crazy though - that plate was clearly exibiting the "correct" colors right before mounting, but it had blueshifted substantially the second I put the prism on. This goes for toluene as well, not just Canada balsam. After it has fully dried, there are two sets of colors in these things - Catching the reflection directly in light shows the colors being true to life. But catching a bright light source juuust before you actually catch the light, the diffuse reflection showcases the blueshifted colors as well, and are more representative of what you'll actually see once the prism is applied. It's almost impossible to snag a picture of these off-angle colors I'm describing, as I can barely even see them in person - maybe something like illuminating with a point source instead might help.


The above images were immediately taken before and after applying the prism.
This makes me think there are two sets of fringes again in these things - metallic ones at the direct contact point of the mica particles, and air-gelatin fringes in between. Or possibly the mica fringes are just shallower than, say, fringes produced by mercury, but deeper than air-gelatin fringes, so they are more susceptible to processing induced shrinkage of the very top of gelatin. I admit though, I am really at the limit of my understanding of how this process works, and I am very much at risk of being extremely confidently wrong with my guesses.
That all being said, treating the plates to a 0.5% solution of citric acid (with a couple drops of Photo-Flo) after development and right before setting them on the drying rack seems to completely fix this problem.
The swelling solution brings the "off-angle" colors more in line, and doesn't really seem to swell the "direct colors" all that much, and the plates still looked really good after mounting even after having set in the air overnight.


Outdoor tests are a bit less pleasent to look at, currently. They have a really heavy response to yellow, and I think my indoor lighting setup is just a bit bluer than outside. This makes some sense, as my air-gelatin plates tended to come out overwhelmingly blue in recent years, and I would have added more green/orange/red spectral dyes to compensate. The autoportait was shot with a 30C filter and the cemetary shot with 40C+30M - blues are still very weak even after all that filtration. With no filter at all, outside shots more or less appear monochromatically yellow.
With the air-gelatin plates, I felt like I was always fighting "other" colors that manifest along with the ones you want - blue from halation/fog and yellow from overdevelopment, and this made it hard to tease out what the actual color response of the plate was. I only have a week or two of experience with them so far, but the mica seems different - it seems like what you see is what you get, and makes finding the right spectral balance a lot easier. I wasted a lot of shots thinking the yellowish appearance was due to overdevelopment, but that doesn't seem to be the case.
This makes me wonder - maybe my reliance on jacking up spectral dye levels was actually putting me in a sort of catch-22 positive-feedback loop type situation. Maybe plates that are poorly balanced experience more halation, or due to some other mechanism, making them appear even more blue, arising separately from the blue light in the scene. It'll be interesting to see how the plates perform when shot with as air-gelatin plates, after getting a good spectral balance with the mica.
I can't share the recipe that went into these plates, because I don't know what it was - I mislableled something in my papersafe! I could tell this wasn't the batch I made back in 25-03-08, because suddenly the test shots stopped working at all, and I realized they needed hypering from ascorbic acid to work. That means this is some random batch from late last summer that predate me adding hydroquinone to the emulsion. I'm not super worried about reproducibility, because it seems like more or less anything you add mica to just looks better, but it's quite unlucky. I will share the recipe when I can reproduce these results with fresh plates.
Last thing - The mica I'm using seems to work really well, and is really cheap. Still, I'm curious how other metallic pigments might perform in comparison. I'm open to suggestions if anyone has any! I'm tempted to, like, even try creating my own silver nanoparticles and seeing if I can centrifuge them out into a similar powder - though I imagine they would be less suitable unless you plan on shooting them pretty soon after applying them, to avoid oxidation. I see some cheap "holographic" mica resin pigments out there - I wonder if those might produce a cool effect?
I've found that tipping a dime-sized amount of the mica pigment on a plate after it has been wetted (either out of the hypering bath, or just wetted with distilled water if hydroquinone was added into the emulsion directly) and thoroughly massaging the wet paste around with a gloved finger for a minute or two gets fairly comprehensive coverage, though there is still a lot of light that makes it through the plate when viewed through it. If the chrome alum has had enough time to assert it's full hardening effect, the paste will dry after a couple of minutes, leaving a nice diffuse metallic coating, the excess dust can then be gently brushed off with a soft makeup brush. Applying the mica on plates that had only been dry for a couple hours results in somewhat goopier work, but they still appear to work fine.
After the plates have dried, they can be exposed - that first flower shot was about 20 minutes at f/2.8, EV12, with heavy filtration (30C+20M). The second was 42 minutes after bellows extension, 40C+30M. To develop, first the mica mirror is removed from the plate with a couple of cotton balls soaked with a little bit of 99% isopropyl alcohol. You must be gentle here, as it's quite easy to scratch. The goal is to just get the vast majority of the mica off for the processing chemistry to find its way in - there will still be a thin "film" of mica on the surface that we'll remove later.
I use GP-2, but I keep the ammonium thiocyanate in its separate solution and add it directly to the working solution. Here I used 15mL GP-2 stock + 2mL 3% ammonium thiocyanate + 100mL water, 3 min with agitation, 20ish-C.
The plates are then washed, and fixed with a 5% solution of hypo for a minute. The remainder of the mica can be easily removed with a water-soaked cotton ball and some dish soap during the final wash.
I'm a little confused about what happens next - that very first image of the flowers in the vase, that was straight off the drying rack, using a prism and some toluene in between to index match - I do this to test out how plates will look under a prism, without fully comitting to the messy Canada balsam. Fresh of the rack it looked great. I let it sit and dry for a couple hours while I worked on other stuff - when I went to mount it with Canada balsam, I was terribly disappointed to see that it had blueshifted!
I'm not crazy though - that plate was clearly exibiting the "correct" colors right before mounting, but it had blueshifted substantially the second I put the prism on. This goes for toluene as well, not just Canada balsam. After it has fully dried, there are two sets of colors in these things - Catching the reflection directly in light shows the colors being true to life. But catching a bright light source juuust before you actually catch the light, the diffuse reflection showcases the blueshifted colors as well, and are more representative of what you'll actually see once the prism is applied. It's almost impossible to snag a picture of these off-angle colors I'm describing, as I can barely even see them in person - maybe something like illuminating with a point source instead might help.
The above images were immediately taken before and after applying the prism.
This makes me think there are two sets of fringes again in these things - metallic ones at the direct contact point of the mica particles, and air-gelatin fringes in between. Or possibly the mica fringes are just shallower than, say, fringes produced by mercury, but deeper than air-gelatin fringes, so they are more susceptible to processing induced shrinkage of the very top of gelatin. I admit though, I am really at the limit of my understanding of how this process works, and I am very much at risk of being extremely confidently wrong with my guesses.
That all being said, treating the plates to a 0.5% solution of citric acid (with a couple drops of Photo-Flo) after development and right before setting them on the drying rack seems to completely fix this problem.
The swelling solution brings the "off-angle" colors more in line, and doesn't really seem to swell the "direct colors" all that much, and the plates still looked really good after mounting even after having set in the air overnight.
Outdoor tests are a bit less pleasent to look at, currently. They have a really heavy response to yellow, and I think my indoor lighting setup is just a bit bluer than outside. This makes some sense, as my air-gelatin plates tended to come out overwhelmingly blue in recent years, and I would have added more green/orange/red spectral dyes to compensate. The autoportait was shot with a 30C filter and the cemetary shot with 40C+30M - blues are still very weak even after all that filtration. With no filter at all, outside shots more or less appear monochromatically yellow.
With the air-gelatin plates, I felt like I was always fighting "other" colors that manifest along with the ones you want - blue from halation/fog and yellow from overdevelopment, and this made it hard to tease out what the actual color response of the plate was. I only have a week or two of experience with them so far, but the mica seems different - it seems like what you see is what you get, and makes finding the right spectral balance a lot easier. I wasted a lot of shots thinking the yellowish appearance was due to overdevelopment, but that doesn't seem to be the case.
This makes me wonder - maybe my reliance on jacking up spectral dye levels was actually putting me in a sort of catch-22 positive-feedback loop type situation. Maybe plates that are poorly balanced experience more halation, or due to some other mechanism, making them appear even more blue, arising separately from the blue light in the scene. It'll be interesting to see how the plates perform when shot with as air-gelatin plates, after getting a good spectral balance with the mica.
I can't share the recipe that went into these plates, because I don't know what it was - I mislableled something in my papersafe! I could tell this wasn't the batch I made back in 25-03-08, because suddenly the test shots stopped working at all, and I realized they needed hypering from ascorbic acid to work. That means this is some random batch from late last summer that predate me adding hydroquinone to the emulsion. I'm not super worried about reproducibility, because it seems like more or less anything you add mica to just looks better, but it's quite unlucky. I will share the recipe when I can reproduce these results with fresh plates.
Last thing - The mica I'm using seems to work really well, and is really cheap. Still, I'm curious how other metallic pigments might perform in comparison. I'm open to suggestions if anyone has any! I'm tempted to, like, even try creating my own silver nanoparticles and seeing if I can centrifuge them out into a similar powder - though I imagine they would be less suitable unless you plan on shooting them pretty soon after applying them, to avoid oxidation. I see some cheap "holographic" mica resin pigments out there - I wonder if those might produce a cool effect?
Thanks for posting this! I cannot imagine ever pursuing such an undertaking, but reading about your adventures is fascinating!
Thanks for posting this! I cannot imagine ever pursuing such an undertaking, but reading about your adventures is fascinating!
Thanks! I have to admit, this has certainly rekindled excitement for these things in a way I haven't had in a while. I was more or less resigned to the fact that it was always going to be a touchy, finicky process with a terrible failure:success ratio, all while the prospect of using mercury called to me like the Green Goblin mask. The improved dynamic range and wider "sweet spot" during development is starting to make these things dangerously close to "kind of practical" - though I'll have to wait to see if I can truly reproduce these results before I make such a claim.
I know I have said it several times over the last few years, but I am hoping to make a full comprehensive video on these things - I'm actively taking footage and reworking the script now. It's definitely going to "really happen this time guys", as I do have a bit of a deadline to meet with it now. It'll still be a couple months though, I want to make it really nice.
| Photrio.com contains affiliate links to products. We may receive a commission for purchases made through these links. To read our full affiliate disclosure statement please click Here. |
PHOTRIO PARTNERS EQUALLY FUNDING OUR COMMUNITY:  |