I was reading a book about printing and had came across this very interesting home made extractor with light bluff made of wood. The author goes on to show how to make a paper safe with wooden planks that will completely block off the light. Not long ago I recall a post in this forum about safelight was paint with red paint have been in service for many years. I was amaze at how a little work around can be so helpful without having to go out and spend money on those item. It really save a lot of money. Of cause, I suppose anybody who would undertake such a task will need some tools at hand to have it all put together, consider this aspect, I do have some tools at my disposal. I want to explore the possibility of how far people will go to hand made the item they use in the darkroom? Will you show me yours?
-
Welcome to Photrio!Registration is fast and free. Join today to unlock search, see fewer ads, and access all forum features.Click here to sign up
You are using an out of date browser. It may not display this or other websites correctly.
You should upgrade or use an alternative browser.
You should upgrade or use an alternative browser.
What Is Your Home Made Darkroom Item?
-
A
- Thread starter ivanlow
- Start date


Recent Classifieds
-
For Sale Leica M-A Black Chrome Body MINT- Late Model
- Started by samuelphoto
-
Found Cambo SC lens board - Copal 1 (possible trade?)
- Started by Kino
-
For Sale FS: Konica Hexanon AR 85mm f/1.8 - Clean Glass/User Barrel - $170 Shipped
- Started by UsedFilmCameras
-
Want to Buy Calumet C1 8×10 rear standard back
- Started by Madmac
Forum statistics
I've made my own negative carriers as well as 35mm inserts for a Durst. A printing frame for border-less RC prints. Drying cabinets and a few other items, Before buying a floor mounted De Vere I made an adjustable bench, I wall mounted two enlargers and could remove part of the bench top and slide it in at various heights allowing up to 30x40" enlargements from a Durst M670/601 and Johnsons V45.
I'm about to make 6x17 and 5x7 inserts for a De Vere 5108 negative holder.
Ian
I'm about to make 6x17 and 5x7 inserts for a De Vere 5108 negative holder.
Ian
Ian,
I'm curious, how do did that negative enlarger? Was it that you simply send in the measurement to the metal workshop for cutting?
I'm curious, how do did that negative enlarger? Was it that you simply send in the measurement to the metal workshop for cutting?
I've made my own negative carriers as well as 35mm inserts for a Durst. A printing frame for border-less RC prints. Drying cabinets and a few other items, Before buying a floor mounted De Vere I made an adjustable bench, I wall mounted two enlargers and could remove part of the bench top and slide it in at various heights allowing up to 30x40" enlargements from a Durst M670/601 and Johnsons V45.
I'm about to make 6x17 and 5x7 inserts for a De Vere 5108 negative holder.
Ian
I won't show it because its ugly but I built a 10-12 foot long 'L"-shaped plywood sink and a wheeled cart that it sits on, and I cobbled together a very crude temperature mixing valve from various plumbing parts, and another table to hold my ICP-42 that I never use so it just gets used as a table. I also built a light-proof vented window insert with 2 muffin fans that I can insert into my darkroom window tracks in about 5 seconds. I also built a glass negative carrier with registration system for masking. Instructions for that are floating around the internet somewhere
All the cabinets and counter tops plus the stand my enlarger sits on, all the shelving, oh and my UV exposure unit for alternate printing.
- Joined
- Apr 19, 2011
- Messages
- 922
- Format
- 35mm
- from pvc sheet I cut a "negative mask" for the Leitz Focomat 1C and Valoy II. It attaches to the negative holder, you sandwich the negative strip in between the two: no more Newton rings. (wasn't my idea, but that of my brother)
- I extended the arm of a Leitz Valoy II, to be able to print 20X24.
- I installed a small fan to the lamp head of the Durst Laborator 1000 and built a box around it that prevents light from coming out, and makes it possible for the air to go in
- I put transparent red acetate (plastic sheet) on top of a light box. I use this in the darkroom to look at the negatives, to lay a Focomat 2C negative holder on and place the negative . . . even if I turn it on by mistake, it does not hurt the paper. Not sure which acetate it exactly is, except it came from a book printing company, some 20 years ago. I first got it to make safe a window in my darkroom that bordered to my garden . . . While printing my cats were visible sitting on the outside, trying to understand what the hell was going on
- I modified red filter mechanisms to under-the-lens filter holders for the older versions Focomats and the Valoy II.
- a friend built me a couple of switch boxes, that make it possible to have one timer for two enlargers. Just by switching the switch direction enlarger I want to use . . .
bdial
Subscriber
Drying screens and a cabinet for them. LED safe lighting. Cabinets, shelves and other fixtures. Plumbing for sink, water heater and filtration. Negative carriers. A remote switch for the enlarging timer.
Ian,
I'm curious, how do did that negative enlarger? Was it that you simply send in the measurement to the metal workshop for cutting?
No I cut the aluminium sheet myself with a jigsaw then cut out the center and filed to the exact dimensions and beveled the two long outside edges. When I made my Durst set I was a penniless student and didn't want to pay the exorbitant price Durst wanted and wanted glass-less carriers forb 35mm.
Ian
- Joined
- Jun 21, 2003
- Messages
- 29,810
- Format
- Hybrid
i've made a dry -side table and a wet side stand for my sink,
lollypop dodging tools ( big and small )
drying rack/screens. walls, drop ceiling electrical work
( had an electrican check it though )
omega-type negative carriers for film and glass plates
light blinds for printing glass plates in a durst enlarger head
darkroom doors, shelves, and wire-spans for drying negatives and prints
i've made a bunch of stuff i can't even remember
( necessity is the mother of invention and all that )
Last edited by a moderator:
I've made my own negative carriers ... A printing frame for border-less RC prints. Drying cabinets and a few other items, ...
Me, too. And um, well, I built the darkroom:
http://newdr.blogspot.com

After losing a 5x7 Elwood enlarger and an Omega B22 in a darkroom fire, it was replaced by a 4x5 DeJur Professional. The DeJur wasn't intended for smaller formats, so I had to make a lens board recessed about 1.5 inches for a 50mm lenses. The negative carrier is made from three pieces of 1/8" hardboard. An improvised chimney about 3" tall between the negative carrier and the condenser lenses focuses the light on the enlarging lens. All of this has served well for about 30 years. Many other items in the darkroom were made or adapted.
Wow! Nice blog! I'm building a darkroom website to show my progress from ground up. Also to promote the use of film and help those who are just like me starting on. Timemachinetraveler.com
Thank you for sharing.
Sent from my iPhone using Tapatalk
Apart from building out the darkroom itself, most of my mods are minor. I wired up an IEC to US 3-pin power cable adapter so I can swap the RH Designs Analyser between enlargers. There's the double 'U' support that lets me wash two 20x16 inch prints in a Versalab 11x14 washer. I have a filed-out 35mm carrier for my Beseler enlarger to handle Horizont negatives. I converted a UK Paterson safelight to use US screw-base bulbs.
The new item is a utility power solenoid and immersion thermometer probe hooked to a Raspberry Pi. This lets me turn on power to the Jobo remotely and monitor the water bath temperature. Useful when the darkroom is in an out-building and California is finally getting some rain. Just needs a convenient interface programmed - the hardware is functional.
The new item is a utility power solenoid and immersion thermometer probe hooked to a Raspberry Pi. This lets me turn on power to the Jobo remotely and monitor the water bath temperature. Useful when the darkroom is in an out-building and California is finally getting some rain. Just needs a convenient interface programmed - the hardware is functional.
Darkroom stuff is usually pretty simple, enough so that even someone like me with ten thumbs can often fabricate something useful. I've got a Beseler 4x5 lensboard for a 150mm lens made from laminated mat board (along with the lensboards for my B&J 5x7 camera,); all the tables, cabinets and shelving in my darkroom, the UV light box for alternative process printing, burning & dodging masks (obviously -- everyone does that!) Not to mention the items repurposed from other uses, often things which showed up unexpectedly at the bottom of boxes that followed my wife home from auctions such as the pharmacy glassware that is enjoying a second life in my darkroom even though the units of measure are drams, etc. 
Mike
Mike
- removed account8
- Deleted
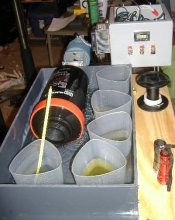
The place I used to work for gave me a bunch of 1/4" Lexan that I turned into an 11x14 print washer. Panic caused me to build a drive and tempering bath for Jobo tanks. My fear was not being able to get parts so it was built from readily available industrial components. Of course now that I know my fears were unfounded a nice used model would have been much faster and easier.
View attachment 121681[/ATTACH]
View attachment 121681[/ATTACH]
Attachments

calebarchie
Member
Ian,
I'm curious, how do did that negative enlarger? Was it that you simply send in the measurement to the metal workshop for cutting?
Metal workshop? Come on now... where is the creativity and ingenuity!
I designed and assembled the rolling cart that my Omega D6 sits on - from chrome shelving components purchased from Storables down in the US: http://www.storables.com/shelving/i...shelving/chrome-industrial-post-shelving.html
Storables cut the shelving posts to the height I required.
The cart plus the enlarger stand together about 7 feet tall and roll nicely through a doorway. The cart itself is about 2 feet tall and features industrial casters.
I use it in conjunction with a smaller table that serves as a working surface for my easel for most prints. That smaller table slides on the massive baseboard that forms part of the D6.
Bdial, can you tell me more about this LED safelight? You use light strip or LED light bulb? What kind of housing you use to install it? Where did you get the safelight filter? Sorry for the questions. I'm also thinking of making one myself.
Drying screens and a cabinet for them. LED safe lighting. Cabinets, shelves and other fixtures. Plumbing for sink, water heater and filtration. Negative carriers. A remote switch for the enlarging timer.
This Raspberry Pi mod, you just build it from ground up or you bought as a ready made solution?
Apart from building out the darkroom itself, most of my mods are minor. I wired up an IEC to US 3-pin power cable adapter so I can swap the RH Designs Analyser between enlargers. There's the double 'U' support that lets me wash two 20x16 inch prints in a Versalab 11x14 washer. I have a filed-out 35mm carrier for my Beseler enlarger to handle Horizont negatives. I converted a UK Paterson safelight to use US screw-base bulbs.
The new item is a utility power solenoid and immersion thermometer probe hooked to a Raspberry Pi. This lets me turn on power to the Jobo remotely and monitor the water bath temperature. Useful when the darkroom is in an out-building and California is finally getting some rain. Just needs a convenient interface programmed - the hardware is functional.
calebarchie
Member
OK Ivan,
You are approaching this the wrong way. This thread may be great for sharing ideas, but if you want to make something for yourself it requires some imagination. Be resourceful and build what you require, there are no 'ready-made' kits for this kind of stuff.
For LED safelights be sure to use the single correct wavelength diodes rather than an RGB type bulb. LEDs have a greater bandwidth but they should be ok for shorter times/bw only.
The raspberry pi is a platform much like an arduino or beagle board but more of a mini computer than a microcontroller. They can be used for a variety of maker projects.
Again, your imagination is the limit so start using that brain of yours!
My über-dooper, high-tech film drying rack used to hold film clips.

It's a piece of AWG 12 electrical wire (solid) that I wrapped around a closet rod. Spread the loops out so the clips are at a 45° angle. Bent the ends to hang off a pressure-held shower curtain rod. The removable curtain rod allows me to adjust the height I hang film from in the shower. Down at eye level for 4x5 sheets, up higher for 35mm strips.
It's a piece of AWG 12 electrical wire (solid) that I wrapped around a closet rod. Spread the loops out so the clips are at a 45° angle. Bent the ends to hang off a pressure-held shower curtain rod. The removable curtain rod allows me to adjust the height I hang film from in the shower. Down at eye level for 4x5 sheets, up higher for 35mm strips.
DWThomas
Subscriber
Back in my flaming youth, when I was forced to be frugal and also would get excited about "tinkering," I built several enlargers of various sizes, as well as an enlarger timer. But they were pretty cranky to work with, and now that I'm way older, retired, and reasonably OK financially -- and used analog gear has plummeted in price -- I just buy the stuff!
I admit to picking up a spare lamphouse (dirt cheap) for my Omega B-8 a year or so back, just in case I get forced to come up with an LED illumination system -- or get a craving to build in variable contrast illumination. I have no plans to do so, unless the correct tungsten bulbs suddenly disappear on the market.
I admit to picking up a spare lamphouse (dirt cheap) for my Omega B-8 a year or so back, just in case I get forced to come up with an LED illumination system -- or get a craving to build in variable contrast illumination. I have no plans to do so, unless the correct tungsten bulbs suddenly disappear on the market.
Lots of things to see in my darkroom...
http://www.classicbwphoto.com/classicBWphoto/Darkroom.html
... also, a print drying blotter stack...
http://www.classicbwphoto.com/classicBWphoto/Print_Drier.html
... And some cropping guides...
http://www.classicbwphoto.com/classicBWphoto/Crop_Guide.html
... Also, search my name (Reinhold) for lots of DIY hints here...
http://www.film-and-darkroom-user.org.uk/forum/showthread.php?t=9309
Have fun
Reinhold
Sirius Glass
Subscriber
This thread should be made a sticky so it is easy to find.
| Photrio.com contains affiliate links to products. We may receive a commission for purchases made through these links. To read our full affiliate disclosure statement please click Here. |
PHOTRIO PARTNERS EQUALLY FUNDING OUR COMMUNITY:  |