IC-Racer: Yes... that's on the docket as a possibility. Part of which will relate to the relevancy - how long a charge lasts. First shot will be to upgrade one of my 3rd party batteries to this approach... as it uses something of its own custom open air platform. If the battery will fit... it'd be easier and a good first shot at things.
-
Welcome to Photrio!Registration is fast and free. Join today to unlock search, see fewer ads, and access all forum features.Click here to sign up
- Home
- Forums
- Analog Workflow Forums (100% Analog/Traditional)
- Analog Equipment
- Medium Format Cameras and Accessories
You are using an out of date browser. It may not display this or other websites correctly.
You should upgrade or use an alternative browser.
You should upgrade or use an alternative browser.
The Power Of Volts and Milliamps!!
-
A
- Thread starter ic-racer
- Start date


Recent Classifieds
-
For Sale Linhof Master Technika '50 Jahre' Edition 4x5 Large Format Camera
- Started by jbprichard
-
Free Zone VI VC Cold Light Head - For Cost Of Shipping
- Started by chuckroast
-
For Sale Acculab VI-400 scale in like new condition. 400 gram capacity.
- Started by MTGseattle
-
For Sale We likely need light seals
- Started by MTGseattle
Forum statistics
I also got a couple of these little batteries to play with. They are 1/2 the size of the 850 batteries. More room for the plug (if you want to make the hole to fish out the plug). I also put one in my flash, the smaller size made it easier to get in and out of the flash handle.
In terms of exposures. I don't know but my original SLX manual states 1000 exposures per charge. Now it has been many , many years , but I recall the original Nicads in my first SLX battery were only about 600 to 800mAh.
I really think either the 850 or 450 battery will give way more exposures per charge (in the flash or the camera) than ever needed unless one plans on shooting 120 film like it is free.
But let us know your results.
For me, since I charged my 850mAh battery, a month ago, I shot about 50 frames and another 50 or so with the camera empty (just testing if the battery works, etc). The 6008i has a battery level indicator from "FULL" to 6,5,4,3,2,1. In the camera it still reads "FULL" and reads 12.269V on my charger.
Let me add for those - unlike IC-Racer - whose handle here must reflect either something of the experience with RC planes, cars or boats...(or that he's an iceboat sailor... which means he's a bit crazy) that for those of us great unwashed BALANCED Charging seems to require plugging both the Red connector into the Output whip and the White connector into the board to create a full feedback loop for balanced charging. That may not be the electrician's view of things, but it's mine, and without this, the Balanced Charger will beef that your circuit is broken. Don't break the circuit.... "It's not nice to fool Mother Nature!" as the ad used to say.
Actually the two outer leads on a balance cable are in continuity with the main + and - leads. So it is also, if one is so inclined, possible to rig the balance leads of a 3 cell to the outside of the Rollei battery through the un-used ports for the temp sensor, because of the 4 wires, only the inner 2 wires are unique on a 3-cell battery balance lead connector. One would then have to rig a special adapter cable to connect the battery to the charger. In my case it is just easier to remove the two screws holding the battery case together for charging.
FYI: 15 years ago I was pretty hard core INTERNAL COMBUSTION R/C racing. None of this electric nonsense for me. Fast forward 15 years and I have completely converted over to LiPo/Brushless for everything, helicopters, cars, planes, etc. Now cameras!

FYI: 15 years ago I was pretty hard core INTERNAL COMBUSTION R/C racing. None of this electric nonsense for me. Fast forward 15 years and I have completely converted over to LiPo/Brushless for everything, helicopters, cars, planes, etc. Now cameras!
Looks like you're having fun! I gather you race these things helicopters? I've seen planes and sailboats, but not much with helicopters until the recent multi engine drone things emerged in the last two or three years.
I'm thinking you're right. So I'm trying to gather another battery pack and just change out when I'm inside if that's necessary. I took apart the 1st battery and it looks like there will be a lot of empty space. Fit very nicely inside and all that.
Took about 45 minutes to charge fully so that's not bad for a balance charge. Still have to work out some details and I'm waiting on the connection... but soon enough we'll have a shot at another run. Thanks.
I don't know much about drones, the are only possible since very advanced microprocessors were developed to fly them. RC helicopters with mechanical stabilization and vacuum tube radios go back to the 60s.

IC-R: That is one honking big prop. I did some U-control planes back in the day (HS in the 1970's) and nearly chopped off a finger.... this machine could looks as though it could really do a number on you if you don't know your way around it.
Seem like there are a number of folks here on this list shooting SLX's. I'll try to document this thing further as I go. Seems like there ought to be a way to post a finished doc here for collective use... like a wikipedia thing. Matter of fact, as all these cameras age, the work-arounds will need to be more commonly documented and shared as the repair guys fade out and as the community tries to cope with the merging of old and new technology - like these batteries. The message threads of Photrio aren't the best way to do this, but may be the only way we've got. As an example, today I developed 3 rolls of Delta 3200 from my SLX in my Jobo 2509 tank on a Uniroller using Microphen... and reading over the threads on Delta 3200, I bumped the contrast to N+1... really N+1.5 contrast time having shot inside in relatively low light. Too early to scan, but the negatives look very promising. The way things run, you do a search on Delta 3200 where half the folks hate the stuff, and on about page 8 you find something useful or worse, find it scattered in spots a little here and a little there over 50 pages. Fortunately, as a newby, I have Chris Johnson's book and his recommended N+1 time for "Crystal" or "T-grain" films. So maybe there's a way to "sticky" a page or something here... or maybe another location.... like the Rollei 6000/SLX Flicker group?
Oh... and btw, I like the smaller battery. If it's thinner, it might work better in the 3rd Party packs I have. And yes, I did order another Rollei pack from Blattworld.com. Prices are high, but they have quite a bit of Rollei gear... 6000's and Hy6's. Steep prices? Dunno. I'm still new to this Rollei thing.
I used a lot of 3200 in medium format. It is only one stop faster than T-max 400 or HP5 (by ISO testing) and it fogs pretty fast in storage (at the store, before you buy it), which further hampers its speed. In my own work under exposure only makes hard to print negatives.
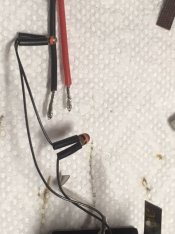
Anticipating the arrival of the wire whipping to connect my battery to the Rollei battery housing, I thought I'd document this project a bit. So here's what you get when you open the housing by unscrewing the tiny metal screws at the top camera-inside end. Of course you will need to slide the plastic spare fuse protector forward to gain some leverage that will allow you to push the battery forward in order to open the end. I recommend a mat of some sort like that shown to catch all the parts on your table top so they don't spill all over your floor ...leading to the X-Games Catch-as-Catch-Can event.that will otherwise leave you puzzling whether you actually didn't lose a part. Note that there are three connections to the camera base connector end on the inside. There's a positive tab which connects to a red wire, a negative tab which connects to a blue wire, and then what appear to be two black wires which as best as I can figure must be some sort of "ground". I have cut the tabs to the NimH batteries trying to leave plenty so that I can merely solder the new connector to these and be done.
Note the tiny little pitchforks will tend to fall out. These will need to be re-inserted carefully into the connector end fork-end up to make the connection to the camera's internal pins. The most curious piece is the brown circuit-board material strip. In both cases, mine fell out without giving me a chance to ascertain it's function. However, since it has no actual circuiting on it, I believe it is being used as an insulator. So my game plan will be to use it similarly upon re-assembly when the wire connectors arrive.... unless someone else knows better (hint hint hint). Yes, hints are welcome! if you've been down this road before. Thanks to IC-Racer, this seems to be a pretty simple project. We'll see. At least it has more promise than the after market batteries I tried... which even after restoking with a new set of 3 cells of AA-type LiPo's seem to have simply fried themselves... and hopefully NOT the camera. Fedex is supposed to deliver the batteries on Tuesday... so we'll be sure to find out. My bet is a little wrapping of the battery in thin insulation wouldn't hurt to keep the things from sliding around inside. Thoughts? My only one is that I wish I had my metric gauge handy so that I could determine the size of these little screws and get a few spares! Not sure how well these are going to travel otherwise... given the requirement to remove the ends to recharge the batteries! But we'll see. All for now. Have a great weekend!


Note the tiny little pitchforks will tend to fall out. These will need to be re-inserted carefully into the connector end fork-end up to make the connection to the camera's internal pins. The most curious piece is the brown circuit-board material strip. In both cases, mine fell out without giving me a chance to ascertain it's function. However, since it has no actual circuiting on it, I believe it is being used as an insulator. So my game plan will be to use it similarly upon re-assembly when the wire connectors arrive.... unless someone else knows better (hint hint hint). Yes, hints are welcome! if you've been down this road before. Thanks to IC-Racer, this seems to be a pretty simple project. We'll see. At least it has more promise than the after market batteries I tried... which even after restoking with a new set of 3 cells of AA-type LiPo's seem to have simply fried themselves... and hopefully NOT the camera. Fedex is supposed to deliver the batteries on Tuesday... so we'll be sure to find out. My bet is a little wrapping of the battery in thin insulation wouldn't hurt to keep the things from sliding around inside. Thoughts? My only one is that I wish I had my metric gauge handy so that I could determine the size of these little screws and get a few spares! Not sure how well these are going to travel otherwise... given the requirement to remove the ends to recharge the batteries! But we'll see. All for now. Have a great weekend!
The brown rectangular insulator should be glued in, yours must have come loose. As you see it will let the gold connectors out. Make sure the gold connectors all go back in the way they came out or there could be connection issues that mimic a bad battery when using the camera. The circled areas are where the lipo battery connector will go. The two temperature sensors are not needed with the lipos. I carefully removed them and saved them (I save everything). The rest of the electronic wiring on the black end cap would not need any change.

Since you bought that battery to modify, you might consider enlarging the hole for the spare fuse, so you can have access to the LiPo balance connector. That way you won't have to open up the battery case to do a balance charge. Another option, if worried about losing the screws, you could tape them inside the battery for safe-keeping and use electricians tape to hold the end of the battery together. You can tape right over the main fuse, that should give enough grip with the tape so the battery won't come apart when inserting and removing from the camera.
Last edited:
Thanks! Not so worried about losing them with my handy Optech cloth in use to collect everything.
So the strip goes atop the pad that the forks go in and out of? Funny that both batteries I bought had these strips come undone. Glue does dry out, and must have in this case.
By the way, looks as if you removed the tabs the old NiMH batteries connected to and went straight to the strip points you've circled, is that right?
Thanks to your help, I'm very gung ho to get this done. Can't wait!!! to get shooting again.
I have the luxury of a Pro Camera shop that stocks darkroom supplies and film available to me on the way home from work. Just stopped there this AM to get two pro packs of 120 T-max 400, 25 sheets of HP5 4x5 film, 100 sheets of Ilford FB and 4 liters of Liquid Hypan Fixer.
I'm a "NON HOARDER" for film, paper and chemicals. Why use expired film when those guys have a refrigerator full of fresh film, and I pass it every day on the way to work. First time in 18 years they told me their film business is increasing.
Just to follow up my own use with the LiPo. It is working perfectly for me. I'll not use the Rollei 6008i for weeks or maybe months, but when I want to use it I need it ready to go right away. If the battery is dead I'll pick another camera. So, after 2 weeks of sitting, I needed to use the camera and I had success! The camera is still fully charged!!!
BTW I also use the Rollei 3000 cameras since the 1980s. They are also powered by the Sanyo Cadnicas and for years I put up with the same issues of batteries always dead. In another thread I finally solved that issue. Those cameras will hold the Panasonic Eneloop batteries. They are still NiMh, but they hold the charge for years! That seems to be working, I just picked up my 3003 and it still reads full charge after a month.
Last edited:
I'll shoot a little more often than that, and then probably run 2 rolls at an outing if not more. I figure 2 batteries will offer plenty of juice!
Let me ask if I may... when you upgraded from the SLX to the 6008i what you find most useful about the newer model? For me, there's appeal to a Aperture Priority as opposed to ONLY Shutter Priority... but I'm not sure about the rest. The rest of nice to have would be change-able backs (but if I were hung up about that I wouldn't have dumped a Bronica SQ-A), but most of the time I will shoot manual... even if like on Christmas, I'll read a room's positions and then set the camera and leave it there. I could see like you... picking up a PQ lens, but AF lenses look a bit pricey... and I don't even use that on my digitals that have it in spades (truth be told, it's the digital that sits most of the time).
Let me ask if I may... when you upgraded from the SLX to the 6008i what you find most useful about the newer model? For me, there's appeal to a Aperture Priority as opposed to ONLY Shutter Priority... but I'm not sure about the rest. The rest of nice to have would be change-able backs (but if I were hung up about that I wouldn't have dumped a Bronica SQ-A), but most of the time I will shoot manual... even if like on Christmas, I'll read a room's positions and then set the camera and leave it there. I could see like you... picking up a PQ lens, but AF lenses look a bit pricey... and I don't even use that on my digitals that have it in spades (truth be told, it's the digital that sits most of the time).
My main reason was film flatness. I got my SLX used from KEH in 1986 when in graduate school (I still remember ridicule from my parents as I put it on their VISA). It was the cheapest one they had and after all these years I think it may have been a "second." with some film flatness issues. The preview button broke in 1988 but repair was only $120 and since then the only issues (other than film flatness) were the battery dead. The first two years after a battery rebuild were always the best, after that the battery was always dead.
I still remember my first rebuild in 1992. I got no-name batteries from a camera repair supply shop (pre-internet). They were the worst, the Rollei charger fried them. Next rebuild was 1999 and I had a service spot weld a pack for me. In 2006 I had a complete workshop so at that time I assembled the packs myself. Next time after that, must have been the start of this thread, 2013.
Kind of a sweet-sour relationship with the SLX. Since it never broke down (like all my Hassy friends said it would) I thought "I got a good one." But since it had the film flatness issue I thought "I got a bad one."
BTW, my might ask how I used it all these years. In 1988 I placed 4 little shims under the focus screen to get the screen in line with the slightly bulged film. This was a pretty good fix.
The diagnosis of the film bulge is easy, with the lens off and camera on "B" you need to waste a frame. If you press on the film emulsion with a pencil and nothing happens, all is good. If you press on the film and it moves back toward the pressure plate, you can see it was bulging not going to be in focus when you go to take a picture.
Last edited:
With an SLX, 6008i and a couple of 3000 series, that's a big Rollei commitment. Don't know the 3000 series. In 35mm I have two Leica M's... bought way old but CLA'd and upgraded windows and shoot these with. Zeiss ZM lenses (but the 90mm is an old Leica F/2.8 rather than the ZM 85/4). Also a Contax S2 for the Contax CY lenses I bought initially for digital.
Still trying to get MF figured and hope either this SLX or an upgrade 6008i will do the trick. Found that the folks in Germany will do a CLA on the SLX but prefer to work on the 6000 series (more parts I guess). Haven't seen anyone here really willing to deal with an SLX. Don't think mine needs one... just like to know that it can be done... if/when needed.
Still trying to get MF figured and hope either this SLX or an upgrade 6008i will do the trick. Found that the folks in Germany will do a CLA on the SLX but prefer to work on the 6000 series (more parts I guess). Haven't seen anyone here really willing to deal with an SLX. Don't think mine needs one... just like to know that it can be done... if/when needed.
THAT is one sweet line-up! Is that the SLX in the back with the 40mm on it? Curious.... you must really like the 3003's. My guess is the lenses between the SL35's and the 3003's don't interchange. I've seen photos of them, but never seen much of them. Do you have a flickr page or something to see some shots with your Rollei's?
These cameras look to be in beautiful shape. Nice collection! Guess it's clear why you don't shoot with your 6008i every weekend!
But back to the earlier question... what drove you to the 6008 from the SLX?
These cameras look to be in beautiful shape. Nice collection! Guess it's clear why you don't shoot with your 6008i every weekend!
But back to the earlier question... what drove you to the 6008 from the SLX?
Only difference with the lenses is the oldest lenses have the aperture mark in a different location. This affects the SL35E's ability to 'see' the marks with its little prism that peeks at the aperture. The 2000/3000 cameras have digital display. They use a little trick. They altered the space between the mount and the lens body. A feeler probe (so called "Third Pin") senses the distance and alters the maximum aperture available for the LED aperture indicator only. The meter calibration for open aperture metering is not affected if you don't use "Third Pin" lenses. Bottom line is all the lenses are interchangeable and fully functional. The only difference is if you will have aperture readout in the finder (which is a luxury anyway).
I was in college when I got the SLX. I know it was an older design, as I first saw the SLX in Popular Photography in the late 1970s. I wanted a 6000, so I said to myself when I get a job, I'll upgrade the SLX. Seems like two things happened. The SLX never died and they kept on improving the 6000 line, so when I was ready to get a 6000, they came out with a new one. Eventually I heard the were going to stop making them, so that is when I decided to upgrade. I can afford a new one, but the price differential is so great, I thought I'd just get an inexpensive one from ebay, and if that fails, then get the newest AF version.But back to the earlier question... what drove you to the 6008 from the SLX?
I was able to fix the 6008i I got from ebay. So I'm pretty happy. Sometimes things follow "Ic-racer's Law" that busted equipment may have only a single defect. If you can find that, the equipment will work fine.
https://www.photrio.com/forum/threads/winning-the-e-bay-game.106567/
https://www.photrio.com/forum/threads/just-got-a-rollei-6008i.105554/
Last edited:
So the upgrade/refresh is complete and it works. The steps to finish the job?
First the tools: You will need wire cutters, a wire stripper, a soldering iron, solder (not acid core) good for electronic connections, electrical tape (belt and suspenders approach, possibly some Krazy glue, needle nose pliers, and a small philips screw driver. In the event you are missing the last screw driver you can find these at Micro Mark ( https://www.micromark.com/Six-piece-Phillips-Head-Screwdriver-Set ) and probably any of the others as well for a lot less than you think!
1) Work on a soft surface with protection for the surface and materials. I'm using an Op/Tech Neotch cloth which will catch just about anything and keep it from rolling away. The screws are tiny! so this is a good idea if you don't want to chase parts across the basement floor.
2) I protected that with a paper towel.
3) Get yourself a very small phillips screw driver. Wish I knew the size, but if you're like me, you have a set, but work by trial and error. Same here. Not helpful in terms of determining the screw size. Note that these are tiny screws (said that before) machined and easy to loose. Hard to find and buy in precise quantity and size. So don't lose the two you'll remove 'cause they need to be replaced.
4) After removing the old battery, and in order to do so, I cut the metal strips making sure to leave a little flash to resolder the new connections to.
5) PC board strip: This fell out randomly in both batteries. I bought some Krazy glue to apply on the ends where the connector yokes are. The strip is used to retain the yokes for making the electrical connection to the camera. Dab a little glue on the plastic between the yoke holes (this will be obvious) but keep it away from the holes as the glue is an insulator. You'll need no more than a pin head size amount of glue so go very lightly. Test fit the strip before hand to make sure you know exactly where it fits... because, yet, it fits into a slot.
6) Use the soldering iron to remove the two black grounding wires that will have been attached to the sides of the old batteries. You won't need these, but save them.
7) Wire the battery connector black-to-blue (flashing attached to a blue wire in the battery), and red-to-red (red wire attached to flashing). You will want to tin the wire connectors with solder first so that the final solder is a momentary application of heat. I used a heat clamp to hold the wire in place with a good pressure connection while soldering, but you could use almost anything that will apply pressure and not prove painful to heat.
8) I taped the connection with a small strip of electrical tape about 1/8th of an inch just to assure that there would be no stray short circuits
9) I wrapped the battery in a papertowel cut to size and taped it to stay.
10) Attached the battery to the wire, shoved it in the battery casing and shoved the wires down into the end
11) Closed the lid and re-screwed the screws back in to the face plate to hold it all together.
12) Tested the battery in the camera and I AM BACK in BUSINESS! You will be too if you're following the same steps. Total time: About 30 minutes if you're slow, careful, and clean... and don't want to break something. The replacement battery and wire connectors are both available from Hobby King (see above). I am looking forward to some new shots!
Pix:
Attachments
Last edited:
Last step is the fun one! Put the battery back into the camera, and THEN try to remember what you were doing two weeks ago... almost 3 weeks ago... when you loaded the puppy up. AND then the battery died. So by deduction, I've decided I was shooting Cinestill @ 1600. If it turns out I've got Ilford Delta 3200, then I can just develop it at half speed. If it's color, I win even more.
Of course, I lose.... 'cause the point was to snag a few more Christmas pictures and everyone's gone back home, the decorations are down, blah blah blah. Oh well. Can't have everything. Good luck, and especially my great thanks to my friend IC-Racer for a shout out of help!
Sooooo, the conclusion to the story is that this solution works, it's pretty doggone easy to implement, and it'll put your camera back in business. If you have the tools and a Rollei battery case, the out-of-pocket cost is somewhere about $12 plus shipping. To be continued after some actual field tests!!!
Last edited:
Any updates on the performance of the battery pack? I'm working on helping a friend get his SLX going again. He bought the packs from the ebay seller in Quebec, and they are total junk. A complete hack job, so I'm looking for something better.
Just do it. It works great. If you don't do it, the camera and lens are junk.
I don't recall the last time I charged the battery I made. It is still reading full, but I'd kind of like to see the voltage. What I do is just take the battery out of the case (remove the two little screws) and charge it on my LiPo balance charger. I recently upgraded the batteries for one of my smaller hellicopters but kept the old lipos (that fit in the rollei battery case). So I have about ten batteries. Each probably still has hundreds of cycles left.
BTW: for the last few years, not having to worry about batteries for my 6008, lets me use it more. So recently I upgraded my monster 40mm Distagon lens to the modern 40mm Angulon. That is a huge jump because the 40mm Distagon was the largest lens (except for the long lenses) and the 40mm Angulon is smaller than the 80mm!
I'm also looking at getting a 6008AF to try autofocus with medium format. Even looking at a Hy6, though it would not use these batteries.
| Photrio.com contains affiliate links to products. We may receive a commission for purchases made through these links. To read our full affiliate disclosure statement please click Here. |
PHOTRIO PARTNERS EQUALLY FUNDING OUR COMMUNITY:  |