Printing a sky - What would you do?

about to extinct

D
about to extinct

  • 2
  • 0
  • 89
Fantasyland!

D
Fantasyland!

  • 9
  • 2
  • 132
perfect cirkel

D
perfect cirkel

  • 2
  • 1
  • 127

Recent Classifieds

Forum statistics

Threads
198,749
Messages
2,780,360
Members
99,697
Latest member
Fedia
Recent bookmarks
1

oxcanary

Member
Joined
Feb 16, 2004
Messages
70
Yes after years of irritating test strips I went to split grade printin. I use a combination of Ilford exposure meter and dividing the calibration time between grade 5 and grade 00 filters, remembering to double the exposure for the grade 5 exposure. Might then tweak either of these exposures slightly and choose dodge and burn accordingl.
 

warden

Subscriber
Joined
Jul 21, 2009
Messages
3,033
Location
Philadelphia
Format
Medium Format
I think the less sky crop is an improvement, and agree with those suggesting split grade printing could be useful here. Plus it's just fun.

As for the paper white sky, if you decide to keep it I prefer a thin black line to define the rectangle when the entire top edge of the image is paper white, and I'm happy to draw it with a pen. Personal preference of course, but I like the rectangle to be anchored.
 

Sirius Glass

Subscriber
Joined
Jan 18, 2007
Messages
50,357
Location
Southern California
Format
Multi Format
Yes after years of irritating test strips I went to split grade printin. I use a combination of Ilford exposure meter and dividing the calibration time between grade 5 and grade 00 filters, remembering to double the exposure for the grade 5 exposure. Might then tweak either of these exposures slightly and choose dodge and burn accordingl.

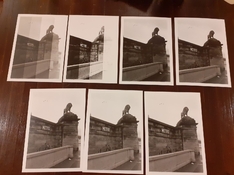
A form of split grade printing.
 
OP
OP
Daniela

Daniela

Member
Joined
Feb 20, 2017
Messages
1,060
Location
France
Format
Multi Format
So thankful for your suggestion to do split-grade printing! 🍻
Why in the world isn't this taught from the very beginning?! It makes the process so much more manageable and easy to figure out what the next step is!
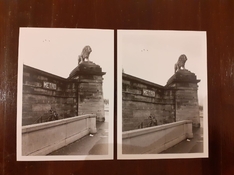
Here are the prints in chronological order:
20230123_172553.jpg
And here is a comparison between the "happy" print from last week and from today:
20230123_172721.jpg
The crappy cellphone photo doesn't really show it, but there's a bit of gray in the sky, enough to define the edges, and I like it. I'm not finished printing it yet, I want a bit more contrast in the lion.
So, I really love how much I can control and opening up shadows or changing the highlights a bit without having to sacrifice one or the other. Early on, I was told I'd have to make a choice on which one to sacrifice, and that may be the only option sometimes, but it's nice to know it doesn't have to be the norm. I also like the subtlety and range of grays I can get.
I'll keep practicing and learning about split-grade printing for sure! Any thoughts or suggestions?
 
OP
OP
Daniela

Daniela

Member
Joined
Feb 20, 2017
Messages
1,060
Location
France
Format
Multi Format
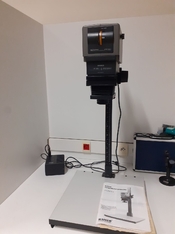
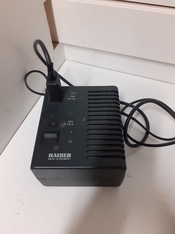
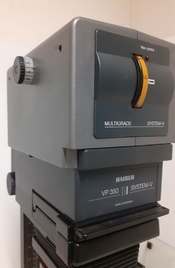
I had to change enlargers to do the split grade printing because the one I usually use is all wobbly and changing filters moved the thing all over the place/messed the focus. I tried to use this one and I couldn't for the life of me figure it out...even with the instructions at hand LOL Where the heck is the timer in this thing?! If I needed an external one, I couldn't find anywhere to plug it in either...
20230123_112555.jpg
20230123_112601.jpg
The knob on the left looks like a timer, but it didn't seem to do anything...
20230123_145427.jpg
 

koraks

Moderator
Moderator
Joined
Nov 29, 2018
Messages
22,713
Location
Europe
Format
Multi Format
I think on that one you're supposed to plug the transformer (the one with the switch on it) into the timer of your choice.
Sorry, I don't know what the dial on the left side of the head does. A friend of mine has a couple of Kaisers, but I never used them.
 

warden

Subscriber
Joined
Jul 21, 2009
Messages
3,033
Location
Philadelphia
Format
Medium Format
So, I really love how much I can control and opening up shadows or changing the highlights a bit without having to sacrifice one or the other.
Yes! It's a satisfying way to print for sure. It's good to see a little sky tone defining those upper edges.
 

cowanw

Member
Joined
Aug 29, 2006
Messages
2,235
Location
Hamilton, On
Format
Large Format
I tried to find a manual for your enlarger but failed. The manual you have is for a larger format model.
Here is the manual for the Straight Black and White version which shows the filter drawer and the colour head accessory but does not show this head but mentions it as multigrade head on page 9.
This is also not your enlarger but is very helpful
This is not a colour enlarger as it does not have three colours, magenta, yellow and cyan. It is a multigrade enlarger (which is fine) which has a one dial for moving between filter grades, moving between yellow and magenta.
It also looks like it has a filter drawer below the front dial for using filters such as Ilford filters.
For split printing you would normally dial the wheel between Zero all the way to 5 for each type of exposure.
The knob on the left side is a variable gray filter, which changes the intensity of the lamp and therefor the time of exposure required.
The knob on the right side moves between white light and the filter setting.
You do need to plug the enlarger into a timer which then plugs into the wall.
I think this model may be for 35mm only ( I could well be wrong on that)
Kindest Regards
 

MattKing

Moderator
Moderator
Joined
Apr 24, 2005
Messages
52,876
Location
Delta, BC Canada
Format
Medium Format
Does adjusting the wheel on the left change the brightness of the light?
 

MattKing

Moderator
Moderator
Joined
Apr 24, 2005
Messages
52,876
Location
Delta, BC Canada
Format
Medium Format
The information on the colour head for that enlarger - which has the same sort of dial on that side - has this:
" Continuously adjustable, illuminated density aperture up to 60 densitometric densities (= two aperture settings). "
So I think I might be right :smile:
 
OP
OP
Daniela

Daniela

Member
Joined
Feb 20, 2017
Messages
1,060
Location
France
Format
Multi Format
I think on that one you're supposed to plug the transformer (the one with the switch on it) into the timer of your choice.
Sorry, I don't know what the dial on the left side of the head does. A friend of mine has a couple of Kaisers, but I never used them.
Thing is, the transformer didn't have any hole to plug anything else into it! I meant to take a picture of the bottom and back, but I assure you, there was nothing there!

I tried to find a manual for your enlarger but failed. The manual you have is for a larger format model.
Here is the manual for the Straight Black and White version which shows the filter drawer and the colour head accessory but does not show this head but mentions it as multigrade head on page 9.
This is also not your enlarger but is very helpful
This is not a colour enlarger as it does not have three colours, magenta, yellow and cyan. It is a multigrade enlarger (which is fine) which has a one dial for moving between filter grades, moving between yellow and magenta.
It also looks like it has a filter drawer below the front dial for using filters such as Ilford filters.
For split printing you would normally dial the wheel between Zero all the way to 5 for each type of exposure.
The knob on the left side is a variable gray filter, which changes the intensity of the lamp and therefor the time of exposure required.
The knob on the right side moves between white light and the filter setting.
You do need to plug the enlarger into a timer which then plugs into the wall.
I think this model may be for 35mm only ( I could well be wrong on that)
Kindest Regards
Thank you. I briefly tried to find something online, but I had limited time there. Yes, the dial was indeed for the filters and I could see the color change in the light as I moved it, so I was excited to try it without moving too many things around...As for plugging the into a timer...I saw now other socket/hole anywhere on the thing and I looked everywhere.

The information on the colour head for that enlarger - which has the same sort of dial on that side - has this:
" Continuously adjustable, illuminated density aperture up to 60 densitometric densities (= two aperture settings). "
So I think I might be right :smile:
Well....this is not a color head enlarger, but the manual called that knob "density aperture", yet nothing seemed to happen when I moved it. However, I didn't test it with a negative in and the room light off, so you might indeed be right! I'll have to wait until next Monday to see!

Thank you all!
 

Pieter12

Member
Joined
Aug 20, 2017
Messages
7,594
Location
Magrathean's computer
Format
Super8
Thing is, the transformer didn't have any hole to plug anything else into it! I meant to take a picture of the bottom and back, but I assure you, there was nothing there!


Thank you. I briefly tried to find something online, but I had limited time there. Yes, the dial was indeed for the filters and I could see the color change in the light as I moved it, so I was excited to try it without moving too many things around...As for plugging the into a timer...I saw now other socket/hole anywhere on the thing and I looked everywhere.


Well....this is not a color head enlarger, but the manual called that knob "density aperture", yet nothing seemed to happen when I moved it. However, I didn't test it with a negative in and the room light off, so you might indeed be right! I'll have to wait until next Monday to see!

Thank you all!
l am not familiar with this enlarger, but if you are able to connect it to the mains, that is the cord you would plug into a timer.
 

cliveh

Subscriber
Joined
Oct 9, 2010
Messages
7,523
Format
35mm RF
Well if you don't like the sky, you could always convert to digital photography and produce a file of a hundred different sky images to combine with what ever image you want.
 

Pieter12

Member
Joined
Aug 20, 2017
Messages
7,594
Location
Magrathean's computer
Format
Super8
Well if you don't like the sky, you could always convert to digital photography and produce a file of a hundred different sky images to combine with what ever image you want.

"Produce a file of a hundred different sky images"? How so? Go out and take them (digitally, I assume)? That can take a while if you want a true assortment to choose from. Buy royalty-free stock? Inserting a sky into an existing scene is not as simple as some may make it. First, you need some basic photo retouching software and the skills to use it. Second (and the one most overlooked by neophytes), the lighting and sometimes the angle of the shot need to match your scene. And some cloud formations are not that common in some areas and seasons. Don't forget to add grain to the digital sky to match your image!
 

MattKing

Moderator
Moderator
Joined
Apr 24, 2005
Messages
52,876
Location
Delta, BC Canada
Format
Medium Format
For clarity:
1) very few enlargers have built in timers;
2) for enlargers that have separate power supplies, usually the enlarger is plugged into or directly wired into the power supply, and then the power supply is either
a) plugged directly into the AC wall socket, or, much more commonly,
b) plugged into the AC socket on the timer, which itself has a cord that is plugged into the wall socket;
3) the "density aperture" control might be bypassed by a white/light switch or lever intended for use when focusing - most colour or variable contrast light sources have such a lever or switch. If that light source has that, when it is engaged, changing the contrast setting wouldn't change the colour of the light, but with the switch or lever is not engaged, the colour will change and, possibly, moving the "density aperture" control will change the brightness.
 

cowanw

Member
Joined
Aug 29, 2006
Messages
2,235
Location
Hamilton, On
Format
Large Format
As I said in post 34
The knob on the left side is a variable gray filter, which changes the intensity of the lamp and therefor the time of exposure required.
The knob on the right side moves between white light and the filter setting.
You do need to plug the enlarger (voltage stabilizer main and only plug with no other openings) into a timer which then plugs into the wall.
 

RalphLambrecht

Subscriber
Joined
Sep 19, 2003
Messages
14,646
Location
K,Germany
Format
Medium Format
Just printed this one this week. I'm happy with the sky just being white and merging into the margins, even if I know that's not really technically correct.*
I'm wondering what you'd do in regards to the sky if this was your picture. There's info in the negative, some static, amorphous gray clouds...
Also, as a viewer, how do you perceive the picture with a borderless sky? Do you notice it? Does it bother you?

*As a side note, I notice I've been printing crisp white skies a lot recently and I know it's heavily influenced by the endless stretches of gray days we've been having. I miss sunlight!

View attachment 326460

blank skies look boring but, having white puffy clouds in every picture is unrealistic and can get boring too. Often, skies are just not worth the effort to print them down. I use a yellow filter and live with the results because it looks more realistic that way.
 

MattKing

Moderator
Moderator
Joined
Apr 24, 2005
Messages
52,876
Location
Delta, BC Canada
Format
Medium Format
As I said in post 34
The knob on the left side is a variable gray filter, which changes the intensity of the lamp and therefor the time of exposure required.
The knob on the right side moves between white light and the filter setting.
You do need to plug the enlarger (voltage stabilizer main and only plug with no other openings) into a timer which then plugs into the wall.

My apologies Bill.
I mistook your comment about the "variable gray filter" as being a reference to the model referred to in the instruction manual you linked to.
 

Sirius Glass

Subscriber
Joined
Jan 18, 2007
Messages
50,357
Location
Southern California
Format
Multi Format
blank skies look boring but, having white puffy clouds in every picture is unrealistic and can get boring too. Often, skies are just not worth the effort to print them down. I use a yellow filter and live with the results because it looks more realistic that way.

I agree. I will also use an orange or Red32a or Red 25 filter on occasion and will use split grade printing. I have never added clouds to any photograph. The sky is the way it should be, some people cannot deal with that.
 
OP
OP
Daniela

Daniela

Member
Joined
Feb 20, 2017
Messages
1,060
Location
France
Format
Multi Format
Looking up, it's a featureless cloudy sky...looking down, you have a tens of thousands of square miles soft box overhead 👍
Want to really thank you for this. It's been on my mind since I read it and it has gotten me out the door to shoot...turn your negatives into positives, indeed! :smile:
Well if you don't like the sky, you could always convert to digital photography and produce a file of a hundred different sky images to combine with what ever image you want.
Blasphemy!
For clarity:
1) very few enlargers have built in timers;
2) for enlargers that have separate power supplies, usually the enlarger is plugged into or directly wired into the power supply, and then the power supply is either
a) plugged directly into the AC wall socket, or, much more commonly,
b) plugged into the AC socket on the timer, which itself has a cord that is plugged into the wall socket;
3) the "density aperture" control might be bypassed by a white/light switch or lever intended for use when focusing - most colour or variable contrast light sources have such a lever or switch. If that light source has that, when it is engaged, changing the contrast setting wouldn't change the colour of the light, but with the switch or lever is not engaged, the colour will change and, possibly, moving the "density aperture" control will change the brightness.

As I said in post 34
The knob on the left side is a variable gray filter, which changes the intensity of the lamp and therefor the time of exposure required.
The knob on the right side moves between white light and the filter setting.
You do need to plug the enlarger (voltage stabilizer main and only plug with no other openings) into a timer which then plugs into the wall.
In regards to the right side, there's indeed a lever labeled "in/out". In the "in" position, the filter colors show up. So, I'll try to see if moving it engages the one on the left.
As for plugging the stabilizer into a timer, the timers I saw didn't seem to have the opening for that type of plug, but I'll look again. There was no Kaiser timer available, that's for sure.

Thank you again!
 

cowanw

Member
Joined
Aug 29, 2006
Messages
2,235
Location
Hamilton, On
Format
Large Format
The Europlug that comes out of the voltage stabilizer ( under the white wall plug in your first picture, post 31 goes into a European timer.
Like this
 

MurrayMinchin

Membership Council
Subscriber
Joined
Jan 9, 2005
Messages
5,481
Location
North Coast BC Canada
Format
Hybrid
Want to really thank you for this. It's been on my mind since I read it and it has gotten me out the door to shoot...turn your negatives into positives, indeed! :smile:
One of the hardest lessons I had to learn (took many years in fact) was to not let my expectations regarding weather or subject matter ruin a day of photographing.

There were so many times where I'd want sunshine and it would rain, or I'd want fresh snow on the trees and it would drop off first thing in the morning. One of my best photographs was taken on a day I didn't want to go because of forest fire smoke. My reward for forcing myself out the door that day is a forest image which everyone misinterprets as being taken on a foggy day...hey...who am I to tell them what to think!??!

Congratulations are on order for your determination; it'll lead you to many unforeseen discoveries 👍
 
Last edited:
Photrio.com contains affiliate links to products. We may receive a commission for purchases made through these links.
To read our full affiliate disclosure statement please click Here.

PHOTRIO PARTNERS EQUALLY FUNDING OUR COMMUNITY:


Ilford ADOX Freestyle Photographic Stearman Press Weldon Color Lab Blue Moon Camera & Machine
Top Bottom