Pix of your home-built cams here please

A street portrait

A
A street portrait

  • 0
  • 0
  • 73
A street portrait

A
A street portrait

  • 1
  • 1
  • 65
img746.jpg

img746.jpg

  • 4
  • 0
  • 65
No Hall

No Hall

  • 1
  • 2
  • 68
Brentwood Kebab!

A
Brentwood Kebab!

  • 1
  • 1
  • 120

Recent Classifieds

Forum statistics

Threads
198,792
Messages
2,780,913
Members
99,705
Latest member
Hey_You
Recent bookmarks
0
Status
Not open for further replies.

SMBooth

Member
Joined
Jun 29, 2008
Messages
1,192
Location
Melbourne, N
Format
Multi Format
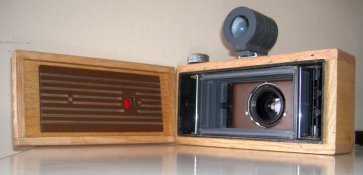
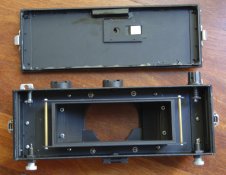
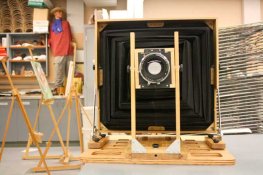
I have not got any recent internal images, but well get some tomorrow for you. As for the pressure plate that why I asked about yours :smile: 
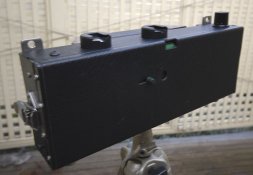
, as yet I have not done it , but last time I used some 6mm draft stop foam with double sided tape which worked quite OK. This time I would like something a bit more refined but I don't have access to flash machinery. So I need to think about it more.
 

Attachments

  • 6x17 MkIII-11 - finished back.JPG
    6x17 MkIII-11 - finished back.JPG
    64.1 KB · Views: 341
Last edited by a moderator:

Steve Smith

Member
Joined
May 3, 2006
Messages
9,109
Location
Ryde, Isle o
Format
Medium Format
As for the pressure plate that why I asked about yours :smile:.

Oh yes!

Mine looks like this inside. Behind the two little captive bolts are a couple of leaf springs from an old Mamiya C33 camera. The plate design is copied from the Mamiya but stretched to cover the format.


Steve.
 

Attachments

  • pano-back.jpg
    pano-back.jpg
    45.4 KB · Views: 447

Steve Smith

Member
Joined
May 3, 2006
Messages
9,109
Location
Ryde, Isle o
Format
Medium Format
That's often my method of solving problems. If I ignore it and get on with doing something else, a solution often presents itself.

The Mamiya pressure plate mechanism is quite well designed and might be worth copying. Otherwise a rigid plate attached to the back by a piece of foam or sponge might work. You need a pair of rails for the film to run against then another pair of rails slightly higher so that when the pressure plate is up against them, there is just enough gap for the film and its backing paper.

How much space do you have between the film plane and the back?


Steve.
 

SMBooth

Member
Joined
Jun 29, 2008
Messages
1,192
Location
Melbourne, N
Format
Multi Format
The rails are there, I do have a couple of pressure plate and springy bits from 2 35mm cameras that I was going to use but in my cleverness to put a hidden sliding counter hole I overlooked the problem that it gets in the way of one of the plates. I have about 6mm to play with depth wise and most likely go back to the foam strip idea (which work well last time), or I toyed with the idea of hinging the plate to the film box which you flip out of the way when loading film and just having a couple of spring epoxyed to the back to provide some light pressure when the lid was closed. One of the big problems is making sure the pressure plate is reliable in seating between the rails when you close the back up.
 

Steve Smith

Member
Joined
May 3, 2006
Messages
9,109
Location
Ryde, Isle o
Format
Medium Format
Another option, which I think you have the space for, is to have the pressure plate fixed rather than sprung. Load the film then put the pressure plate on top of it and fix it in place with some screws leaving just enough space for the film to transport smoothly. It doesn't need to be spring loaded, this is just a convention to make film loading easier and not having to have tight tolerances on the film rails to back/pressure plate dimensions.


Steve.
 

bliorg

Member
Joined
Sep 20, 2006
Messages
677
Location
NW Philly, PA
Format
Large Format
Don't know if I've posted this here, but this is the latest revival of my fixed-focus 4x5, the Neretta Mk II:


Neretta Mk II, rev 03... by Scott --, on Flickr

Based on Sandeha Lynch's design, has a Graflok back and a (new to me) Linhof-select 90/6.8 Angulon on front. Mortise and tenon joinery in mahogany. Need to figure out a hood now...
 

Steve Smith

Member
Joined
May 3, 2006
Messages
9,109
Location
Ryde, Isle o
Format
Medium Format
Nice. The fact that we can get lenses with built in shutters and film holders with built in dark slides means that we can get great results with the most simple of cameras, as your foam core example shows. All we really need is a box to keep the darkness in with a lens at one end and the film holder at the other.

This makes it easy for any of us to make a camera and is doesn't matter if we are master craftsmen or bodgers with gaffer tape!


Steve.
 

moki

Member
Joined
May 10, 2010
Messages
161
Location
Wismar, Germ
Format
35mm
a box to keep the darkness in

Hehe, I love that wording. All the people who try to keep the light out, probably understood something wrong :laugh:

I built a few boxes myself and it wasn't easy to collect enough darkness, put it inside and then seal the whole thing. Most of these boxes have a hole insted of a lens, though. This one's an old Kiev magazine (the camera was broken beyond repair) with with a 35mm/175 pinhole. And no, I didn't throw it into a mirror to test its sturdiness :wink:

IMG_5479.jpg
 

Steve Smith

Member
Joined
May 3, 2006
Messages
9,109
Location
Ryde, Isle o
Format
Medium Format
Seems to work o.k. What lens is currently on it?


Steve.
 

Jeff Searust

Member
Joined
Sep 6, 2007
Messages
360
Location
Texas
Format
Med. Format Pan
New 6x17 pano camera

Dead Link Removed
Dead Link Removed
Dead Link Removed
Dead Link Removed
Dead Link Removed
 

Steve Smith

Member
Joined
May 3, 2006
Messages
9,109
Location
Ryde, Isle o
Format
Medium Format
Wow. that looks bomb proof!


Steve.
 

polka

Member
Joined
May 1, 2008
Messages
167
Format
Medium Format
urPOLKa : panoramic pinhole camera

This was my first "Panoramische Oberlicht Loch Kamera.

Using 120 rollfilm formed as a cylinder of 80mm diameter.

Giving 4 pictures of 55x175mm per roll

Horizontal angle : 250°

Paul

First picture : the camera is open, ready for loading a roll
Second picture : 2 views of closed camera ready for shooting :
- left : backside with 2 film spooling buttons
- right : frontside with shutter and viewfinder
 

Attachments

  • UR-Polka.jpg
    UR-Polka.jpg
    54.4 KB · Views: 444
  • UR-Polka2.jpg
    UR-Polka2.jpg
    65.1 KB · Views: 401
Last edited by a moderator:

himself

Member
Joined
Apr 8, 2011
Messages
513
Format
Multi Format
My plywood/gaffers tape masterpiece.

that thing looks great!!

I thought I'd add a couple shots of my newly finished creation.

it takes a 6x9 back and 3x4 polaroid film back and has tilt/swing, a little lift but not shift. I made it entirely out of recycled and scavenged parts, but the lens board was made by a collagist friend of mine.

the runners need redesigning and I could do with a lens with a bit more coverage for full movements, but beggars can't be choosers.

this is my first full build so be nice :wink:
a camera.jpg
 

ChristopherCoy

Subscriber
Joined
Aug 9, 2011
Messages
3,599
Location
On a boat.
Format
Multi Format
this is my first full build so be nice :wink:
View attachment 41643


That thing looks awesome! Makes me want one! Whether it works or not, it looks like it was pulled straight out of a Home & Garden home design add. One of those shabby/chic/modern room design articles or something....
 

himself

Member
Joined
Apr 8, 2011
Messages
513
Format
Multi Format
it looks like it was pulled straight out of a Home & Garden home design add. One of those shabby/chic/modern room design articles or something....

not sure how to take that :wink:

but thanks and it does really work like, I've only taken one shot so far and was gob-smacked to see that there weren't any light leaks or anything
 

Andrew O'Neill

Moderator
Moderator
Joined
Jan 16, 2004
Messages
11,968
Location
Coquitlam,BC Canada
Format
Multi Format
Well, after more than a year the 14x17 is finally finished. Some of it looks nice, lots of it looks like #!@*...especially the bellows. Ground glass is plexi. Sort of looks like a Chamonix, that's because I "borrowed" the design...Used the lens board sliding lock from my old Cambo. Used birch 'cause it's cheap and light. Now I need to check it for light leaks. Then hopefully I can use it to make bigger carbon prints and other alt processes.
 

Attachments

  • Front.jpg
    Front.jpg
    36.9 KB · Views: 457
  • CrappyBellows.jpg
    CrappyBellows.jpg
    21.1 KB · Views: 512
  • Side.jpg
    Side.jpg
    12.4 KB · Views: 437
  • Back.jpg
    Back.jpg
    15 KB · Views: 435

Andrew O'Neill

Moderator
Moderator
Joined
Jan 16, 2004
Messages
11,968
Location
Coquitlam,BC Canada
Format
Multi Format
Fitting the bellows was pretty easy. I plan on using existing lenses: 355, 450, 600... magnifying glass lenses, and assorted pinholes. The 355G that you see in the pic is about the biggest/heaviest of the three.
 
Status
Not open for further replies.
Photrio.com contains affiliate links to products. We may receive a commission for purchases made through these links.
To read our full affiliate disclosure statement please click Here.

PHOTRIO PARTNERS EQUALLY FUNDING OUR COMMUNITY:


Ilford ADOX Freestyle Photographic Stearman Press Weldon Color Lab Blue Moon Camera & Machine
Top Bottom