-
Welcome to Photrio!Registration is fast and free. Join today to unlock search, see fewer ads, and access all forum features.Click here to sign up
- Home
- Forums
- Analog Workflow Forums (100% Analog/Traditional)
- Analog Equipment
- Camera Building, Repairs & Modification
You are using an out of date browser. It may not display this or other websites correctly.
You should upgrade or use an alternative browser.
You should upgrade or use an alternative browser.
Pix of your home-built cams here please
-
A
- Thread starter nick mulder
- Start date


Recent Classifieds
-
For Sale Vacuseal Vacuum Press 4468H
- Started by oficinouno
-
For Sale Paper Safes and glossy photo paper
- Started by oficinouno
-
For Sale Nikon d810, RRS bracket, battery charger and 3 batteries..$800
- Started by ChrisK
-
For Sale Colorado Tripod Company Vector tripod and Aspen ball head combo
- Started by jshcrlsn
-
For Sale Shen-Hao HZX810-IIA Classic - like new
- Started by Solicitor
Forum statistics
- Status
- Not open for further replies.


-

- SMBooth
- Deleted
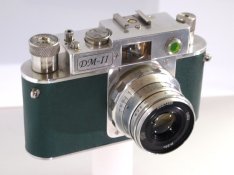
Here is a rangefinder camera, the "DM-II", made by the same guy who had built a SLR ("DM-Flex").
Attachments
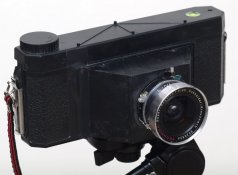
I really do envy all of you for your marvelous large format constructions... I have neither the tools nor the skill for stuff like that. Only an assortment of scrap lying around and 15m of duct tape, so I built this:
This is the very basic version without bells and whistles:

It's basically a very simple retrofocus wideangle lens with an experimental film holder attached. The lens consists of an ancient brass barrel lens (probably from a laterna magica) and a much smaller two-element lens from another objective in front.
I just randomly combined some lenses that seemed promising and was really surprised that this one worked so well. The angle of view for 35mm film is about the same as a 28mm lens, only with lots of barrel distortion. The focal plane for infinity is exactly at the end of the brass barrel (wow, really lucky!) and wide open it's at about f/1,6. Yep, I built a lovely 28mm/1,6 from scratch without calculating or even buying anything at all.
Take that, Zeiss!
The film holder is (obviously) inspired by medium format SLRs to make it more compact. The film plane, otherwise known as "piece of wood" was later covered with metal sheet from a film canister to reduce scratches on the film. The picture is as big as the barrel (almost 50 mm diameter) and circular right over the perforation, because I didn't build a film mask.
The shutter in front of the lens is a flea-market find: a very small and primitive one with only one speed of around 1/30 sec plus B and T modes and a tiny 5mm aperture. Sadly, this limits the lens to 5,6-16, but with slow film it's enough for most situations.
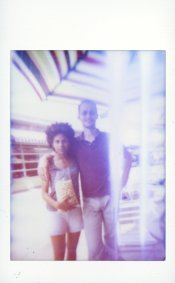
Because of it's unusual form, the camera is held in the palm of the right hand with the thumb at the shutter release. No focus or viewfinder, so it's hyperfocal and shooting out of the hip all the time. Kinda Lomo...
There's one obvious advantage: It doesn't look like a camera at all to most people, even if I point it right at their faces - every shy street photographer's dream. That one might be the biggest disadvantage as well, especially at airports...
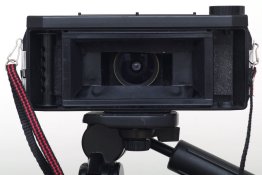
This is the current and probably final version:

This is the very basic version without bells and whistles:
It's basically a very simple retrofocus wideangle lens with an experimental film holder attached. The lens consists of an ancient brass barrel lens (probably from a laterna magica) and a much smaller two-element lens from another objective in front.
I just randomly combined some lenses that seemed promising and was really surprised that this one worked so well. The angle of view for 35mm film is about the same as a 28mm lens, only with lots of barrel distortion. The focal plane for infinity is exactly at the end of the brass barrel (wow, really lucky!) and wide open it's at about f/1,6. Yep, I built a lovely 28mm/1,6 from scratch without calculating or even buying anything at all.
Take that, Zeiss!
The film holder is (obviously) inspired by medium format SLRs to make it more compact. The film plane, otherwise known as "piece of wood" was later covered with metal sheet from a film canister to reduce scratches on the film. The picture is as big as the barrel (almost 50 mm diameter) and circular right over the perforation, because I didn't build a film mask.
The shutter in front of the lens is a flea-market find: a very small and primitive one with only one speed of around 1/30 sec plus B and T modes and a tiny 5mm aperture. Sadly, this limits the lens to 5,6-16, but with slow film it's enough for most situations.
Because of it's unusual form, the camera is held in the palm of the right hand with the thumb at the shutter release. No focus or viewfinder, so it's hyperfocal and shooting out of the hip all the time. Kinda Lomo...
There's one obvious advantage: It doesn't look like a camera at all to most people, even if I point it right at their faces - every shy street photographer's dream. That one might be the biggest disadvantage as well, especially at airports...
This is the current and probably final version:
I really do envy all of you for your marvelous large format constructions... I have neither the tools nor the skill for stuff like that. Only an assortment of scrap lying around and 15m of duct tape, so I built this:
Quite ingenious! Changing film is lot of taping work?
Quite ingenious! Changing film is lot of taping work?
It was with the very first version, but now the top has a hinge (or piece of tape) towards the lens and can be opened without removing a single piece of tape. There is a cut piece of foam underneath the lid to prevent lightleaks and also a U-shaped lip around the back that holds pretty tight. I usually add one piece of transparent tape to make sure, the lid doesn't open accidentally, but that one is easily removed for changing the film.
I also glued a piece of metal (again, from an old film canister) onto the receiving spool, so I can just slip the film in like in a regular camera and don't need any tools or additional tape. It's a pretty sophisticated, though low-tech, construction now.
Onto the next project: Somewhat more traditional looking, but similar in principle.

This one is built around a compur shutter from a Welta Trio folding camera that disintegrated beyond repair. It had a 3 element 105mm/3,8 lens that became a 35mm/1,3, focused to near infinity (as always, guessing the focal length from the angle of view)... The format is 25x25mm, making the lens a "normal", not wide angle as expected. The lens has 6 elements now, but to be honest, I just kept adding more convex pieces behind the shutter, until the focal length seemed short enough without reducing the image circle too much.
Image quality is on par with a Holga from an especially bad badge, so it's mostly Lomo material, but with two advantages: 1) I can actually select different shutter speeds and apertures and 2) I get about 50 frames from a roll of 36.
Next project: A 35mm panoramic camera with rotating lens, somewhat similiar to the Horizon. Woke up 5am today and couldn't get the idea of a simplified, hand-cranked version out of my head. It already is halfway functional, but still far from finished.
6x12 Holgarama
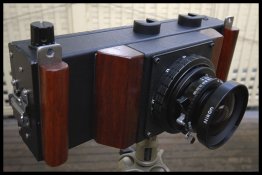
Well, here is my low-tech solution to 6x12 desire. Not pretty, not built entirely from the scratch, but functional enough.
Holga 120WPC body with Linhof-selected Super-Angulon 65/8 attached
WPC is not the best donor, to be honest, with his thin plastic body. Handling requires a bit caution, had the tripod mount broken off once. And there are a lot of internal reflections to get rid of.
But as long as the results go, I'm pleased. Some of them are here: http://www.flickr.com/photos/werra/sets/72157619515880980/
Attachments
Excellent. I was going to use a Holga for my 6x12 camera but decided to build my own body in the end (link below). Is it fixed at hyperfocal distance?
Steve.
Steve.
Is it fixed at hyperfocal distance?
Yes, fixed focus at ca 15-20m. Two stops down and it's sharp enough til horizon. Framing is a guess but I'm already used to it. Bubble level on the camera is a good assistance.
I was going to make mine fixed focus too then I started playing around with the focus helicals of old lenses and ended up with the Olympus lens as a focusing mount.
Steve.
Steve.
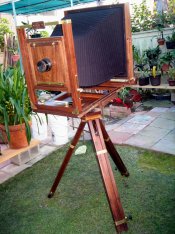
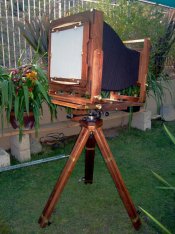
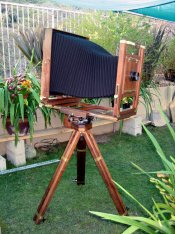
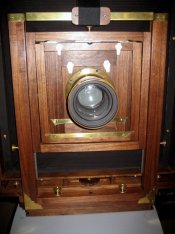
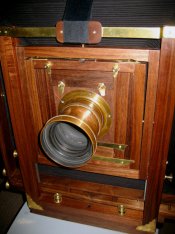
Here are some more images of my recently completed 14x17. I just finished the reducing board and I think that is all I have to do.
Attachments
-
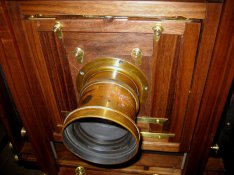 14x17-with-Darlot-close-up.jpg153.8 KB · Views: 305
 -
 14x17-on-tripod-side-shot.jpg204.2 KB · Views: 329
 -
 14x17-on-tripod-right-side-.jpg182.6 KB · Views: 321
 -
 14x14-camera-on-tripod-side.jpg213.5 KB · Views: 367
 -
 14x17-front-std-straight-on.jpg131.6 KB · Views: 339
 -
 front-std-14x17-with-Darlot.jpg146.9 KB · Views: 304
 -
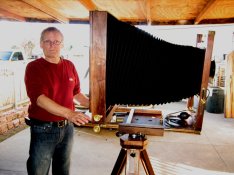 jim-with-the-14x17-#2.jpg131.1 KB · Views: 386
Jim:
Looks really beautiful.
And it is very useful to me.
Every time my wife says something about my camera stuff taking up too much space, I'll just show her a copy of "jim-with-the-14x17-#2.jpg".
Looks really beautiful.
And it is very useful to me.
Every time my wife says something about my camera stuff taking up too much space, I'll just show her a copy of "jim-with-the-14x17-#2.jpg".
Matt, good idea! It does take up a bit of space.
My very nearly finished 6x17 AEDor camera, made out of a Cognac bottle case and som pieces of wood I had lying around. For more info on the project see here: DIY 6x9 or 6x12 or even 6x17


Excellent. I love the sliding rear door - I think I might steal that idea! I was wondering what to do about the back on my 6x12 camera (link below). This might be the answer.
EDIT: Then again, perhaps not. The film pressure plate is fixed to the back!
Steve.
EDIT: Then again, perhaps not. The film pressure plate is fixed to the back!
Steve.
Thanks Steve. Yes, starting out with a Cognac case does make demands on the imagination. I think I'll be able to get the pressure plate to work, but the main problem is getting the door light tight. The far end is not much of an issue, a lip on both sides of the door takes care of that. But the near end where the door slides through the handle is a tough one. I've added a sealing lip to the door, but it I'm not too confident it works to satisfaction. As you said, attaching anything to the door is a no go. The film advance window is a point in case. A red window would work, but the distance from window to film backing is such that it makes reading frame numbering all but impossible. Adding a louvre over the window won't either (due to the sliding mechanism). I have to solve this one way or another.
Last edited by a moderator:
A red window would work, but the distance from window to film backing is such that it makes reading frame numbering all but impossible. Adding a louvre over the window won't either (due to the sliding mechanism). I have to solve this one way or another.
I wonder if there is some way to use a magnifier? One that could be inserted/removed so as not to interfere with the slide?
Anyway, what a great idea for a camera. Nice work!
I thought that I would add my two latest creations for you to see on this forum. The first is a 5 x 7 camera made from an unknown wood that came from a table top that was ancient in 1983 when it was retired and given to me in 2009. It has proved to be very stable and the movements are still as free as when I almost completed it last year. There are still a few things to finish off but I should be able to use it properly within the next couple of weeks.
The second is a 12 x 10 camera that is complete except for the back. I plan to initially make a 10 x 8 back as I have darkslides for that size but if and when I either locate or make 12 x 10 darkslides (probably never) I'll complete it to my original design. I built it from MDF which has proved to be extremely heavy so I will probably rebuild it at a later date using some parts that work well in MDF plus the metal parts. It is fitted with a Symmar 360/420 lens which contributes greatly to the weight. This lens has no shutter so I have fitted a Packard type shutter behind the lens.
I was shocked at the cost of rack and pinion gearing so have used threaded rod with a nut for focusing on both cameras. It is very slow to use but costing £2 as against £50 I don't think that I will worry too much. On the 5 x 7 camera I have made an extension bed with interlocked threaded rod to give continuous focusing (albeit a bit graunchy, but functional).
I made the bellows for both cameras using curtain blackout material which is white but lighttight. On the smaller camera I painted it black on the outside but found that the paint tended to flake off so on the second camera I dyed the fabric Navy Blue. Due to the plasticised fabric the dye did not take very well and I ended up with the denim colour that you see in the picture. It's not so bad.
Attachments


Hi Norman
Just an idea to think about. Google Lee Valley Tools. They sell a nut and threaded rod (1/4-20). The nut can be bent sideways to slide freely on the rod. This would make coarse focussing really fast. I do not know if you could adapt it and would probably be a PITA to get, but might be adaptable to your camera. Another idea would be to cut a nut in half and be able to back it out of the thread for rapid movement. Really nice creation.
Just an idea to think about. Google Lee Valley Tools. They sell a nut and threaded rod (1/4-20). The nut can be bent sideways to slide freely on the rod. This would make coarse focussing really fast. I do not know if you could adapt it and would probably be a PITA to get, but might be adaptable to your camera. Another idea would be to cut a nut in half and be able to back it out of the thread for rapid movement. Really nice creation.
thanks Richard. The 5 x 7 camera has a half nut running on the threaded rod this is to allow it to run directly on to the rod in the extension baseboard. I had tried to devise a method of disengaging it to allow coarse focus but haven't yet worked it out. It is something that I am still working on but I wanted to get the camera into a useable condition but have not yet taken any pics.
I looked on the Lee Valley Tools website but could not find the nut that you mentioned, can you give me a clue where to find it please?
Norman
I looked on the Lee Valley Tools website but could not find the nut that you mentioned, can you give me a clue where to find it please?
Norman
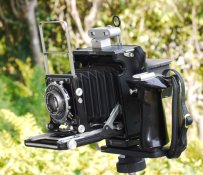
Century Graphic Upgrades
I had to replace the pins for the catches on the back for the Graflok. The catches have a tendency to pull away from the body as the pin heads either pop off or as the metal distorts. This sat around in parts till recently and I added a few accessories such as the cold shoe and Voightlander rangefinder. The bracket is a Hasselblad grip with a RRS B2 Pro clamp on the grip and a N80 plate on the body. I turned the body distance scale over and painted it white so I could mark it with a pencil. It probably will go up for sale soon.
I had to replace the pins for the catches on the back for the Graflok. The catches have a tendency to pull away from the body as the pin heads either pop off or as the metal distorts. This sat around in parts till recently and I added a few accessories such as the cold shoe and Voightlander rangefinder. The bracket is a Hasselblad grip with a RRS B2 Pro clamp on the grip and a N80 plate on the body. I turned the body distance scale over and painted it white so I could mark it with a pencil. It probably will go up for sale soon.
Attachments
Here are some more images of my recently completed 14x17. I just finished the reducing board and I think that is all I have to do.
that is amazing! great work!
- Joined
- Mar 15, 2011
- Messages
- 4
- Format
- Multi Format
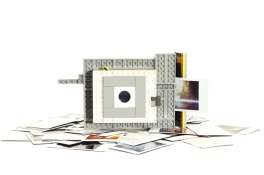
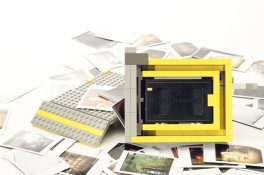
instax lego cam
Hi hi.
I'm new here. Industrial design student in cincinnati with a love for film.
This is what I made for my last project.
It's a working full manual instax mini camera built from legos.
No tape or anything, light traps are built into it with the lego brick orientations.
Fixed focus lens (~50mm? maybe wider) 1/60ish & B.
It has a fairly large light leak because of the film ejector. Working on removing it.
Attachments
For the three people who haven't seen it yet: (there was a url link here which no longer exists)
Steve.
Steve.
Nice. I think my next one might be 6 x 17. Could you post some pictures of the interior and the pressure plate which I assume is mounted to the back. Your body construction looks similar to my 6 x 12 in layout and I am interested in seeing how other people do it.
Steve.
Steve.
- Status
- Not open for further replies.
| Photrio.com contains affiliate links to products. We may receive a commission for purchases made through these links. To read our full affiliate disclosure statement please click Here. |
PHOTRIO PARTNERS EQUALLY FUNDING OUR COMMUNITY:  |