Pix of your home-built cams here please

Machinery

A
Machinery

  • 0
  • 0
  • 17
Cafe art.

A
Cafe art.

  • 0
  • 0
  • 42
Sheriff

A
Sheriff

  • 0
  • 0
  • 36
WWPPD2025-01-scaled.jpg

A
WWPPD2025-01-scaled.jpg

  • 3
  • 1
  • 70
Shannon Falls.jpg

D
Shannon Falls.jpg

  • 3
  • 0
  • 95

Forum statistics

Threads
198,086
Messages
2,769,396
Members
99,560
Latest member
ujjwal
Recent bookmarks
0
Status
Not open for further replies.
OP
OP
nick mulder

nick mulder

Member
Joined
May 15, 2005
Messages
1,212
Format
8x10 Format
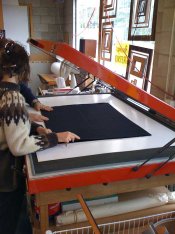
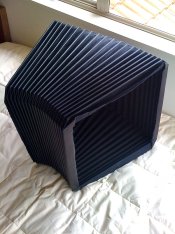
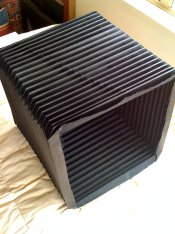
That would be useful. Do you have any pictures of the bellows under construction?

I have made bellows before but I am always interested in other people's methods as I'm sure mine was not the best method.

I have access to sheets of various thicknesses of polyester and polycarbonate with and without adhesive applied and the use of a nice laser cutter to cut out things like stiffeners and I am just about to have a go at making a set of bellows for a Speed Graphic and perhaps another set for something else.

No photos taken - but some facts:

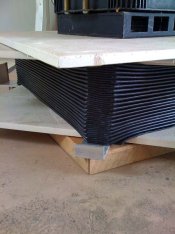
- I did use a form and will continue to do so (recommended)
- I did the gluing 'inside out' as you'll see in some instructions - I've been thinking this might work against things for a couple of reasons, I'll experiment next time with an alternative
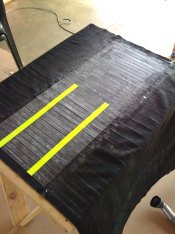
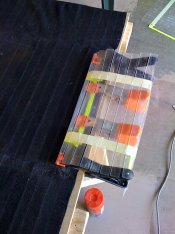
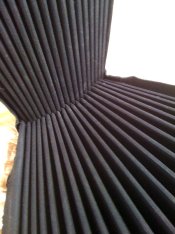
- I used thin 'stiffeners', I find the real work they do is in fact in the areas where they are not, as in the folds, the flat areas are kept flat by the nature of the folds so no need to bulk up here, LF film is fine and 'at home' so to speak :wink: I used what felt like even thinner stuff at ~100um
- I don't draw anything on the leather or inside cotton but a couple of initial registration points, the stiffener registration is formed on the paper model and kept in place by strips of masking tape... a picture is worth a thousand words here (sorry!)

The real money is in getting the geometry into your blood, its a strange hybrid of continuous and discrete maths problems to solve if you get to thinking about it - remembering that once its all perfect on paper there is still a large fudge factor anyway with all the construction slop (especially of the additive kind)... Every change will affect something

I can tell you that there are instructions out there that are just plain wrong - you'll get a bellows, but not quite right ya'know :sad: At the least redundant procedures and some which go about things correctly but use a half way there method explaining it that doesn't help you understand why what needs to happen is happening, and hence no chance to learn how to extrapolate the concepts and have a universal understanding...

I can see that typing up instructions would be almost harder work than the bellows themselves.

Perhaps tell me your process and I can chip in ?

Remember that I still have no idea of the long term prospects of my bellows - I'm interested to see how a bit of use will affect them
 
OP
OP
nick mulder

nick mulder

Member
Joined
May 15, 2005
Messages
1,212
Format
8x10 Format
Here is a view of the bottom showing the non overlapping seam:

IMG_0040.JPG


You can see a little bump on each rib, but thats it... (the bottom is the face to the left, not the one directly in front, which is the left ... (from the back:rolleyes:smile:)
 

Steve Smith

Member
Joined
May 3, 2006
Messages
9,109
Location
Ryde, Isle o
Format
Medium Format
Thanks for your details.

The last set I made (only set which has ever found its way onto a camera) I made the correct way round. Then I read about making them inside out!

I think I am fairly proficient with the geometry. I spent a lot of time thinking about it, and drawing them up on CAD with folds in one direction in one colour and the opposite direction in another then folding up full size paper models.

The nice thing about using the laser cutter for the stiffeners is that I can cut a full sheet of material - e.g a 100 micron polyester with adhesive on both sides, and whilst it is all on the bed of the laser cutter, I can remove the release liner un-covering the adhesive from the stiffeners only, leaving the waste material not sticky. The outer (or inner) material can then be laminated onto the stiffeners with a roller and when removed they will stick to the material in the right place and the waste of the stiffener material will fall away.

I tend to think that I could get away with fewer stiffeners. I think I only need one on one side of each fold rather than both sides but I will have to try that to prove it out. It may be o.k. with 5x4, possibly not with 8x10. I have noticed that some bellows just have rectangular stiffeners with the triangular areas at the ends where the material overlaps left un-stiffened.

I am going to experiment using some material from a changing bag for both inside and outside coverings. I don't think I'm proficient enough to experiment with thin leather yet!


Steve.
 
OP
OP
nick mulder

nick mulder

Member
Joined
May 15, 2005
Messages
1,212
Format
8x10 Format
I have noticed that some bellows just have rectangular stiffeners with the triangular areas at the ends where the material overlaps left un-stiffened.
Steve.

Yup, in my camera I've done that but only the top and bottom (could have just as well been the sides, but I figured maybe less sag with the full stiffeners on the sides) - the reason being that around the corner folds there is a triangular area where when compacted there is a doubling of the amount of folds, this in effect becomes your compacting limit, so by truncating 2 sides worth of stiffeners you at least remove the doubling in thickness of that component... Which in reality when using thin stiffeners with respect to the other fabrics is pointless, but one day when I find a source of the thin leathers of yesterday or indeed the synthetics used nowadays then this will become more a factor for consideration. Until then I'm thinking I'll go back to full stiffener width with taper.

Hmmm, I don't know if one side only would be that pretty myself :wink:

As for your description of the adhesive and way you go about laying the stiffeners I think we're on the same page - different but sounds like the same thought process going into time savings and accuracy - :wink:

At the moment I'm making paper versions of bellows that have helical folds (spiral if tapered) and am trying but have failed so far to make one with not helical folds but helical edges (the zig-zaggy bits ... they'll spin around the bellows) - pointless really, for now - hoping a usual function may come to me though :rolleyes:
 

Steve Smith

Member
Joined
May 3, 2006
Messages
9,109
Location
Ryde, Isle o
Format
Medium Format
At the moment I'm making paper versions of bellows that have helical folds (spiral if tapered) and am trying but have failed so far to make one with not helical folds but helical edges (the zig-zaggy bits ... they'll spin around the bellows) - pointless really, for now - hoping a usual function may come to me though :rolleyes:

That sounds interesting. I can't quite visualise it at the moment though.

One day I am going to build a shed roof with a bellows design. Just take the top and one side and rotate by 45 degrees (and obviously make it much bigger!).


Steve.
 

thart1

Member
Joined
Dec 26, 2009
Messages
10
Format
4x5 Format
Finished my Bender today. I used the unassembled kit I stumbled upon as a template to cut new pieces. I want to work on a better focusing rail/system, and found some good ideas on this thread..
 

Attachments

  • finished my Bender 4x5 today....jpg
    finished my Bender 4x5 today....jpg
    99.6 KB · Views: 421

Andy38

Member
Joined
Aug 16, 2008
Messages
242
Location
Lyon , Franc
Format
Medium Format

Attachments

  • 164-6431_IMG.jpg
    164-6431_IMG.jpg
    49.1 KB · Views: 362
Joined
May 14, 2009
Messages
75
Location
Boston, MA
Format
35mm
2nd prototype but ufortunately, not the last ...

DSCF5868_cr.jpg

DSCF5861_cr.jpg

DSCF5870_cr.jpg

DSCF5873_cr.jpg


This is a project I've been working on for over an year. I was hoping this was the final version, but in testing it turned out that some changes need to be made. So there will be a third prototype :wink:
 
Last edited by a moderator:

TSSPro

Member
Joined
Feb 15, 2010
Messages
376
Location
Colorado
Format
Multi Format
SV, I love the brass hardware and wooden handle knobs. Looks great, hope that you get all the kinks worked out.
 

Ezzie

Member
Joined
Feb 22, 2010
Messages
429
Location
Sande i Vest
Format
Multi Format
My meager effort at making a 4x5/6x12 P+S. Have no previous experience with LF/MF at all. And it been 10 years since I last shot film. So this will Proove to be exciting.

Built around a Graflok back. Attached to a frame, which has a subframe to the front on to which the lens box slides, friction mounted. This allows me to adapt another lens box for when I will be using a sliding DSLR adapter back (in future) Lens box front has a Linhof to Deardoff 6x6 adapter. Linhof lens board has a helicoid mounted to it, on which a Fujinon SW 90/f8 in a Copal 0 is attached. Will be using a 6x12 back om it from the outset.

Dead Link Removed
 

Steve Smith

Member
Joined
May 3, 2006
Messages
9,109
Location
Ryde, Isle o
Format
Medium Format
Looks good. Is there a reason for having the viewfinder offset from the top of the body?


Steve.
 

Ezzie

Member
Joined
Feb 22, 2010
Messages
429
Location
Sande i Vest
Format
Multi Format
Hi and thanks.

The reason for the viewfinder being somewhat elevated and drawn back from the body is so my cheek doesn´t bump into the rather large and sharp edged DAYI 6x12 back. I´ve overdone it somewhat, so I´m on the lookout for a fixture more suiting, or I´ll shape one out of wood. The advantage of the arm on which it sits now is that it can be persuaded into different angles to compensate for parallax.

The viewfinder is big and clear, but not without distortion. Build quality is solid. The glass front protection cover got cracked in shipping, and will need replacing - no big deal.

I´ve yet to take pictures with it, I don´t even have film :wink: I don´t have a darkroom either so I´ll have send away for processing, the turnaround will take a while. Slow photography getting even slower.
 
Last edited by a moderator:

Ezzie

Member
Joined
Feb 22, 2010
Messages
429
Location
Sande i Vest
Format
Multi Format
Latest incarnation, v0.3. Soon ready to take pictures:

4624337333_820ec4e4af_o.jpg
 

polka

Member
Joined
May 1, 2008
Messages
166
Format
Medium Format
Panoramische Oberlicht Loch KAmera (POLKA)

Not a picture but a link to a document with lot of pictures of my (at this time three) anamorphic pinhole cameras. The paper is however in french, so questions for clarification (if needed) are welcome !

Paul
 

Ezzie

Member
Joined
Feb 22, 2010
Messages
429
Location
Sande i Vest
Format
Multi Format
I hope I´m not boring you to death with further incarnations of the same camera, but the recent change was due to necessity, more than cosmetics. But when I did redesign the handle, I thought I´d do something different, which I think added to the camera´s looks.

After the first trial run I found the existing handle to be too puny and cramped for comfort. Took design cues from one of flickr user adbieber´s creations ( www.flickr.com/photos/adbieber/4491652903/in/set-72157623... ). Much better grip for handheld shots now.

4676126084_57f7d23a72.jpg


4676127000_b8b0728d9f.jpg


I think my woodworking skills are improving. Which bodes well for the next project (winter 2010/11?)
 

LarsHennings

Hi, I have built a special shift wide lens camera only for the Schneider 47XL. It should be not expensiv, not complecated. It was for a travel to NYC to get the scyscrapers. For the 47XL is sharp from very of near the camera it is a fixfocus. 1,5 m away all the world looks sharp.
You find an explanation with a drawing and an image here, it´s in German, sorry: http://www.larshennings.de/larshennings.de-ww47xl-plan.pdf

Gruß
lars
 
OP
OP
nick mulder

nick mulder

Member
Joined
May 15, 2005
Messages
1,212
Format
8x10 Format
attachment.php


4th proper bellows made out of the leather from a relatively unsuccessful 3rd (it worked completely, but was just plain ugly)...

370mm outer dimension with 21.5mm wide strips = just under 13" inside dimension that means it is large for 8x10" and too small for 11x14" ... But made in mind to test new techniques but it will end up on a Wetplate tailboard with a universal plate holder system that can take any size plate up to around 12" square.

Extends completely to 850mm (33") if need be - easily 2/3rds that with no refolding required upon contraction - compress to 85mm (3.35")

Should keep me happy until I get a much larger lens - although I suspect I may have reached the limit of size envy with my ~19" f5(ish) Voightlander anyway - my Dallmeyer 4A at least will be able to reach 1:1, the Voight maybe also ok at 1:1 due to the fact the iris is forward of the lens board anyway and the extra dimension of the holder and the rest of the camera body gumph:wink:

Strips were laser cut in registration already out of 0.5mm clear PET plastic which was kept with strips of tape as you can see in the pictures for gluing, something I'll do every time from now on - compared to the amount of work involved and crap output of cutting it myself its goer from now on - I'm even considering buying a laser cutter myself, at least something CNC. I use clear strips as they become black enough anyway, and you can see where the adhesive isn't covering fully on the first side. I also had the bellows vacuum pressed with a bit of heat as an experiment - the heat did nothing as the adhesive wasn't a heat activated variety (nor a deactivated variety thankfully!). The press worked for half an hour and I did note some more compression on pulling it out - not sure if I'll continue doing it however. As the previous bellows had thicker strips, the older bend/creases could be seen phasing in and out of alignment in these newer ones, a bit of steam treatment over the winter soup making sorted that out (they smelled like vege stock), then compression for a week or so and some boot polish while I was otherwise occupied with work and there is now no trace of either carrots or the older creasing.

You can see the seams of the inner and outer leather in photo 6 or 7 I think - leather on top for the pic but the seam will live on the bottom for the camera... Too hard to explain how I do it this way without pics, which I'll try to do for the next one (a larger tapered one, which will need a full hide to do, so far I've been working with half beasts :rolleyes:smile: - anyways, the way I do it means there is no overlap in the leather, much better for the eventual compressed dimension... It's a completely light proof butt joint of sorts. The linen interior joint does overlap, but the double size increase fits in the area that the extra dimension the corner folds introduce (leather wont do the same) - all joints angled so they don't get a chance to bunch in one spot, effectively meaning only about 3 strips worth bunch in any one area... The leather butt joint does have a slightly thicker dimension (glue) but as it is so small the smallest of gradients will offset it strip to strip...

A lot of the info will make more sense to someone who has made a bellows or two previously - a lot of gotchas involved that can only be fully appreciated hands on :D (agree ?)

They're a bit dusty at the mo' - will clean up once the mess making is over ...
 

Attachments

  • IMG_0135.JPG
    IMG_0135.JPG
    123.3 KB · Views: 336
  • IMG_0160.JPG
    IMG_0160.JPG
    76.3 KB · Views: 320
  • IMG_0151.JPG
    IMG_0151.JPG
    83.5 KB · Views: 353
  • IMG_0143.JPG
    IMG_0143.JPG
    87.2 KB · Views: 338
  • IMG_0142.JPG
    IMG_0142.JPG
    104.3 KB · Views: 317
  • IMG_0141.JPG
    IMG_0141.JPG
    87.3 KB · Views: 354
  • IMG_0249.JPG
    IMG_0249.JPG
    134.6 KB · Views: 328
  • IMG_0248.JPG
    IMG_0248.JPG
    144.1 KB · Views: 305
  • IMG_0247.JPG
    IMG_0247.JPG
    142.1 KB · Views: 332
  • IMG_0166.JPG
    IMG_0166.JPG
    77.5 KB · Views: 333
Last edited by a moderator:
Joined
Mar 11, 2009
Messages
15
Format
4x5 Format
Looks like I didn't put up my pictures of the camera I made this summer. It took right around 3 weeks to complete. It's pretty rough in areas but I have been successfully taking many photographs this summer with it. I'm planning a second camera for maybe this school year or next summer that will be much slimmer and tailored to my needs more exactly. One of the things I did give up on was a spring back to contain a 4x5 holder. Instead I have a removable GG frame and it sits in a slot where the 4x5 holder can slide into. Here it is:
IMG_6018.JPG

IMG_6019.JPG

IMG_6025.JPG
\

What I plan on improving is the overall bulk (I started this camera with the intention of a reversible back, so it is 180mm square, but I ended up simplifying it to a vertical position and have a lot of wasted space now), using a better bellows material, the front standard will be hinged like the older half-plate cameras, and the back will probably be an actual slot for a gg frame or a 4x5 holder to slide into snugly without needing little brass springs or anything.
 

Ian Grant

Subscriber
Joined
Aug 2, 2004
Messages
23,244
Location
West Midland
Format
Multi Format
Missed this post before. Nice work Nick

My bellows projects have ground to a halt at the moment as I can't find the adhesives I really want yet here where we live in Turkey.

Patterns are ready, much the same as yours, but both tapered sets.

Ian

attachment.php


4th proper bellows made out of the leather from a relatively unsuccessful 3rd (it worked completely, but was just plain ugly)...

370mm outer dimension with 21.5mm wide strips = just under 13" inside dimension that means it is large for 8x10" and too small for 11x14" ... But made in mind to test new techniques but it will end up on a Wetplate tailboard with a universal plate holder system that can take any size plate up to around 12" square.

Extends completely to 850mm (33") if need be - easily 2/3rds that with no refolding required upon contraction - compress to 85mm (3.35")

Should keep me happy until I get a much larger lens - although I suspect I may have reached the limit of size envy with my ~19" f5(ish) Voightlander anyway - my Dallmeyer 4A at least will be able to reach 1:1, the Voight maybe also ok at 1:1 due to the fact the iris is forward of the lens board anyway and the extra dimension of the holder and the rest of the camera body gumph:wink:

Strips were laser cut in registration already out of 0.5mm clear PET plastic which was kept with strips of tape as you can see in the pictures for gluing, something I'll do every time from now on - compared to the amount of work involved and crap output of cutting it myself its goer from now on - I'm even considering buying a laser cutter myself, at least something CNC. I use clear strips as they become black enough anyway, and you can see where the adhesive isn't covering fully on the first side. I also had the bellows vacuum pressed with a bit of heat as an experiment - the heat did nothing as the adhesive wasn't a heat activated variety (nor a deactivated variety thankfully!). The press worked for half an hour and I did note some more compression on pulling it out - not sure if I'll continue doing it however. As the previous bellows had thicker strips, the older bend/creases could be seen phasing in and out of alignment in these newer ones, a bit of steam treatment over the winter soup making sorted that out (they smelled like vege stock), then compression for a week or so and some boot polish while I was otherwise occupied with work and there is now no trace of either carrots or the older creasing.

You can see the seams of the inner and outer leather in photo 6 or 7 I think - leather on top for the pic but the seam will live on the bottom for the camera... Too hard to explain how I do it this way without pics, which I'll try to do for the next one (a larger tapered one, which will need a full hide to do, so far I've been working with half beasts :rolleyes:smile: - anyways, the way I do it means there is no overlap in the leather, much better for the eventual compressed dimension... It's a completely light proof butt joint of sorts. The linen interior joint does overlap, but the double size increase fits in the area that the extra dimension the corner folds introduce (leather wont do the same) - all joints angled so they don't get a chance to bunch in one spot, effectively meaning only about 3 strips worth bunch in any one area... The leather butt joint does have a slightly thicker dimension (glue) but as it is so small the smallest of gradients will offset it strip to strip...

A lot of the info will make more sense to someone who has made a bellows or two previously - a lot of gotchas involved that can only be fully appreciated hands on :D (agree ?)

They're a bit dusty at the mo' - will clean up once the mess making is over ...
 
OP
OP
nick mulder

nick mulder

Member
Joined
May 15, 2005
Messages
1,212
Format
8x10 Format
Too many half built projects laying about and a heap of 11x14" in the freezer so I decided to build a 1:1 magnification only camera (no focus) for a new Petzval I have here...

The plan was zero design - just GO! COMPLETE THE DAMN THING!! - I had delusions of a rule that I wasn't allowed to ponder a design issue for longer than 10minutes, but once again it took me ages (work, travel etc...)

Its a Voightlander 18" f4 or so - like the 7B, but longer and correspondingly slower - very nice specimen from Bulgaria, I know the seller and at least one other keen buyer lurks the forums here and there (hello!)

I shoot fairly composed portraiture at this mag so no focus is no issue - I can always move the camera or sitter (and cat, added for scale incidentally) - will either lay it on a table, or use two tripods so I wont crack the base when I load the holders...

meow

The pile of bits you also see is a wet plate camera I'm building (rear tilt and swing only) that I started even before this one - should get about an 11" to 12" square image size out of it, pretty much a tailboard but with a lead screw focus with a 'quick release' system of sorts - we'll see!

After all of this and once I get my CNC mill working is an attempt at a 11x14" field camera that can take huge lenses - based on in no particular order:

Ebony
Chamonix
Deardorff
Canham

As you can see, a hybrid of all these would be impossible, but those are the ones I'm looking at may as well learn from the best - but in the spirit of "imitation is the sincerest form of limitation" (or flatulence) I'll have a crack at my own invention also

>>>>groan, I've just realised that I've still got to wire and mount the dang PC plug on the Packard shutter board :pinch::laugh:
 

Attachments

  • IMG_0107.JPG
    IMG_0107.JPG
    80 KB · Views: 292
  • IMG_0121.JPG
    IMG_0121.JPG
    309 KB · Views: 290
  • IMG_0122.JPG
    IMG_0122.JPG
    349 KB · Views: 284
  • IMG_0118.JPG
    IMG_0118.JPG
    361.2 KB · Views: 298
  • IMG_0116.JPG
    IMG_0116.JPG
    371.2 KB · Views: 296
  • IMG_0109.JPG
    IMG_0109.JPG
    73.4 KB · Views: 270
  • IMG_0104.JPG
    IMG_0104.JPG
    73.3 KB · Views: 288
  • IMG_0111.JPG
    IMG_0111.JPG
    300.1 KB · Views: 277
  • IMG_0123.JPG
    IMG_0123.JPG
    321.6 KB · Views: 255
Status
Not open for further replies.
Photrio.com contains affiliate links to products. We may receive a commission for purchases made through these links.
To read our full affiliate disclosure statement please click Here.

PHOTRIO PARTNERS EQUALLY FUNDING OUR COMMUNITY:


Ilford ADOX Freestyle Photographic Stearman Press Weldon Color Lab Blue Moon Camera & Machine
Top Bottom