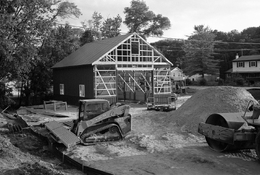
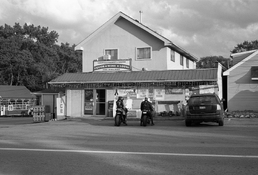
Kodak Medalist unusual out of focus areas on negative

What is this?

D
What is this?

  • 0
  • 4
  • 39
On the edge of town.

A
On the edge of town.

  • 7
  • 4
  • 150
Peaceful

D
Peaceful

  • 2
  • 12
  • 310
Cycling with wife #2

D
Cycling with wife #2

  • 1
  • 3
  • 112

Recent Classifieds

Forum statistics

Threads
198,276
Messages
2,772,222
Members
99,589
Latest member
David Mitchell
Recent bookmarks
1
OP
OP
Hunter_Compton
Joined
Nov 20, 2019
Messages
229
Location
Oxford, MI
Format
Analog
One last thing to check- the hinge pins. Are both pins on each side seating, sliding to the outer edge? Sometimes a pin will not seat. This could leave the back canted slightly (very slightly). The back is actually part of the spool positioning, as you can see by the small wear marks from the edge of the spools. So maybe the back wasn't quite seated, and maybe this would let the spool wobble a bit and spread some uneven tension into the film?

Pure speculation.

Both pins on each side are locking properly and the pressure plate seems normal.

I'm not in doubt it most likely had to do something with my re-spooling of the film, it's just a matter of determining what exactly and how to avoid it in the future.

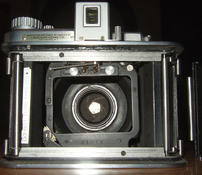
Also, while I have the group's attention, I figured I'd ask a question I've never been certain about. I have always assumed that the correct way to load the film is over the two small rollers that hold the supply spool in place, as seen here:
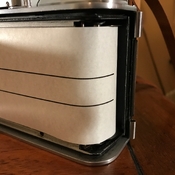
IMG_3543.JPG

You could in theory run it under these, as below, but that seems like it would distort the film more than anything, so I assume this is wrong. IMG_3544.JPG

None of the Kodak manuals are specific on this point, they say to thread the paper over the rollers, but it isn't clear if that means all of them, or just those adjacent to the film gate, nor do they illustrate this part.

In any case, it would seem even when loaded the first way, the film/backing paper having only the outer edges on these small rollers would pose the most likely chance of the film distorting, and I do notice that the Medalist II changed this so that it was an additional solid roller rather than two, one on each end. Any thoughts?
 

blee1996

Subscriber
Joined
Jul 25, 2008
Messages
1,170
Location
SF Bay Area, California
Format
Multi Format
My Medalist II looks very different on the supply side from yours. Is it remotely possible that you are missing one roller?

P.S. I just saw your comments about differences between model I and II. But from my understanding the improvements were made on the take up side to make frame counting more reliable.


1000016397.jpg
 
Last edited:
OP
OP
Hunter_Compton
Joined
Nov 20, 2019
Messages
229
Location
Oxford, MI
Format
Analog
Unless it’s a part that’s easily broken or lost, I’m fairly certain it’s a design change as you see the split rollers on Medalist I cameras and then the solid design comes late in Medalist I production or during the changeover to Medalist II.

Here’s another one from the web with split feed rollers.
13B579C2-1289-4ECB-997B-452FDAC88234.jpeg
 

Mr Bill

Member
Joined
Aug 22, 2006
Messages
1,469
Format
Multi Format
135 is narrower, which makes a difference in this regard. The base is generally also slightly thicker.

I don't know what you're talking about. Wasn't I clear that that the specific long-roll film we were using WAS 35mm perforated film?? And no, it was not fundamentally different from the film that pros might buy over the counter.

You're just plain wrong about this. What else can I say?

But back to the main topic of this thread: I've offered a relatively simple yet very effective test to see if the surface of the film is flat or not. It requires some setup, but then is a quick visual check. I fail to grasp why there's no interest in this. I can only surmise that people don't quite believe me. (Cuz I think they DO want to solve this.)
 

Mr Bill

Member
Joined
Aug 22, 2006
Messages
1,469
Format
Multi Format
Unless it’s a part that’s easily broken or lost, I’m fairly certain it’s a design change...

I couldn't really say for sure; I don't have any real knowledge of the Medalist guts, and haven't used one since late 1960s(?). So I'm strictly guessing.

But to me... it seems odd to have those two little stubs there (per your photo in post #26) that COULD allow someone to stick the sides of the film under em. And I always look at things like this as WHY would the designer(s) do this? When I saw blee1996's photo (post #27) my first thought was, "ahh, an intermediate roller in the middle, possibly with pin tips that fit into the 'stubs'. And IF one of those pin ends SHEARED off..." Total speculation on my part, though.
 

koraks

Moderator
Moderator
Joined
Nov 29, 2018
Messages
21,994
Location
Europe
Format
Multi Format
I don't know what you're talking about. Wasn't I clear that that the specific long-roll film we were using WAS 35mm perforated film??

I'm referring to the Medalist in this thread, which consumes 120 film. We're looking at a phenomenon that appears to consist of a ripple/bulge emerging in the frame. The mechanism you offered based on your experience seemed to fit and I expanded on that thought. I don't really see the need for your aggressive response, to be honest.
 
Joined
Nov 15, 2017
Messages
474
Location
?
Format
Analog
Yes, that's what the teeth do here too. Though it still poses the question as to why it's causing an issue here, and hasn't in the past. I think I'm going to check dimensions on the width of both the film and backing paper of this roll of Kentmere 200 in comparison to prior Ilford and Kodak rolls and see if there's any discrepancy.

I think these teeth can cause this problem. The harder this roller (and the frame counter it is driving) turns, the more tension has to be exerted on the take-up spool to advance the film. The more tension there is between take-up spool and frame-counter-roller, the more likely it is for the film edges to be lifted by the teeth and the middle of the film to have contact to the middle of the roller.
I mean the teeth always have contact to the film, but the middle of the film should not have contact to the middle of the roller. If tension on the take-up-spool is increased, the film could make contact to the middle of the roller.
Then there is a bulge at the frame-counter-roller, which could provoke a bulge in the image area.

With such a camera you`re not advancing the film the same way every frame. It`s possible that you`re sometimes winding harder and sometimes gentler, which would explain why the effect occurs sometimes - independent of time passed or camera-shake during transport.

Now this roller does drive the frame counter which could become sticky. Depending on when the camera has been serviced last time, you may run into a sticky mechanism now - though you didn`t suffer this some time ago.
...

The re-spooled film also could be a problem, but both (possible) problems also could add up. Therefore i`d check the roller for stickiness - as i think this could produce that problem.
...


1750327399838.png


This does look bad and wouldn`t make sense to me. It is better for the film not to make any tight turns when going from the spool to the film gate. If there is a tight turn like this and the film is sitting in the camera for some time, the film would curl on that spot and have poorer flatness once advanced to the film gate.
These short rollers must be meant to avoid a tight turn - when the spool is almost empty. Then the diameter of the spool is smaller producing a tighter turn at the end of the roll than at the beginning. These short rollers must be meant to preserve good flatness towards the end of the roll.
 
Last edited:

Dan Daniel

Subscriber
Joined
Jul 4, 2009
Messages
2,864
Location
upstate New York
Format
Medium Format
I'm not in doubt it most likely had to do something with my re-spooling of the film, it's just a matter of determining what exactly and how to avoid it in the future.
I think you should shoot another roll. Check the Kentmere film to other emulsions, and run another roll of an emulsion that has not had problems. Most likely it was a re-spooling problem.

You could in theory run it under these, as below, but that seems like it would distort the film more than anything, so I assume this is wrong. View attachment 401107
Uh.. yeah, that's a no :smile:
 

Mr Bill

Member
Joined
Aug 22, 2006
Messages
1,469
Format
Multi Format
The mechanism you offered based on your experience seemed to fit and I expanded on that thought. I don't really see the need for your aggressive response, to be honest.

No, no, I am not trying to offer "this mechanism," from our portrait camera as a possible explanation for the Medalist problem. (I did not actually explain the mechanism behind our portrait camera problem.) I am offering a TEST METHOD to check for film flatness. I only brought up the portrait camera issue as demonstration about the effectiveness of the "flatness check" method.

Ps, until you revealed that you had switched the topic from (my) portrait camera back to the Medalist, it looks exactly like you were telling me that I didn't know what size film I'd been working with for years. I reread things carefully and decided that things had to be made clear. I get now what happened; I don't think any apologies are called for.

FWIW I deliberately avoided describing the test method as it might seem too unbelievable (and/or complicated) to the casual reader here. So I prefer that someone be interested enough to actually try it out, in which case they'll come back and say "OMG, that's almost unbelievable how well it works!"

The test method is somewhat akin to something those "paintless dent removal" people do when repairing hail damage to a car. They need a way to judge the effectiveness of their efforts. So they place a small light box with a dark grid pattern on the other side of the dent. Then while looking at the dent they see a distorted reflection of the grid, and minimizing this distortion is their guide while gradually removing the dent.

Here's a conceptual description of the film test method. One attaches a grid pattern to the front of a light box. Then set up the camera as if photographing the grid. (If the shutter is opened an image of the grid is projected onto the film, right?) Now for the tricky part(s): put a small mirror in front of the camera lens at a 45 deg angle, and turn the camera so as to again be photographing the illuminated grid. But... instead of a normal mirror, use a so called beamsplitter where, for example, it might reflect half the light and let the other half go through. (Window glass behave as a beamsplitter except that it reflects only about 10% whilst about 90% goes through.

To evaluate: we know that an image of the lit grid is being projected onto the film, via the beamsplitter, right? By looking into the front of the lens, through the beamsplitter, one can inspect the image being projected onto the film! If there are bulges or other distortions in the film surface they will show up as distortions in the grid. Does it work? Yep, works great!
 
Photrio.com contains affiliate links to products. We may receive a commission for purchases made through these links.
To read our full affiliate disclosure statement please click Here.

PHOTRIO PARTNERS EQUALLY FUNDING OUR COMMUNITY:


Ilford ADOX Freestyle Photographic Stearman Press Weldon Color Lab Blue Moon Camera & Machine
Top Bottom