Fitting issue on the Yashica-12 TLR

Sonatas XII-81 (Farms)

A
Sonatas XII-81 (Farms)

  • 0
  • 1
  • 35
Black Locust

A
Black Locust

  • 10
  • 3
  • 111
Contrast

A
Contrast

  • 4
  • 1
  • 96
Sonatas XII-80 (Farms)

A
Sonatas XII-80 (Farms)

  • 2
  • 1
  • 82
Pink Rose

A
Pink Rose

  • 8
  • 0
  • 108

Recent Classifieds

Forum statistics

Threads
200,199
Messages
2,804,148
Members
100,169
Latest member
FL Heliographer
Recent bookmarks
0
OP
OP

HHS

Member
Joined
Aug 27, 2025
Messages
36
Location
Germany
Format
Multi Format
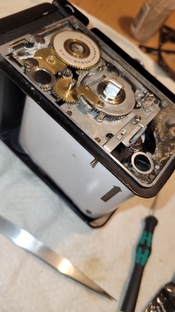
The spring at the blue arrow is out of position.

Where is the counter? That is integral to proper operation.

Maybe hardly visible - but as written in the picture, I already began to disassemble everything in this picture - that's why the counter is already removed and also the springs detached. ( I forget to take a picture of this situation when everything was still assembled)

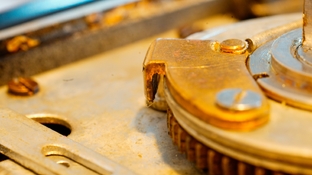
With this picture I just wanted to show what was the position of the winding stop lever arm and the brass thing on the rotary disc, when it is jammed.

Maybe It is better I make a video showing the inside from loaded to picture "1" to "jammed". Will need some days as I have a busy week.
 

Dan Daniel

Subscriber
Joined
Jul 4, 2009
Messages
2,956
Location
upstate New York
Format
Medium Format
OK. The right side of the board is where you need to pay attention. The two black lever parts and where they interesect affect the overall rotation of the winding lever. The lower black lever is moved by the shutter release at the bottom end, pin on back side of plate. Well, you'll get it.
 

monopix

Member
Joined
Dec 10, 2009
Messages
189
Location
Lincolnshire, UK.
Format
Hybrid
Maybe hardly visible - but as written in the picture, I already began to disassemble everything in this picture - that's why the counter is already removed and also the springs detached. ( I forget to take a picture of this situation when everything was still assembled)

With this picture I just wanted to show what was the position of the winding stop lever arm and the brass thing on the rotary disc, when it is jammed.

Maybe It is better I make a video showing the inside from loaded to picture "1" to "jammed". Will need some days as I have a busy week.

I think you need to reassemble it and start fresh. Once you dismantle the mechanism you have lost vital information regarding the interaction of parts. You need to make sure you understand what 'should' happen and then determine what is different in yours. Once you do that then you can dismantle it to try to find the root cause. It's basic fault finding techniques.

Note that the winding stopper only stops the crank from going clockwise (advancing the film) it won't stop it being wound backwards. You say the crank won't move either way so the problem is somewhere else.
 
OP
OP

HHS

Member
Joined
Aug 27, 2025
Messages
36
Location
Germany
Format
Multi Format
Thank you very much, that's more than helpful @Dan Daniel and @monopix !
I think I have dismantled and reassembled it at least three times. And indeed I could find small things and fix/ adjust, so it is running smooth - except the named problem.
Today, I realised that my test conditions were inadequate and perhaps unrealistic: A completely empty plastic film spool, already somewhat worn out (you can see traces of the scanning wheel), naturally leads to errors, as the scanning wheel in the upper film chamber no longer runs correctly. A fully wound spool in the upper film chamber, on the other hand, sends a completely different signal to the mechanism – with similar results.

So I threaded a 6 cm wide and 30 cm long strip of thin paper into an empty film spool like real film and wound it up just as before. Surprise: this time everything worked without any problems. I was able to replicate this several times. Even simple adhesive tape wrapped around the spool at the side where the scanning wheel is running worked successfully. So in theory I should be able to use a fresh film without any problems now.

This helps me a lot to find out, if there is really a problem inside - or maybe outside the camera ;-).
 
OP
OP

HHS

Member
Joined
Aug 27, 2025
Messages
36
Location
Germany
Format
Multi Format
@Dan Daniel @monopix
I finally solved it! 😀

Dan, you were right - it had something to do with one of the two black arms - more precisely, there is a spring between the upper black arm (on the winding stop arm) and the edge of the case.

One leg of this spring is bent at right angles and belongs on the edge of the case, the other in a groove in the black arm.

However, I had inserted it with the bent leg on the arm - i.e. the wrong way round. So I put it back now in the other way round - and now it works perfectly again as described in the operating instructions.

I wouldn't have thought that this small could have had such a great effect.

Even if it was really tricky - it was fun - and my respect for the engineers, but for all the professionals who still maintain such cameras, is huge!

So many Thanks to you all for your help!
 
OP
OP

HHS

Member
Joined
Aug 27, 2025
Messages
36
Location
Germany
Format
Multi Format
No, no - unfortunately I was completely wrong!😢

The crank jammed with the very first film I loaded. I couldn't fix it without opening the back cover door - so unfortunately the film was lost. Now at least I have a film that I can rewind every time to find out the cause. As far as I can tell, this only ever happens when the crank stops between 12 o'clock and 3 o'clock during loading. Even my earlier fix of cranking it back before closing the door doesn't help.

I don't know how many times I should take the camera apart - I just can't find the cause. I'm really frustrated! Mark Hama or Bob Sara in the USA as former Yashica technicans are not a solution for me as a European. Apart from the fact that neither will live forever.

I really want to know what's the reason. But slowly I think it is nothing more than a design error by Yashica - I mean other camera companies had been able to produce cameras, which had been working flawless. Maybe I should have better invest in Rolleiflex, or even Hasselblad.
 

monopix

Member
Joined
Dec 10, 2009
Messages
189
Location
Lincolnshire, UK.
Format
Hybrid
Honestly? I'm not surprised. I just couldn't see how what you found could cause what you described. I still say you need to put it together with the side plate off so that you can see what is happening. There is an issue in doing that as one of the gears relies on the side plate to keep it in position. I made up a small retaining plate for it but it's possible without.
 
OP
OP

HHS

Member
Joined
Aug 27, 2025
Messages
36
Location
Germany
Format
Multi Format
Honestly? I'm not surprised. I just couldn't see how what you found could cause what you described. I still say you need to put it together with the side plate off so that you can see what is happening. There is an issue in doing that as one of the gears relies on the side plate to keep it in position. I made up a small retaining plate for it but it's possible without.

As I said - I exactly did that. Several times. Even right now am I doing this, while I'm writing these words.

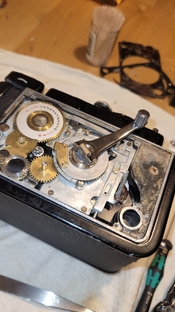
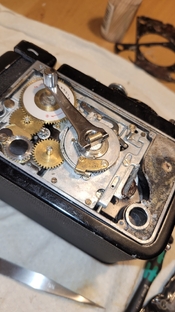
Crank forward to the lens, driving claw outside the wind Stop arm:
* 20250907_155445.jpg

After 1/4 the crank stops, winding arm closed to the rotary disc - I would expect not doing this:
* 20250907_160903.jpg


Jammed, after turning back to release the shutter. Fixing by opening door, and cranking backwards:
* 20250907_160916.jpg
 

Dan Daniel

Subscriber
Joined
Jul 4, 2009
Messages
2,956
Location
upstate New York
Format
Medium Format
Almost always if the crank stops after a 1/4 wind it's a spring out of position. Suggestion: operate with side off. As you wind in the way that leads to the jam, find out which pawl is dropping, which lever is moving, to cause the jam.

Most likely it is the lower black arm dropping to the center and stopping it, but that's based on other cameras as much as anything I remember about the YashicaMats. The reason it drops could be based on the main counter pawl. Is something happening when the large brass part on the center disk drops over the arm that pushes it out on rewind?

You can hold the spool gear in place with a finger while winding. You need to study the actual failure in motion.
 
OP
OP

HHS

Member
Joined
Aug 27, 2025
Messages
36
Location
Germany
Format
Multi Format
Almost always if the crank stops after a 1/4 wind it's a spring out of position. Suggestion: operate with side off. As you wind in the way that leads to the jam, find out which pawl is dropping, which lever is moving, to cause the jam.

Well, it stops at 1/4 and it jams, and other times it stops at 1/4 and there is no jam.
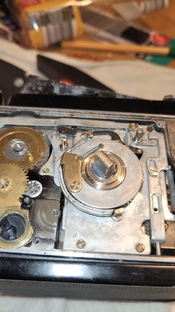
What irritates me is, those jams really only happens everytime when the brass part - it is called driving claw according the parts manual - is between winding stop arm and rotary disc when closing the door as you can see on the first image.
Other than that I can't see anything. suspicious.

Which let me ask myself, if it could be something below the Base Plate.
 
OP
OP

HHS

Member
Joined
Aug 27, 2025
Messages
36
Location
Germany
Format
Multi Format
Your problem is that the Winding Claw is on the wrong side of the Stopper Arm. It should run inside the arm (as the crank is turned anticlockwise) not outside as in your pictures. Look at the diagrams in the manual and my photo.

View attachment 406981
Thanks you very much! That was very helpful and brings me a step further to the solution.
I positioned now all gears and levers as in your pictures.

But still: when the film is transported to the start marking and with that, the claw ends on the outer side. Then somehow it will never run inside.

If the claw ends opposite the winding stopper arm ( towards the lens) everything will be alright.

Now it also explains my former short fix by cranking backwards before closing the back door.

But that's not how it is written in the cameras manual.

Hmm... I wonder what's off...
 

monopix

Member
Joined
Dec 10, 2009
Messages
189
Location
Lincolnshire, UK.
Format
Hybrid
Wherever the claw finishes when you reach frame one, it should rotate anticlockwise (backwards) all the way back to the stop but it should ALWAYS go under the stopper arm. If yours is going over the stopper arm when you wind anticlockwise then the alignment of the arm is wrong. But you have another problem, maybe it's the only problem, the claw, if it's on the outsideof the stopper arm, should ride over the top of the end stop and continue around to finish under the arm. In your third picture above, the claw is over the arm but appears to be stuck by the end stop. This shouldn't happen. Here's a link to a video.
 
OP
OP

HHS

Member
Joined
Aug 27, 2025
Messages
36
Location
Germany
Format
Multi Format
Wherever the claw finishes when you reach frame one, it should rotate anticlockwise (backwards) all the way back to the stop but it should ALWAYS go under the stopper arm. If yours is going over the stopper arm when you wind anticlockwise then the alignment of the arm is wrong. But you have another problem, maybe it's the only problem, the claw, if it's on the outsideof the stopper arm, should ride over the top of the end stop and continue around to finish under the arm. In your third picture above, the claw is over the arm but appears to be stuck by the end stop. This shouldn't happen. Here's a link to a video.


Thanks again. I tried to recreate your video by removing the exact gear, holding the shutter button to have the lower black arm raised so I can turn the wheel - but surprise - it will not go further than that: 20250908_200637.jpg

and it is springloaded.


Unless I missed something, it seems to me there is something not correctly aligned beneath the plate, am I correct?
 
OP
OP

HHS

Member
Joined
Aug 27, 2025
Messages
36
Location
Germany
Format
Multi Format
And does the stopper arm move away from the crank wheel if you manually pull it away?

I will check it again tomorrow. When it is jammed like in my third picture it wasn't possible.

Btw. my end stop pin also looks a bit dented and I would probably have to sand it smooth – perhaps one of the reasons why the whole thing doesn't work properly.
 

Dan Daniel

Subscriber
Joined
Jul 4, 2009
Messages
2,956
Location
upstate New York
Format
Medium Format
Thanks again. I tried to recreate your video by removing the exact gear, holding the shutter button to have the lower black arm raised so I can turn the wheel - but surprise - it will not go further than that: View attachment 407043

and it is springloaded.


Unless I missed something, it seems to me there is something not correctly aligned beneath the plate, am I correct?

Important!!!! See that brass disk at the top left with the notches in it? It MUST be in the proper position for the motion of the outer flying arm to be correct. The counter must be fully assembled and screwed in place. That arm (winding stopper arm?) on the other end is the frame metering (measuring) stop pawl. The counter assembly must be assembled for this to work, or to fail in a way that will tell you what is going on.
 
OP
OP

HHS

Member
Joined
Aug 27, 2025
Messages
36
Location
Germany
Format
Multi Format
@monopix and @Dan Daniel
Thank you very much—especially for your patience, which I think I am putting to the test right now.
And @Dan Daniel:
Of course, that makes sense—I could kick myself for not understanding this. All this time, I thought it had to be something really complex and hidden.

After watching the video above, re-inspecting the device, and, above all, getting some sleep, I think that something is indeed simply preventing the claw from moving over the end stop pin when it is outside the winding stop arm. Since the users manual say to turn the crank back until it stops—which, in my case, happens to be also the point at which it can be released—I always had the impression that the fault lay elsewhere. Instead, the crank should simply be able to be turned further over the End Stop Pin until it actually stops with the claw inside the winding stop arm.

I'll make a video of it today after work, sharing it here and try to take a few detailed photos of the condition of certain parts.
 
OP
OP

HHS

Member
Joined
Aug 27, 2025
Messages
36
Location
Germany
Format
Multi Format
@monopix @Dan Daniel
First Video showing the problem:


The second video recreation of the video by monopix:


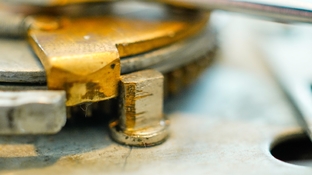
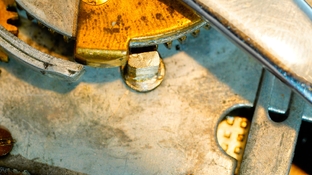
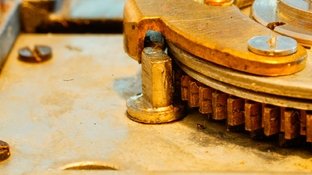
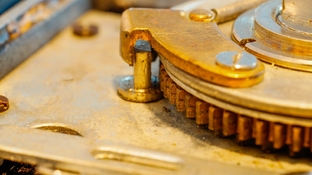
Here some macro shots of the End Stop Pin:
_DSC0795.jpg
_DSC0775.jpg
Someone before ( I know from the previous owner that camera was already in repair twice due winding failure) had obviously sanded down or ground down the pin.
 
OP
OP

HHS

Member
Joined
Aug 27, 2025
Messages
36
Location
Germany
Format
Multi Format
@monopix @Dan Daniel
First Video showing the problem:


The second video recreation of the video by monopix:


Here some macro shots of the End Stop Pin:
View attachment 407093
View attachment 407094
Someone before ( I know from the previous owner that camera was already in repair twice due winding failure) had obviously sanded down or ground down the pin.


Some more to show the situation - first image when it is jammed
_DSC0798.jpg
_DSC0800.jpg
_DSC0801.jpg
 

monopix

Member
Joined
Dec 10, 2009
Messages
189
Location
Lincolnshire, UK.
Format
Hybrid
  • HHS
  • Deleted
  • Reason: Link to flickr doesn't work
OP
OP

HHS

Member
Joined
Aug 27, 2025
Messages
36
Location
Germany
Format
Multi Format
Your videos are not showing. Can you give the links to them?

It seems flickr isn't supported here.


The used film in the film chamber is already very wornout, that's why the transportation is quite stiff in the first video
 

monopix

Member
Joined
Dec 10, 2009
Messages
189
Location
Lincolnshire, UK.
Format
Hybrid
Pretty obvious the problem is the claw not getting past the end stop. A bit of shaping of the inside edge of the claw might help, also some grease. Also the stopper arm might be sitting too close to the wheel, bending it outwards away from the wheel slightly on the end near the end stop would hold the claw further away from the stop. You'll have to decide the best solution.
 

Dan Daniel

Subscriber
Joined
Jul 4, 2009
Messages
2,956
Location
upstate New York
Format
Medium Format
I'm with monopix. Looks like the 'Winding Stopper Arm' is not parallel/concentric to the central disk. That the end is sitting closer. What if it was bent out at the end? Maybe pliers at the center of it- maybe where the transfer gear is- and the end section bent out about 1/2mm or so. Gentle but firm. Get the end to sit out further.
 
Photrio.com contains affiliate links to products. We may receive a commission for purchases made through these links.
To read our full affiliate disclosure statement please click Here.

PHOTRIO PARTNERS EQUALLY FUNDING OUR COMMUNITY:


Ilford ADOX Freestyle Photographic Stearman Press Weldon Color Lab Blue Moon Camera & Machine
Top Bottom