First time darkroom experience, what am I doing wrong?

Curious Family Next Door

A
Curious Family Next Door

  • 0
  • 0
  • 0
spain

A
spain

  • 1
  • 0
  • 58
Humming Around!

D
Humming Around!

  • 5
  • 1
  • 70

Recent Classifieds

Forum statistics

Threads
198,425
Messages
2,774,789
Members
99,612
Latest member
Renato Donelli
Recent bookmarks
0

BGriffin23

Member
Joined
Oct 21, 2020
Messages
56
Location
CT, USA
Format
Multi Format
Hello all. I am having trouble with development of paper in my first attempt to set up a darkroom. I will not get into my camera setup or the film development aspect to this adventure unless someone asks.

I set up my film shiny side up in a Beseler Cadet 35 and adjusted the enlarger to get as sharp looking an image onto the frame created by my easel to fit a 5x7 paper sheet as I could. Then taking out a sheet of Ilford Multigrade 5x7 in red light I expose it to make my very first print with 5, 10, 15 and 20 second strips using a Priority Mail envelope for a mask and dip into a 14:1 solution of Ilford Multigrade paper developer for one minute (I later learn it should have been 90 seconds). My image appears (!!!) and then goes completely black (!!!) over the course of 60 seconds before making successive trips to Ilfostop and Kodafix before finishing up with a wash and hang dry. For the next few minutes I wait in the dark for it to dry hopeful that my first image might somehow reappear...but no. My firsy print is just solid black, not the slightest hint of what it was supposed to have been.

Through four more attempts I try different exposure times in the Beseller until I take the daring move of leaving the print in for less time in the developer (since it appears quite nicely after about 20 seconds before disappearing completely into blackness some time after 50 seconds in all previous tries). On the sixth attempt a very light image appears after developing for 30 seconds and exposure for 3/6/9. For this I used a no-name cheaper alternative brand paper to Ilford called Multitone. Next I go for 5/10/15 and 45 seconds of development (half what Ilford says!) and a darker but still discernible image appears on Ilford Multigrade. FWIW Ilford supplies an instruction sheet with their paper, but I can make no sense of it and it seems to have an enlarger far more sophisticated than my little Beseler in mind. The Multitone needless to say has no instructions of any kind.

Long story short through some more experimentation I reach the following tentative conclusions:

• Ilford Multigrade is best developed for 45 seconds, Multitone for 30. Both of these are way below the 90 seconds Ilford calls for when using a 14:1 solution of their Mutligrade paper developer (temperature is as close to 20°C as I can make it).

• An exact count of seconds in how long your paper sits in the developer is very important to how your image will eventually appear.

• The longer the development time the darker the image.

• The longer the exposure time the higher contrast the image.

The Besseler's lens was set to f/8 and I measured 10" from the bottom of the lens to the top of the paper-holding surface of the easel. The Beseler has a 75W PH140 bulb.

So my questions for the forum are as follows (plus a bonus question at the end):

1. Are my development times correct? Is Ilford's spec of 90 seconds way off? Really what should I expect the development times to be (seems to me to be 20-50 seconds).

2. What is a realistic exposure time?

3. While in the end I did manage to create images of some sort they are quite poor, low to very low contrast and with wavey lines which I suspect to be a result of not being able to insert the paper evenly into each tray. What am I doing wrong? BTW I am inserting the paper into the dev, stop and fix upright while washing is upside down.

Bonus question: My Beseller's film holder doesn't seem to be able to hold flat the end exposure of a short length of film. From everything I've seen online it seems people cut a film roll into 5-exposure strips for easy light table viewing and storage in a binder. The film holder has one side which seems appropriate for 35mm but the other is more like the size of a 120! As such the end of a film strip just hangs down through the larger hole (see pictures below). Is my film holder defective or missing something or is it supposed to look like this? Am I only supposed to use full-length film rolls with the Beseller Cadet?
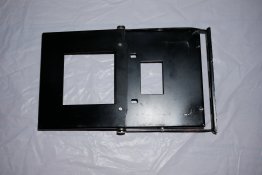
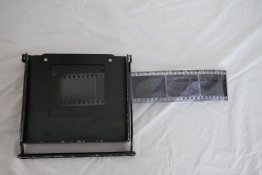
P1080540.JPG P1080542.JPG
 

logan2z

Subscriber
Joined
Jan 11, 2019
Messages
3,700
Location
SF Bay Area, USA
Format
Multi Format
I'm going to take a shot and say that, depending on the density of the negative, even the 5s exposure at f8 may be too long for a 5x7 print on the Beseler. I have a Beseler 23C with the same bulb and it's very bright. My exposure times for 8x10s at f8 are often in the 8-10s range. You can try cutting the exposure time further or using a smaller aperture on the enlarging lens to test out this theory.

I doubt there's any issue with the development times specified by Ilford and I would continue to follow their directions. I use the same developer at the same dilution and develop Ilford MG Classic Fiber paper for the recommended 3 mins without issue.
 

koraks

Moderator
Moderator
Joined
Nov 29, 2018
Messages
22,235
Location
Europe
Format
Multi Format
You're overexposing by a large margin. Stop down to f/22 and try again, but do develop to completion. So no 30 or 45 seconds, but 60 or 90. If this solves the issue, then proceed to figure out how you can print at larger apertures if you feel it's necessary (lower power bulb, neutral density filter etc.)
 

MattKing

Moderator
Moderator
Joined
Apr 24, 2005
Messages
52,611
Location
Delta, BC Canada
Format
Medium Format
Welcome to Photrio.
I agree - I think you are probably over-exposing your print. Try the suggestions above. If it turns out that you need to use f/22 and/or really, really short times for a decent print, there are some steps you can take to reduce the light intensity.
As for that carrier, it looks to me to be incomplete.
Here is a link to the exploded part diagram for your enlarger, which shows trhe various configurations of the negative and slide carrier: https://www.beselerphoto.com/wp-content/uploads/2018/08/Cadet-II-Exploded-View.pdf
 

jimjm

Subscriber
Joined
May 2, 2007
Messages
1,224
Location
San Diego CA
Format
Multi Format
It looks like your carrier has been modified somehow. The cutout in both halves should be the same size, approximately the size of one 35mm frame.
You also want to make sure to develop your print to completion, whatever the manufacturer states, which is usually 60 sec to 2 mins (for most RC papers) depending on the dilution. I develop Ilford MG RC IV for at least 90 sec in 1:14 Multigrade developer. It doesn't hurt to leave it in a bit longer than that. You'll never get satisfactory results by pulling the paper before it's fully developed.
Every enlarger is different, but 5x7 prints commonly call for short print times, so I would close down the lens a few more stops and try test strip exposures of shorter increments. 5-second gaps are a lot for a small print, where your base exposure time may end up only being around 10 sec.
 

pentaxuser

Member
Joined
May 9, 2005
Messages
19,821
Location
Daventry, No
Format
35mm
BGriffin 23, can you tell us what the aperture on your enlarger was ? Incidentally all is not lost with the black prints. Keep these and use them for dodging and burning by turning the black side towards the print during exposure to avoid any reflection. The white side shows you the projected print for accuracy during the doge and burn sequences

Thanks

pentaxuser
 

Sirius Glass

Subscriber
Joined
Jan 18, 2007
Messages
50,306
Location
Southern California
Format
Multi Format
  1. Stop down the lens to a smaller aperture f/8 to f/22 range.
  2. Does your enlarger have more than one brightness level? If so use the dimmer range.
 

mshchem

Subscriber
Joined
Nov 26, 2007
Messages
14,522
Location
Iowa City, Iowa USA
Format
Medium Format
I'm assuming you are using new paper? Red light, what sort of red light? You are definitely overexposing the paper that close to the easel. Try developing a sheet of paper without any exposure from the enlarger, if it turns black or gray at all your paper has been exposed, or your red light is not "safe" .
Print developer is designed to work from 65 to 75 F, If you have correct exposure and process at 68 F, the image should appear gradually, shouldn't change much after 90 seconds.

Something is blasting the paper and over exposing it. Beware 2nd hand paper.
 

AnselMortensen

Subscriber
Joined
Jun 9, 2020
Messages
2,416
Location
SFBayArea
Format
Traditional
I suspect your "red light" safelight.
Try processing **(In Total Darkness)** a sheet of paper that HAS NOT been exposed to your "red light"....
If it comes out clean white, it shows that the paper is not fogged, and puts the blame on the safelight.
The safelight should be amber-colored...best to use a real safelight with a real OC filter.
 

Agulliver

Member
Joined
Oct 11, 2015
Messages
3,525
Location
Luton, United Kingdom
Format
Multi Format
If the safe light is suspected, try developing a sheet of paper which has not been exposed at all to anything....and one which has been exposed to the safe light but nothing else. this way you can determine if there's any problem with your paper or your safe light.

What distnce is your safe light from the enlarger and the developing tray? what colour is your developing tray?
 

voceumana

Member
Joined
Aug 4, 2004
Messages
896
Location
USA (Utah)
Format
Multi Format
Make sure your developer temperature is around 68 degrees F or so, and you are probably grossly overexposing. Generally when a print is developed for a longer period of time, it looks much better than one that is pulled out of the developer too soon. Paper and film development time is very dependent upon temperature.
 

Sirius Glass

Subscriber
Joined
Jan 18, 2007
Messages
50,306
Location
Southern California
Format
Multi Format
Safe Light Test
  1. In total darkness take out a sheet of paper an place it emulsion side up.
  2. Place an object such as coins on the paper.
  3. Put away the package or box of paper.
  4. Turn on the safe light for 30 seconds.
  5. Turn off the safe light.
  6. Develop the paper.
If the paper is darker than were the coins were, you have a safe light problem.
 

Donald Qualls

Subscriber
Joined
Jan 19, 2005
Messages
12,266
Location
North Carolina
Format
Multi Format
The safelight should be amber-colored...best to use a real safelight with a real OC filter.

I used a red bulb (originally sold as a darkroom safelight, probably 1970s vintage) in a plain aluminum reflector clamp-lamp for both graded and multigrade paper in my old "darkroom" (a quick-conversion bathroom setup). I never saw evidence of safelight fogging. I've just recently acquired some amber LED bulbs, in hopes I can use them for both multigrade and color (they're listed as 596 nm emission). I'm very confident they'll be fine for multigrade; my main question is whether even a single one, reflected from a dark painted wall, will be too bright for RA-4. There was to be a safelight test on RA-4 paper this weekend, but I ran into some problems with my enlarger setup, so it'll be a couple more weeks before I get to that. If too bright, it's easy enough to partially mask the reflector bowl. And of course I'll need to keep the red bulb, in case it's needed for handling ortho materials (ortho lith film, ortho camera films, Harman Direct Positive, etc.) -- at least until I test whether 596 nm is long enough to be beyond the green limit of ortho film.
 

MattKing

Moderator
Moderator
Joined
Apr 24, 2005
Messages
52,611
Location
Delta, BC Canada
Format
Medium Format
I too would recommend testing for unwanted light and an unsafe safelight.
If your developed in total darkness test shows no light leaks, and your safelight passes the test above, put a reminder in your calendar to check in after you have done a few more sessions and are starting to get results you are happy with. We can then point you to a much more detailed and thorough safelight test, that will catch much more subtle problems (if they are happening to you).
In the meantime, here is a link to that much more detailed and thorough Kodak Safelight Test: https://www.kodak.com/uploadedfiles..._motion_products_filter_K4_Safelight_1106.pdf
 

Donald Qualls

Subscriber
Joined
Jan 19, 2005
Messages
12,266
Location
North Carolina
Format
Multi Format
Safe Light Test
  1. In total darkness take out a sheet of paper an place it emulsion side up.
  2. Place an object such as coins on the paper.
  3. Put away the package or box of paper.
  4. Turn on the safe light for 30 seconds.
  5. Turn off the safe light.
  6. Develop the paper.
If the paper is darker than were the coins were, you have a safe light problem.

Also note that this only tests for gross safelight problems. To be really safe, you need to perform the same test for minutes. I'd consider a safe time (exposure time that won't cause fogging) of ten minutes to be the minimum to aim for, and twenty minutes might not be unreasonable if you wind up (later) needing to do extensive burning, split filtering, etc. on a large print that, due to higher magnification, already requires a longer exposure.

Also, when you do the above test, while you're still in total darkness, tear or cut the sheet in half. Put one half straight into the fixer, then run the safelight test on the other half as above (longer times can wait until you know your paper is good and the safelight isn't fogging in 30 seconds). Try to put one of the coins (or some other object) overlapping the edge of the portion you're testing on; that way you can also, after developing and fixing, compare the protected area of paper against the fixed-out, undeveloped portion -- ideally, exposed to safelight, protected, and fixed without developing will all be the same "paper white", but if not, you can tell this way whether the paper was fogged before you started (protected portion of the test sheet has some gray density compared to the undeveloped-fixed piece), or fogged by the safelight (protected portion is the same as the undeveloped, fixed out piece, but the unprotected has some density.
 
OP
OP
BGriffin23

BGriffin23

Member
Joined
Oct 21, 2020
Messages
56
Location
CT, USA
Format
Multi Format
Thank you for your responses everyone! I will look into my film carrier. It is a small square thing and not the usual large round carriers you see on eBay that are for far bigger enlargers so I will have to contact Beseler and see what they say. The lens on my enlarger only steps down to f/16. At that level the image is very dim, but I will try it with 1/2/3 second exposures and the full 90 (or 120) seconds development and see what happens. Unfortunately I have already exposed all my paper to the safelight so I will have to buy more to do the safelight test. The light itself is right next to the enlarger, which I'm guessing is a bad idea. My set-up is very cramped in my small bathroom so I just put the enlarger, timer and light on the top level of a lightweight shelving unit, the chemical trays on the level below and the wash tray on the bottom, all in my bathtub. I could place the timer/light on the other side of the bathroom, but then it would still only be maybe 5-6 feet from the enlarger. The dev tray is red.

PS: While we're on the subject of suspect "safelights" my timer is a Master Time-o-Lite who's clock face is painted with a dim green photoluminescent ink. Is this a danger?
 
Last edited:

Donald Qualls

Subscriber
Joined
Jan 19, 2005
Messages
12,266
Location
North Carolina
Format
Multi Format
Try turning the safelight over and bouncing it off the ceiling. First, that adds distance from both easel and trays; second, it spreads the light so it can be dimmer and still adequate to work in (because it comes from a larger area where the light scatters off the ceiling). You want the timer, at least, close to the enlarger, so you can dodge if needed (which you usually want to start as soon as the enlarger comes on) or burn (where you'll be turning on the enlarger without a timer to add light in controlled areas -- and obviously don't want to have it shining on the whole print for the second or two it takes to turn and take a step).

In my experience, a 5x7 from 35mm with a common diffusing enlarger ought to require at least 7-10 seconds at f/8, commonly twice that or longer (depending on the density and fog level of the negative, of course).

Edit: I just went back to your original post. You said you used Ilford Multigrade at 14:1 -- we'd normally write that as 1+14, indicating one part concentrate to fourteen parts water. Hopefully, you didn't use fourteen parts concentrate to one part water... Even if you did, that shouldn't make your prints turn black without something else exposing them to light in their sensitive color range.

However, the fact you were seeing the print look okay after 20 seconds, but then go past that "okay" state to full black before 90 seconds led me to ask...
 
Last edited:

pentaxuser

Member
Joined
May 9, 2005
Messages
19,821
Location
Daventry, No
Format
35mm
Update: My safelight is a 5W E27 LED. Reading the last post my light is just a bare bulb, so I will have to improvise a way to direct/bounce it.
What colour light does this give - red I take it? Do you know what wavelength it operates at. Unless a normal safe red light is shining right on the paper at a close distance then I am amazed that a safelight even a faulty one can turn the print completely black. How long is each sheet exposed to the safelight? I take it that only one sheet at a time is exposed so I am puzzled why you know all your paper is exposed to the safelight or do you mean that you have run out of paper when you say all of your paper is exposed to the safelight

pentaxuser
 

Donald Qualls

Subscriber
Joined
Jan 19, 2005
Messages
12,266
Location
North Carolina
Format
Multi Format
That safelight unit should work with your E27 base (medium screw) lamp. If the lamp is monochromatic red, you won't see much if any light through the filter -- but if it was monochromatic red you wouldn't be having the fogging problems you are. That filter unit, however (at least when the filter was fresh) was intended for incandescent lamps of similar lumen output to your 5W LED.

I mentioned fresh filter because gelatin filters (which that almost certainly has under the texture glass) can fade with age and light exposure, so a light that was very safe when new, forty years or more ago, might not be safe now. This bulb is the type I used in my last darkroom (mine is older and more transparent appearing); this one is the one I hope to use going forward, with a little luck for both B&W and color printing. I've linked the amber one, but if you prefer red, the red one in that same style would work. This is a small globe, draws only 2.2 W, and is still FAR brighter than my old red safelight (7W?) -- and this exact stock number has been tested by a Photrio member and found to be completely safe on multigrade enlarging paper.
 
OP
OP
BGriffin23

BGriffin23

Member
Joined
Oct 21, 2020
Messages
56
Location
CT, USA
Format
Multi Format
What colour light does this give - red I take it? Do you know what wavelength it operates at. Unless a normal safe red light is shining right on the paper at a close distance then I am amazed that a safelight even a faulty one can turn the print completely black. How long is each sheet exposed to the safelight? I take it that only one sheet at a time is exposed so I am puzzled why you know all your paper is exposed to the safelight or do you mean that you have run out of paper when you say all of your paper is exposed to the safelight
pentaxuser

I tend to take the whole stack out of the black plastic wrapper, remove a sheet and then stuff the rest back in, fully folded over and stuffed in the outer container before inserting the working sheet in the easel, all under red light.

Donald: I will try that bulb and some new paper. I would prefer something other than red so I will try the amber one.
 

MattKing

Moderator
Moderator
Joined
Apr 24, 2005
Messages
52,611
Location
Delta, BC Canada
Format
Medium Format
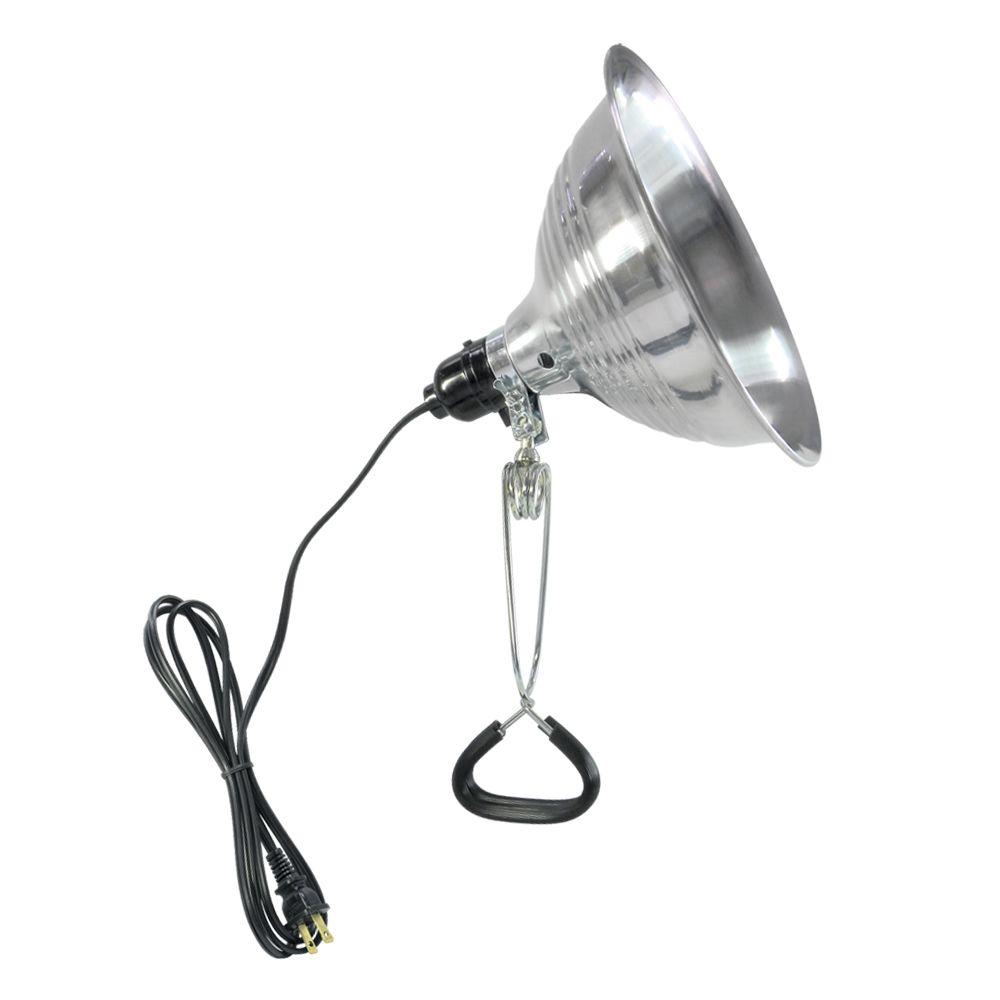
Put that safelight bulb in one of these clampable holders and point it at a wall or ceiling:
https://www.homedepot.com/p/HDX-8-1...-with-Clamp-277894/202847393#product-overview
hdx-clamp-on-hand-helds-stand-up-277894-64_145.jpg

The ones I used (before I switched to a red LED rope light) were smaller and had white reflectors rather than shiny metal reflectors, so are probably better, but that one should work - as long as the LED bulb you are using has the right type of red light.
The switch on the lamp is important.
Unfortunately I have already exposed all my paper to the safelight so I will have to buy more to do the safelight test.
I'm curious how you handled the paper. I generally take only a few pages out of the package at a time, and then place those pages into a paper safe.
 

wiltw

Subscriber
Joined
Oct 4, 2008
Messages
6,431
Location
SF Bay area
Format
Multi Format
WHERE did you get your enlarging paper from...a brand new unopened box?...or you acquired some paper from a source, and the box had been opened? Is there evidence (or not) of the easel mask on the print?

There is a chance that the paper was exposed to light before you acquired it...There are known examples of eBay (or other souce) of enlarging paper for sale, with all the paper fanned out acrossed the table surface to be photographed for the ad placement!

Try developing and fixing one sheet of paper (with no exposure to safelight or enlarger)...it should come out perfectly white. If dark result, the paper was exposed to light even before you got it!
 
OP
OP
BGriffin23

BGriffin23

Member
Joined
Oct 21, 2020
Messages
56
Location
CT, USA
Format
Multi Format
I'm curious how you handled the paper. I generally take only a few pages out of the package at a time, and then place those pages into a paper safe.

I have been grabbing the whole stack out of the packaging since the black wrapper is fairly tight around it. Trying to grab for just one usually results in several (the no-name brand has cardboard on either side of the stack for stiffener, making it yet harder to grab just one) and then having to re-insert the remainder into a tightly bound stack. Easier one stiff bundle.

I have some of those holders in the basement somewhere.

Wiltw: My paper source is B&H in New York. Newly sealed packaging all. If by easel mask you mean a white border around the print which is made by the leaves of the easel which go over the paper and block their exposure, yes I do on the 30-45 second developed prints, but the fully developed all-black prints are all black, right up to the edge of the paper.

The only light any of this paper has been exposed to is the safelight. I have been vary fastidious about blocking out all other possible sources of light.
 

glbeas

Member
Joined
Sep 25, 2002
Messages
3,918
Location
Marietta, Ga. USA
Format
Multi Format
It does sound like the safelight is the problem. Next box of paper try treating it like color paper and do it all in the dark. If this works get a better safelight and be sure to adhere to minimum distances the safelight needs to be from the paper.
 
Photrio.com contains affiliate links to products. We may receive a commission for purchases made through these links.
To read our full affiliate disclosure statement please click Here.

PHOTRIO PARTNERS EQUALLY FUNDING OUR COMMUNITY:


Ilford ADOX Freestyle Photographic Stearman Press Weldon Color Lab Blue Moon Camera & Machine
Top Bottom