Film curve plotting and fitting

Girraween

A
Girraween

  • 0
  • 0
  • 67
mirrorculous

A
mirrorculous

  • 3
  • 0
  • 638
The Lady In Black

A
The Lady In Black

  • 1
  • 0
  • 839
Lady in Black

A
Lady in Black

  • 6
  • 0
  • 911

Forum statistics

Threads
199,875
Messages
2,798,023
Members
100,065
Latest member
surf2trails
Recent bookmarks
0

ic-racer

Member
Joined
Feb 25, 2007
Messages
16,633
Location
USA
Format
Multi Format
It doesn't look like the barns changed to illustrate the compression of tones in the toe.

In both cases the barn is the "Scene" to be photographed with fixed values. The point I was trying to show graphically with the barn and the shaded rectangle, is how, when you expose the film with a step wedge in a sensitometer, the ordered values are geographically right next to each other, whereas when you expose the negative to a scene, the ordered values are scatttered around the scene.

I should make the barn upside down and reversed with a focusing grid over it :smile:
 

ic-racer

Member
Joined
Feb 25, 2007
Messages
16,633
Location
USA
Format
Multi Format
But my ground glass has no grid and a fresnel. :smile:

Lee

Then you need the cool Horseman screen from the FA where the gridlines are clear or lighter than the rest of the ground glass :smile:
 

RalphLambrecht

Subscriber
Joined
Sep 19, 2003
Messages
14,706
Location
K,Germany
Format
Medium Format
Let me ask you a question. If you have a scene which is 15 stops of brightness range, do you think you can reproduce all the tones in that scene in a print?

Yes you can, and the print does not have to look ugly. The important point is to capture all tones in the negative. Once that is done, you can represent any of these tones (and all of them if you like) in a print through proper exposure and contrast selection, combined with selective dodging and burning. That's how many of the famous AA prints were done.
 

Ray Rogers

Member
Joined
Aug 27, 2005
Messages
1,543
Location
Earth
Format
Multi Format
Yes you can, and the print does not have to look ugly. The important point is to capture all tones in the negative. Once that is done, you can represent any of these tones (and all of them if you like) in a print through proper exposure and contrast selection, combined with selective dodging and burning. That's how many of the famous AA prints were done.

???
I must have misunderstood you.

I don't think that it is technically possible to represent all of a negative's tones on a print.
Since the DR (?) of the neg is > that of the print, numerous different negative densites will necessarially be mapped to the same tones in a print.

I think that is correct, and I think that you probably agree,
so I am not sure how to read your statement.

15 (stops) IDK Maybe.

but "all of them (neg densities) if you like" ?

Did you mean they could all be represented...
but not necessarilly each by a unique tone?
 
Last edited by a moderator:

RalphLambrecht

Subscriber
Joined
Sep 19, 2003
Messages
14,706
Location
K,Germany
Format
Medium Format
... Did you mean they could all be represented...
but not necessarilly each by a unique tone?

Ray

I meant that all 15 stops could all be represented, each by a unique tone.

Let me explain how I get to this statement.

Unlike digital, film and paper are continuos-tone imaging. So, no problem there. Let's now assume that a film can capture an exposure range of 15 stops (it can capture more by the way).

With shortened development (N-3 for example) you get most of it into the normal negative density range. Some of it will be outside of a paper grade 2, but grade 0 can probably render all of it. Unfortunately, that is unlikely to make a nice print (battleship-gray alert).

However, compensating film development, in combination with normal grade paper, and strategic burn-in will be able to render a wide range of exposure and not lose any tones. It will compress some, but not lose them. The trick is to compress the unnecessary and highlight the important.

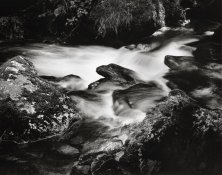
Attached is a sample of a print rendering tones from Zone I to Zone XI. OK, not quite 15 stops, but the technique is the same. By the way, a 10 stop range is not unusual in nature; a sunlit window in a dark church can provide more of a challenge.
 

Attachments

  • WaterFallWales.jpg
    WaterFallWales.jpg
    71.1 KB · Views: 122

tlitody

Member
Joined
Apr 29, 2010
Messages
186
Format
35mm
Ray

I meant that all 15 stops could all be represented, each by a unique tone.

Let me explain how I get to this statement.

Unlike digital, film and paper are continuos-tone imaging. So, no problem there. Let's now assume that a film can capture an exposure range of 15 stops (it can capture more by the way).

With shortened development (N-3 for example) you get most of it into the normal negative density range. Some of it will be outside of a paper grade 2, but grade 0 can probably render all of it. Unfortunately, that is unlikely to make a nice print (battleship-gray alert).

However, compensating film development, in combination with normal grade paper, and strategic burn-in will be able to render a wide range of exposure and not lose any tones. It will compress some, but not lose them. The trick is to compress the unnecessary and highlight the important.

Attached is a sample of a print rendering tones from Zone I to Zone XI. OK, not quite 15 stops, but the technique is the same. By the way, a 10 stop range is not unusual in nature; a sunlit window in a dark church can provide more of a challenge.

If you use any kind of pull development or compensating development you are throwing away tones(and detail) at that stage and if you use a developer which catches the whole subject in a relatively normal CI all the way up to higher than normal negative density, then you can't print without throwing away tones.
You might be able to retrieve a decent print but it will have a far shorter tonal scale than your original subject which is the point which was being made.
Does that matter? No not at all. But a lot of people seem to think that because you can get it in the negative it follows that you can get it all on the print. Well no you can't. You can only print part of it which fundamentally changes what you saw. Again that doesn't matter.
 

RalphLambrecht

Subscriber
Joined
Sep 19, 2003
Messages
14,706
Location
K,Germany
Format
Medium Format
... a lot of people seem to think that because you can get it in the negative it follows that you can get it all on the print. Well no you can't. You can only print part of it which fundamentally changes what you saw. Again that doesn't matter.

I still maintain that you can. I am not throwing any tones away; I may stretch or compress them, but they are all there. There is no need to create a negative that allows me to make straight print on grade-2 paper. That only work well for 'normal' subject brightness. I am better off with a negative that has all the detail I want on its straight line portion. I can print all of it with extra exposure or by holding the exposure back in certain areas. Toe and shoulder densities are hard to print. I stay away from those if I can.
 
Joined
Jan 7, 2005
Messages
2,663
Location
Los Angeles
Format
4x5 Format
Stephen,
The idea that any method is successful when the curve is straight is important. Your six variables are also important. In my practice, my curve is straight. Also in my practice most of these variables are out of my control. For example when backpacking, if I find a scene I want to capture, I have to take the picture at the moment because I am moving on and won't be back, possibly for several years if ever. I'm stuck with whatever time of day or sky conditions are there. If I can talk my buddy into camping near that spot I have a chance for afternoon light and if I am lucky there will be weather.

Bill,

I should of posted those quotes with more of an explanation. I included the six variables because there was some talk about obtaining speed information from practical tests. I wanted to show the many factors that need to be considered to do a realistic comparison of field tests to sensitometric tests. Your point about lighting conditions is well taken, but doesn't apply to this kind of test. This test is to confirm a pictorial speed to a sensitometric method already determined. Something like the First Excellent Print Test, which shot hundreds of different conditions, was to establish a method.

A solar altitude of 40 degree is part of the standard model. The illuminance of the Sun at a normal angle is around 10000 fc. At 40 degrees to the subject it is around 7660 fc. The standard model for exposure uses approximately 7680. A solar altitude of 40 degrees is around 10am and 2pm. That makes a good balance for the slightly higher and slightly lower illuminance levels for the rest of the day.

The quote "Films differing in D-log E curve shape were required for this study because almost any speed criterion is successful if the D-log E curve shape remains constant," has some major implications. It should be the topic of a thread and I'm surprised it hasn't created a discussion. While it is a swiping statement that includes a lot of contributing factors, what it is saying is that almost any system of exposure determination will work for a single emulsion. I believe the "D-log E curve shape remains constant" refers to a single emulsion type and not a linear curve. This explains why there are so many different approaches to film testing that all seem to work since most people only use one or two emulsions, while the standards have to take into consideration the best method for a broad range of emulsions. This quote is the pop photo magazine's best friend.

Steve
 
Joined
Dec 27, 2004
Messages
475
Location
Arlington, M
Format
Medium Format
I still maintain that you can. I am not throwing any tones away; I may stretch or compress them, but they are all there. There is no need to create a negative that allows me to make straight print on grade-2 paper. That only work well for 'normal' subject brightness. I am better off with a negative that has all the detail I want on its straight line portion. I can print all of it with extra exposure or by holding the exposure back in certain areas. Toe and shoulder densities are hard to print. I stay away from those if I can.

I absolutely agree with Ralph on this.
 

BetterSense

Member
Joined
Aug 16, 2008
Messages
3,151
Location
North Caroli
Format
35mm
There is no need to create a negative that allows me to make straight print on grade-2 paper.

Maybe not for the fine artist who has time and talent to crank out the perfectly manipulated print in the darkroom--and who enjoys doing it. For those of us that just want to easily make pictures, making a negative that allows us to make a straight print on grade-2 paper can be an important goal. I totally understand the Adams-school theory of getting as much information as possible onto the negative for later use, but Adams himself, in his books, says that the Zone system is not designed to make a negative that is easy to print; it's designed to leave as many darkroom options open as possible. Exposing TMAX onto the straight line of the curve accomplishes this easily--I do this often because I know that my exposure doesn't have to be perfect, and I will still have all tones available to me later. However, I find that a lot of these prints require highlight burn-in if there are bright highlights present. If I know that I'm very likely going to throw away some of that highlight contrast in printing then I can save later work by exposing and developing for a negative that is, by the textbook definition, 'less optimum' (although in fact 'pre-optimized' to my visualization). My summertime routine involves generously exposing Neopan 400, developing in a soft-working developer, and printing at grade 2. Plenty of shadow contrast, and pre-burned-in-highlights.
 

Kirk Keyes

Member
Joined
Jun 17, 2004
Messages
3,234
Location
Portland, OR
Format
4x5 Format
Reading Adams, one gets the impression that his goal was always to get a negative that could be printed straight on a grade 2 paper. But then further reading reveals that he pretty much never made a straight print on grade 2 paper...

I think one was a technical goal in film processing, the other was the result of his artistic goals when printing.
 

ic-racer

Member
Joined
Feb 25, 2007
Messages
16,633
Location
USA
Format
Multi Format
If you use any kind of pull development or compensating development you are throwing away tones(and detail) at that stage and if you use a developer which catches the whole subject in a relatively normal CI all the way up to higher than normal negative density, then you can't print without throwing away tones. .

There is a misunderstanding of the tone reproduction cycle here.
 

RalphLambrecht

Subscriber
Joined
Sep 19, 2003
Messages
14,706
Location
K,Germany
Format
Medium Format
... I totally understand the Adams-school theory of getting as much information as possible onto the negative for later use, but Adams himself, in his books, says that the Zone system is not designed to make a negative that is easy to print; it's designed to leave as many darkroom options open as possible. ...

You stated it perfectly, but I dont understand the 'but' in your quote. It looks more like an 'and' to me.
 

RalphLambrecht

Subscriber
Joined
Sep 19, 2003
Messages
14,706
Location
K,Germany
Format
Medium Format
Reading Adams, one gets the impression that his goal was always to get a negative that could be printed straight on a grade 2 paper. But then further reading reveals that he pretty much never made a straight print on grade 2 paper...

Correct. The first statement is a popular misconception. One just needs to take a look at his printing maps. They clearly reveal that he apparently never made straight prints. The reason lies in the nature of visualization. Our eyes don't see the scene the same way a camera and film records it. Dodging and burning become a necessity when one attempts to make visualization a print reality.
 
Joined
Jan 7, 2005
Messages
2,663
Location
Los Angeles
Format
4x5 Format
A solar altitude of 40 degree is part of the standard model. The illuminance of the Sun at a normal angle is around 10000 fc. At 40 degrees to the subject it is around 7660 fc. The standard model for exposure uses approximately 7680.

Just to take this thought farther for those with Connelly's Calibration Levels of Films and Exposure Devices. Converting 7680 fc to nits and multiplying it by 12% gives the value for Lg.

(7680 * 10.76/pi) * .12 = 3156.5

Putting that into the exposure equation:

(.65 * 3156.5) / 16^2 = 8 where 8 = the constant P.

Compare that to the light meter calibration value of B where B = 297 fL. Converting fL to nits.

10.76 * 297 = 3195.72

The difference can be attributed to rounding. I've found P equaling 8.11 makes for cleaner results.

According to Connelly, "The constant P is the basic photographic constant and can be considered to be either the average illumination required for light sensitive material having unity film speed when exposed for a time of one second." In other words P or 8 * 1/ISO gives the metered exposure value at the film plane. It's Sunny 16.

For b&w film, the difference between the speed point and the metered exposure is 10x or 1.0 logs or 3 1/3 stops. So, for a 125 speed film, the metered exposure would be 0.064 mcs making the speed point 0.0064 mcs. The comparison is even more clear when you consider P = 8 and the constant for b&w film speed is 0.8.

I have a scanned version of the paper I could email to any interested.
 

Photo Engineer

Subscriber
Joined
Apr 19, 2005
Messages
29,018
Location
Rochester, NY
Format
Multi Format
How many Newtons does this generate on the front of the camera lens, or lacking the ability to calculate Newtons, how many Pascals?

Geez this is getting complicated. And it really is so simple.

PE
 
Joined
Jan 7, 2005
Messages
2,663
Location
Los Angeles
Format
4x5 Format
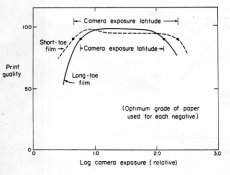
I've attached a print quality vs camera exposure curve for short and long toed films. It's from Simonds, J.L, Factors Affecting the Quality of Black-and-White Reflection Prints, Journal of Photographic Science, v. 11, 1963.
 

Attachments

  • Quality vs exposure graph.jpg
    Quality vs exposure graph.jpg
    61.9 KB · Views: 107

Photo Engineer

Subscriber
Joined
Apr 19, 2005
Messages
29,018
Location
Rochester, NY
Format
Multi Format
If you can relate Newtons or Pascals to any of your posts then I urge you to report my post! :D

I am referring to the entire thread FYI!

PE
 

RalphLambrecht

Subscriber
Joined
Sep 19, 2003
Messages
14,706
Location
K,Germany
Format
Medium Format
I've attached a print quality vs camera exposure curve for short and long toed films. It's from Simonds, J.L, Factors Affecting the Quality of Black-and-White Reflection Prints, Journal of Photographic Science, v. 11, 1963.

Stephen

Do you have an electronic version of this paper?
 
Joined
Dec 27, 2004
Messages
475
Location
Arlington, M
Format
Medium Format
I've attached a print quality vs camera exposure curve for short and long toed films. It's from Simonds, J.L, Factors Affecting the Quality of Black-and-White Reflection Prints, Journal of Photographic Science, v. 11, 1963.

The attached graph shows what many here have been saying: stay off of the toe and shoulder.
 
Joined
Jan 7, 2005
Messages
2,663
Location
Los Angeles
Format
4x5 Format
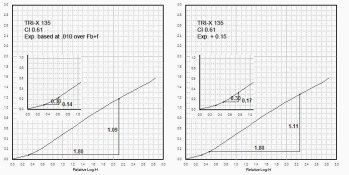
I've attached an example showing the increase in shadow separation between an exposure with the shadows at 0.10 over Fb+f and an additional 1/2 stop exposure. If my four quadrant reproduction program was functioning, I would have included a reproduction curve comparison too. For the record, I'm not suggesting that the exposure should or does fall at 0.10.

In fact, the ISO has 1/3 stop over-exposure built into the speed equation and depending on flare the amount of additional exposure can be higher. With average flare, add 1/4 to 1/3 stop more exposure. Because Zone System testing uses a difference between the metered exposure and 0.10 of 4 stops, instead of the ISOs 3 1/3 (see complicated post #166), the shadow exposure for an average scene falls above 0.10 by 1/2 to 2/3 of a stop. These conditions are only applicable for average scenes with luminance ranges of 2.2 (7 1/3 stops). Any shadows from scenes shorter than 2.2 will fall above 0.10 based on the their range plus the above stated differences.

I chose TX 135 for the example because it is a medium toed film. The LSLR is 2.2 with a flare value of 0.40. The insert shows the affect on the local contrast of the shadows.
 

Attachments

  • Exposure examples.jpg
    Exposure examples.jpg
    112.6 KB · Views: 108
Last edited by a moderator:

BetterSense

Member
Joined
Aug 16, 2008
Messages
3,151
Location
North Caroli
Format
35mm
Photons, despite being massless, actually do have momentum. So, I think film speed would be faster if you ran rapidly toward your subject.
 
Photrio.com contains affiliate links to products. We may receive a commission for purchases made through these links.
To read our full affiliate disclosure statement please click Here.

PHOTRIO PARTNERS EQUALLY FUNDING OUR COMMUNITY:


Ilford ADOX Freestyle Photographic Stearman Press Weldon Color Lab Blue Moon Camera & Machine
Top Bottom