Film curve plotting and fitting

Girraween

A
Girraween

  • 0
  • 0
  • 14
mirrorculous

A
mirrorculous

  • 2
  • 0
  • 589
The Lady In Black

A
The Lady In Black

  • 0
  • 0
  • 788
Lady in Black

A
Lady in Black

  • 6
  • 0
  • 861

Forum statistics

Threads
199,874
Messages
2,797,986
Members
100,064
Latest member
RonnieP
Recent bookmarks
1
Joined
Jan 7, 2005
Messages
2,663
Location
Los Angeles
Format
4x5 Format
Mahler,

People do excellent work not knowing anything about the technical aspects of photography all the time. For me, it's about obtaining more consistent results as well as being able to make personal choices based on knowledge and not hearsay. It's also a great BS meter. May of the discussion here are about the finer points and about a better understanding. There are so many variables involved with shooting, how we see, and personal taste, that there's enough slop that most of what we discuss here doesn't have much of an influence. People can get acceptable results the majority of the time with pocket instamatic and disposable cameras which have no meter abd a single f/stop and shutter speed. The majority of the scenes encountered fall around the average. The only time you will really see a difference is with extreme situations.
 

Mahler_one

Member
Joined
Oct 26, 2002
Messages
1,155
Thanks Stephen. I agree completely. I was wondering if there was some very, very significant point that I was over-looking.
 

ic-racer

Member
Joined
Feb 25, 2007
Messages
16,633
Location
USA
Format
Multi Format
I can follow you up to here and it sounds good so far. Do you mind walking me through these last two steps?

I'm going to elaborate on my use/interpretation of Delta-X here because it does represent a potential, practical, addition to my workflow.

First I'm going to paraphrase your "Delta-X" just so we can be sure I am reading your paper correctly. Correct me if I am wrong.

1) Delta-X is the distance in log units on the X-axis of a standard H&D curve between the calculated 0.3G point and the point the curve crosses 0.1 log d on the Y-axis.
2) The 0.1 crossing point is easier to determine than 0.3G
3) The 0.1 crossing point is slightly affected by development, so the overall development needs to be standardized to a set gamma.
4) The 0.3G point is calculated at any gamma.
5) A table of Delta-X values lets you estimate the 0.3G point based on a simple determination of the 0.1 Y-axis crossing point without the complex math to actually determine the X-axis value at the 0.3G tangent.

Then I'll add my personal workflow info here:
1) I get good negatives when I base exposure on the 0.1 log d point when development yields a gamma of 0.65
2) From you Delta-X chart I can calculate that my personal, known-to-be-good, exposure point is about 0.22 log units to the right of the 0.3G point.
3) So, for a film speed test processed to any gamma other than 0.65, I will add 0.22 to the 0.3G point estimated by your table to get my personal speed point for an unknown film without having to trial-and-error process multiple strips to get a gamma of 0.65
 

RalphLambrecht

Subscriber
Joined
Sep 19, 2003
Messages
14,706
Location
K,Germany
Format
Medium Format
I sincerely hope that I am NOT inviting the wrath of all, but I simply must ask the following: Will any of the information so well presented and described by the obviously bright individuals on this thread enable us to produce negatives that are materially different ( or "better" ) than those that we are already making?...

Mahler

This is the simplest of all Zone Systems:


-----------------------------------------------------------
"Zone System in a nutshell", by Jim Brick
-----------------------------------------------------------

There are four zones.
Zone Good, Zone Bad, Zone Ugly, Zone Butt Ugly.

To use the system:
Wake up. Get out of bed. Go outside.

Zone Good
It is light overcast, light shadows but good light direction. Normal contrast.
Expose normal (eg: ASA-100 @ 100) develop normal.

Zone Bad
It is dismally overcast, no shadows, perhaps even drizzle. Low contrast.
Underexpose one stop (eg: ASA-100 @ 200) overdevelop 20%

Zone Ugly
The sun is out, sky is clear with puffy clouds, and there are blatant shadows. High contrast.
Overexpose one stop (eg: ASA-100 @ 50) underdevelop 20%

Zone Butt Ugly
The sun is squinty bright, cloudless sky, and the shadows really deep. Very high contrast.
Go in, and go back to bed!. But, if you are a die-hard...
Overexpose two stops (eg: ASA-100 @ 25) underdevelop 30%


Not very scientific but works well.
 
Joined
Jan 7, 2005
Messages
2,663
Location
Los Angeles
Format
4x5 Format
Dale,

Great summary. There's just a few items to cover in order to nail everything down. According to my calculations a generic slope of .65 should produce a ΔD of 0.845 at the Δlog-H 1.30 from 0.10 speed point. The Delta-X table, which does save having to do the math, has that equal a ΔX of 0.725 and not the 0.22 you have. Could you double check your numbers on that please?

You're right that the ΔX value represents the log exposure difference between the 0.10 fixed density speed point and 0.3G. Subtracting the ΔX value from the 0.10 density point will give you where the factional gradient speed point is. But that's not the end. The 0.3G uses a different constant in the speed equation. Where the fixed density method uses 0.8/Hm where Hm is the exposure in meter candle seconds, 0.3G uses 0.4/Hfg where Hfg is the exposure in meter candle seconds. It's just an additional step and you don't need the actual log-H value, you can use a relative one.

The value of ΔX is derived from the value of ΔD which changes as the gradient changes. You will need to determine a new ΔX value with each gradient you use. The relationship between the fractional gradient speed point and the fix density method changes depending on the film gradient. That is why the 0.3G produces different speeds for the same set of conditions than the fix density method. Nelson defines what this means, "the fixed-density criterion tends to underrate films that are developed to a lower average gradient and to overrate films that are developed to a higher average gradient."

You should only see a small difference in speed with your standard gamma of 0.65. Only when the gradient is at 0.61 will the two speeds be the same. One aspect of the 0.3G / Delta-X speeds that surprised me was do to how the 0.3G point varies in distance from the fixed density point relative to the gradient of the toe and the average gradient of the curve. Depending on how fast the over contrast increases relative to the local contrast in the toe, a higher contrast test could have a lower film speed than the previous lower contrast test. But I think that helps to illustrate different concepts of what film speed is and isn't. It's a very different way to look at film speed and since the 0.3G / Delta-X method more accurately reflects the psychophysical judgment print results, it is also the most realistic way to look at film speed.

Let me know if there is anything that isn't clear.
 

ic-racer

Member
Joined
Feb 25, 2007
Messages
16,633
Location
USA
Format
Multi Format
. According to my calculations a generic slope of .65 should produce a ΔD of 0.845 at the Δlog-H 1.30 from 0.10 speed point. The Delta-X table, which does save having to do the math, has that equal a ΔX of 0.725 [0.275 right?] and not the 0.22 you have. Could you double check your numbers on that please?

Ok, I see I was using delta log-H of 1.5 rather than the correct 1.3.
 
OP
OP

dpgoldenberg

Member
Joined
Feb 18, 2009
Messages
50
Format
Med. Format RF
David

Have you looked at the nonlinear function I highlighted in post #39? It does all you desire for toe, midsection and shoulder. I don't know why anybody would need more.

Ralph,
I only recently had a chance to look at your function. I don't doubt that it works fine. What I was hoping to do, though, was devise a function for which there is a simple relationship between the fit parameters and the important features of the curve. This makes it easy to calculate the gradient and speed point (however one wants to define it), and it makes the fitting very robust. Since I am only interested in film curves at this time, the function I described seems to suit my needs.

There is an aesthetic quality to mathematics, just as with photography, and different people have different tastes!

David
 
OP
OP

dpgoldenberg

Member
Joined
Feb 18, 2009
Messages
50
Format
Med. Format RF
I sincerely hope that I am NOT inviting the wrath of all, but I simply must ask the following: Will any of the information so well presented and described by the obviously bright individuals on this thread enable us to produce negatives that are materially different ( or "better" ) than those that we are already making?

Absolutely! Using the method I propose to determine negative contrast and speed will generate negatives that have an indescribable special quality. The effect is not unlike the "glow" from a vintage Leica lens or the subtle highlights found in prints from negatives developed with pyro. In fact, combining my method, a Leica lens and pyro will give the best possible results.

Believe it or not, I started all of this with the idea of making it *simpler* to interpret film tests! Somehow, though, the discussion became more complicated (and heated) than I ever imagined.

David
 

Photo Engineer

Subscriber
Joined
Apr 19, 2005
Messages
29,018
Location
Rochester, NY
Format
Multi Format
Gentlemen;

Here is a simple way to test for proper exposure.

1. Make a step wedge exposure using either a sensitometer or your enlarger. Use an exposure time close to your normal camera time such as 1/100 or similar.

2. Process the film using your selected conditions and plot the step wedge that results.

3. Take photos of a reflection step wedge in shadow and full sunlight at N, -N, and +N, these being in 1/3, 1/2 or 1 stop intervals, your choice. Process as in 2.

4. Measure the film densities from the photographed step wedge and plot on top of the step wedge in #2. This includes flare and the reflection "anomalies" of the chart, but it will tell you where on the chart the reflection step wedge lies.

5. If it is on the toe, showing curvature, you are under and if it is on the shoulder showing curvature it is over. If the slope is low, then you need to adjust development time upwards and if it is high, you need to adjust development time downwards.

6. This is a refined method posted by Ralph above.

And, here is a parable for you:

While at Cape Canaveral, the photo division there had a testing lab that checked every film and paper batch coming in from the manufacturers, color and B&W. At that time, it included Kodak, Ansco and Dupont. They spent thousands of dollars every year on this lab. So, I asked them how often a film was off in speed or contrast from the published data. The answer was "NEVER".

I tried to get them to stop this apparent waste of money, but they kept arguing that they could not "just blindly trust" their suppliers. Well, this was a sore point for them as in my 1.5 years there and $50M of film and paper / year, they never found a product from anyone that deviated significantly from the manufacturers published specification. Therefore, they used the film at box speed, or 1/3 stop over.

PE
 

ic-racer

Member
Joined
Feb 25, 2007
Messages
16,633
Location
USA
Format
Multi Format
Gentlemen;

Here is a simple way to test for proper exposure.

Simpler than the coffee can?

Seriously, though, I think I follow, but what values do you use for the X axis when plotting the reflection wedge densities from the in-camera negative? Or does it matter? Are we just looking for curvature (or lack thereof).
How are you metering the reflection wedge for the in-camera exposure?
 

RalphLambrecht

Subscriber
Joined
Sep 19, 2003
Messages
14,706
Location
K,Germany
Format
Medium Format
Gentlemen;

Here is a simple way to test for proper exposure.

1. Make a step wedge exposure using either a sensitometer or your enlarger. Use an exposure time close to your normal camera time such as 1/100 or similar....

PE

I like to make a slight modification to the first point. If you use a tungsten enlarger but you are a daylight photographer, this could give you very conservative results. In such a case try to do the lest with daylight instead. I suggest to tape the step wedge to a window or protect it with a ground glass and flash through it.
 

Bill Burk

Subscriber
Joined
Feb 9, 2010
Messages
9,383
Format
4x5 Format
The criteria for quality might no longer be Grain, Sharpness, Resolution. (For me with 4x5 I get enough no matter what I do).

Now the most beautiful exposure might be farther up the curve than any of us could have predicted. The EI might move dramatically and in unexpected directions with changes in development time, not because the traditional speed point moved, but because the shape of the curve changed and now the best part of the curve is somewhere else.

An absurd but possible recommendation that a curve fitting program might spit out when you specify straight line placement for mid-tones: EI 400 for low contrast scene, EI 64 for normal contrast scene and EI 200 for high-contrast scene [all with shadows placed on Zone II]. Again I toss that out as an example of what such a program could reveal, I don't suggest it is reality (except maybe EI 64 is right for normal).

Bill
 
Joined
Jan 7, 2005
Messages
2,663
Location
Los Angeles
Format
4x5 Format
The criteria for quality might no longer be Grain, Sharpness, Resolution. (For me with 4x5 I get enough no matter what I do).

Now the most beautiful exposure might be farther up the curve than any of us could have predicted. The EI might move dramatically and in unexpected directions with changes in development time, not because the traditional speed point moved, but because the shape of the curve changed and now the best part of the curve is somewhere else.

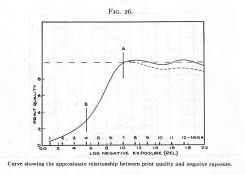
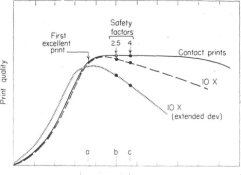
It's not so unexpected. I've attached a graph from the first excellent print test from back in the 1940s. It shows that excellent prints can be made past the point where the first excellent print can be made. The major limiting factor was format. Smaller formats tended to have a greater degree of enlargement. That's why the 1960 speed change (Print Quality vs Exposure Graph). Modern films have better grain and less of a shoulder (but short toes have always existed), so now they have more flexibility.
 

Attachments

  • first excellent print.jpg
    first excellent print.jpg
    151.3 KB · Views: 118
  • Print Quality vs exposure.jpg
    Print Quality vs exposure.jpg
    49.8 KB · Views: 105
Joined
Jan 7, 2005
Messages
2,663
Location
Los Angeles
Format
4x5 Format
Simpler than the coffee can?

Seriously, though, I think I follow, but what values do you use for the X axis when plotting the reflection wedge densities from the in-camera negative? Or does it matter? Are we just looking for curvature (or lack thereof).
How are you metering the reflection wedge for the in-camera exposure?

Exactly. It's all about degrees. The higher the precision, the more variables to deal with. It's up to the individual to decide what level is good enough for their purposes.
 

Bill Burk

Subscriber
Joined
Feb 9, 2010
Messages
9,383
Format
4x5 Format
Thanks Stephen,

I always wondered about how they did that 'first excellent print' study.

Did they, in fact, try to make the very best print they could off each exposure, using the appropriate paper grade or Variable Contrast choice? Of course the woefully underexposed would always make a poor print, but on the overexposed side of the graph - maybe a better print could be made than the ones they produced?

Bill
 

Bill Burk

Subscriber
Joined
Feb 9, 2010
Messages
9,383
Format
4x5 Format
And to add to my question about about the 'first excellent print' study. I doubt they adjusted film development times, something I certainly would be doing (less time) when the overexposure was most severe (long range subject).

I know the viewers were 'positive of their choices', but were they saying 'oh those ugly ones are so Grainy' or were they saying they were too Harsh. I want to avoid Harshness but maybe not so much worried about Graininess.

Also I see the contact print stretch out practically indefinitely - I wonder if that also applies in my case since I'm using an Omegalite diffuse source.

I also wonder about the relative ability of UV to pass through silver that I read about in Todd-Zakia. Is it significant (or is the fact I'm going through a glass lens blocking most of the UV)?

Bill
 
Joined
Jan 7, 2005
Messages
2,663
Location
Los Angeles
Format
4x5 Format
Bill,

They actually made a series of prints from each negative and the best of those were chosen. I believe that goal of any psychophysical test is to eliminate the influence of personal taste and focus on the underlying universally human response. Jones has a paper on Psychphysics and Photography and the 3rd edition of The Theory of the Photographic Process has an excellent section on subjective and objective tone reproduction.

However, new materials unknown at the time could have an influence (whiteners?), or maybe not. They did psychophyical testing on color in the 1930s and those results still stand. Something to look into perhaps.
 

Photo Engineer

Subscriber
Joined
Apr 19, 2005
Messages
29,018
Location
Rochester, NY
Format
Multi Format
Simpler than the coffee can?

Seriously, though, I think I follow, but what values do you use for the X axis when plotting the reflection wedge densities from the in-camera negative? Or does it matter? Are we just looking for curvature (or lack thereof).
How are you metering the reflection wedge for the in-camera exposure?

Any value for X. It is actually Log E, but you can just use 1, 2, 3 etc, for the step numbers on the wedge.

PE
 

Photo Engineer

Subscriber
Joined
Apr 19, 2005
Messages
29,018
Location
Rochester, NY
Format
Multi Format
I like to make a slight modification to the first point. If you use a tungsten enlarger but you are a daylight photographer, this could give you very conservative results. In such a case try to do the lest with daylight instead. I suggest to tape the step wedge to a window or protect it with a ground glass and flash through it.

I have found this method to work quite well for me, but you are right.

To be exact, you should use about 100C and 30M to approximate daylight if using a color enlarger.

Of course, an EG&G Sensitometer uses a "daylight" strobe for exposure so there is no concern. Ours at EK had adjustable spectral output that could be dialed in. It used degrees Kelvin.

PE
 

Mahler_one

Member
Joined
Oct 26, 2002
Messages
1,155
Steve: The graphs are certainly interesting. Let me understand the crux of the argument: One overexposes to move off of the toe of the curve onto the straight line. Using one's "usual development" one ends up with greater contrast and more separation in the shadows. GREATER development without increasing exposure simply increases the density of the highlights whilst not moving off of the toe, i.e., as we have been taught, develop for the highlights, and expose for the shadows...in the case you illustrated with the curves, move off of the toe. If one begins to think about the curves you included, one now has a cogent method of implementing one's "previsualization" of a given scene. One can decrease the separation of the shadows by moving back onto the toe of the curve while maintaining or increasing highlights by the degree of development. One can increase shadow details by overexposing about a stop or two, and one can bring the contrast back down if one wishes by decreasing the development time. Exposure and development continue to be the variables with the caveat that move off of the toe when needed and desired...correct?


Ed
 

Ray Rogers

Member
Joined
Aug 27, 2005
Messages
1,543
Location
Earth
Format
Multi Format
Slightly OT...

Of course, an EG&G Sensitometer uses a "daylight" strobe for exposure so there is no concern. Ours at EK had adjustable spectral output that could be dialed in. It used degrees Kelvin.

PE

Does that filtration effectivly remove the unnatural xenon spikes too?
Are there situations where you would not bother with correcting the light?

Ray
 
Joined
Jan 7, 2005
Messages
2,663
Location
Los Angeles
Format
4x5 Format
Does that filtration effectivly remove the unnatural xenon spikes too?
Are there situations where you would not bother with correcting the light?

Ray

Absolutely right. It's all a matter of level of accuracy and precision. Even daylight has many factors to consider. Exposure meters are basically tested using a 4600k light source as a compromise between tungsten and daylight. So, in reality, it's not perfectly accurate for either, but good enough for both.

Also, I want to mention that most of the speed/exposure questions are only really valid for the statistically average 2.2 log scene luminance range. Plus, I shoot Tri-X 4x5 which takes way more exposure to get the shadows onto the straight line portion than with TMX 4x5. The idea for additional exposure isn't to place it on the straight-line portion, but to a slightly higher gradient. Again, take a look at the first excellent print curve. Quality doesn't shoot up with additional exposure and also note that the current ISO speed places the exposure at 1 or 2 print values above the first excellent print point (I can't remember of hand if each step is 1/2 or one stop).
 

Kirk Keyes

Member
Joined
Jun 17, 2004
Messages
3,234
Location
Portland, OR
Format
4x5 Format
To be exact, you should use about 100C and 30M to approximate daylight if using a color enlarger.

I use a Wratten 80A color temp conversion filter on my enlarger to get close to daylight. I've checked it with a late-1980s vintage Minolta Color Meter and it brings the temp to 5400K, I think.

An 80B or 80C would drop the temp closer to 4600K, but since I'm testing film and not the meter, I figure being closer to 5500K was better.
 
Photrio.com contains affiliate links to products. We may receive a commission for purchases made through these links.
To read our full affiliate disclosure statement please click Here.

PHOTRIO PARTNERS EQUALLY FUNDING OUR COMMUNITY:


Ilford ADOX Freestyle Photographic Stearman Press Weldon Color Lab Blue Moon Camera & Machine
Top Bottom