-
Welcome to Photrio!Registration is fast and free. Join today to unlock search, see fewer ads, and access all forum features.Click here to sign up
You are using an out of date browser. It may not display this or other websites correctly.
You should upgrade or use an alternative browser.
You should upgrade or use an alternative browser.
Darkroom portraits
-
A
- Thread starter argentic
- Start date


Recent Classifieds
-
For Sale Out of Production Paper Sale - Sealed Boxes - UK only.
- Started by Gary Holliday
-
For Sale Sinar Norma 4x5 5x7 set and some Sinar accessories.
- Started by Jammoh
-
Free 3 enlarging lenses
- Started by jvo
-
For Sale Pentax 67 body with metered prism and grip
- Started by Guivd
Forum statistics
- Status
- Not open for further replies.

Hello .....
will post a pic later, my bathroom is my darkroom! so its not set up all the time but doesnt take long, its my first attempt at developing and im pleased with the results .....
Pics are hung on a dryer to dry! so im still very basic
will post a pic later, my bathroom is my darkroom! so its not set up all the time but doesnt take long, its my first attempt at developing and im pleased with the results .....
Pics are hung on a dryer to dry! so im still very basic
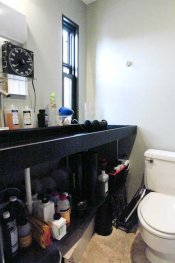
Here is my bathroom
[URL="http://farm4.static.flickr.com/3354/3334978624_1002e62c45.jpg"]http://farm4.static.flickr.com/3354/3334978624_1002e62c45.jpg[/URL]
Very tight space, and a total pain to set up and take down, but I love it.
[URL="http://farm4.static.flickr.com/3354/3334978624_1002e62c45.jpg"]http://farm4.static.flickr.com/3354/3334978624_1002e62c45.jpg[/URL]
Very tight space, and a total pain to set up and take down, but I love it.
ic-racer, I'm having problems stepping on my bottom lip since you posted those pictures. They should call that a dark mansion, not a darkroom.
As my young daughter would say....
OMG!!
The shelving and draw space alone makes me drool, never mind the hardware!
Sweet!!
OMG!!
The shelving and draw space alone makes me drool, never mind the hardware!
Sweet!!
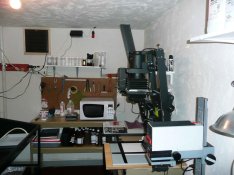
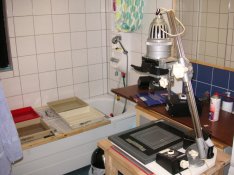
These are Omega D5500s. One is set up for Minox, 16mm and 35mm. The other is set up for 6x6cm, 6x9cm and 4x5"
Trond
Subscriber
Here is a photo of my bathroom darkroom. I have set up my enlarger, an old Meopta Opemus IIa, on a table with wheels.
It has helped a lot to simplify the darkroom sessions as much as possible. I print on 24x30 cm sized paper, with a fixed frame enlarging easel. I have two frames for the easel, one for printing from 35mm film and one for 6x6.
Always using printing the same sizes makes it easy to guess the correct exposure.
I'm quite happy with this setup, a permanent darkroom would obviously be better, but it works well.
Trond
Attachments
ic-racer ... I think that people with awesome darkrooms like yours should be heavily taxed ; it is unfair that some people would be happier than others.:rolleyes:
ic-racer ... I think that people with awesome darkrooms like yours should be heavily taxed ; it is unfair that some people would be happier than others.:rolleyes:
Most of it was had 'on the cheap.' In fact my new rules for equipment acquisition are that it must be free. (Isn't digital great
)Craig's list around here is always filled with darkroom equipment. I have considered posting links to the good stuff, but seeing those listings for the midwest USA is probably not of any value if you live in the Ukraine (or wherever) and are looking for a free 4x5 enlarger.

ic-racer,
I don't think you need to defend yourself. What formats are you working with in the darkroom?
Tom.
I don't think you need to defend yourself. What formats are you working with in the darkroom?
Tom.
I manage to equip myself on the cheap too Will try to upload photos of my welldom very soon.
Of course you understood that I have the silliest sense of humour.... I hate taxes like everybody
Will try to upload photos of my welldom very soon. Of course you understood that I have the silliest sense of humour.... I hate taxes like everybody
I'm somewhat of a format fanatic.ic-racer,
I don't think you need to defend yourself. What formats are you working with in the darkroom?
Tom.
I have standard-8 movie editing equipment under the negative area. I enlarge Minox (using Minolta Rokkor-X 30mm and recently Omegar /Rodenstock 25mm lenses). I rotary process the Minox in modified Jobo reels.
I do 16mm stills with a Minolta 16QT (though my spool of Super-16 HP5 Negative film is starting to increase its base density).
also 35mm, 6x6, 6x9, 4x5 and 8x10.
I have standard-8 movie editing equipment under the negative area. I enlarge Minox (using Minolta Rokkor-X 30mm and recently Omegar /Rodenstock 25mm lenses). I rotary process the Minox in modified Jobo reels.
Have you (or how do you) process(ed) Super8 film in the darkroom? I've seen those Lomo tanks advertised but they seem to have limited availability.
Tom.
Have you (or how do you) process(ed) Super8 film in the darkroom? I've seen those Lomo tanks advertised but they seem to have limited availability.
Tom.
Currently I use Prep Film in Michigan. The difficulty with the standard-8 film is the need for precision splitting following processing. If the splitting of the film is not exact then the film won't go through the projector film gate, as the tolerance is small. Much less tolerance than the film gate of a Minox. So, the typical DIY type of film splitters don't seem practical.
ic-racer; you've heard it more than once I guess but that looks like a fantastic darkroom to work in. Neatly organized too, me likes!
So, I recently finished building mine for now, for the next one we will have to move, and I am terribly happy with it:


And on the other side of the room (not doka related but I just love the space):

So, I recently finished building mine for now, for the next one we will have to move, and I am terribly happy with it:
And on the other side of the room (not doka related but I just love the space):
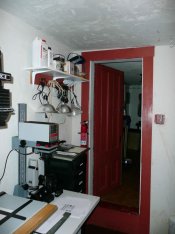
Here my 'creativity-centre' (although known to other members of the family as the 'Dad's sulking room!). It's in the apex of my garage roof,and has running water (sink behind the camera). The main problems are that there is no walls for shelving, so everythings in plastic boxes under the worktops, and height is a limitation. I can just stand upright, and I had to lower the workbench to fit in the LPL7700 enlarger.

Rob,
What size prints can you make in there and how are you washing your fibre base paper?
Tom.
What size prints can you make in there and how are you washing your fibre base paper?
Tom.
It's in the apex of my garage roof,...
Interesting. My next darkroom is going to be in a very similar space, although perhaps a bit bigger. It is an "attic" space, for all intents and purposes. The floor area available to me is 12 x 18 ft, which is more than enough, and the ceiling is 9 or 10 ft in the center, but slopes drastically as does yours down to the side walls. So, I won't have the shelves above the sink or the peg-board on the dry side, as I'm used to, but I suppose I'll adapt.

Of course, all this depends on the financing and all the other details going through to buy a new house!

OP
OP
argentic
Member
IC-RACER, what's the size of your darkroom? I am planning a new group darkroom here in France, and yours is a big inspiration.
I finally got the darkroom completed a few weeks ago and wanted to share photos and the story behind it.
The kids are gone and the wife and I decided to downsize from an urban single family residence to an open loft-style condominium. We found an ideal 2 bedroom, 2.5 bath unit, 2,284 square feet over two floors, but the layout was very closed-in with small rooms. Knowing that it had great "bones", over the next 14 months, it was completely gutted down to the exterior studs and renovated. It was converted to a 1 bedroom + office. Since we have an occasional out of town visitor, the office must serve as guest quarters occasionally, along with its adjoining bathroom and walk-in closet.
Last summer, I grew weary of d!#!+@l photography and longed for another darkroom. Alas, what to do we just spent $$ on renovations and now I wanted to tear part of it up. My initial thought was to make the darkroom completely portable: the enlarger, the Jobo, etc on utility carts and wheel it to/fro as needed. However, this proved too inconvenient, so I proposed to the wife that I modify the office bath a bit. Thankfully, she agreed.
I took a very measured approach and outlined the requirements from all perspectives:
-Don't destroy anything that we just built
-No irreversible changes
-Must be able to do all of this myself
-Maximize adaptive re-use and economize
-A workable darkroom for me, this means the luxury of running water, a large wet surface and a drain
-The bathroom must be functional as a powder room (lav and water closet) all of the time, and must be convertible to full bath use with 1 hour notice
-When its a Bathroom, the photo equipment and supplies have to be easily storable and compact
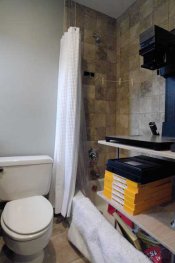
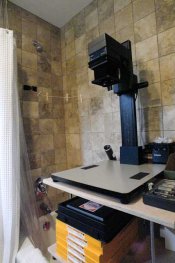
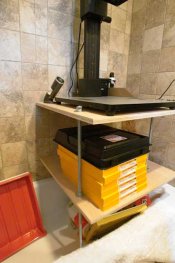
The bathroom is 5 feet by 7.5 feet which includes the tub, so I really only had about 5x5 of floorspace to use, unless I could come up with a way to use the tub space. A platform would be too tough on my back, but a raised platform, that could work. I needed it to hold the enlarger, be waterproof should an accident in the tub occur <g>, and be portable. I then remembered the Flexy-Rack concept. Audiophiles have built these solid supports for equipment it fit my requirements perfectly, so I built a Flexy-Table for the enlarger and a Flexy-Sink for the wet side. Original details on this type of construction is available at http://www.soundstage.com/upton01.htm
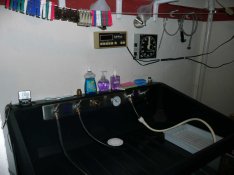
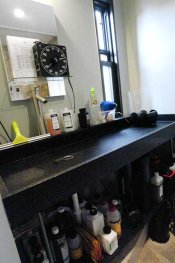
The only major change to the Bathroom was to remove the existing lavatory and pedestal. I replaced it with the Flexy-Sink, using the original lavatory faucet. Its made of plywood and 1x4 pine and coated with black Rhino Lining (the stuff used for pick-up beds). It stands on 5 legs made of the 5/8 diameter threaded steel rod.
Black foamcore is press fit into the window opening when darkness is needed. Prints and film are hung to dry in the corner of the tub (note string held in place with gaffers tape).
Is the enlarger table rock solid? No, because I only added one shelf in addition to the top, but its fine for me. Enlargements rarely exceed 8-9x for medium format and I just wait a moment for any vibrations to settle before printing. When I need to convert to a bathroom, I can take the enlarger stand apart with 2 wrenches in 10 minutes and it stores flat behind a door. Chemicals, the enlarger and the Jobo are moved to a cart and the Bathroom is ready to go. And visitors have a nice big sink in which to freshen up!
The kids are gone and the wife and I decided to downsize from an urban single family residence to an open loft-style condominium. We found an ideal 2 bedroom, 2.5 bath unit, 2,284 square feet over two floors, but the layout was very closed-in with small rooms. Knowing that it had great "bones", over the next 14 months, it was completely gutted down to the exterior studs and renovated. It was converted to a 1 bedroom + office. Since we have an occasional out of town visitor, the office must serve as guest quarters occasionally, along with its adjoining bathroom and walk-in closet.
Last summer, I grew weary of d!#!+@l photography and longed for another darkroom. Alas, what to do we just spent $$ on renovations and now I wanted to tear part of it up. My initial thought was to make the darkroom completely portable: the enlarger, the Jobo, etc on utility carts and wheel it to/fro as needed. However, this proved too inconvenient, so I proposed to the wife that I modify the office bath a bit. Thankfully, she agreed.
I took a very measured approach and outlined the requirements from all perspectives:
-Don't destroy anything that we just built
-No irreversible changes
-Must be able to do all of this myself
-Maximize adaptive re-use and economize
-A workable darkroom for me, this means the luxury of running water, a large wet surface and a drain
-The bathroom must be functional as a powder room (lav and water closet) all of the time, and must be convertible to full bath use with 1 hour notice
-When its a Bathroom, the photo equipment and supplies have to be easily storable and compact
The bathroom is 5 feet by 7.5 feet which includes the tub, so I really only had about 5x5 of floorspace to use, unless I could come up with a way to use the tub space. A platform would be too tough on my back, but a raised platform, that could work. I needed it to hold the enlarger, be waterproof should an accident in the tub occur <g>, and be portable. I then remembered the Flexy-Rack concept. Audiophiles have built these solid supports for equipment it fit my requirements perfectly, so I built a Flexy-Table for the enlarger and a Flexy-Sink for the wet side. Original details on this type of construction is available at http://www.soundstage.com/upton01.htm
The only major change to the Bathroom was to remove the existing lavatory and pedestal. I replaced it with the Flexy-Sink, using the original lavatory faucet. Its made of plywood and 1x4 pine and coated with black Rhino Lining (the stuff used for pick-up beds). It stands on 5 legs made of the 5/8 diameter threaded steel rod.
Black foamcore is press fit into the window opening when darkness is needed. Prints and film are hung to dry in the corner of the tub (note string held in place with gaffers tape).
Is the enlarger table rock solid? No, because I only added one shelf in addition to the top, but its fine for me. Enlargements rarely exceed 8-9x for medium format and I just wait a moment for any vibrations to settle before printing. When I need to convert to a bathroom, I can take the enlarger stand apart with 2 wrenches in 10 minutes and it stores flat behind a door. Chemicals, the enlarger and the Jobo are moved to a cart and the Bathroom is ready to go. And visitors have a nice big sink in which to freshen up!
Attachments

Nice! Looks like a comfortable place to work too.
Bob H
Bob H
Thanks - kind of like kitchen design - the smaller the triangle, the less the walking.
You 'downsized' to a space almost twice the size of our house! Just goes to show the difference between mid-West space and the cramped SF Bay.
I think this is a better solution than the usual wet bench over the bath. Less chance of chemical stains.
I think this is a better solution than the usual wet bench over the bath. Less chance of chemical stains.
IC-RACER, what's the size of your darkroom? I am planning a new group darkroom here in France, and yours is a big inspiration.
It is about 30 feet lengthwise and it varies from 8 to 10 feet across.
- Status
- Not open for further replies.
| Photrio.com contains affiliate links to products. We may receive a commission for purchases made through these links. To read our full affiliate disclosure statement please click Here. |
PHOTRIO PARTNERS EQUALLY FUNDING OUR COMMUNITY:  |